Security and Access Control
Enforcing Pod Security
A cluster is only as safe as the workloads it lets run. By default, Kubernetes will happily schedule a container that runs as root, mounts the host filesystem, or asks for privileged access - exactly the things an attacker wants. This lesson closes that door with Pod Security Admission, a control built into the Kubernetes API server that rejects unsafe pods before they ever start. You drive it from the dev-machine workstation.
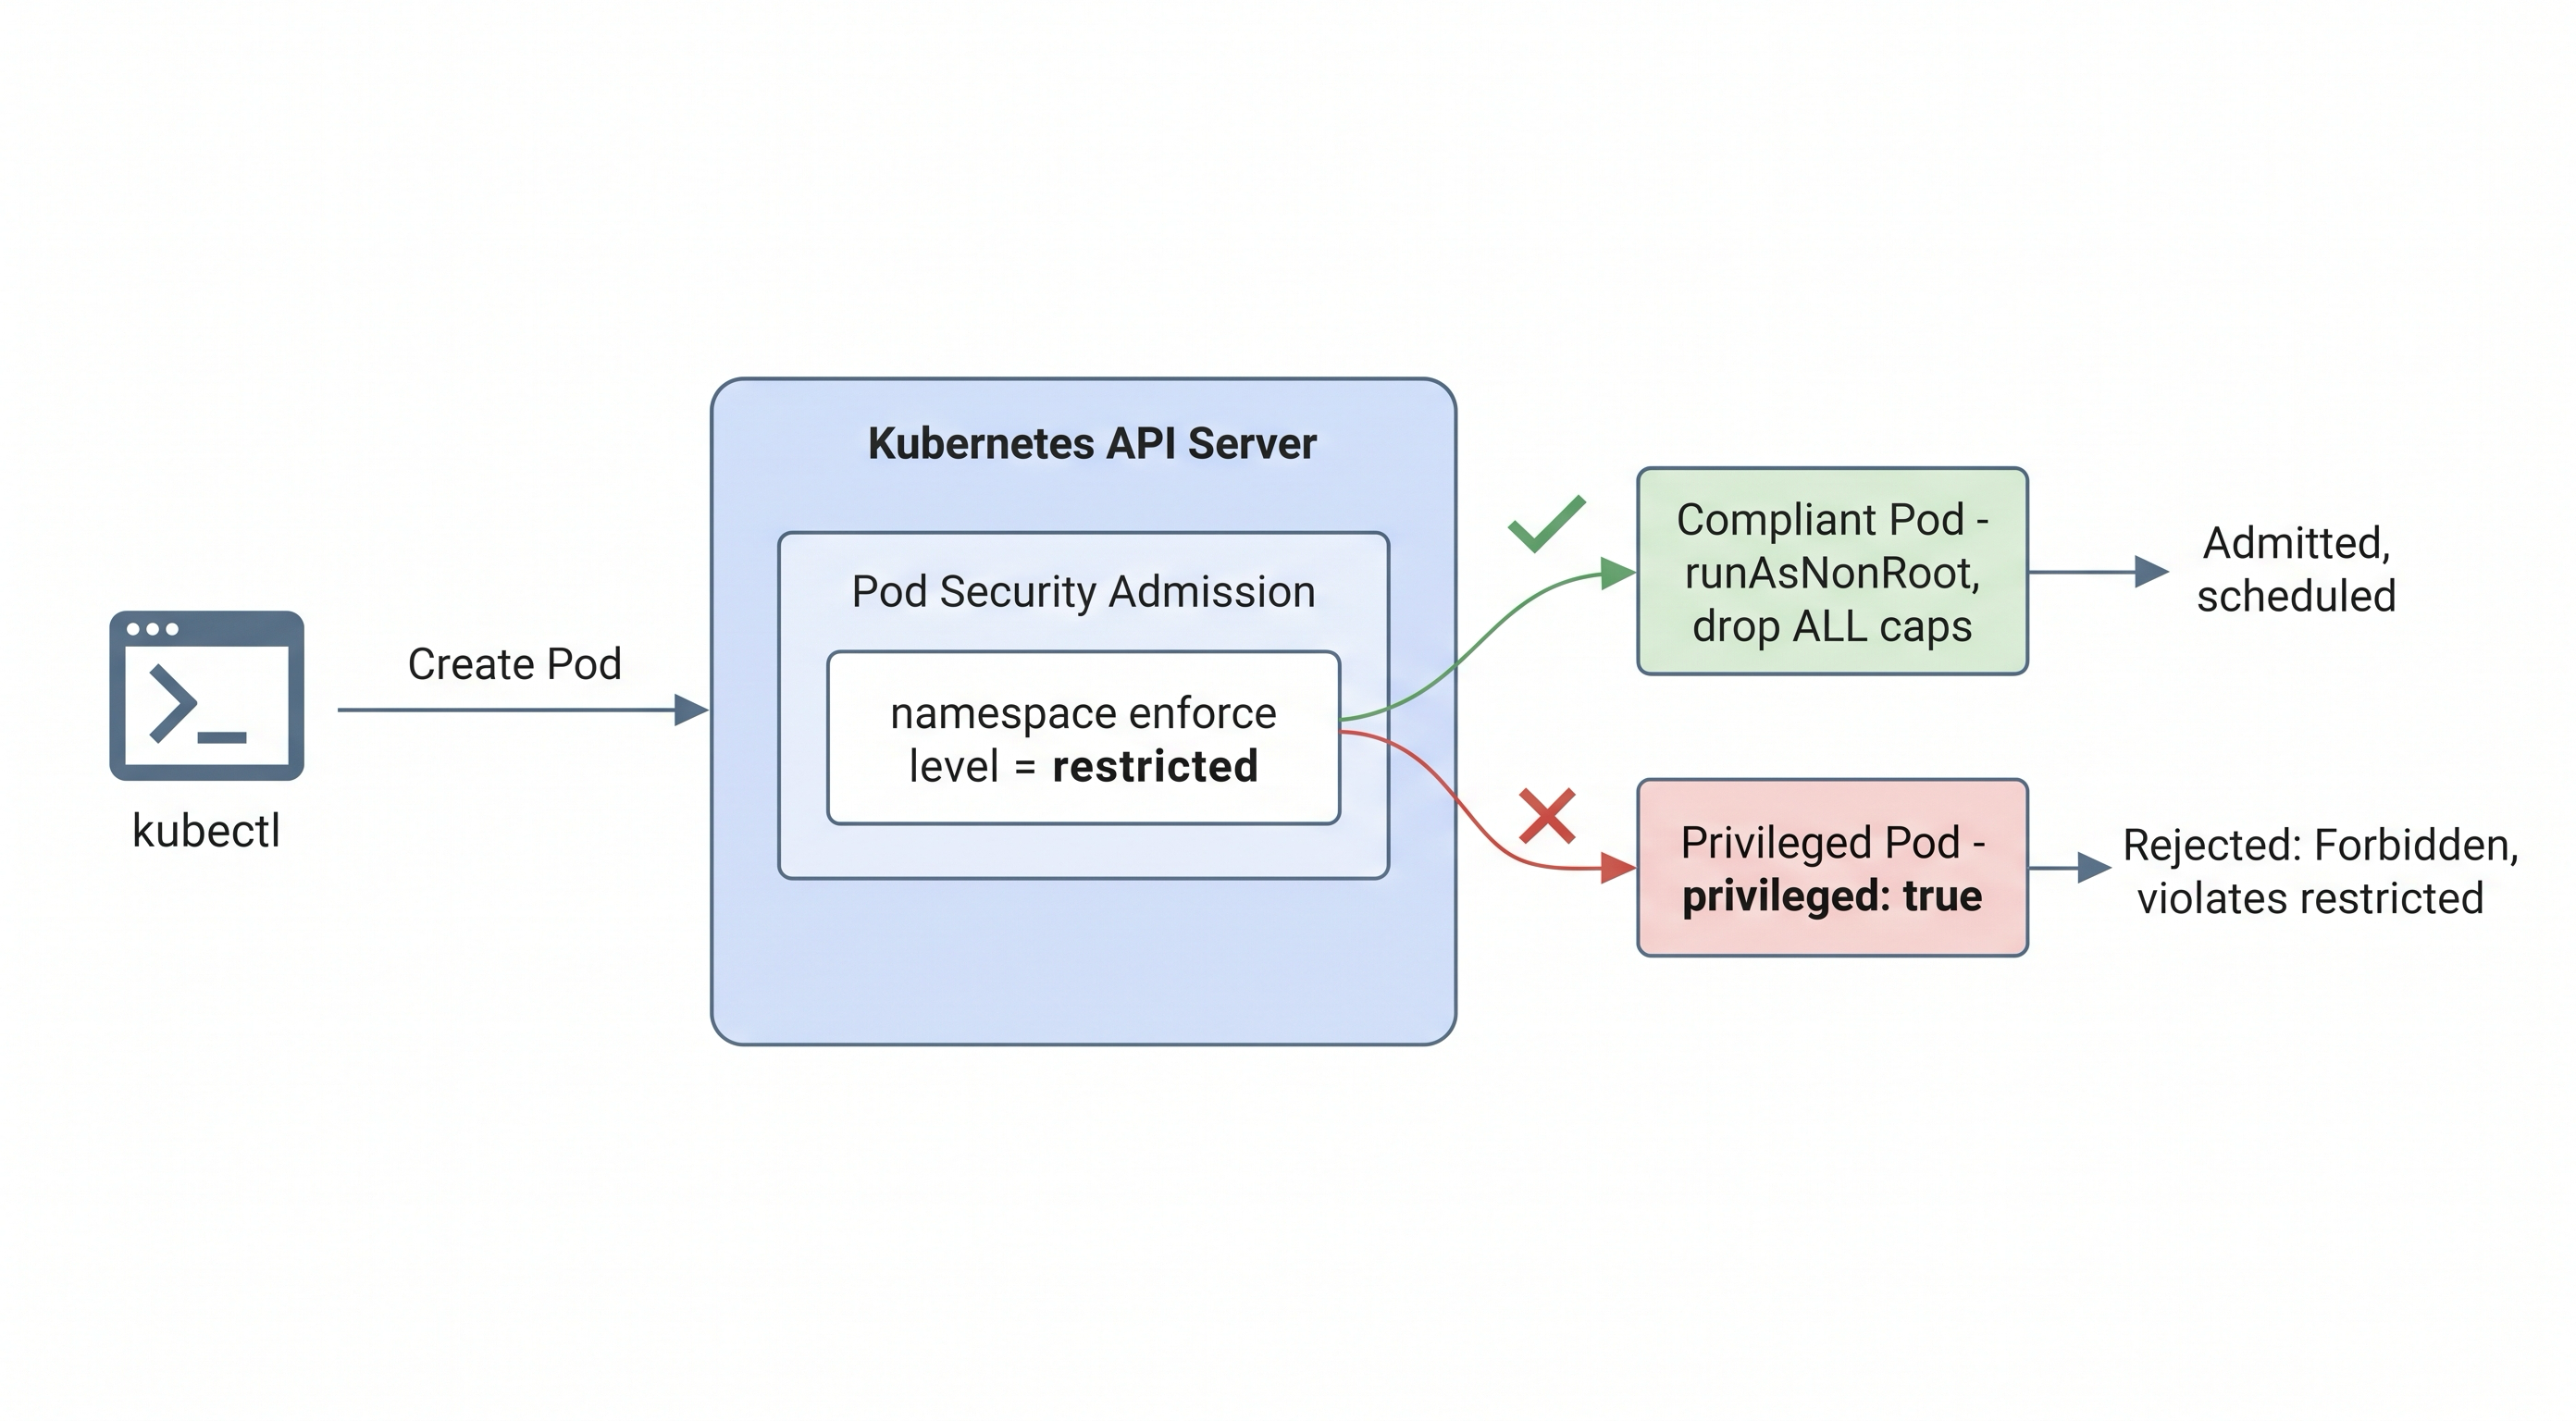
Pod Security Admission checks every pod against its namespace's standard and rejects the ones that violate it.
The Three Pod Security Standards
Kubernetes defines three built-in Pod Security Standards, from most to least permissive:
- privileged - no restrictions; anything goes. This is the default when you set nothing.
- baseline - blocks the most dangerous settings (privileged containers, host namespaces) while staying easy to adopt.
- restricted - the hardened profile: containers must run as non-root, drop all Linux capabilities, disallow privilege escalation, and use a seccomp profile.
You apply a standard to a namespace with a label, and the API server enforces it on every pod created there. This is namespace-scoped by design: you can run system components under a loose policy while holding your application namespaces to restricted.
Pod Security Admission vs the old PodSecurityPolicy
If you have seen PodSecurityPolicy (PSP) in older material, note that it was removed in Kubernetes 1.25. Pod Security Admission is its built-in replacement: simpler (three fixed standards instead of hand-written policies), namespace-labelled, and always compiled into the API server so there is nothing to install. For rules beyond the three standards - say, "every image must come from our registry" - you reach for a policy engine like OPA Gatekeeper or Kubewarden, which the wider-security unit covers.
Step 1: Create a Namespace for Your Apps
Create a namespace to hold application workloads. From the dev-machine terminal:
kubectl create namespace secure-apps
At this point the namespace has no policy - it is effectively privileged, so an unsafe pod would run without complaint.
Step 2: Enforce the Restricted Standard
Label the namespace so the API server enforces the restricted standard on every pod created in it:
kubectl label namespace secure-apps \
  pod-security.kubernetes.io/enforce=restricted
That single label is the whole control. Confirm it:
kubectl get namespace secure-apps --show-labels
enforce, audit, and warn - three ways to apply a standard
Each standard can be attached at three levels, and you can mix them:
pod-security.kubernetes.io/enforce- rejects violating pods outright. This is the one with teeth.pod-security.kubernetes.io/warn- allows the pod but returns a warning to the user, useful for flagging issues without breaking anything.pod-security.kubernetes.io/audit- allows the pod and records a violation in the audit log, for after-the-fact review.
A common rollout pattern is to set warn and audit to restricted first, watch what would break, fix it, and only then switch enforce to restricted. Here we go straight to enforce because the point is to see the rejection.
Step 3: Watch an Unsafe Pod Get Rejected
Now try to run a privileged container in that namespace - the kind of workload the restricted standard exists to stop:
kubectl -n secure-apps run rogue --image=nginx:1.27 \
  --overrides='{"spec":{"containers":[{"name":"rogue","image":"nginx:1.27","securityContext":{"privileged":true}}]}}'
Instead of scheduling, the API server rejects the request with a Pod Security violation, listing exactly which rules the pod broke (privileged, allowPrivilegeEscalation, missing runAsNonRoot, capabilities, and seccomp). Nothing is created - the unsafe workload never runs.
Contrast that with a compliant pod, which the same namespace accepts:
kubectl -n secure-apps run safe --image=nginx:1.27 \
  --overrides='{"spec":{"containers":[{"name":"safe","image":"nginx:1.27","securityContext":{"runAsNonRoot":true,"runAsUser":1000,"allowPrivilegeEscalation":false,"capabilities":{"drop":["ALL"]},"seccompProfile":{"type":"RuntimeDefault"}}}]}}'
Setting Pod Security levels from the Rancher UI
Everything you just did with kubectl is also available in the Rancher UI. When you create or edit a namespace (or a Project), Rancher exposes the Pod Security Admission level as a dropdown, so you can set enforce, warn, and audit to privileged, baseline, or restricted without touching labels by hand. Rancher also ships built-in Pod Security Admission Configuration Templates that you can apply cluster-wide, so new namespaces inherit a secure default. The underlying mechanism is identical - Rancher is writing the same namespace labels the API server reads.
You're Done
You enforced the restricted Pod Security Standard on a namespace and watched the API server reject a privileged pod before it could run - a real, built-in security control with no extra components. That is the foundation of workload security in Kubernetes: decide what "safe" means per namespace, and let the API server enforce it on every pod.
Pod security is one layer. The next unit surveys the rest of the security surface on a Rancher-managed cluster - authentication, compliance scanning, network policy, and secrets - and where each fits.
The challenge below asks you to harden a namespace yourself and prove an unsafe pod is turned away. Solving it records your progress.
The Wider Security Surface
Pod security is one control among several. Hardening a Rancher-managed cluster in production means layering authentication, compliance scanning, network segmentation, and secrets management on top. This unit surveys those layers and where each fits - it is a map of the territory rather than a hands-on walk, because most of these controls depend on external systems (an identity provider, a policy-enforcing CNI, a secrets backend) that a single throwaway cluster does not have.
Authentication: Who Gets In
Out of the box Rancher uses a local admin account, which is fine for a lab but not for a team. In production, Rancher integrates with an external identity provider so people log in with credentials they already have, and Rancher maps their group membership to roles automatically:
- LDAP / Active Directory - the classic enterprise directory.
- SAML (Okta, ADFS, Ping Identity, Keycloak) - single sign-on for web access.
- GitHub / GitLab - OAuth login, popular with engineering teams.
- OpenID Connect - standards-based federation for anything OIDC-capable.
Why this is not hands-on here
Every one of these requires a second system to authenticate against - a running LDAP directory, a configured Okta tenant, a GitHub OAuth app. A disposable single-cluster playground has none of them, and standing one up would teach you about the identity provider, not about Rancher. The Rancher side is straightforward once an IdP exists: Users & Authentication > Auth Provider, pick the type, enter the endpoint and credentials, and map groups to Rancher roles. The skill that transfers is the concept - authenticate against an external directory, authorize by group - not the specific provider setup.
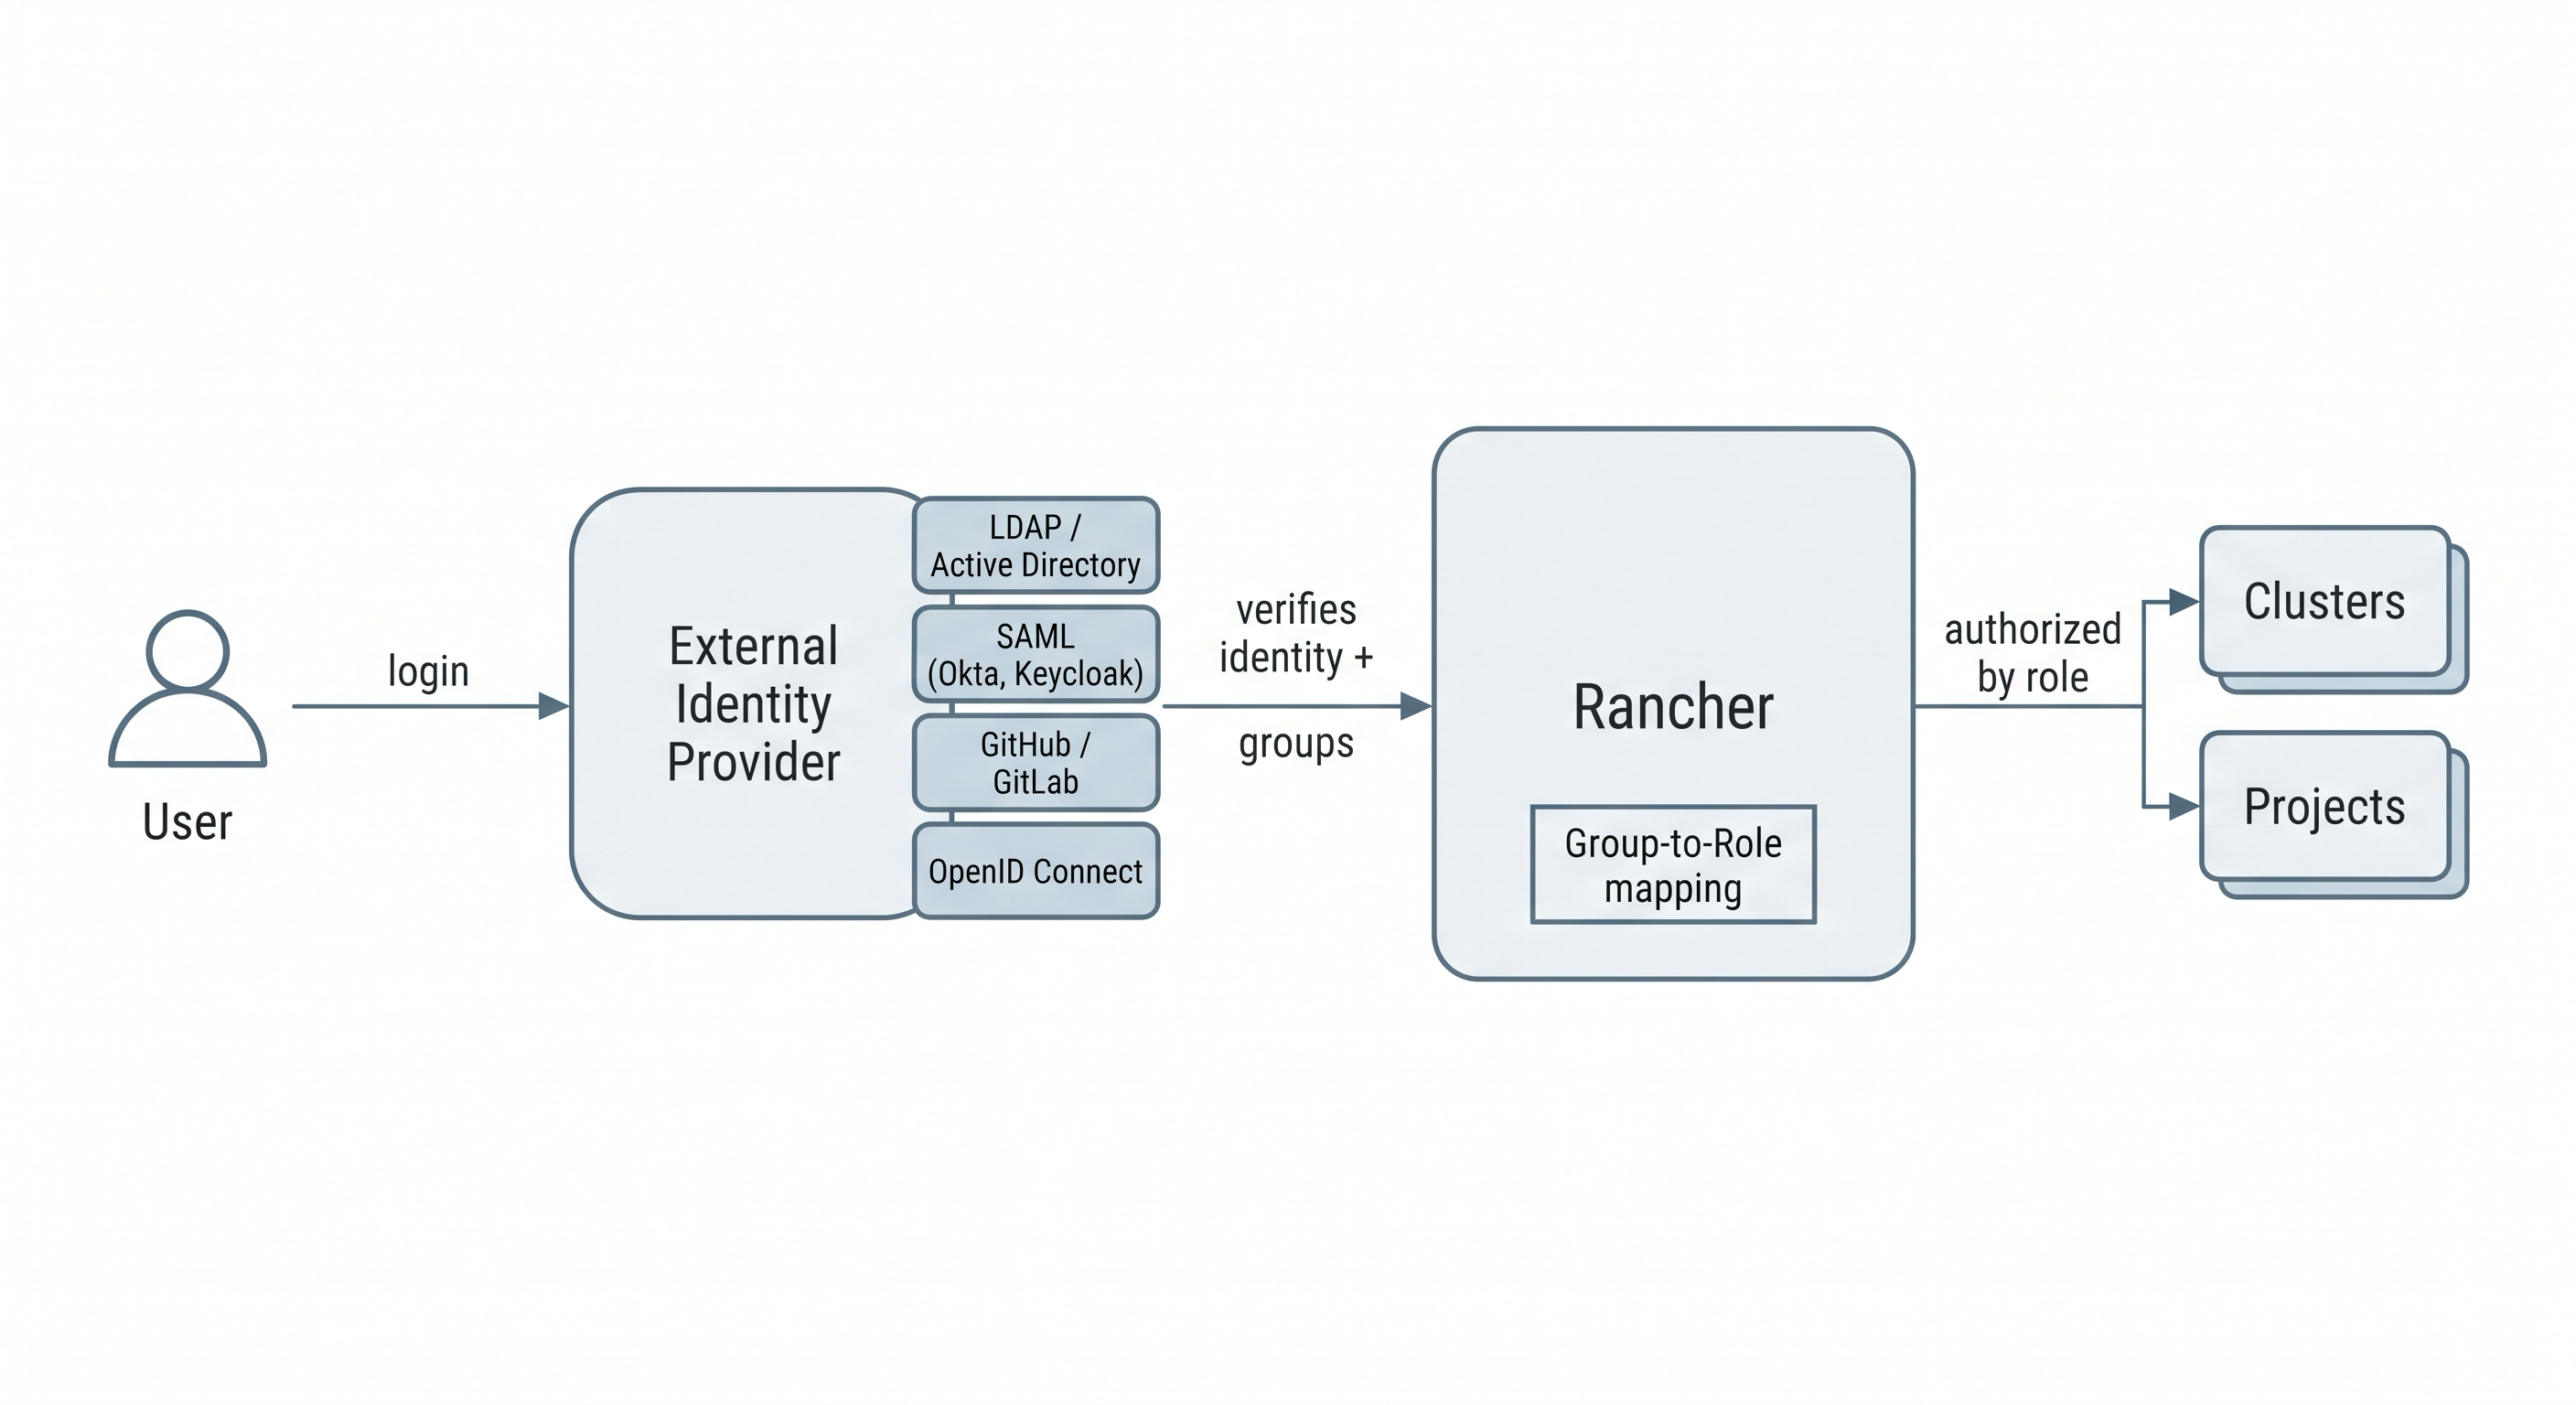
Rancher delegates login to an external identity provider, then maps the user's groups to Rancher roles.
Compliance: CIS Benchmark Scanning
Rancher ships a CIS Benchmark scanning tool that audits a cluster against the Center for Internet Security's Kubernetes Benchmark - a published checklist of hardening controls. You install it as a Rancher app, run a scan, and get a report of which controls pass, fail, or need manual review. Scans can be scheduled so you track compliance drift over time. It is the fastest way to answer "how hardened is this cluster against a recognized standard?" without auditing by hand.
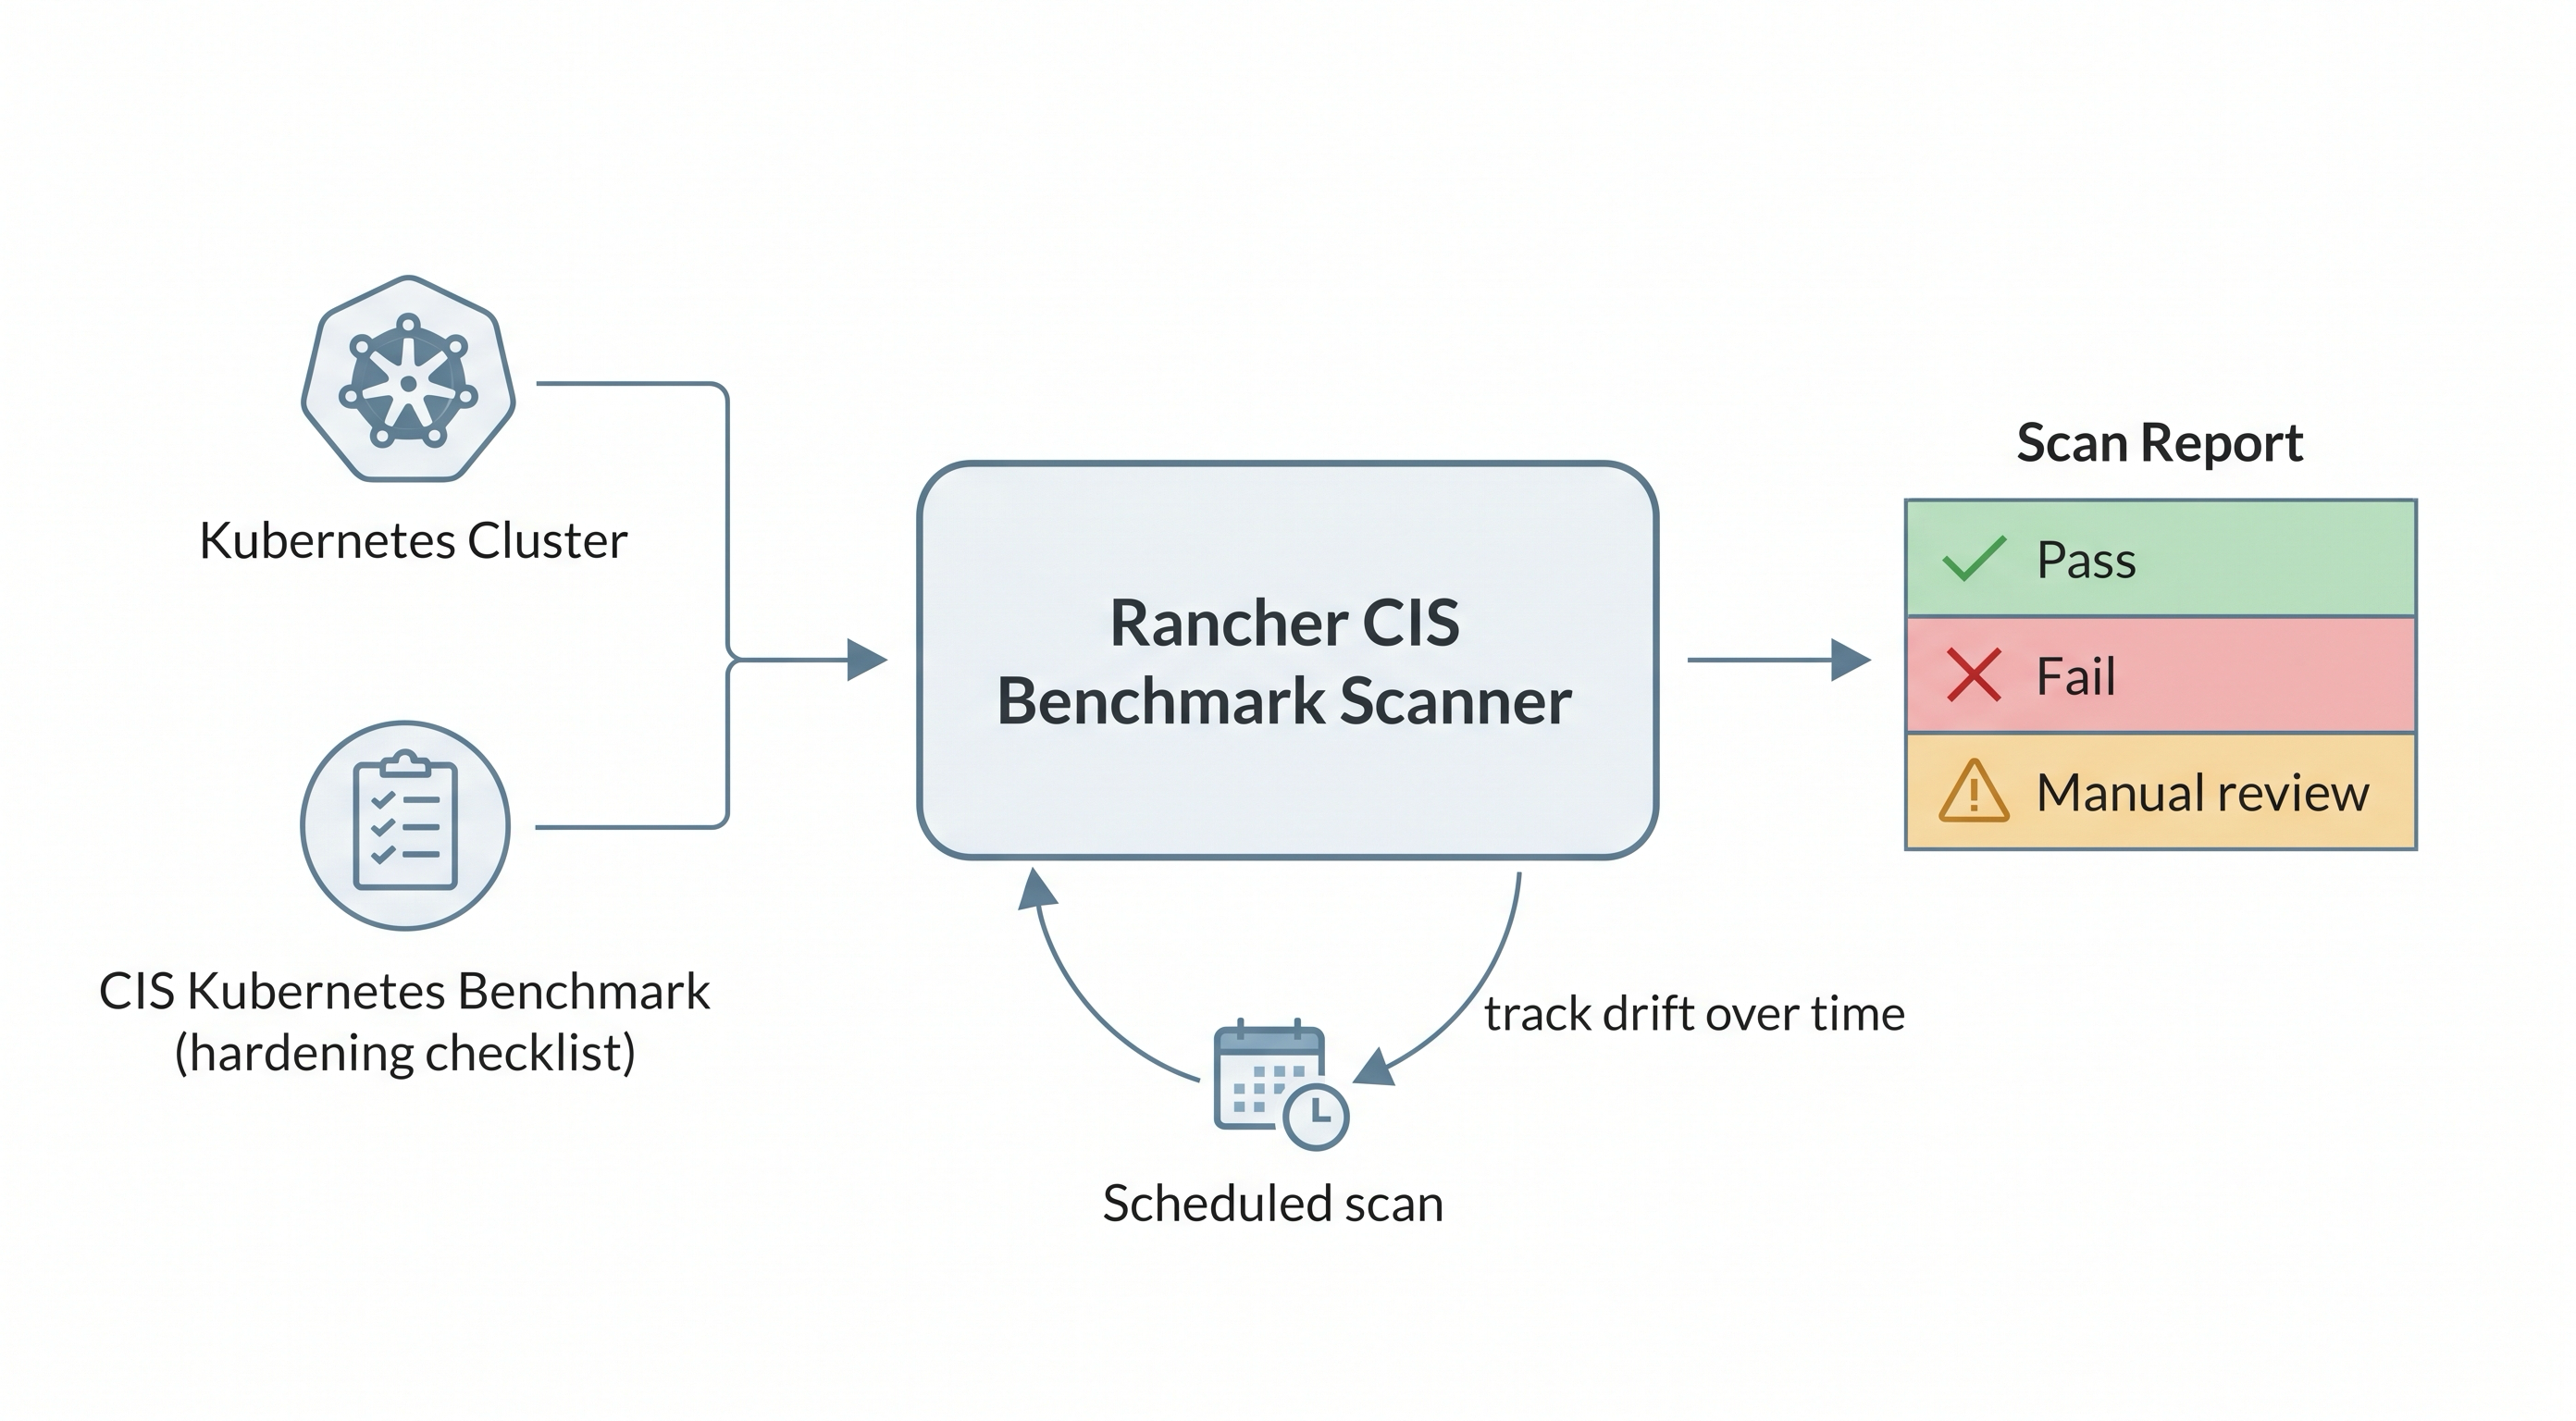
The CIS Benchmark scanner audits the cluster against a published checklist and reports which controls pass, fail, or need a manual check.
Network Policy: Segmenting Traffic
By default, every pod in a Kubernetes cluster can talk to every other pod. NetworkPolicy objects let you lock that down - default-deny all traffic, then allow only the connections each workload actually needs, isolating namespaces and restricting egress to known endpoints.
There is an important catch: NetworkPolicy objects are only enforced if the cluster's CNI plugin supports them. This playground's K3s uses the default Flannel CNI, which does not enforce NetworkPolicy - you could create the objects, but nothing would honor them. Production clusters that rely on network policy run a policy-enforcing CNI such as Calico, Cilium, or Canal. That is why network segmentation is described here rather than demonstrated: teaching a control that silently does nothing would be worse than not teaching it.
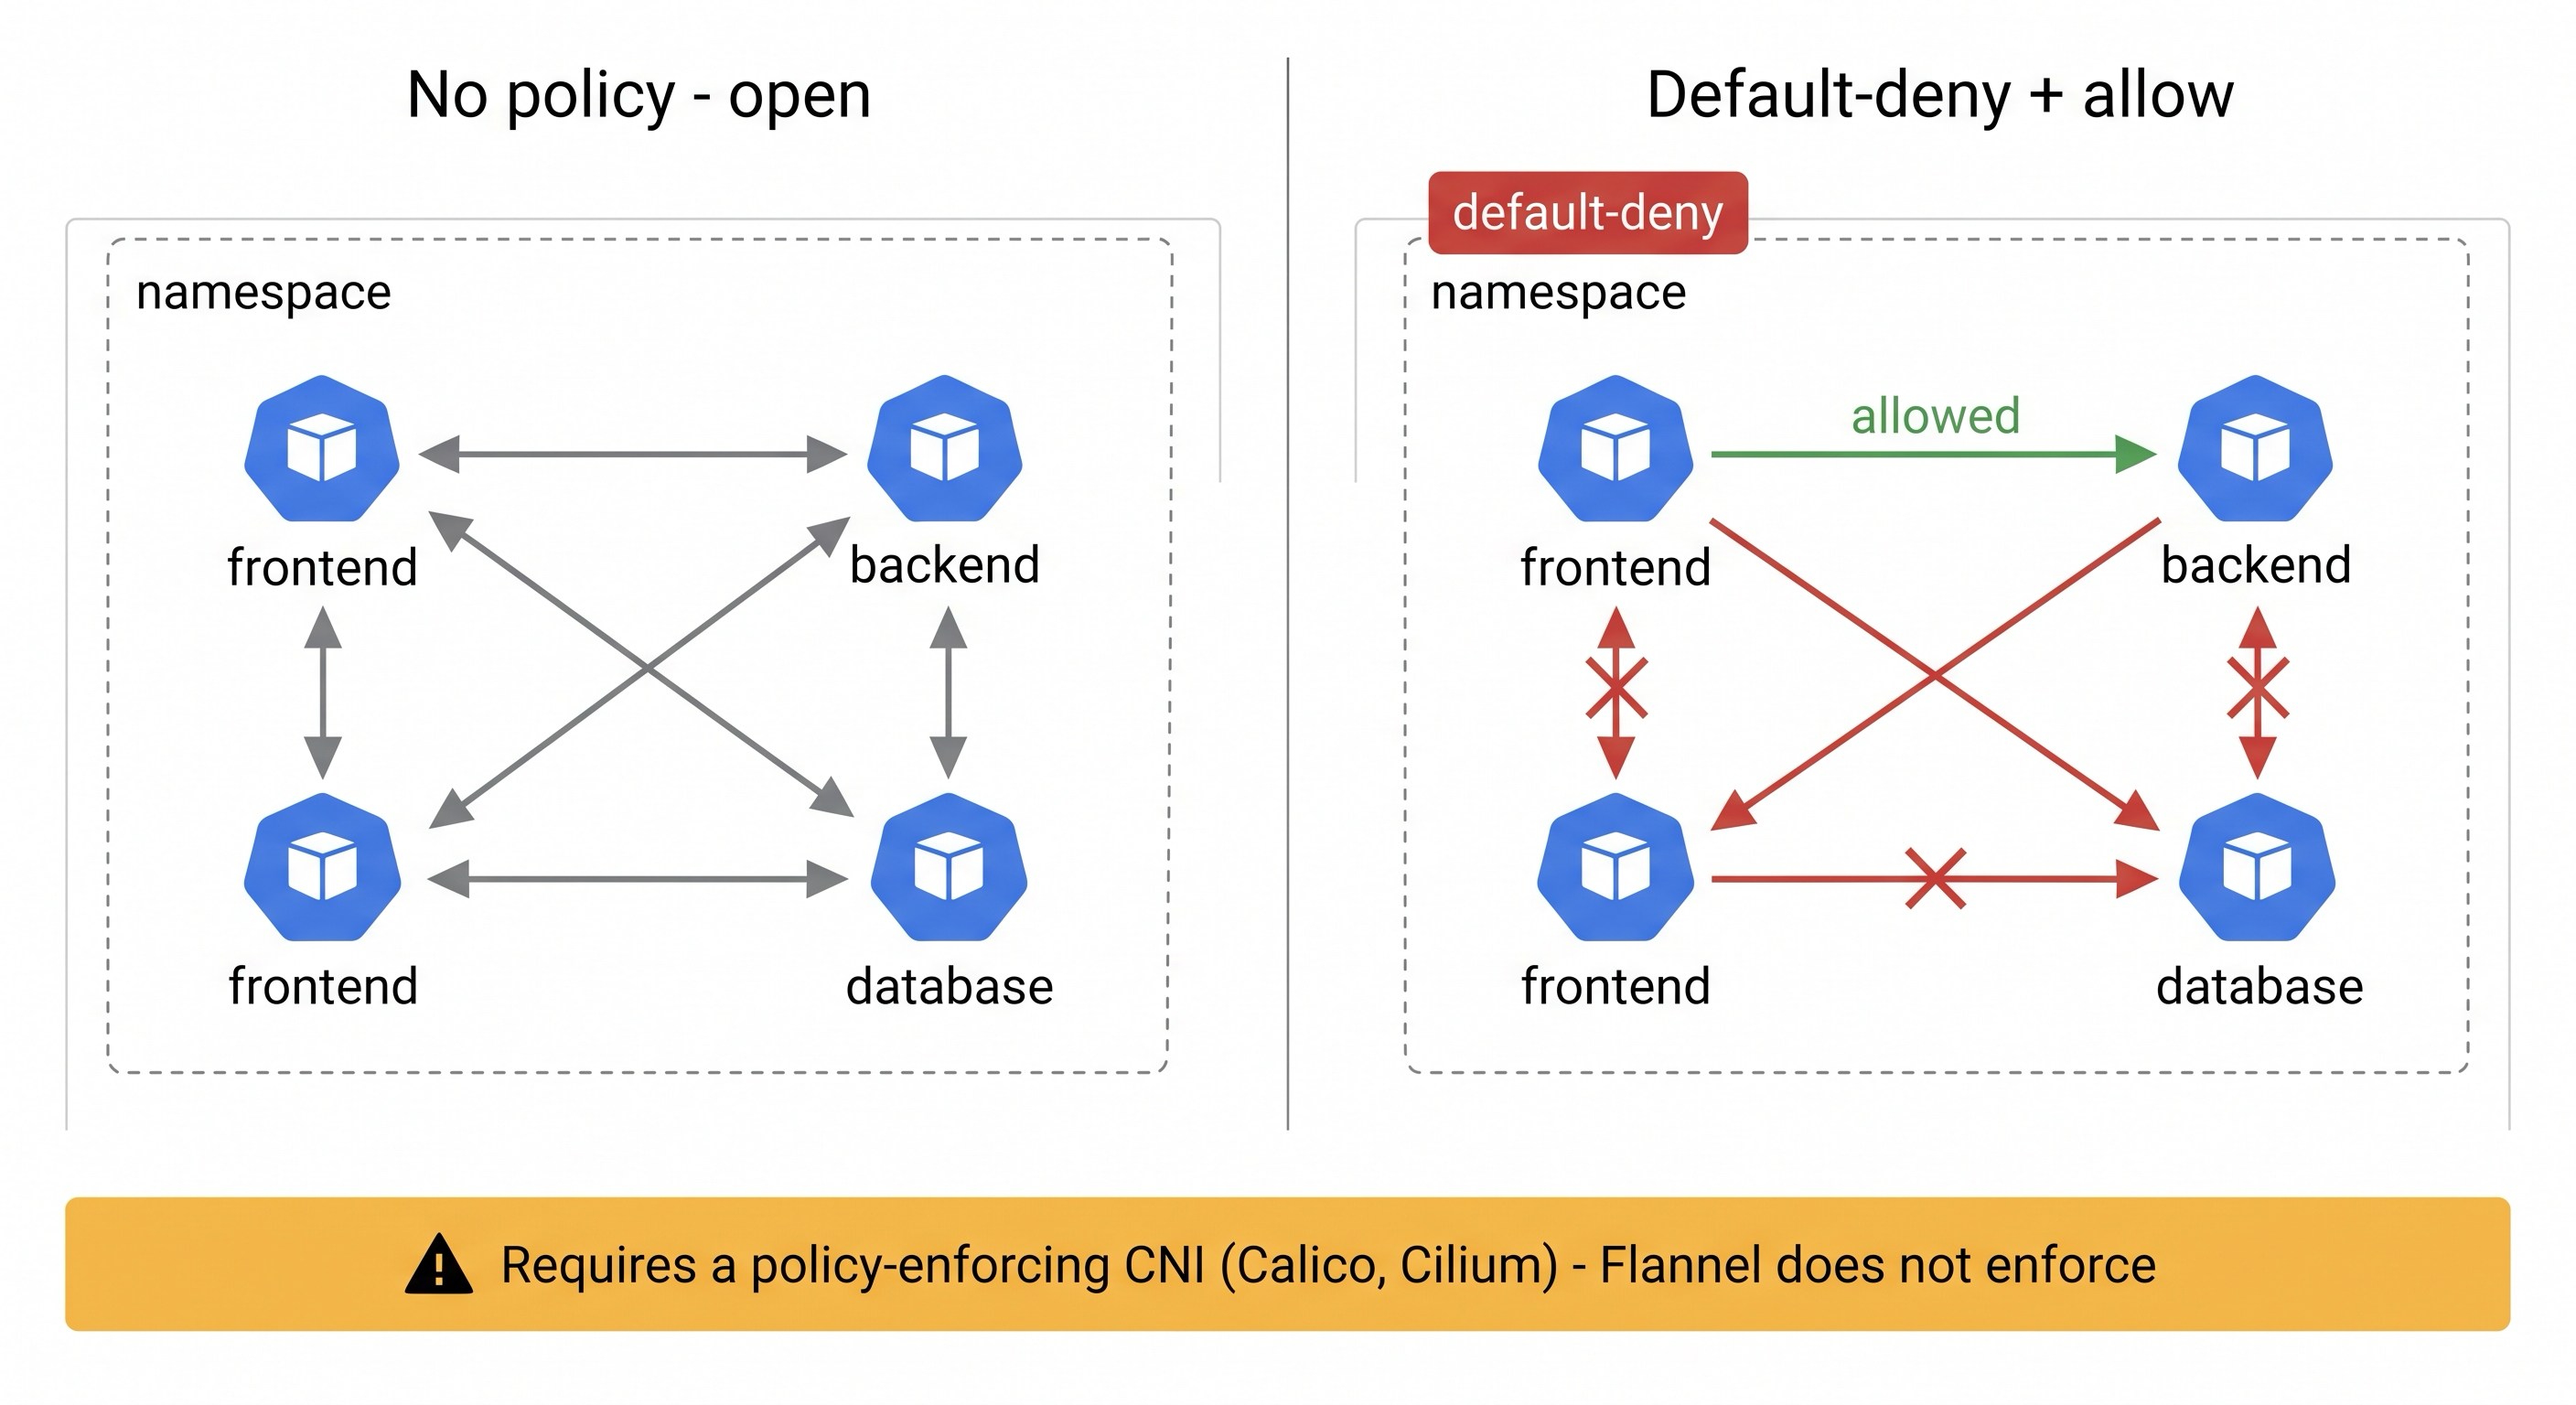
NetworkPolicy turns an open namespace into default-deny plus explicit allow rules - but only a policy-enforcing CNI actually applies them.
Secrets Management
Kubernetes Secrets are only base64-encoded in etcd by default - encoded, not encrypted. Hardening secrets means one or more of:
- Encryption at rest for etcd, so a stolen etcd snapshot does not leak secrets.
- External secret stores - HashiCorp Vault, AWS Secrets Manager, or Azure Key Vault - that hold the real secret and inject it at runtime, so it never lives in the cluster datastore.
- Sealed Secrets - encrypt a secret so the ciphertext is safe to commit to Git, which fits the GitOps workflow from the Fleet lessons.
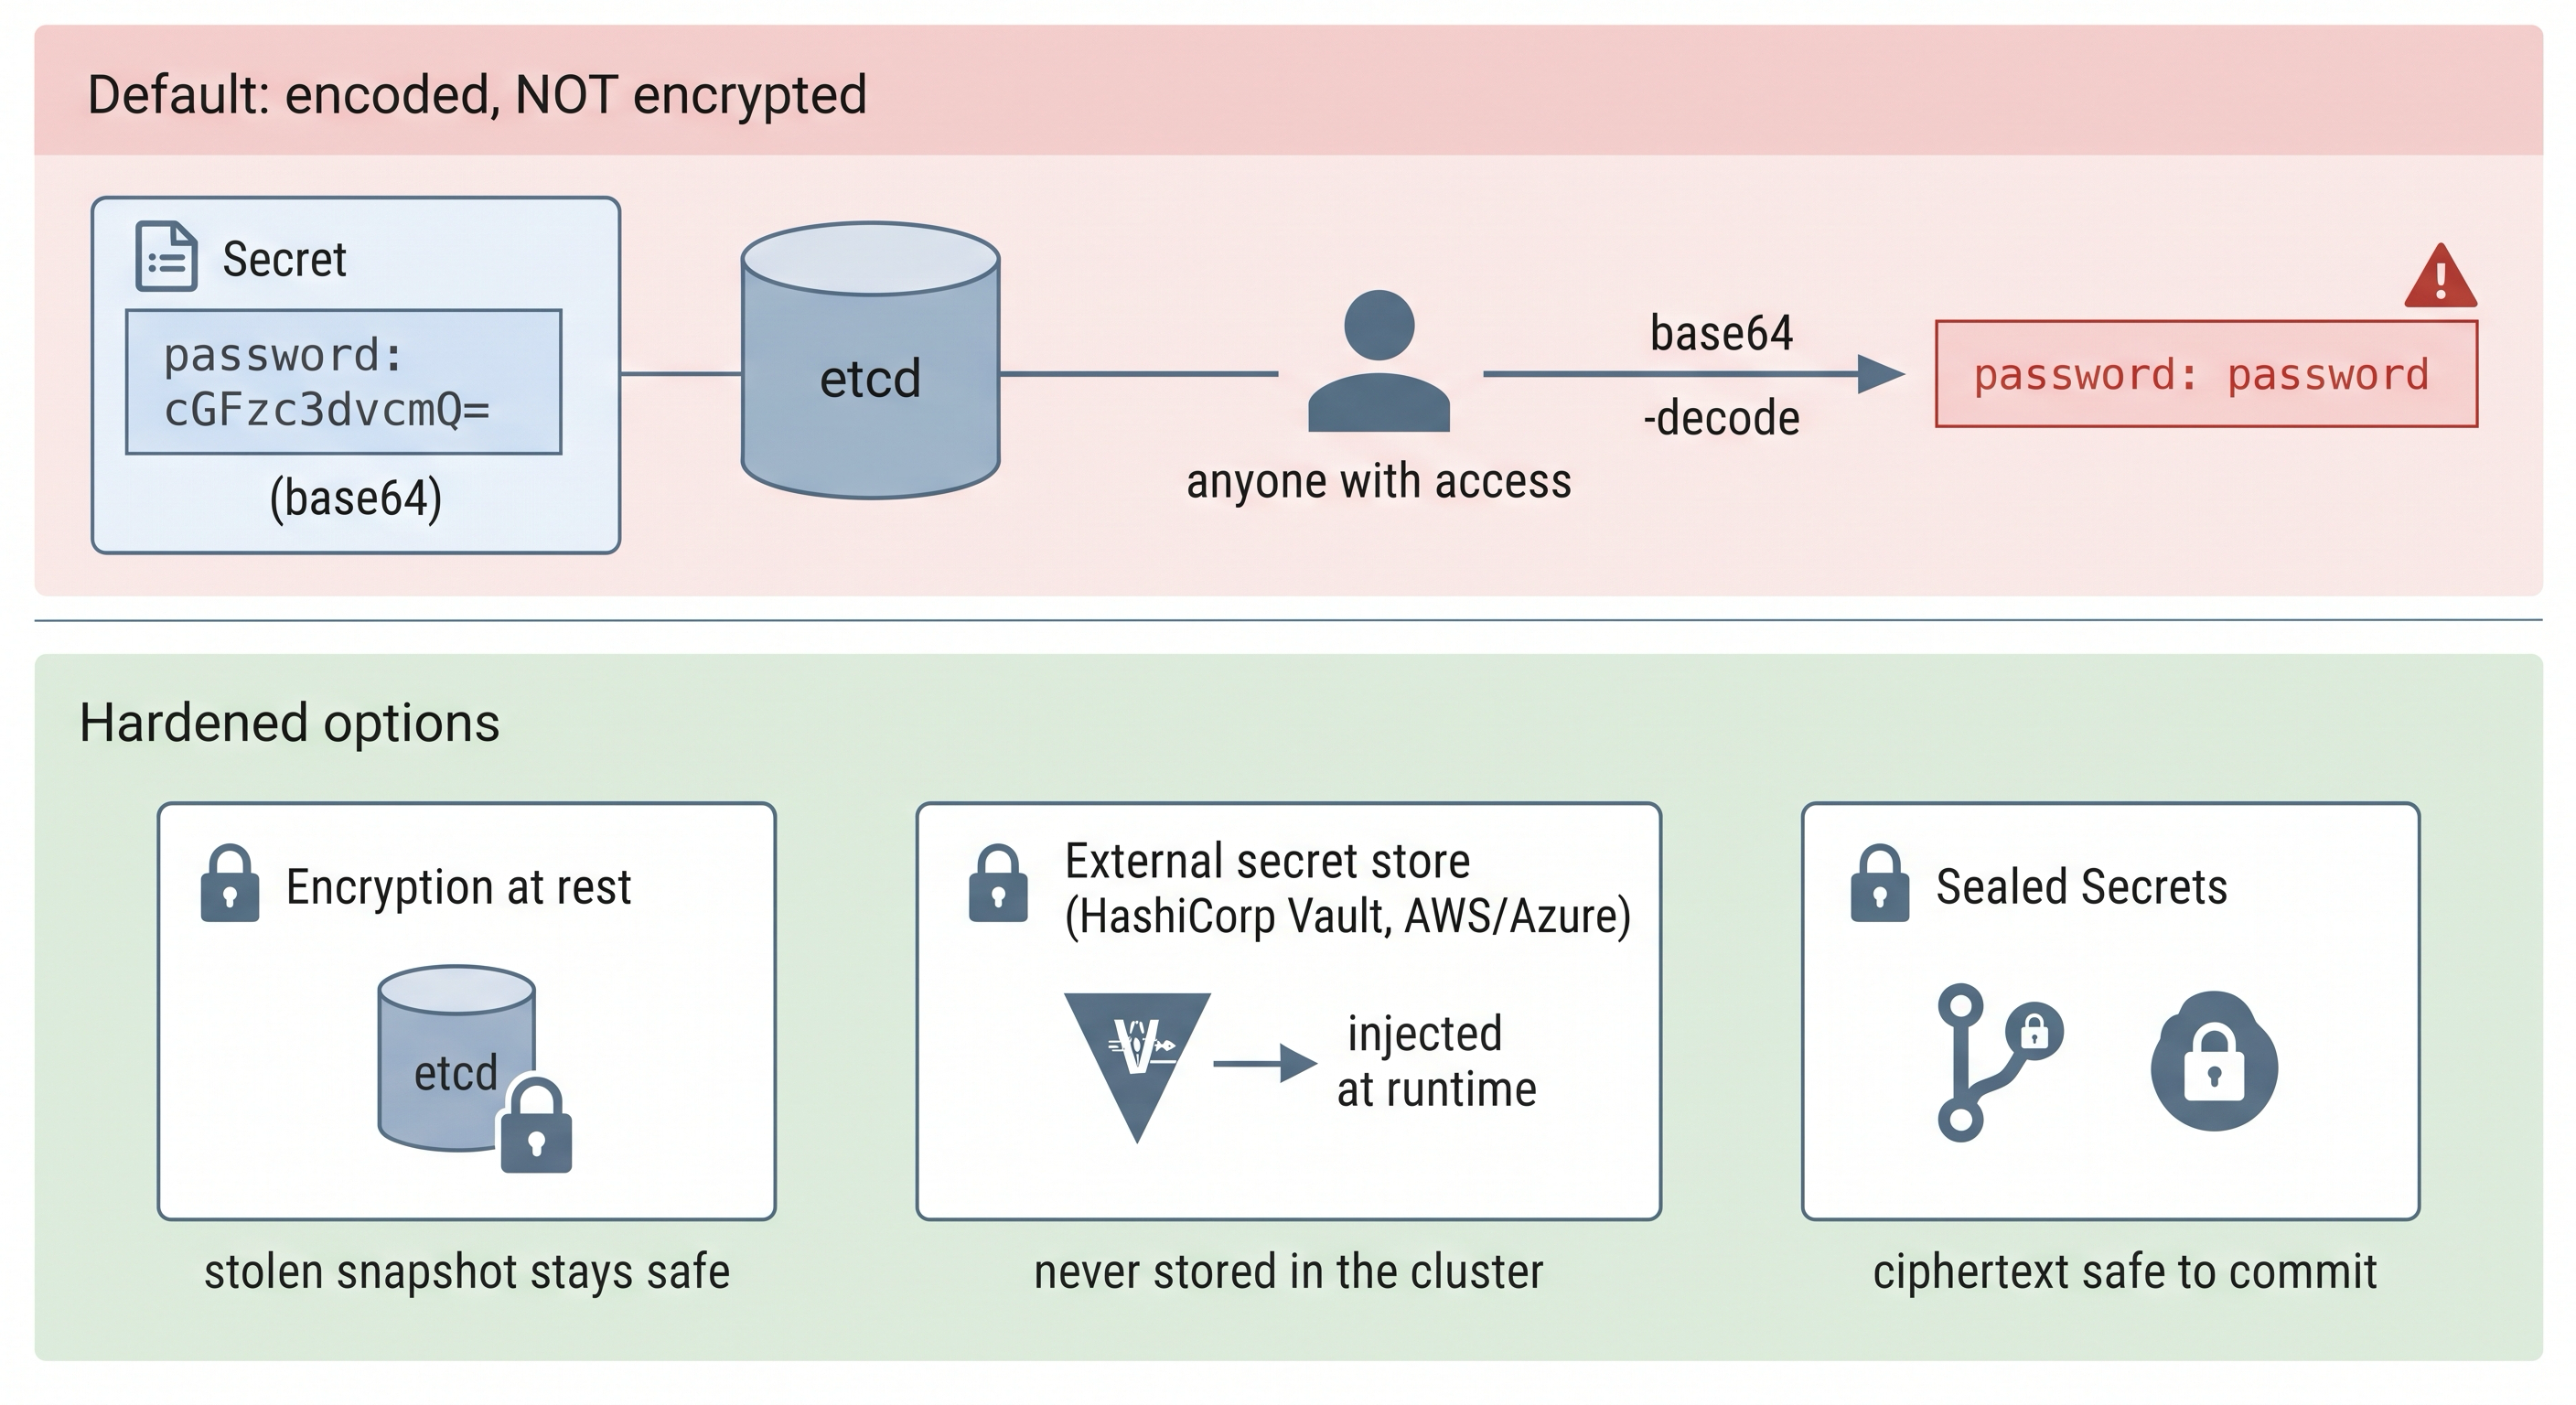
Base64 is encoding, not encryption - a Secret in etcd is trivially decoded unless you add encryption at rest, an external store, or Sealed Secrets.
Putting It Together
A hardened Rancher-managed cluster layers these controls: authenticate people against a real identity provider, authorize them by role, enforce Pod Security Standards on workloads (which you did hands-on in the previous unit), segment traffic with a policy-enforcing CNI, scan against the CIS Benchmark to catch drift, and keep secrets out of plain etcd. No single control is sufficient alone; security is the sum of the layers.
- Previous lesson
- Logging with Loki and Grafana Alloy
- Next lesson
- Day-2 Operations