Gateway Policies with Kong Plugins
In the last lesson you installed Kong and routed a workload through it. That alone makes Kong an ingress controller - but it is not yet doing anything Traefik could not. What makes Kong an API gateway is its plugins: policies you attach to a route to control traffic before it ever reaches your service - rate limiting, authentication, request transformation, logging, and dozens more.
On Kubernetes, you do not configure these through a separate Kong admin API. You declare them as Kubernetes resources using Kong's own CRDs, and attach them to a route with an annotation. This lesson applies two of the most common policies to the web workload from the previous lesson: a rate limit, then key authentication. Each is a few lines of YAML, and each produces a visible, deterministic change in how the gateway responds.
You work from the dev-machine terminal. This lesson assumes Kong is installed and the web workload in the demo namespace is routed through it, exactly as you set up in the previous lesson.
Playgrounds are temporary, so if you come back to a fresh cluster - a new day, a new session, or you simply do not remember - you will not have Kong or the web route anymore. The hint below rebuilds that starting point in one block so you can begin from a known state.
Starting fresh? Rebuild Kong and the routed workload first
Run this in the dev-machine terminal to get back to where the previous lesson left off - Kong installed, and a web workload routed through it. It is safe to run even if some pieces already exist.
export KUBECONFIG=$HOME/.kube/config

# Install Kong (skips if already installed)
helm repo add kong https://charts.konghq.com
helm repo update
helm upgrade --install kong kong/ingress \
  --namespace kong --create-namespace \
  --set gateway.proxy.type=NodePort \
  --set gateway.proxy.http.nodePort=30081 \
  --wait --timeout 5m

# Create and route the web workload
kubectl get namespace demo >/dev/null 2>&1 || kubectl create namespace demo
kubectl -n demo get deploy web >/dev/null 2>&1 || kubectl -n demo create deployment web --image=nginx:1.27
kubectl -n demo get svc web >/dev/null 2>&1 || kubectl -n demo expose deployment web --port=80
kubectl apply -f - <<'EOF'
apiVersion: networking.k8s.io/v1
kind: Ingress
metadata:
  name: web
  namespace: demo
spec:
  ingressClassName: kong
  rules:
    - http:
        paths:
          - path: /
            pathType: Prefix
            backend:
              service:
                name: web
                port:
                  number: 80
EOF
Confirm the starting point is good - this should print HTTP 200:
curl -sS -o /dev/null -w "HTTP %{http_code}\n" http://172.16.0.2:30081/
Once you see 200, the route works and you are ready to attach plugins.
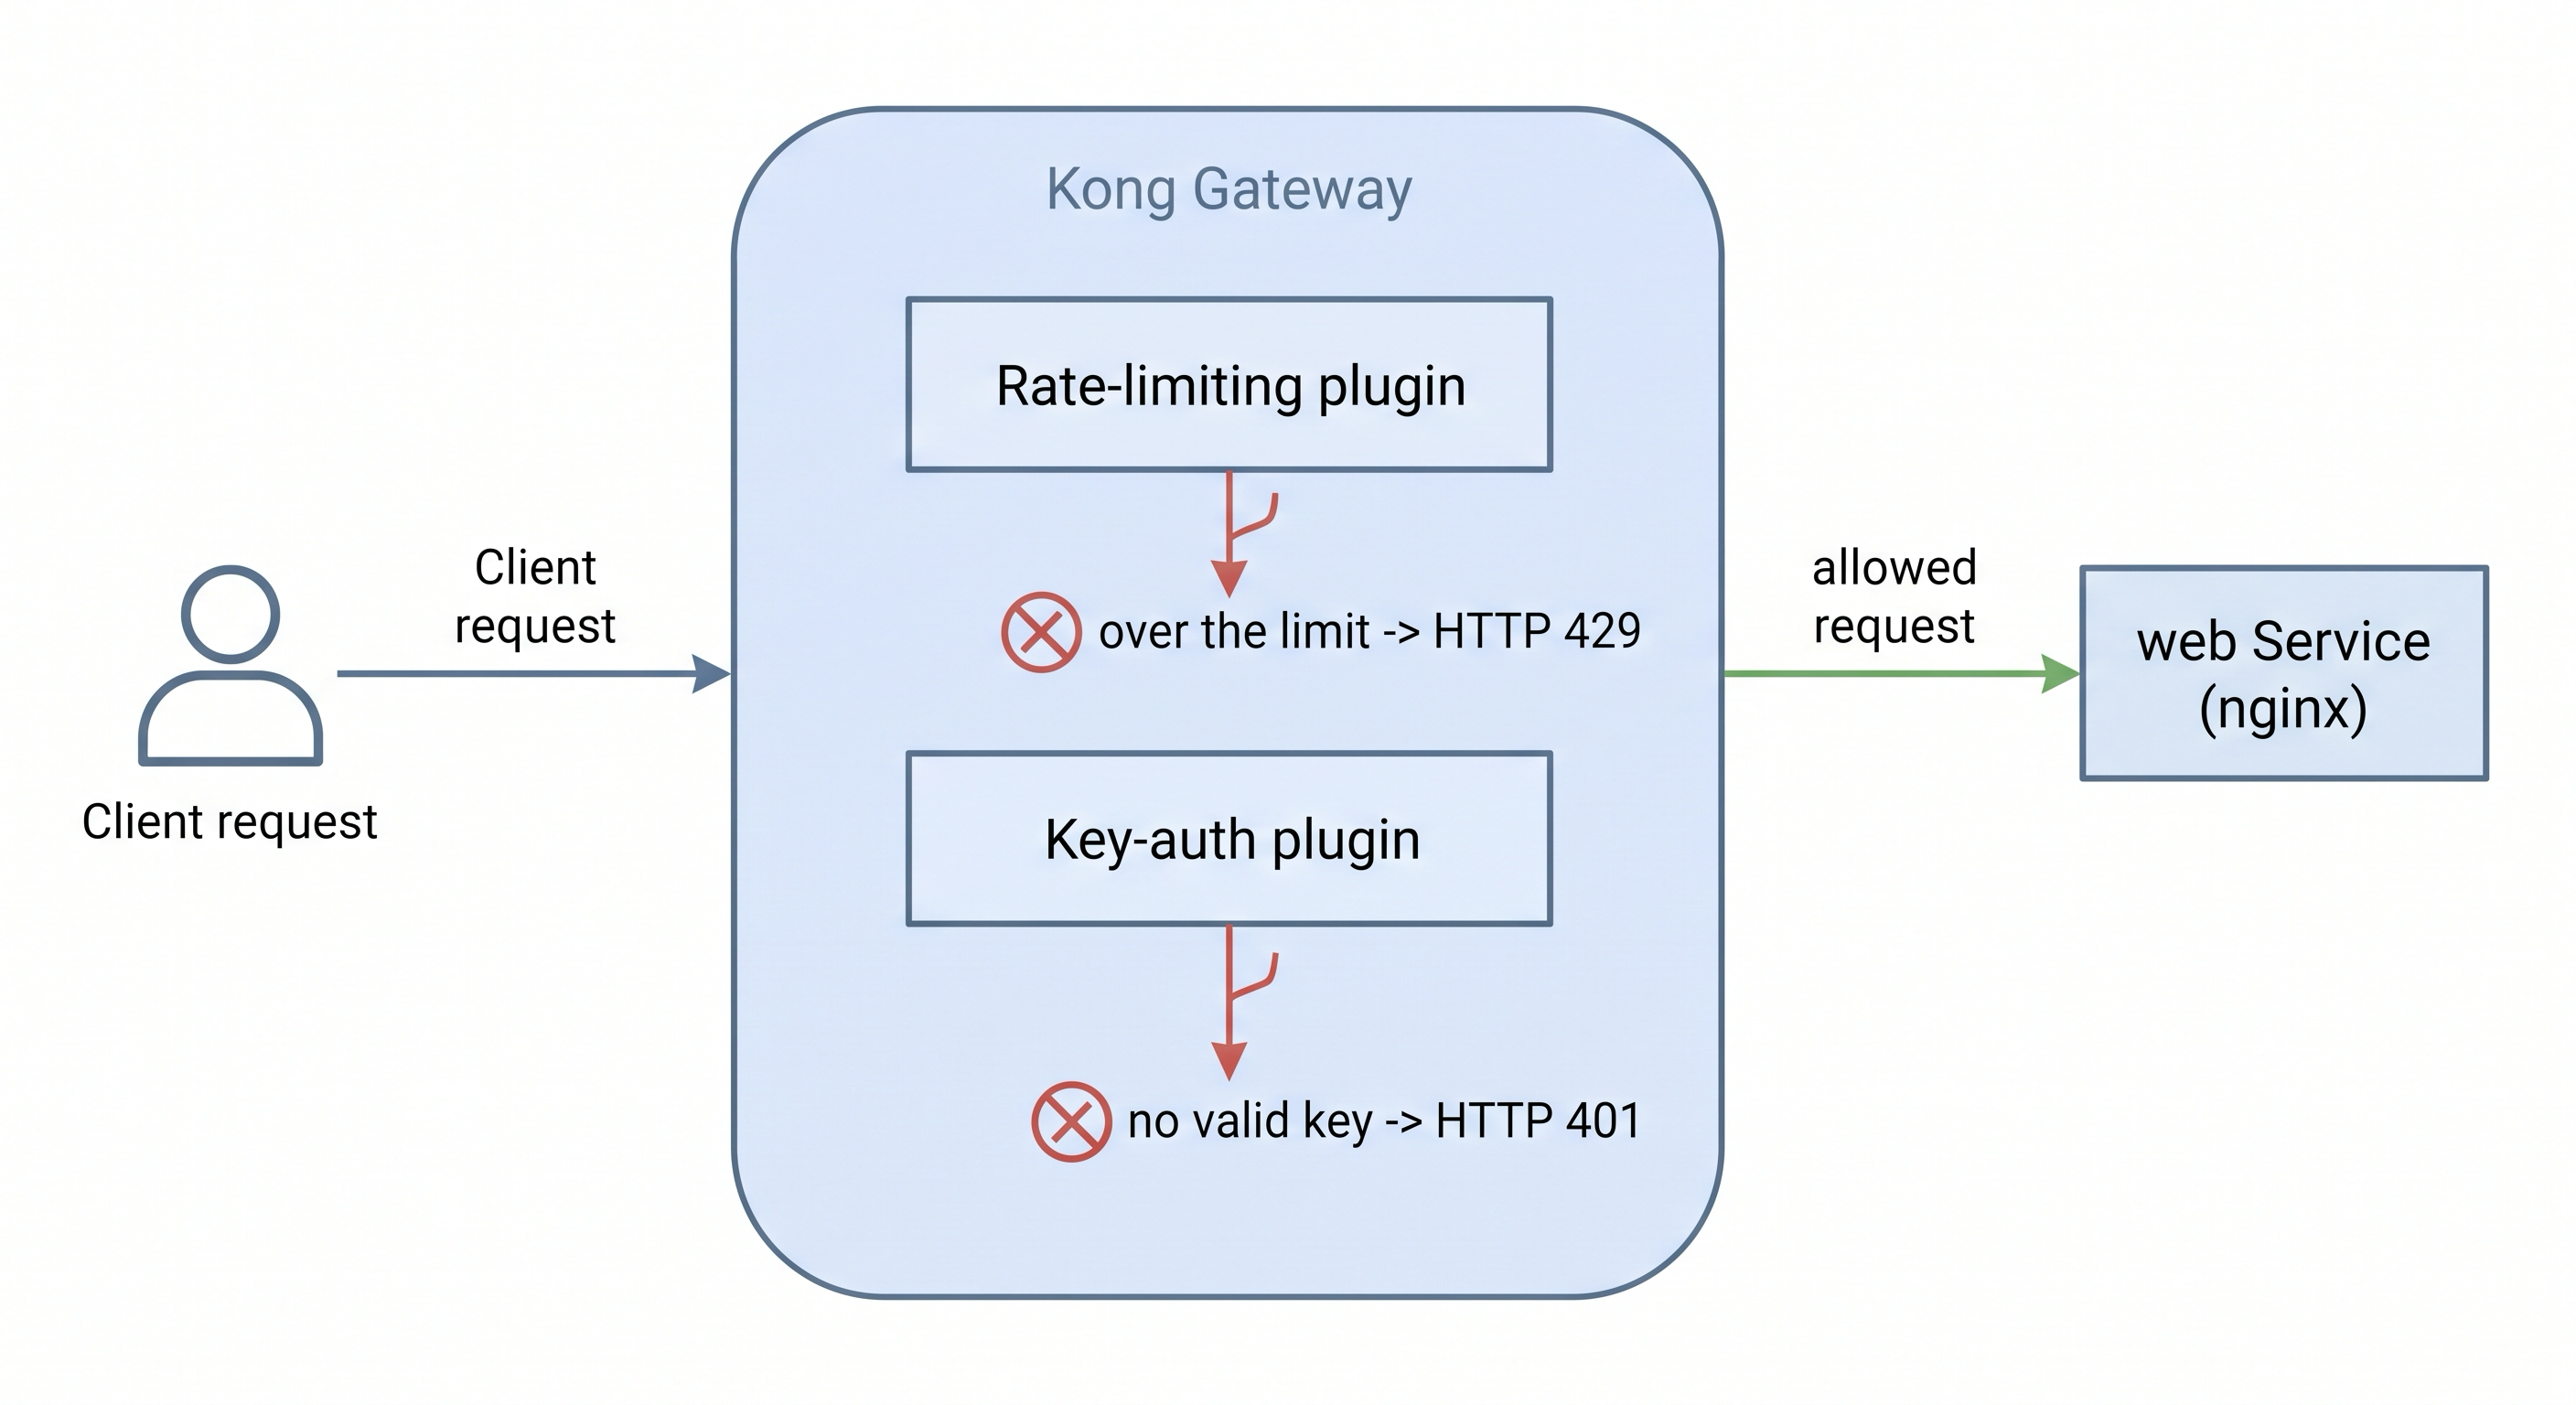
Plugins run inside the Kong gateway: each attached policy inspects the request and can reject it (429, 401) before it reaches your service.
How Plugins Attach to a Route
Two pieces work together:
- A
KongPluginresource defines the policy and its configuration (for example, "rate limiting, five requests per minute"). It lives in a namespace but does nothing on its own. - An annotation on the route -
konghq.com/plugins: <plugin-name>on the Ingress - tells Kong to apply that plugin to traffic for that route.
This split is deliberate: you define a policy once and attach it to any number of routes, and a route can carry several plugins at once (comma-separated in the annotation). Everything is a Kubernetes object, so it lives in Git, is reviewed in pull requests, and is applied with kubectl like anything else.
Step 1: Rate-Limit the Route
A rate limit caps how many requests a client may send in a window. Create a KongPlugin that allows five requests per minute:
kubectl apply -f - <<'EOF'
apiVersion: configuration.konghq.com/v1
kind: KongPlugin
metadata:
  name: rate-limit-5
  namespace: demo
plugin: rate-limiting
config:
  minute: 5
  policy: local
EOF
A note on policy: local - it counts requests per gateway pod, in memory, with no external datastore. That is exactly what you want for a DB-less Kong like this one. In a multi-pod production gateway you would use redis so the count is shared across pods.
Now attach the plugin to the web Ingress with an annotation:
kubectl -n demo annotate ingress web konghq.com/plugins=rate-limit-5 --overwrite
Kong's controller notices the annotation and programs the limit into the gateway within a few seconds.
Step 2: Watch the Limit Trip
Send a burst of requests to the route and watch the status codes. The first five succeed; the sixth and beyond are rejected with HTTP 429 Too Many Requests:
for i in $(seq 1 8); do
  curl -sS -o /dev/null -w "request $i -> HTTP %{http_code}\n" http://172.16.0.2:30081/
done
You will see five 200s followed by 429s.
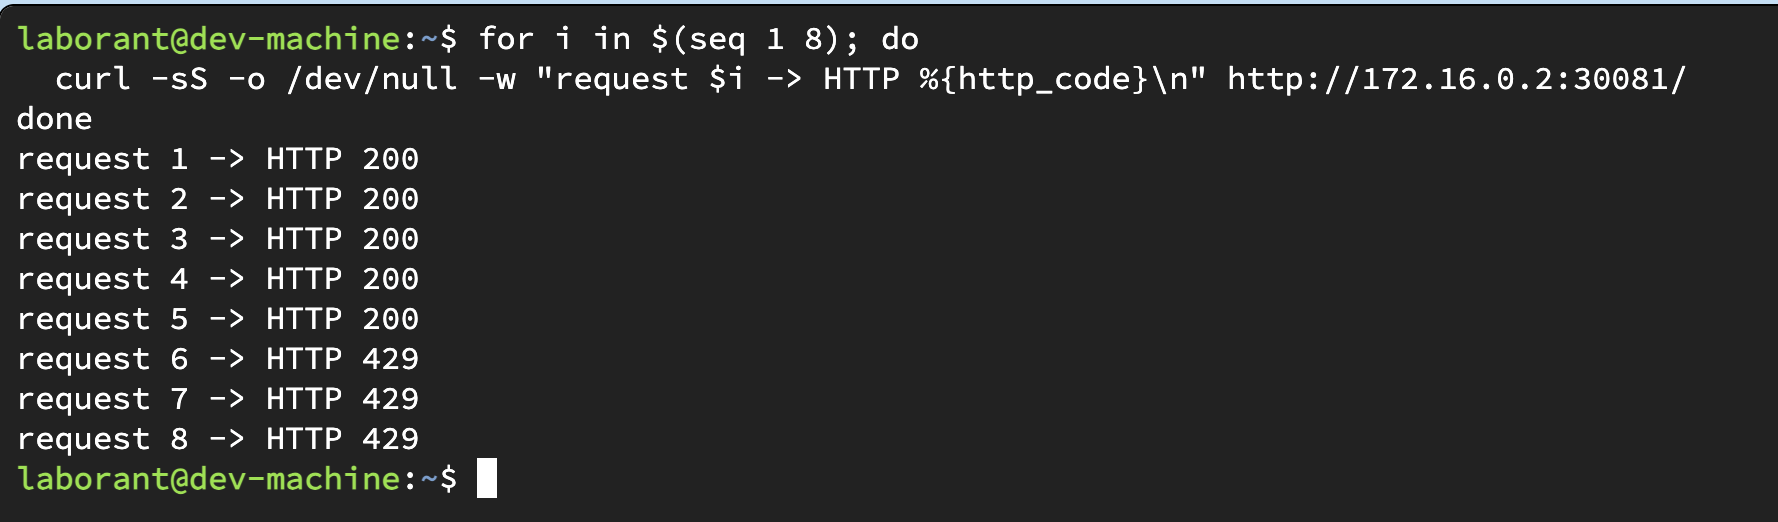
The burst trips the limit - five 200s, then 429 Too Many Requests.
Kong also returns rate-limit headers on every response - inspect them:
curl -sS -o /dev/null -D - http://172.16.0.2:30081/ | grep -i ratelimit
X-RateLimit-Limit-Minute: 5 and X-RateLimit-Remaining-Minute show the client exactly how much budget is left - a standard courtesy that lets well-behaved clients back off before they are blocked.
The limit resets - and why you saw it "recover"
The minute window is a rolling one. Once a minute passes since your burst, the counter frees up and requests return 200 again. If you want to watch the limit trip a second time, wait a minute (or lower the limit) and repeat the burst. This is normal rate-limiter behaviour: it throttles, it does not permanently ban.
Step 3: Require an API Key
Rate limiting controls how much; authentication controls who. The key-auth plugin rejects any request that does not carry a valid API key. Create the plugin and attach it alongside the rate limit (comma-separated, so both apply):
kubectl apply -f - <<'EOF'
apiVersion: configuration.konghq.com/v1
kind: KongPlugin
metadata:
  name: key-auth
  namespace: demo
plugin: key-auth
EOF

kubectl -n demo annotate ingress web konghq.com/plugins=rate-limit-5,key-auth --overwrite
Give Kong a few seconds, then try the route with no key - it is now rejected with HTTP 401 Unauthorized:
curl -sS -o /dev/null -w "no key -> HTTP %{http_code}\n" http://172.16.0.2:30081/
Step 4: Issue a Key to a Consumer
A caller that Kong recognizes is a KongConsumer. You create the consumer, store its API key in a Secret, and link them. Apply both:
kubectl apply -f - <<'EOF'
apiVersion: v1
kind: Secret
metadata:
  name: alice-key-auth
  namespace: demo
  labels:
    konghq.com/credential: key-auth
stringData:
  key: alice-secret-key
---
apiVersion: configuration.konghq.com/v1
kind: KongConsumer
metadata:
  name: alice
  namespace: demo
  annotations:
    kubernetes.io/ingress.class: kong
username: alice
credentials:
  - alice-key-auth
EOF
The Secret carries the label konghq.com/credential: key-auth, which tells Kong it is a key-auth credential; the KongConsumer references it by name. After a few seconds, the same request now succeeds when it carries the key in the apikey header, and is still rejected without it:
curl -sS -o /dev/null -w "valid key -> HTTP %{http_code}\n" -H "apikey: alice-secret-key" http://172.16.0.2:30081/
curl -sS -o /dev/null -w "wrong key -> HTTP %{http_code}\n" -H "apikey: nope" http://172.16.0.2:30081/
You will see 200 for the valid key and 401 for the wrong one.

With key-auth attached, a valid key returns 200 and a wrong key is rejected with 401.
Kong now authenticates every request before it reaches nginx - the service itself needs no auth code at all, which is the whole point of doing it at the gateway.
Getting 429 instead of 401 while testing?
Both plugins are attached, so if you burst too many requests the rate limiter may answer first with 429 before the auth check returns 401. Wait a minute for the limit window to reset, then send a single request with no key - you will get the 401. When testing the plugins independently, it is fine to detach one by re-running the annotate command with only the plugin you want.
Quick refresher - what these HTTP status codes mean
The gateway answers with standard HTTP status codes, so you can read the outcome from the number alone:
200 OK- the request succeeded and reached the service. This is the "allowed" path.400 Bad Request- the request itself was malformed (bad syntax, missing required fields). The server could not understand it.401 Unauthorized- the request lacked valid credentials. Here it means no API key, or a wrong one - thekey-authplugin rejected it. (Despite the name,401is really "unauthenticated".)429 Too Many Requests- the client sent too many requests in the time window. Here it means therate-limitingplugin's limit was exceeded.
Codes in the 4xx range mean the client's request was rejected; 5xx codes (like 502 or 503) would instead mean something went wrong on the server side - for example, the gateway could not reach the backend service.
Why This Matters
Everything you did here is an ordinary Kubernetes object - KongPlugin, KongConsumer, a Secret, and an annotation. That is what separates an API gateway from a plain ingress controller: cross-cutting concerns like throttling and authentication move out of every service and into the gateway, declared as resources you version and review like any other manifest. Traefik routes; Kong routes and governs.
Could I have done all this from the Rancher UI?
Yes - and it is worth understanding exactly how. Once Kong is installed, its CRDs (KongPlugin, KongConsumer, and the rest) are registered types in the cluster, so they appear in Rancher's Cluster Explorer under More Resources. You can browse them, and click Create to add a new one - Rancher opens its YAML editor with the same fields you wrote here, and applies the object through the Kubernetes API exactly as kubectl apply does. The annotation on the Ingress is editable the same way, from the Ingress's edit screen.
The nuance: there is no dedicated "Kong plugin" wizard or form in Rancher. Unlike Rancher's own features (projects, catalog apps), third-party CRDs get the generic resource editor, which means you are still writing and reviewing the same YAML. So the UI is a convenience for browsing and one-off edits, but for anything you want to version, review, and reproduce - which is most real work - the manifests you applied here are the source of truth. This lesson used kubectl precisely so the exact objects are explicit; the UI would have created identical ones.
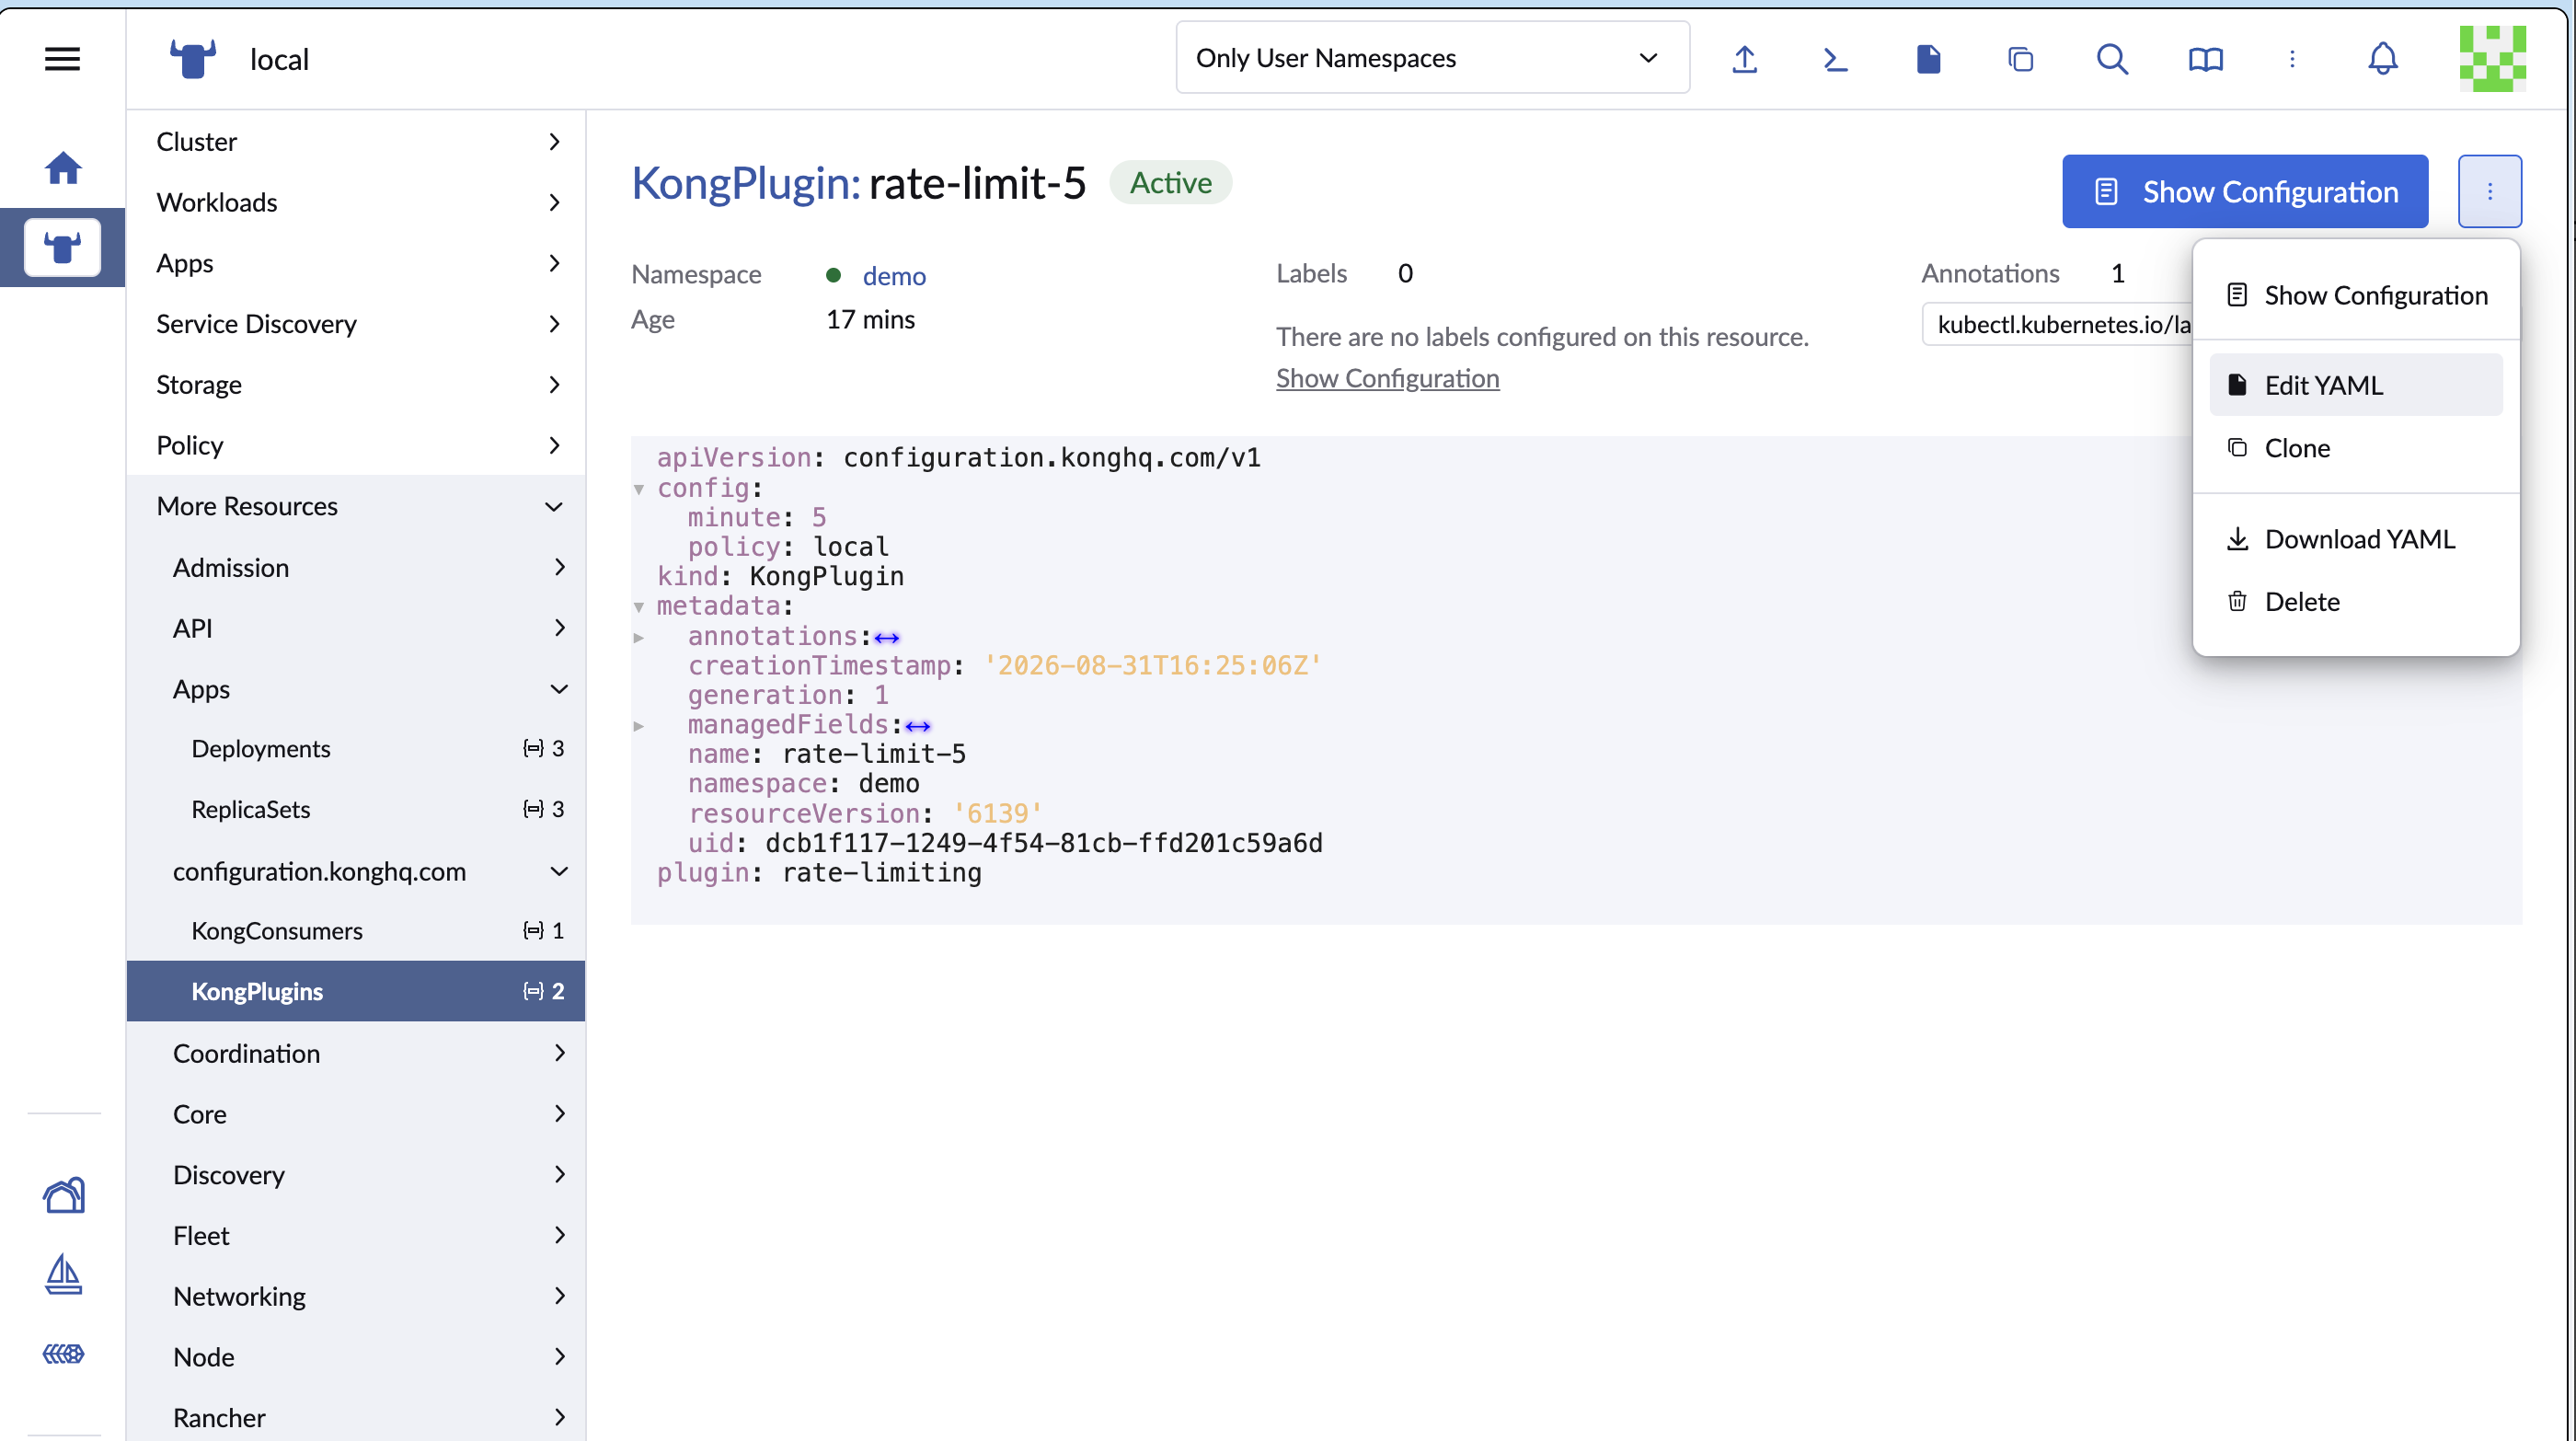
Editing the rate-limit-5 KongPlugin in Rancher's Cluster Explorer - the same YAML you applied with kubectl, just in the UI's generic resource editor.
Kong ships dozens more plugins the same way - request/response transformation, JWT and OAuth2 authentication, IP restriction, request logging, CORS - each a KongPlugin you attach with the same annotation. The pattern you learned here is the pattern for all of them.
- Previous lesson
- Deploying Platform Apps - Kong Gateway
- Next lesson
- Multi-Cluster Management