Multi-Cluster Management
Up to now you have worked with a single cluster - the one Rancher itself runs on. Rancher's real job, though, is to manage many clusters from one place. This lesson introduces that model by registering a second, independent Kubernetes cluster into Rancher and watching it come under management.
This playground gives you two separate clusters:
- The upstream (management) cluster runs Rancher. This is the
localcluster you have seen in the UI. It lives on therancher-servermachine - you do not open a terminal on it directly; you reach it through the Rancher tab for the UI and through the dev-machine terminal forkubectl(its kubeconfig points at this upstream cluster). - The downstream (user) cluster is a fresh, empty K3s cluster on the
downstream-01machine. It has never met Rancher. Bringing it under management is your task.
You drive everything from the dev-machine workstation, open the dashboard with the Rancher tab, and run the registration command on the downstream cluster through the downstream-01 terminal.
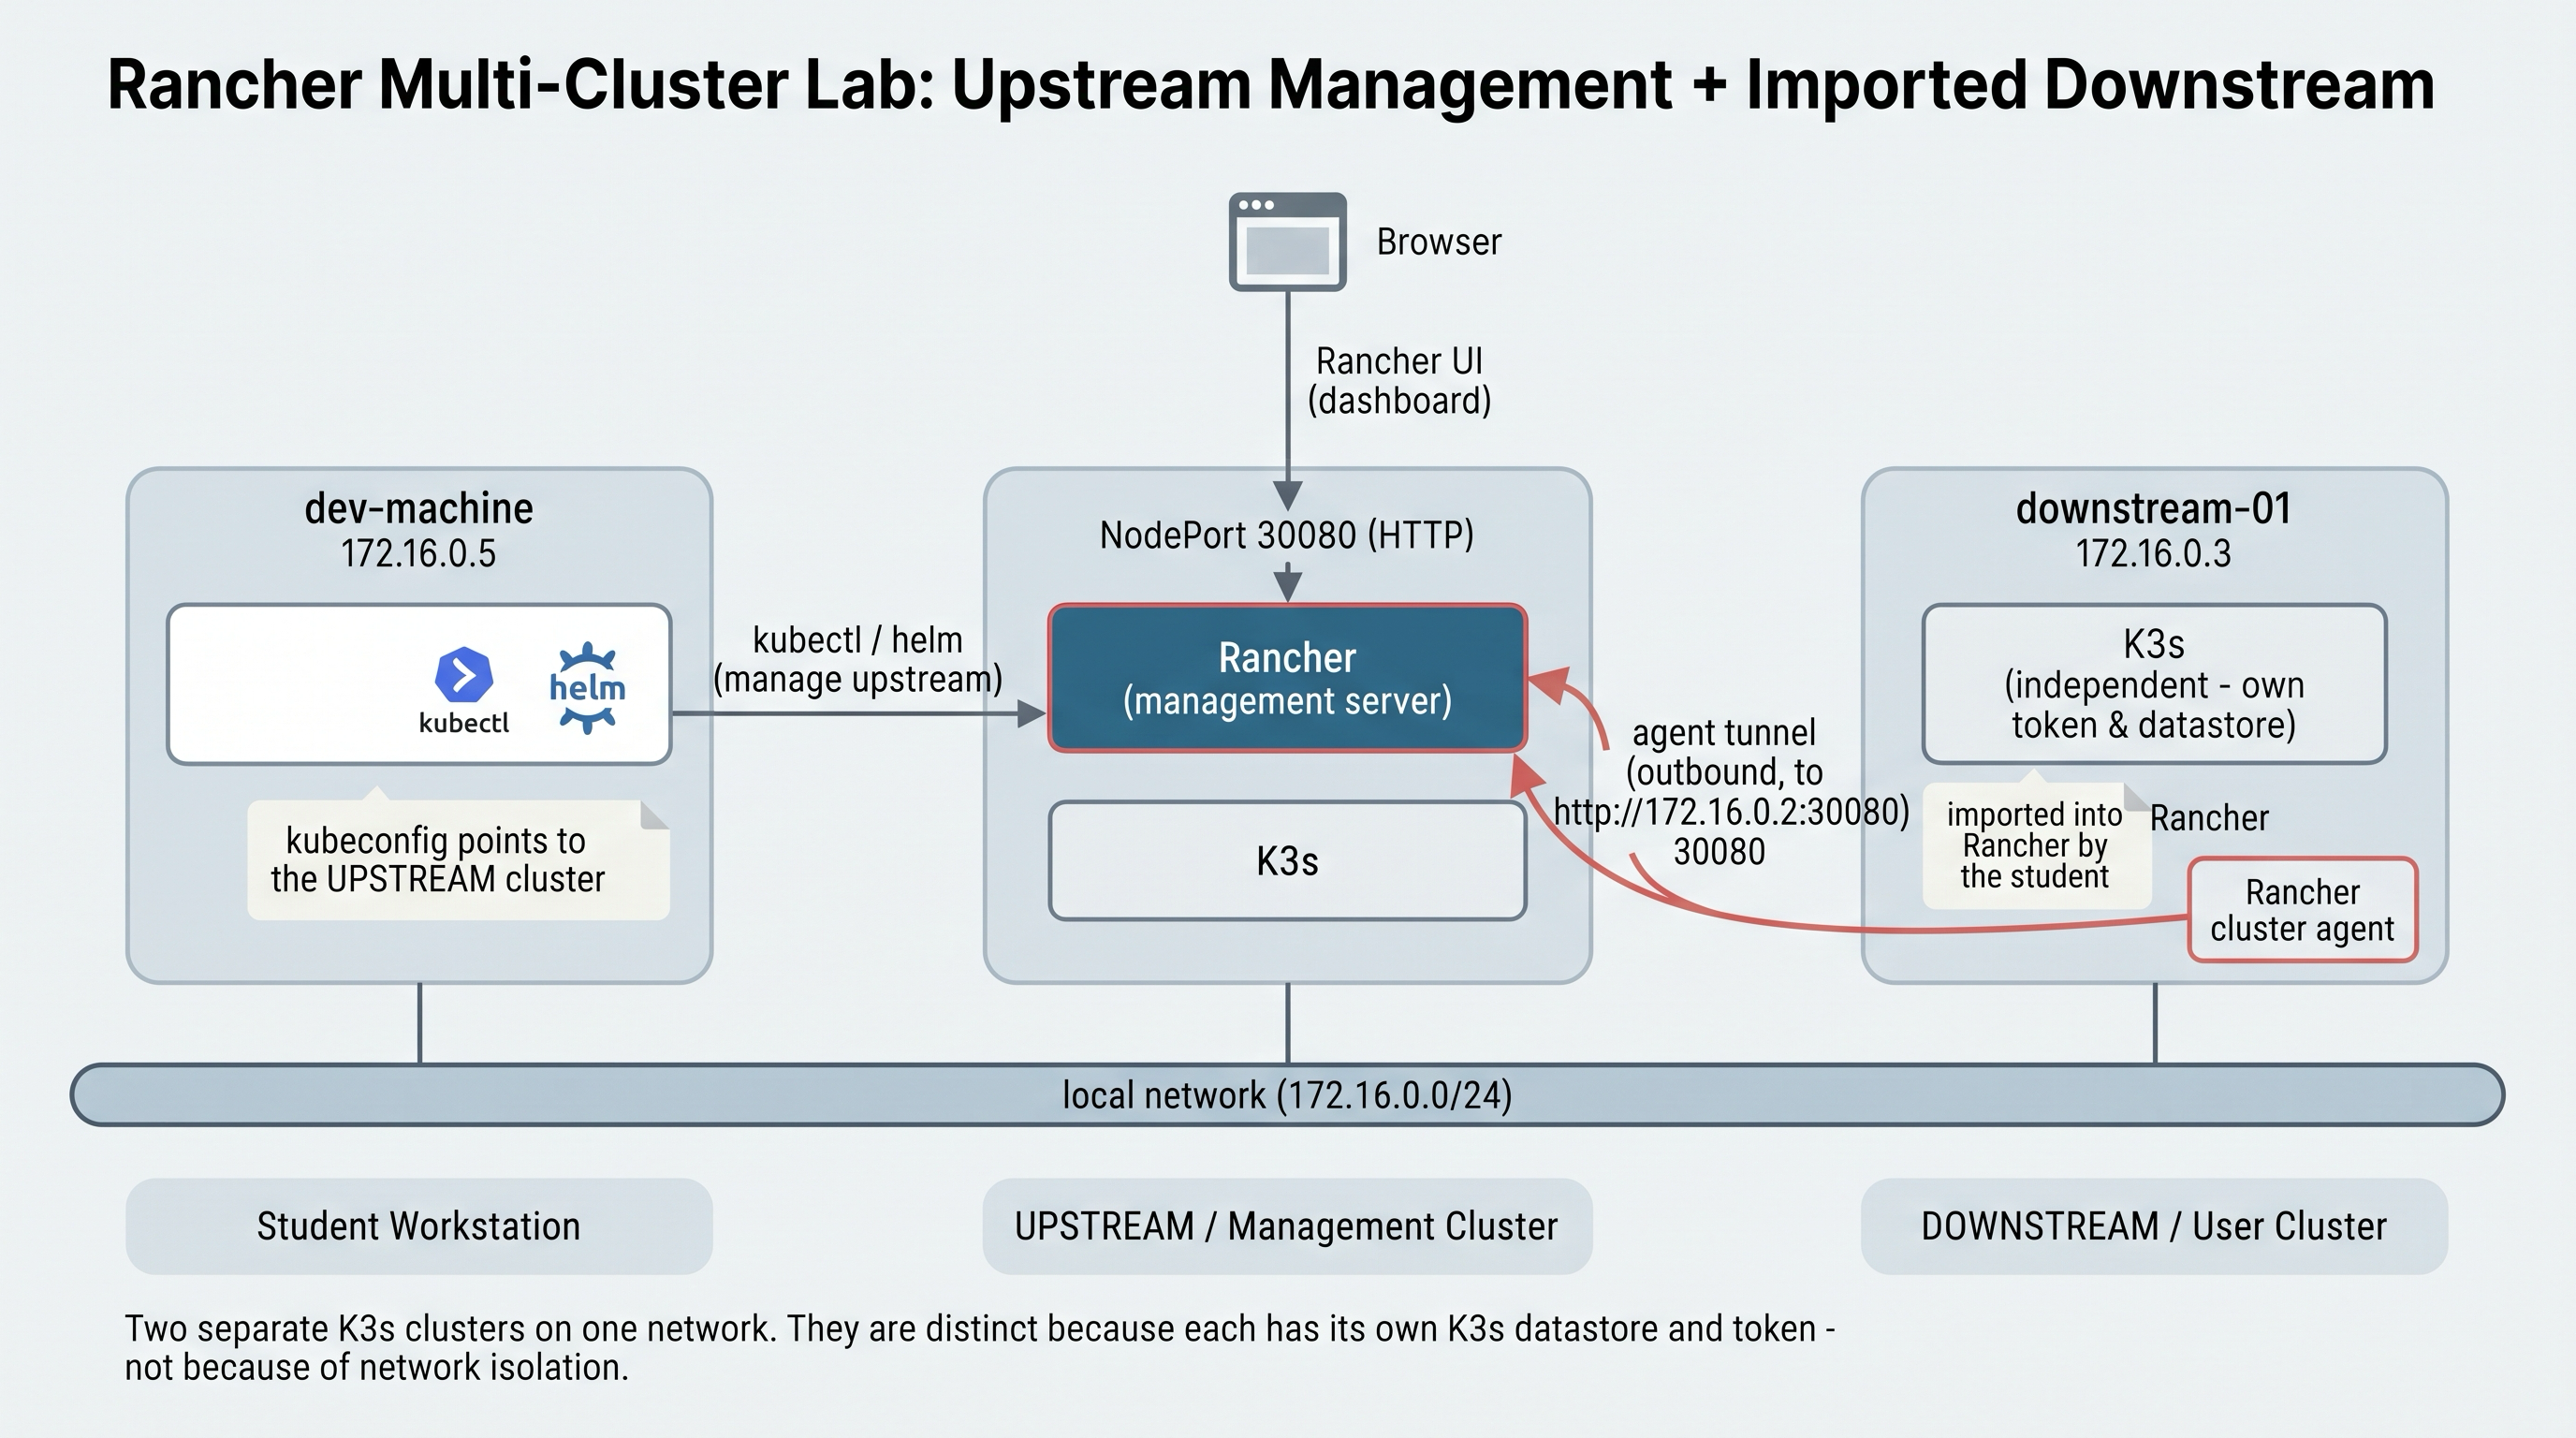
Rancher runs on the upstream management cluster; the downstream cluster's agent dials back over an outbound tunnel, so Rancher manages it without a direct inbound route.
Why keep Rancher and the downstream cluster separate?
Rancher's own architecture guidance is that the cluster running Rancher should be separate from the clusters it manages. The management cluster holds Rancher's state and the record of every cluster, user, and permission; the downstream clusters run your actual applications. Keeping them apart means a busy or failing workload cluster cannot take Rancher down with it, and it mirrors how real deployments are laid out. That is exactly the shape of this playground: Rancher on one cluster, your workloads destined for another.
Step 1: Confirm You Start With Only the Local Cluster
In the dev-machine terminal, list the clusters Rancher knows about:
kubectl get clusters.management.cattle.io
You should see a single entry named local - the cluster Rancher runs on. There is no downstream cluster yet, because we have not told Rancher about it.
What is a management Cluster object?
Rancher represents every cluster it manages as a clusters.management.cattle.io custom resource on the upstream cluster. The built-in one is always named local. When you import or provision another cluster, Rancher creates a new object here to track it - its state, its agent connection, and its access details. Listing these objects is a quick, UI-free way to see Rancher's fleet from the command line, and it is exactly what this lesson's checks look at.
Step 2: Start the Import in the Rancher UI
Open the Rancher tab and log in. Rancher here uses a self-signed certificate, so your browser shows a certificate warning the first time you open the tab - accept it to continue. From the home screen, click Import Existing (under Cluster Management > Clusters, use Import Existing).
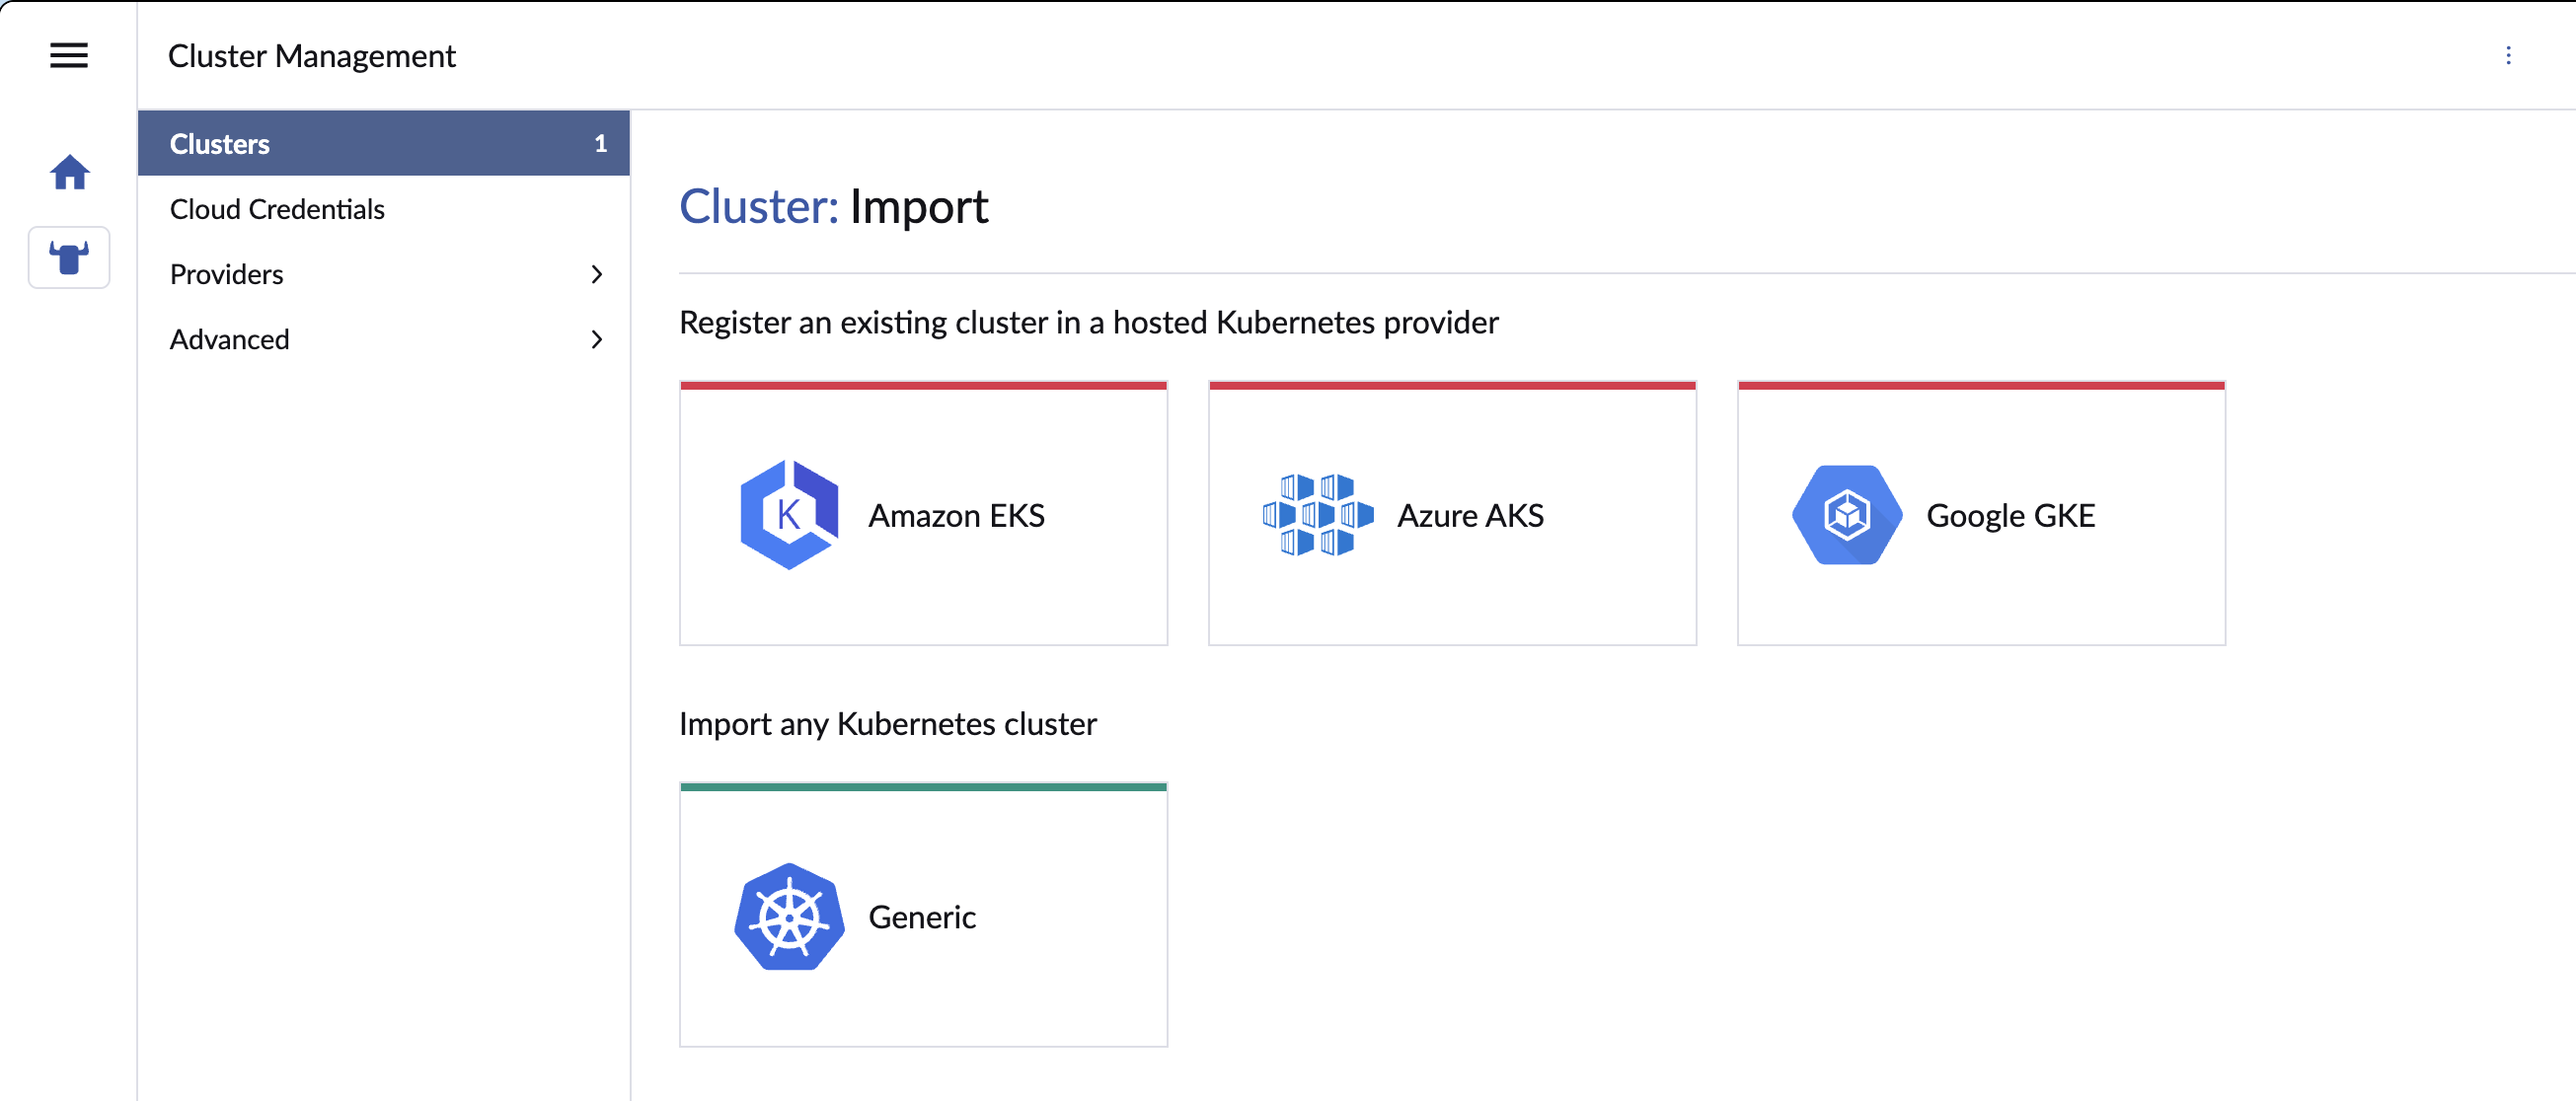
Cluster Management > Import Existing - choose how to register a cluster; Generic covers any standard Kubernetes cluster.
Why the browser warns about the certificate
This playground runs Rancher with a self-signed certificate - the same ingress.tls.source=rancher mode covered in the installation lesson. Because the certificate is signed by Rancher's own CA rather than a public authority, your browser does not trust it automatically and shows a warning. Accepting it is safe in this controlled lab. The same self-signed CA is what the downstream cluster's agent must trust to complete the import, which is why the registration command you use in the next step is the insecure variant.
Choose the Generic cluster type (this covers any standard Kubernetes cluster, which is what our downstream K3s is), give the cluster a name such as downstream, and click Create.
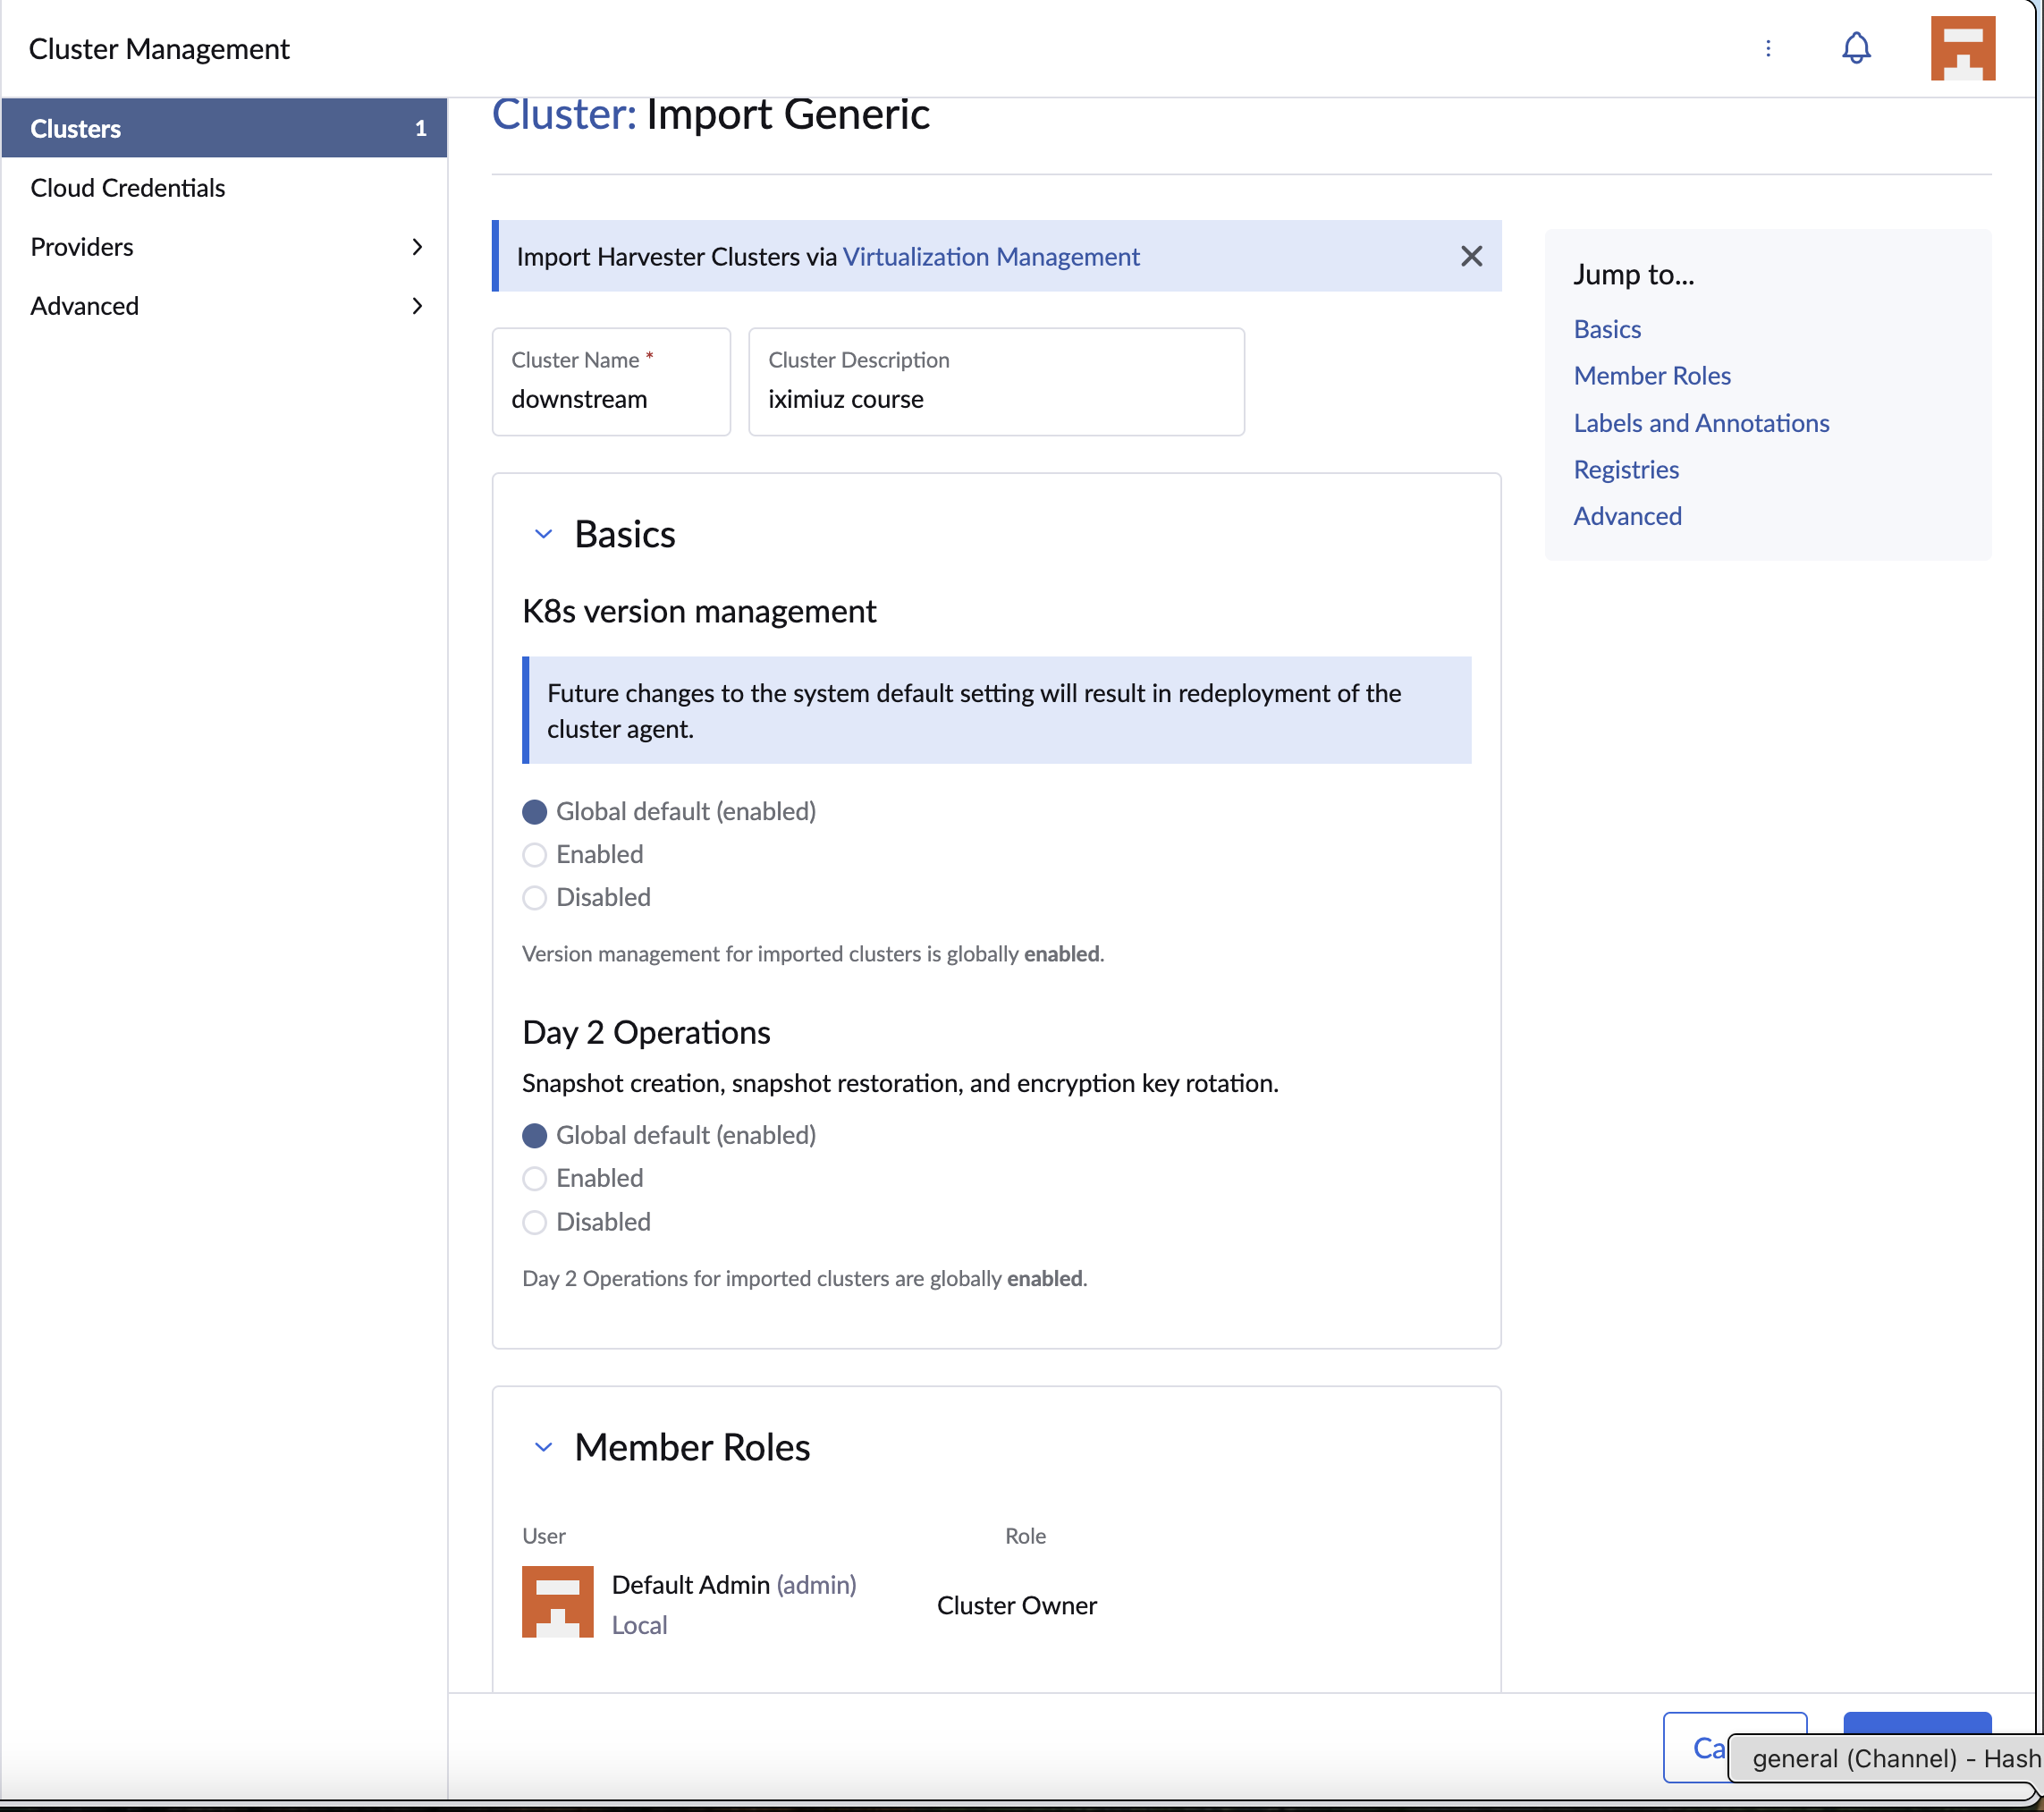
Naming the Generic import downstream before clicking Create.
Rancher then shows you a registration command - a kubectl apply of a manifest served from the Rancher server. That manifest installs the Rancher cluster agent into the target cluster, which dials back to Rancher and completes the registration.
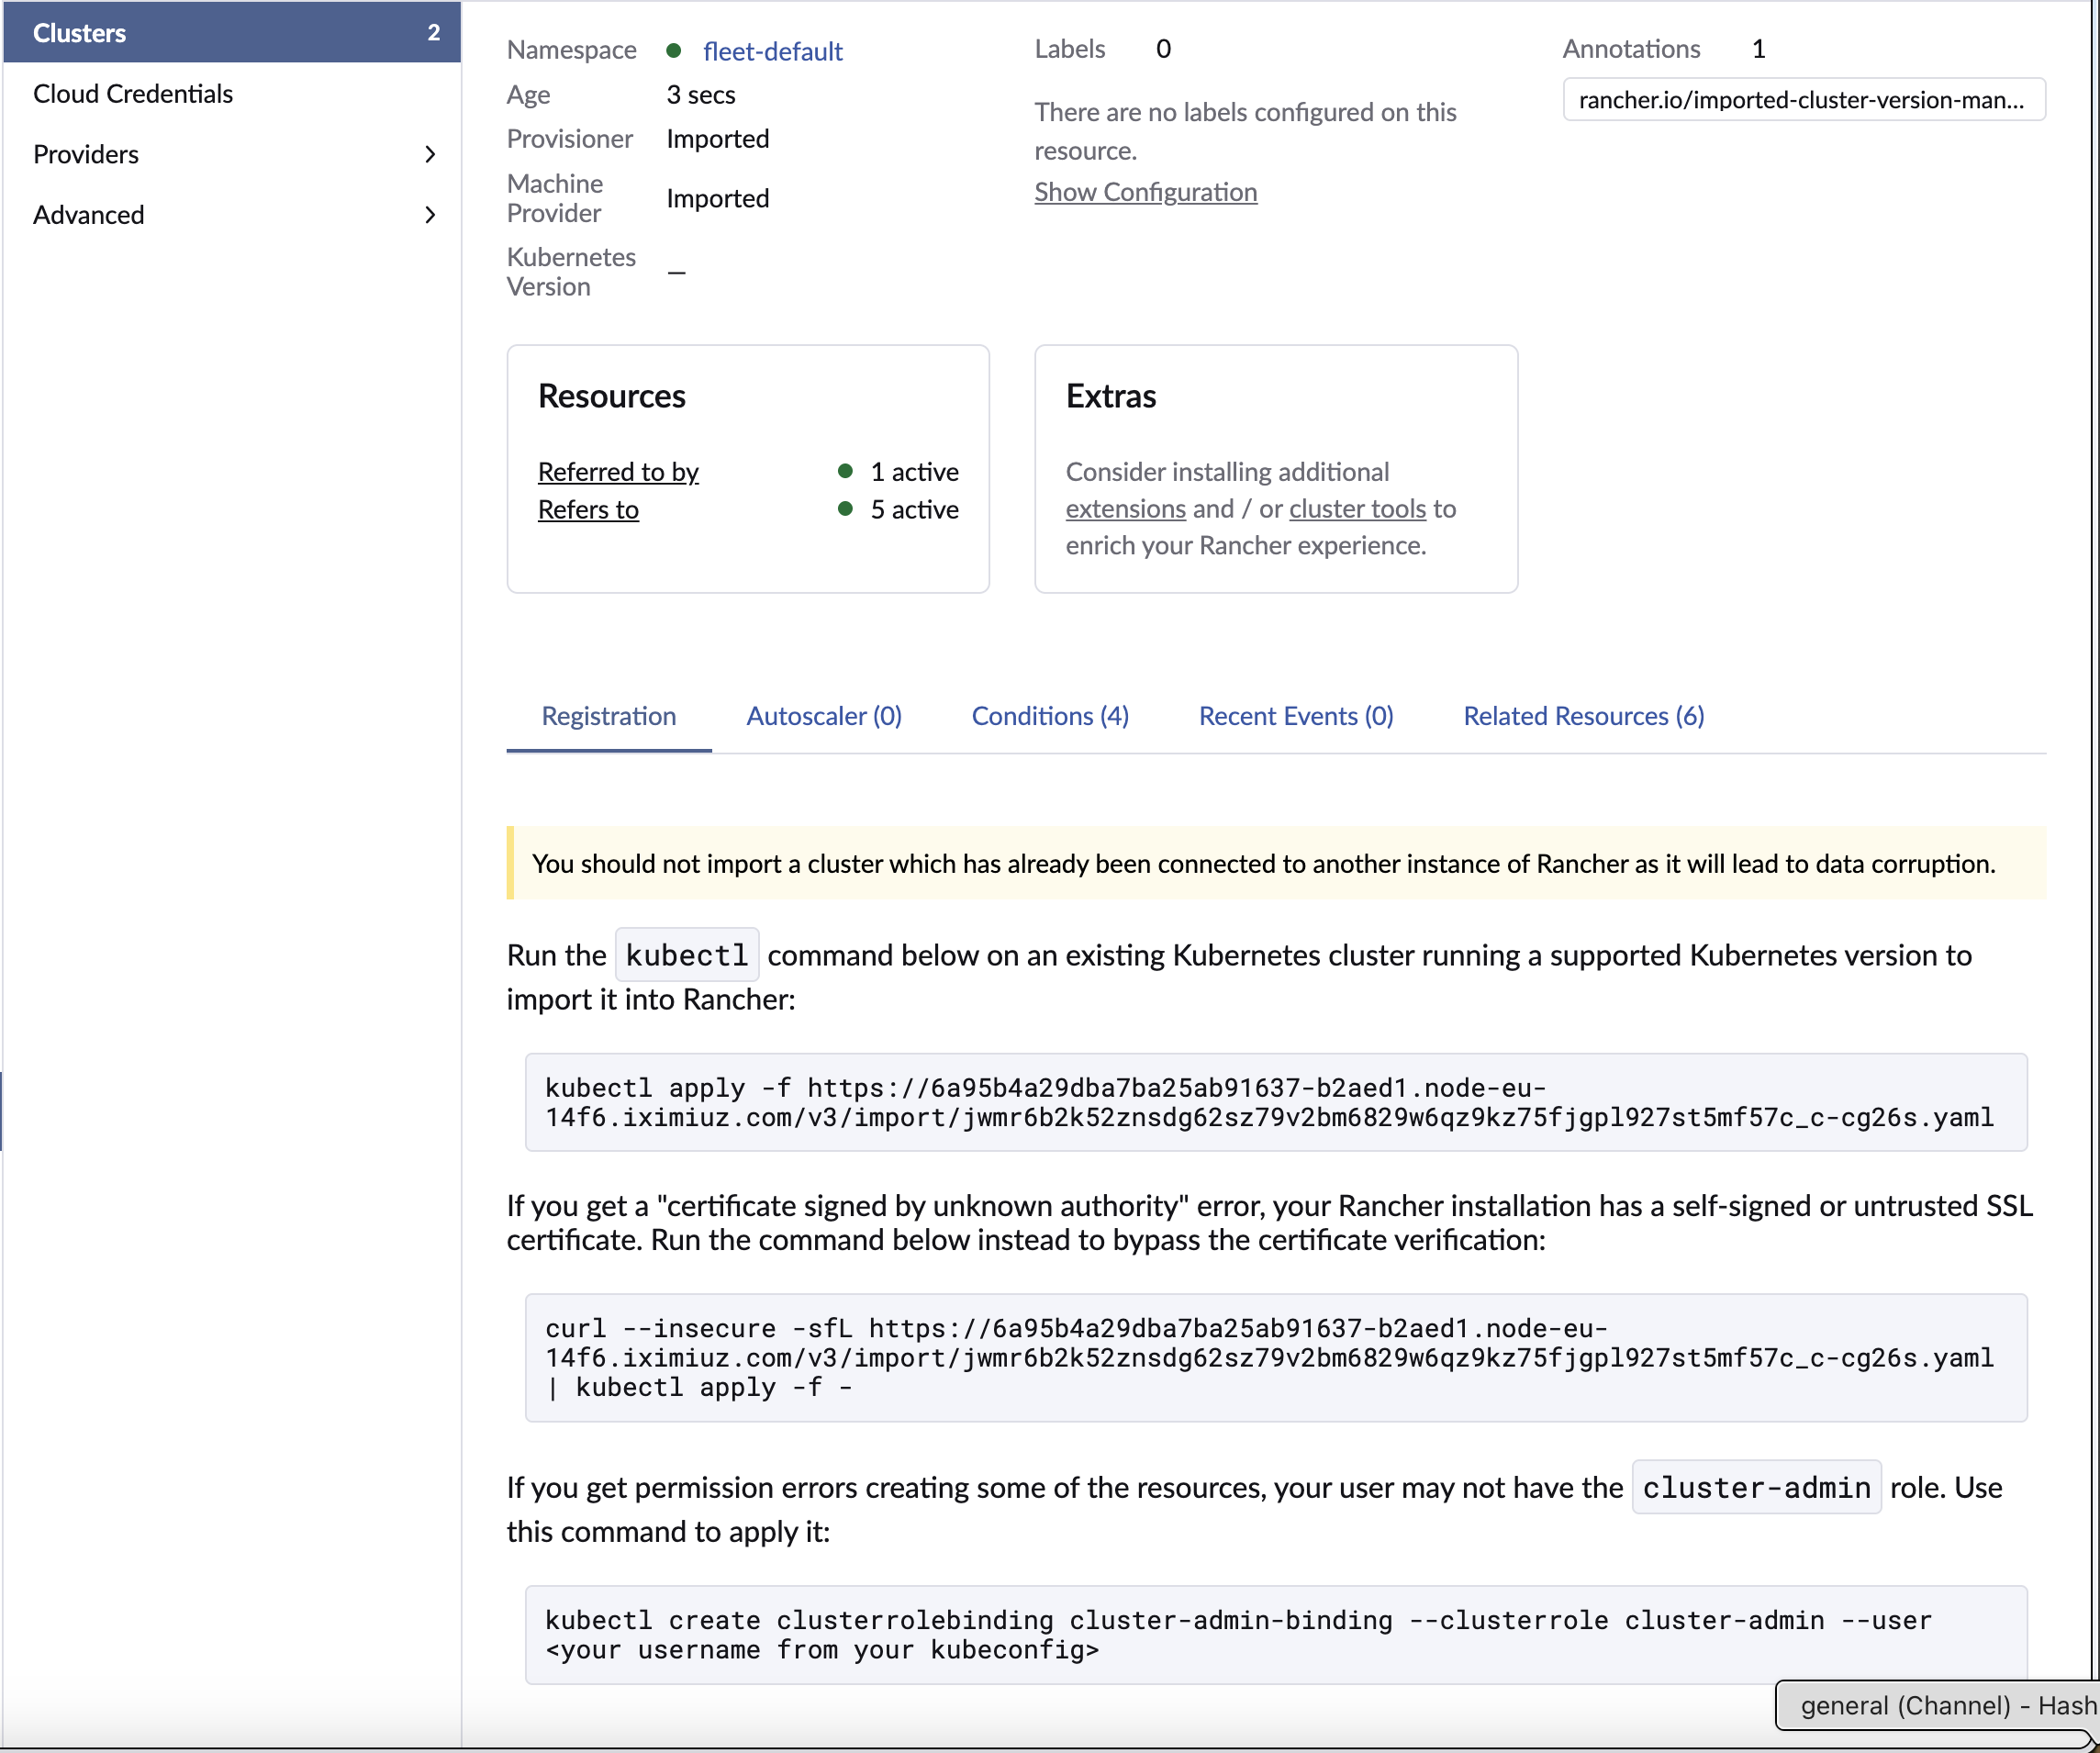
The registration command Rancher displays - a kubectl apply that installs the cluster agent on the downstream cluster. Use the insecure variant here (self-signed CA).
What does the registration command install?
The command applies a manifest that creates the cattle-system namespace on the downstream cluster and deploys the cluster agent (and a node agent) into it. The cluster agent opens an outbound tunnel to the Rancher server, so Rancher never needs a direct inbound route to the downstream API server - the agent calls home. Once the tunnel is up, Rancher can read and act on the downstream cluster through it. This is why an imported cluster works even when it sits behind a firewall or on a separate network, as our downstream cluster does here.
Step 3: Run the Registration Command on the Downstream Cluster
The registration screen shows more than one command. The first is a plain kubectl apply -f https://.../v3/import/....yaml - that one works only when Rancher has a trusted (publicly signed) certificate. Because this playground's Rancher uses a self-signed certificate, that plain command would fail with a certificate error. Use the second command instead - the one that begins with curl --insecure ... | kubectl apply -f -. The --insecure flag tells curl to accept Rancher's self-signed certificate when downloading the manifest.
Copy that curl --insecure ... | kubectl apply -f - command. Then open the downstream-01 terminal - this is a shell running on the downstream cluster itself - to run it. Run it on downstream-01, not on the dev-machine: the manifest must install the Rancher agent into the downstream cluster, and the dev-machine terminal targets the upstream cluster instead.
One adjustment before you run it. On this K3s node you are logged in as the laborant user, but K3s's kubeconfig (/etc/rancher/k3s/k3s.yaml) is readable only by root. If you run Rancher's command exactly as shown, kubectl cannot read that file and fails:
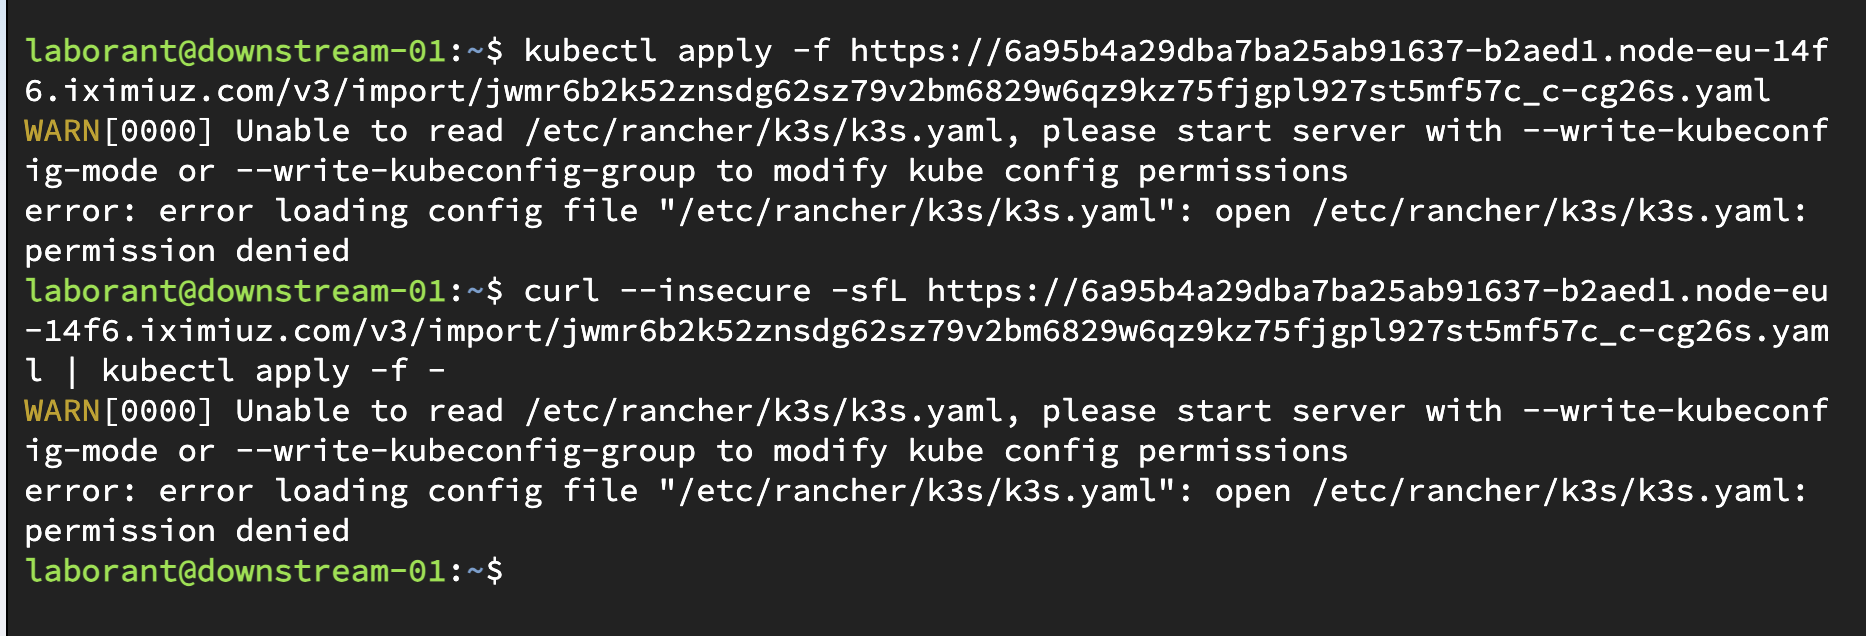
Running the raw command as laborant fails: the K3s kubeconfig is root-only.
Two adjustments are needed before the command will work here.
First, the hostname. The URL Rancher shows uses the address from your browser's tab - which in this playground is the iximiuz proxy hostname (something like 6a95...node-eu-14f6.iximiuz.com). That proxy requires a login, so the downstream node cannot fetch the manifest from it - curl would silently download an HTML sign-in page instead of the YAML, and kubectl would then fail with error validating "STDIN": invalid object. The downstream cluster must instead reach Rancher at its internal address on the lab network: 172.16.0.2.sslip.io:30443. So replace the hostname in the URL, keeping the /v3/import/....yaml path exactly as Rancher generated it.
Second, the permission fix above - use sudo k3s kubectl instead of plain kubectl.
Putting both together, the command to run on downstream-01 looks like this (substitute the /v3/import/....yaml path from your own registration screen):
curl --insecure -sfL "https://172.16.0.2.sslip.io:30443/v3/import/<YOUR-TOKEN>.yaml" | sudo k3s kubectl apply -f -
When it works, you will see a series of created lines - the cattle-system namespace, the cattle service account, cluster role bindings, a cattle-credentials-... secret, and the cattle-cluster-agent deployment and service. That agent is what connects back to Rancher.
Why swap the hostname? (the manifest downloads an HTML login page otherwise)
The registration URL Rancher displays is built from the address in your browser, which here is the authenticated iximiuz proxy (...iximiuz.com). A curl from the downstream node is not logged in to that proxy, so it receives the proxy's sign-in HTML page rather than the agent manifest - and kubectl apply then reports invalid object to validate because it was handed HTML, not YAML. Rancher's own server-url for this playground is the internal https://172.16.0.2.sslip.io:30443, which is directly reachable from the downstream cluster over the lab network. Fetching the same /v3/import/....yaml path from that internal address returns the real manifest.
Which of the three commands do I use?
Rancher's import screen shows three snippets:
- A plain
kubectl apply -f <url>- skip it. It fails here because Rancher's certificate is self-signed. - A
curl --insecure ... | kubectl apply -f -variant - use this one, changingkubectltosudo k3s kubectlfor the permission fix above. - A
kubectl create clusterrolebinding cluster-admin-binding ...line - skip it. That is a prerequisite for managed clusters (like GKE) where your kubeconfig user is not cluster-admin. K3s's admin user already has cluster-admin, so you do not need it.
Only command 2 matters on this playground, run in the downstream-01 terminal.
Which terminal am I in, and which cluster does it talk to?
This is the one place in the course where you deliberately work on a cluster node rather than from the workstation. The downstream-01 terminal is a shell on the downstream cluster's node, and its kubectl targets the downstream cluster. The dev-machine terminal, by contrast, targets the upstream Rancher cluster. Keep the two straight: you apply the agent manifest on downstream-01, and you verify the result from dev-machine (or in the Rancher UI).
Step 4: Watch the Cluster Become Active
Back in the Rancher UI, the new downstream cluster moves from Pending to Active as its agent connects and reports in. This can take a minute or two while the agent pods start.
Confirm it from the dev-machine terminal as well - Rancher created a management object for the imported cluster on the upstream:
kubectl get clusters.management.cattle.io
You now see a second entry alongside local.
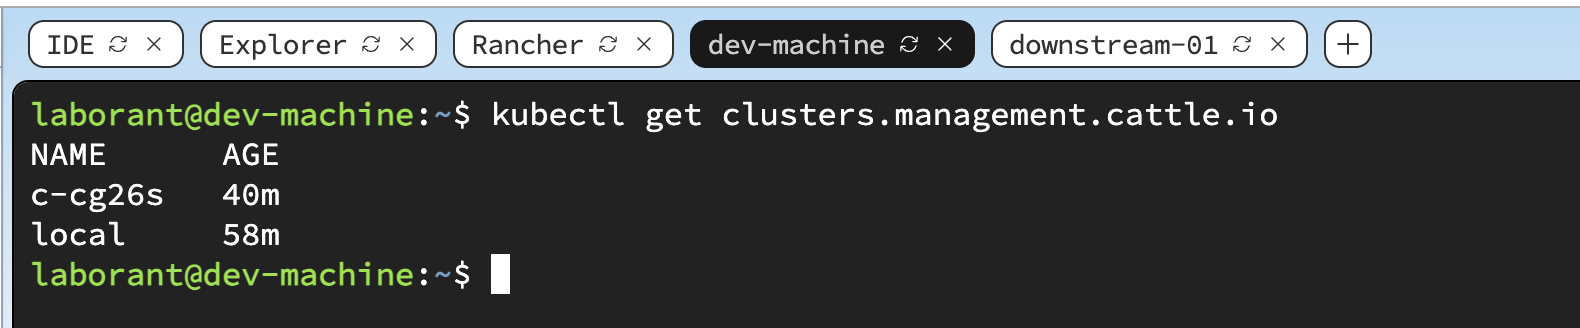
From the workstation, kubectl get clusters.management.cattle.io now lists the imported cluster next to local.
Importing vs Provisioning: Two Ways a Cluster Joins Rancher
What you did in this lesson is one of two distinct ways a cluster comes under Rancher. It is worth knowing both, because they answer different needs and people often confuse them.
- Import (what you just did) - the cluster already exists and is running. Rancher installs an agent into it and remote-controls it: workloads, namespaces, RBAC, monitoring, catalog apps. Rancher does not own the cluster's lifecycle - it did not create the cluster and cannot resize its nodes or upgrade its Kubernetes version. Import adopts what you already run.
- Provision - Rancher creates a brand-new cluster for you by calling out to infrastructure: a cloud provider's API (EKS, AKS, GKE), a VM platform (vSphere, a node driver), or bare machines you register. Rancher then owns the full lifecycle - it can scale node pools and upgrade Kubernetes versions from the Rancher UI, because it built the cluster.
The cluster type is a separate axis from this choice. "Generic" is simply the import option for any standard Kubernetes cluster (which is what your downstream K3s was); EKS/AKS/GKE can be either imported (adopt an existing one) or provisioned (have Rancher create a new one):
| Action | What happens | Rancher's role |
|---|---|---|
| Import - Generic | Adopt an existing standard cluster (K3s, on-prem, etc.) | Remote control |
| Import - EKS / AKS / GKE | Adopt an existing managed cloud cluster | Remote control |
| Provision - EKS / AKS / GKE / RKE2 | Rancher creates a new cluster | Full lifecycle owner |
This course teaches import, because it is the common day-one task - bringing the clusters you already run under one management plane - and it works self-contained in a lab. Provisioning is not hands-on here: creating a real cloud cluster needs live cloud credentials and bills real resources, and provisioning onto fresh VMs needs spare infrastructure and node drivers. The concept transfers directly though: same Rancher, same single pane of glass - the difference is only whether Rancher adopts a cluster or builds one.
A Look at Provisioning EKS (demonstration only)
The walkthrough below is a demonstration, not a lab exercise. There is nothing to run here - provisioning a real Amazon EKS cluster requires your own AWS account and credentials, and it creates billed cloud resources. Do not enter cloud credentials into this or any shared playground. The screenshots show the flow so you can recognize it when you do it later in an environment you control.
At a high level, provisioning EKS with Rancher looks like this:
- In Cluster Management, choose Create, then Amazon EKS.
- Add an AWS cloud credential (an access key scoped to the EKS/EC2 permissions Rancher needs). Rancher stores it and uses it to call the AWS API on your behalf.
- Pick the region, Kubernetes version, and a node group (instance type and count).
- Click Create. Rancher calls AWS, EKS provisions the control plane and node group, and the cluster moves to Active - now managed in Rancher alongside your other clusters.
- Because Rancher built this cluster, it owns the lifecycle: you can scale the node group and upgrade the Kubernetes version from the Rancher UI - the difference from an imported cluster.
Provisioning vs importing EKS - the practical difference
If you import an existing EKS cluster, Rancher remote-controls its workloads but leaves node pools and version upgrades to the AWS console. If you provision EKS through Rancher (the flow above), Rancher owns that lifecycle too - scaling and upgrades happen from Rancher. Same destination (an EKS cluster managed by Rancher), different amount of control depending on who created it. When you try this in your own account, remember to delete the cluster afterward so it stops billing, and revoke the temporary credentials you used.
Is this like Terraform?
It reaches the same outcome as Terraform - declare a cluster, and something calls the cloud API to build it - but the mechanism is different.
Terraform is a run-it-yourself tool. You write a declarative config, run terraform apply, and its AWS provider converges reality to your config once, then stops until you run it again. You manage the state file, and ongoing changes mean another apply.
Rancher provisioning is a continuous controller. When you fill in the Create form, Rancher stores your intent as a custom resource on the management cluster, and a built-in operator (for EKS, Rancher's EKS operator) reconciles it - calling the AWS API to create the control plane, node groups, and IAM wiring. Crucially, that controller keeps running: change the node count or Kubernetes version later and it reconciles the difference automatically, no manual re-run. It is the Kubernetes "desired state, continuously reconciled" model applied to whole clusters.
| Terraform | Rancher provisioning | |
|---|---|---|
| Model | Declarative, applied on demand | Declarative, continuously reconciled |
| Engine | Terraform CLI + provider plugins | Kubernetes controllers / operators |
| State | A state file you manage | Custom resources in the management cluster |
| Ongoing changes | Re-run terraform apply | Edit the spec; the controller reconciles it |
Both call the same kind of cloud APIs underneath. The difference is that Terraform converges once per run, while Rancher keeps the cluster matching your spec the way an operator keeps a Deployment matching its replica count.
You're Done
You registered a separate, independent cluster into Rancher and watched it come under management through the cluster agent. From here, Rancher can deploy to, monitor, and control the downstream cluster exactly as it does the local one - and you can switch between them from the cluster picker in the UI.
Two things worth being clear about as a conclusion. First, the downstream cluster was a real, running Kubernetes cluster the whole time - importing did not create it. What importing produced is two distinct things: a management record on the upstream (the clusters.management.cattle.io object, Rancher's handle for the cluster) and a live agent running inside the downstream cluster that connects the two. The record is a definition; the cluster behind it is a live system, and the agent is what makes Rancher's control of it real rather than just an entry in a list. Second, Rancher here is a remote control, not a new owner: it manages the cluster in place, it did not move or re-provision it.
What does importing look like for EKS, AKS, or GKE?
The same "install an agent, connect it to Rancher" flow applies to a managed cloud cluster - and the key point is that Rancher is a remote control over a cluster the cloud provider still owns, not a re-creation of it.
When you import an existing EKS (AWS), AKS (Azure), or GKE (Google) cluster:
- The cluster keeps running on the cloud provider, on its control plane, billed by them. Nothing moves.
- Rancher installs the same cluster agent into it, and from then on you manage its workloads, namespaces, RBAC, monitoring, and catalog apps through Rancher's single pane of glass alongside all your other clusters.
- What Rancher does not do for a purely imported managed cluster is control the cloud control plane itself. You cannot resize the node pool or upgrade the Kubernetes version from Rancher - those stay in the AWS/Azure/GCP console, because the provider owns that lifecycle.
There is a separate mode - provisioning - where Rancher creates the cluster in the cloud through the provider's API and then manages its full lifecycle, including scaling and upgrades. That is a different workflow from importing. Importing adopts a cluster that already exists; provisioning builds a new one. This lesson did an import, which is the more common day-one task: bring the clusters you already run under one management plane.
The challenge below has you do the import on your own and confirm the cluster reaches the Active state. Solving it records your progress.
- Previous lesson
- Gateway Policies with Kong Plugins
- Next lesson
- GitOps with Rancher Fleet