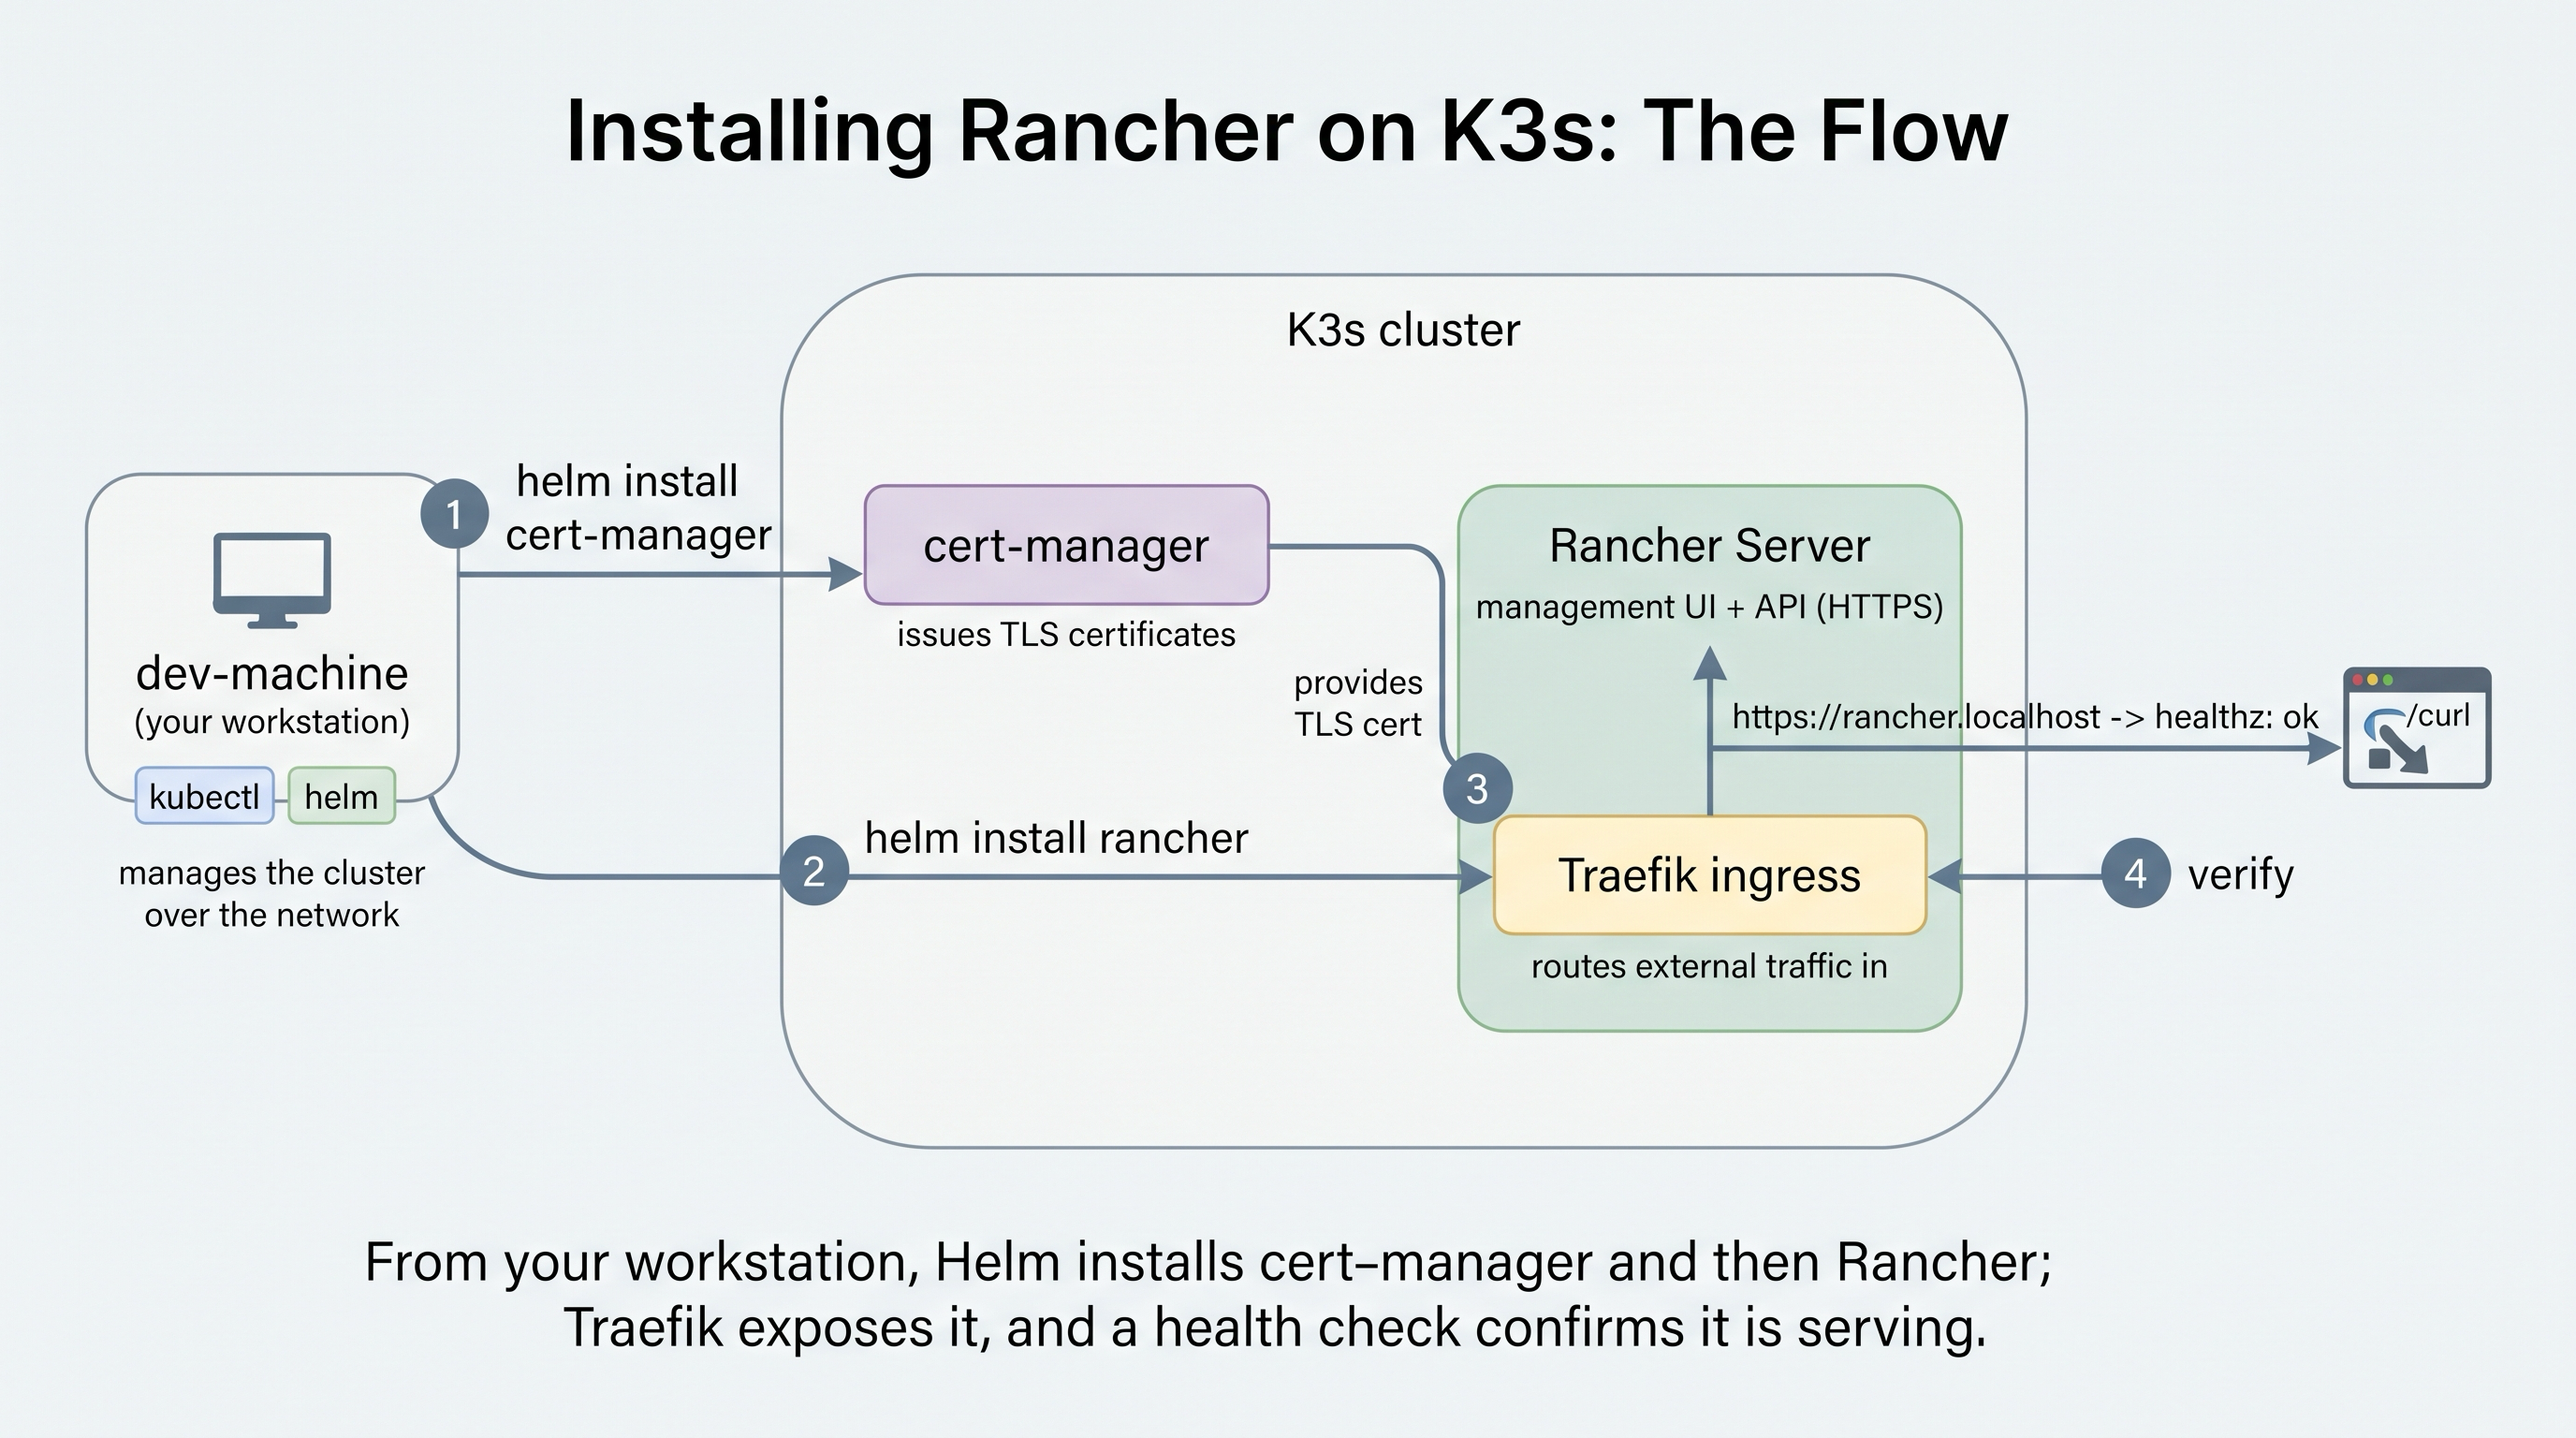
This lesson walks you through a full Rancher installation on a K3s cluster. You will install cert-manager for TLS certificate management, then install Rancher itself using Helm, exposing it through the Traefik ingress controller that ships with K3s. Run every command in this lesson from the dev-machine terminal.
Use the dev-machine terminal for every command in this lesson. This playground has several machines, and each terminal tab logs you into a different one. The dev-machine is your workstation - it has kubectl and helm installed. Switch to the dev-machine tab before you begin and stay there throughout.
This mirrors how you would work in the real world: an operator manages a cluster from their own workstation using cluster credentials, rather than logging into the control-plane node directly. cert-manager and Rancher are deployed into the cluster with Helm, which talks to the Kubernetes API server over the network - so you never need a shell on the control plane, and you never install anything on the worker nodes by hand. You declare what should run; Kubernetes decides where it runs.
Confirm You Are on the Workstation
Before anything else, make sure your terminal is on dev-machine. Print the machine's hostname:
hostname
It must return dev-machine. If it shows anything else (like cplane-01 or node-01), switch to the dev-machine terminal tab and run it again.
Confirm Your Workstation Reaches the Cluster
Your workstation already has cluster credentials configured (a kubeconfig at ~/.kube/config), so kubectl and helm can talk to the cluster right away. Confirm it:
kubectl get nodes
All three nodes (cplane-01, node-01, node-02) should report Ready.
And confirm Helm is available:
helm version
What is a kubeconfig, and how did it get here?
A kubeconfig is the file kubectl and helm read to find a cluster: its API server URL, a cluster CA certificate to trust, and your credentials. By convention it lives at ~/.kube/config.
On this playground the kubeconfig was placed on your workstation for you, already pointed at the cluster's network address - so you arrive ready to work, the way a consultant would after being handed credentials for an engagement.
In a Rancher-managed environment, the usual way to get one is to download it straight from the Rancher UI: Rancher generates a kubeconfig scoped to your permissions and pointed at the right endpoint. You will see exactly where to do that in the next lesson.
What is Helm?
Helm is the package manager for Kubernetes - think apt or brew, but for Kubernetes applications. Instead of applying a pile of individual YAML manifests by hand, you install a chart: a versioned, parameterized package that bundles all the resources an application needs.
The pieces you will use in this lesson:
- Chart - the package itself (for example,
cert-managerorrancher), describing all the Kubernetes objects to create. - Repository - a place charts are published and pulled from.
helm repo addregisters one (like adding a package source). - Release - a specific install of a chart into your cluster, with a name you choose.
helm install rancher ...creates a release calledrancher. - Values - the knobs you tune with
--set, such as--set hostname=rancher.localhost. They let one chart produce different configurations without editing its templates.
Helm is a graduated CNCF project and comes pre-installed on your workstation, so it is ready to use. Every install step in this lesson is a helm install - you are packaging-managing Rancher and its prerequisites rather than hand-writing manifests.
Check that Traefik is already running as the ingress controller:
kubectl -n kube-system get pods | grep traefik
You should see a traefik-* pod in Running state.
A bit of background on Traefik
Traefik is an open-source reverse proxy and ingress controller first released in 2015 by Traefik Labs (formerly Containous), a company founded by Emile Vauge. It was one of the first proxies designed for dynamic, container-native environments, discovering services automatically instead of relying on static configuration files.
A few facts that matter here:
- It is K3s's default ingress controller. K3s bundles Traefik out of the box, which is why this cluster can route external traffic to Rancher without you installing anything extra.
- Automatic service discovery. Traefik watches the Kubernetes API (and other providers) and reconfigures its routes on the fly as Ingress resources appear or change - no reloads required.
- Ingress class
traefik. When you install Rancher later in this lesson, you point its Ingress at this controller with thetraefikingress class. - Written in Go. Like Kubernetes and K3s themselves, Traefik is written in Go, which keeps it lightweight and easy to ship as a single binary - a good match for K3s's small footprint.
You do not need to configure Traefik in this course; it simply provides the front door through which you will reach the Rancher UI.
What about NGINX?
NGINX is an equally valid choice, and in many Rancher installations it is the ingress controller people reach for. It began as a web server and reverse proxy written by Igor Sysoev, first released in 2004, and quickly became one of the most widely deployed web servers in the world thanks to its event-driven design and low memory footprint. The company behind it, NGINX Inc., was acquired by F5 in 2019, and the project continues as both an open-source server and commercial products.
In the Kubernetes world, the community ingress-nginx controller wraps NGINX as an Ingress controller. It is mature, heavily documented, and the default many Rancher guides assume - Rancher's own docs frequently show installing ingress-nginx before Rancher on clusters that ship without an ingress controller.
So why does this course use Traefik instead?
- It is already here. This K3s playground ships Traefik enabled, so there is nothing extra to install. Adding
ingress-nginxwould mean installing and configuring a second controller for no real benefit in this environment. - Fewer moving parts. One ingress controller keeps the lesson focused on Rancher rather than on ingress setup.
- The concepts transfer. Whether the controller is Traefik or NGINX, Rancher creates a standard Kubernetes Ingress; only the ingress class name changes (
traefikvsnginx). What you learn here applies directly to an NGINX-based cluster.
If you later install Rancher on a cluster that uses NGINX, the only real difference is setting --set ingress.ingressClassName=nginx and installing ingress-nginx first.
Step 1: Install cert-manager
cert-manager automates issuing and renewing the TLS certificates that Rancher relies on. Add the Jetstack Helm repository:
New to TLS? Read this first
TLS (Transport Layer Security) is the technology that puts the "S" in HTTPS. It does two things when your browser talks to a server like Rancher:
- Encryption - it scrambles the traffic so nobody on the network can read your password or session as it travels between your browser and the server.
- Identity - it proves the server really is who it claims to be, using a certificate: a small signed file that vouches for the server's hostname.
Certificates are issued by a Certificate Authority (CA) and they expire, so they have to be renewed periodically. Doing that by hand across many services is tedious and error-prone - which is exactly the chore cert-manager automates inside Kubernetes. When you see "TLS certificate" in this lesson, think "the credential that lets your browser trust and encrypt its connection to Rancher."
helm repo add jetstack https://charts.jetstack.io
helm repo update
If you see connection reset by peer: this is a transient network hiccup, not a permissions problem. Wait a moment and re-run the two commands above. helm repo add is safe to repeat.
Wait, what is Jetstack?
Jetstack is the name in the Helm repository URL (charts.jetstack.io), and it is worth knowing why it is there. Jetstack was a UK-based Kubernetes consultancy that created cert-manager, the project you are about to install. cert-manager became the de facto standard for automating TLS certificate issuance and renewal in Kubernetes - talking to issuers like Let's Encrypt, HashiCorp Vault, or a cluster's own self-signed CA, and keeping certificates rotated before they expire.
A few relevant facts:
- Acquired by Venafi (2020), then part of CyberArk. Jetstack was acquired by the machine-identity company Venafi in 2020; Venafi itself was later acquired by CyberArk. The Helm repository kept the historical
jetstackname. - cert-manager is a CNCF project. It was donated to the Cloud Native Computing Foundation and is maintained in the open, independent of any single vendor.
- Why Rancher needs it. Rancher serves its UI and API over HTTPS. cert-manager provisions and renews the certificate behind that endpoint - which is why it must be installed before Rancher.
So jetstack/cert-manager simply means "the cert-manager chart, published in the repository historically maintained by Jetstack." You are installing cert-manager, not a separate Jetstack product.
Install cert-manager along with its Custom Resource Definitions:
helm install cert-manager jetstack/cert-manager \
  --namespace cert-manager \
  --create-namespace \
  --set crds.enabled=true
What is a Custom Resource Definition (CRD)?
Kubernetes ships with built-in object types like Pods, Deployments, and Services. A Custom Resource Definition (CRD) lets a project teach the Kubernetes API about brand-new object types of its own.
Once a CRD is installed, the cluster understands those new objects and you can create and manage them with kubectl exactly like the built-in ones. cert-manager, for example, adds types such as Certificate, Issuer, and ClusterIssuer - so you can request a certificate by writing a Certificate object, and cert-manager's controller does the rest.
That is why --set crds.enabled=true matters: it installs those definitions so the rest of cert-manager (and later Rancher, which relies on them) has the object types it needs. CRDs are the standard way tools extend Kubernetes without modifying Kubernetes itself.
Wait for all three cert-manager components to become ready:
kubectl -n cert-manager rollout status deployment/cert-manager
kubectl -n cert-manager rollout status deployment/cert-manager-webhook
kubectl -n cert-manager rollout status deployment/cert-manager-cainjector
cert-manager runs as three separate deployments, each with its own job:
cert-manager- the main controller. It watchesCertificate,Issuer, and related objects and drives the actual work of requesting and renewing certificates.cert-manager-webhook- an admission webhook that validates and mutates cert-manager resources as they are created, so misconfigured objects are rejected before they reach the controller.cert-manager-cainjector- a helper that injects CA certificates into places that need to trust them (for example, into the webhook's own configuration).
All three must be ready before cert-manager can issue the certificate Rancher depends on - which is why the check below waits for every one of them.
Step 2: Install Rancher
Add the Rancher stable Helm repository:
helm repo add rancher-stable https://releases.rancher.com/server-charts/stable
helm repo update
Which edition of Rancher is this?
This course installs the community edition of Rancher, published from releases.rancher.com. It is free and open source under the Apache License 2.0, which permits using, modifying, and distributing the software freely. There is no license key, trial period, or usage restriction - it is the same Rancher codebase maintained in the open at github.com/rancher/rancher.
SUSE also offers a separate commercial product, SUSE Rancher Prime, which adds enterprise support, hardened images, and extra features on top of the same core. This course does not install Rancher Prime and does not require any SUSE subscription.
In short: everything you do here uses freely licensed, open-source software.
This is a general summary of the projects' public licensing, not legal advice.
Create the namespace Rancher runs in:
kubectl create namespace cattle-system
Ever wondered about the cattle- prefix? It nods to the well-known "pets vs. cattle" analogy in infrastructure: pets are servers you name and nurse back to health, while cattle are identical, disposable instances you replace rather than repair. Rancher (the name itself is a wink at herding cattle) embraces that cloud-native mindset, and its internal namespaces - cattle-system, cattle-fleet-system, and friends - carry the theme through.
Install Rancher with a self-signed certificate, which is appropriate for a learning environment. The ingressClassName=traefik setting tells Rancher to expose its UI through the ingress controller that K3s already provides:
helm install rancher rancher-stable/rancher \
  --namespace cattle-system \
  --set hostname=rancher.localhost \
  --set bootstrapPassword=admin \
  --set ingress.tls.source=rancher \
  --set ingress.ingressClassName=traefik \
  --set replicas=1
The hostname becomes the Rancher URL, bootstrapPassword is the initial admin password, and replicas=1 keeps things light for this cluster. The ingress.tls.source=rancher setting is the important one for certificates: it tells Rancher to generate and manage its own self-signed certificate.
How Rancher gets its TLS certificate (self-signed vs Let's Encrypt vs your own)
Rancher serves its UI and API over HTTPS, so it always needs a TLS certificate. The ingress.tls.source value chooses where that certificate comes from, and there are three options worth knowing because the right one depends on the environment:
rancher- Rancher-generated self-signed (what this course uses). Rancher creates its own Certificate Authority and issues its own certificate through cert-manager. It has no external dependencies, works offline, and comes up immediately. The tradeoff is that nothing outside the cluster trusts that CA by default, so browsers show a certificate warning, and any cluster you later import has to be given Rancher's CA so its agent can trust the connection. This is the standard quick-start and proof-of-concept choice.letsEncrypt- a real, publicly trusted certificate. cert-manager requests a certificate from Let's Encrypt, which is trusted by browsers automatically, so there are no warnings and no CA to distribute. It requires a real public DNS name for Rancher and inbound reachability so Let's Encrypt can validate the domain. This is a common choice for internet-facing Rancher installations.secret- bring your own certificate. You supply a certificate issued by your organization's internal CA or a commercial CA, stored in a Kubernetes secret. This suits enterprise and private or air-gapped environments where machines already trust the corporate CA and Rancher sits behind a load balancer.
Which one resembles production? There is no single answer - it splits by environment. Internet-facing Rancher tends toward Let's Encrypt; enterprise or private Rancher tends toward bring-your-own with a corporate CA. Self-signed is the outlier: excellent for learning, not intended for production. We use it here precisely because a throwaway playground has no public DNS and no corporate CA, and because it makes the certificate-trust flow visible - something you will see directly in Module 3 when an imported cluster's agent has to trust this self-signed CA to connect.
This is a general summary of Rancher's TLS options, not a security recommendation for any specific deployment.
Why only one replica? replicas controls how many copies of the Rancher server pod run. In production you would use replicas=3 so Rancher stays available if a node or pod fails - three copies spread across nodes give high availability. In this learning environment none of that matters: a single replica uses less CPU and memory, starts faster, and is perfectly fine for a throwaway cluster where an outage costs nothing. So we trade high availability for a lighter, quicker install.
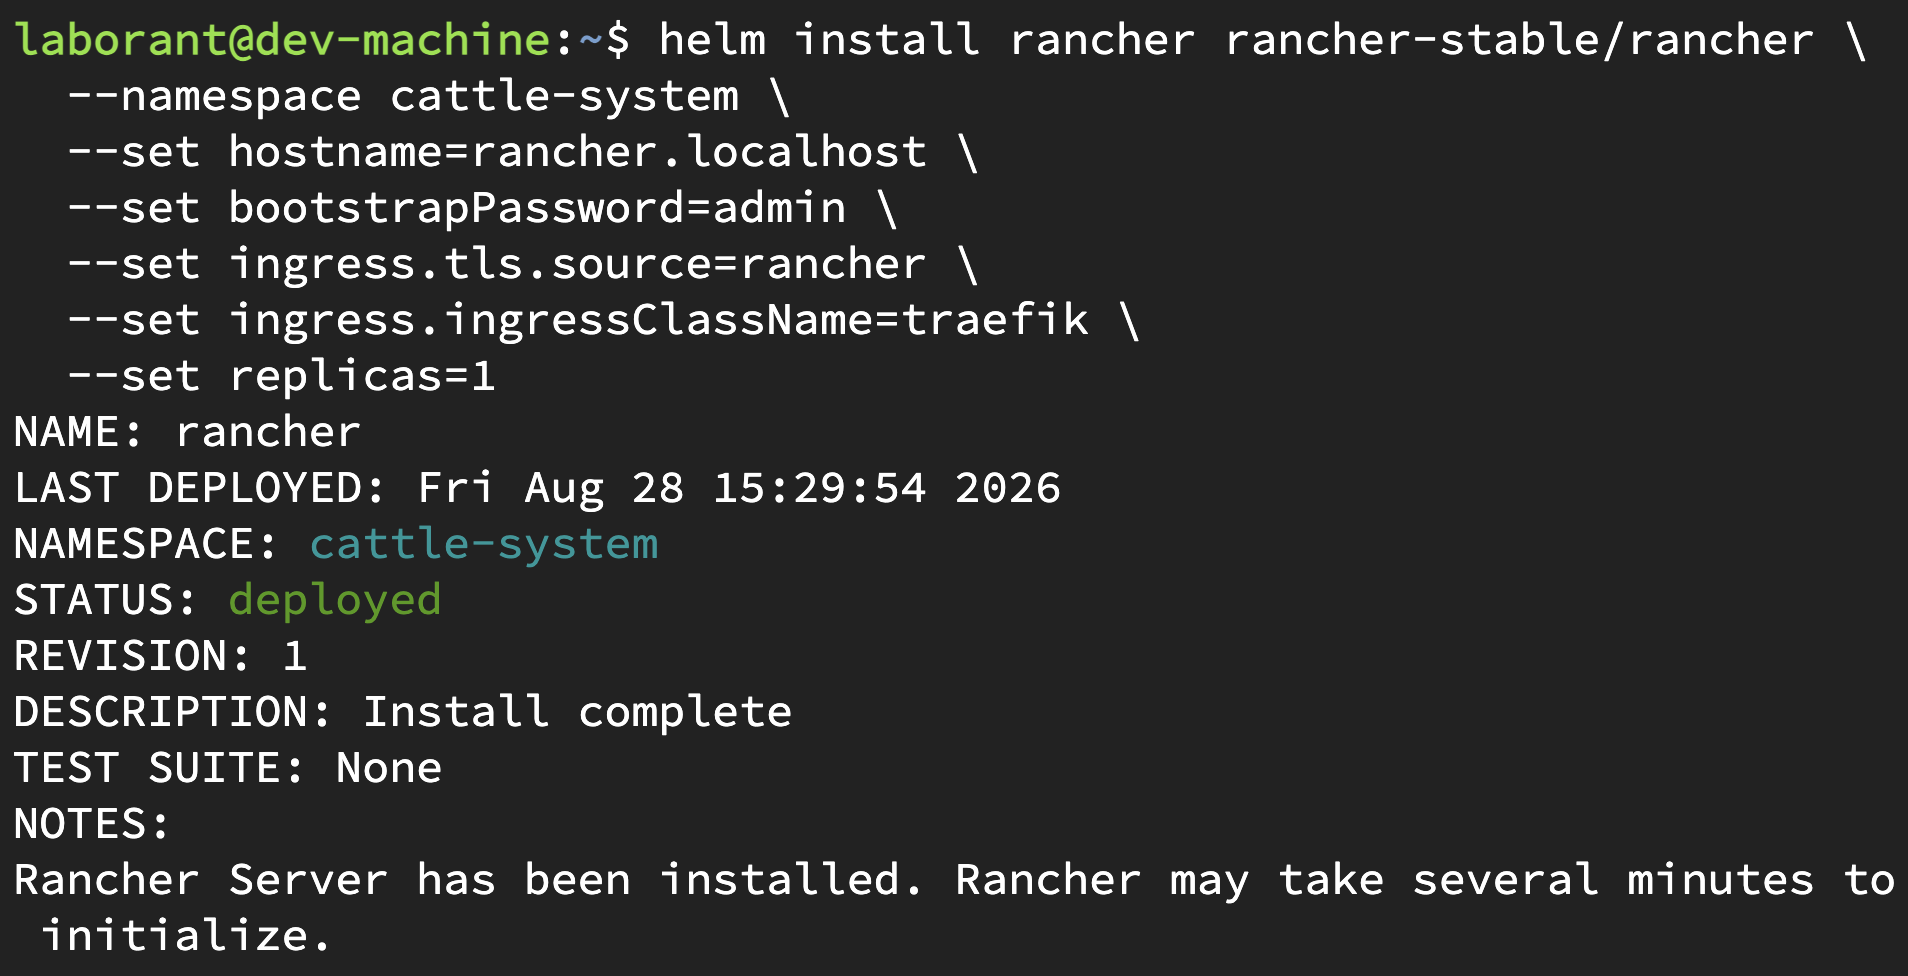
Once the Helm release is installed, Rancher reports a Deployed status.
The bootstrapPassword=admin used here is a convenience for this throwaway lab. In any real environment, choose a strong, unique bootstrap password and set replicas=3 for high availability.
Step 3: Wait for Rancher to Start
The first startup takes a few minutes because Rancher bootstraps its entire management plane. Watch the rollout:
kubectl -n cattle-system rollout status deployment/rancher
Check that the Rancher pods are running:
kubectl -n cattle-system get pods
Step 4: Verify the Installation
Rancher creates several namespaces during bootstrap. Confirm they exist:
kubectl get namespaces | grep -E "cattle|fleet"
You should see cattle-system alongside the Fleet namespaces (cattle-fleet-system). Confirm Rancher created an ingress served by Traefik:
kubectl -n cattle-system get ingress
The ingress is the front door to Rancher. When you reach rancher.localhost, the request travels through Traefik, into the Rancher Service, and on to the Rancher pod - all inside the cluster:
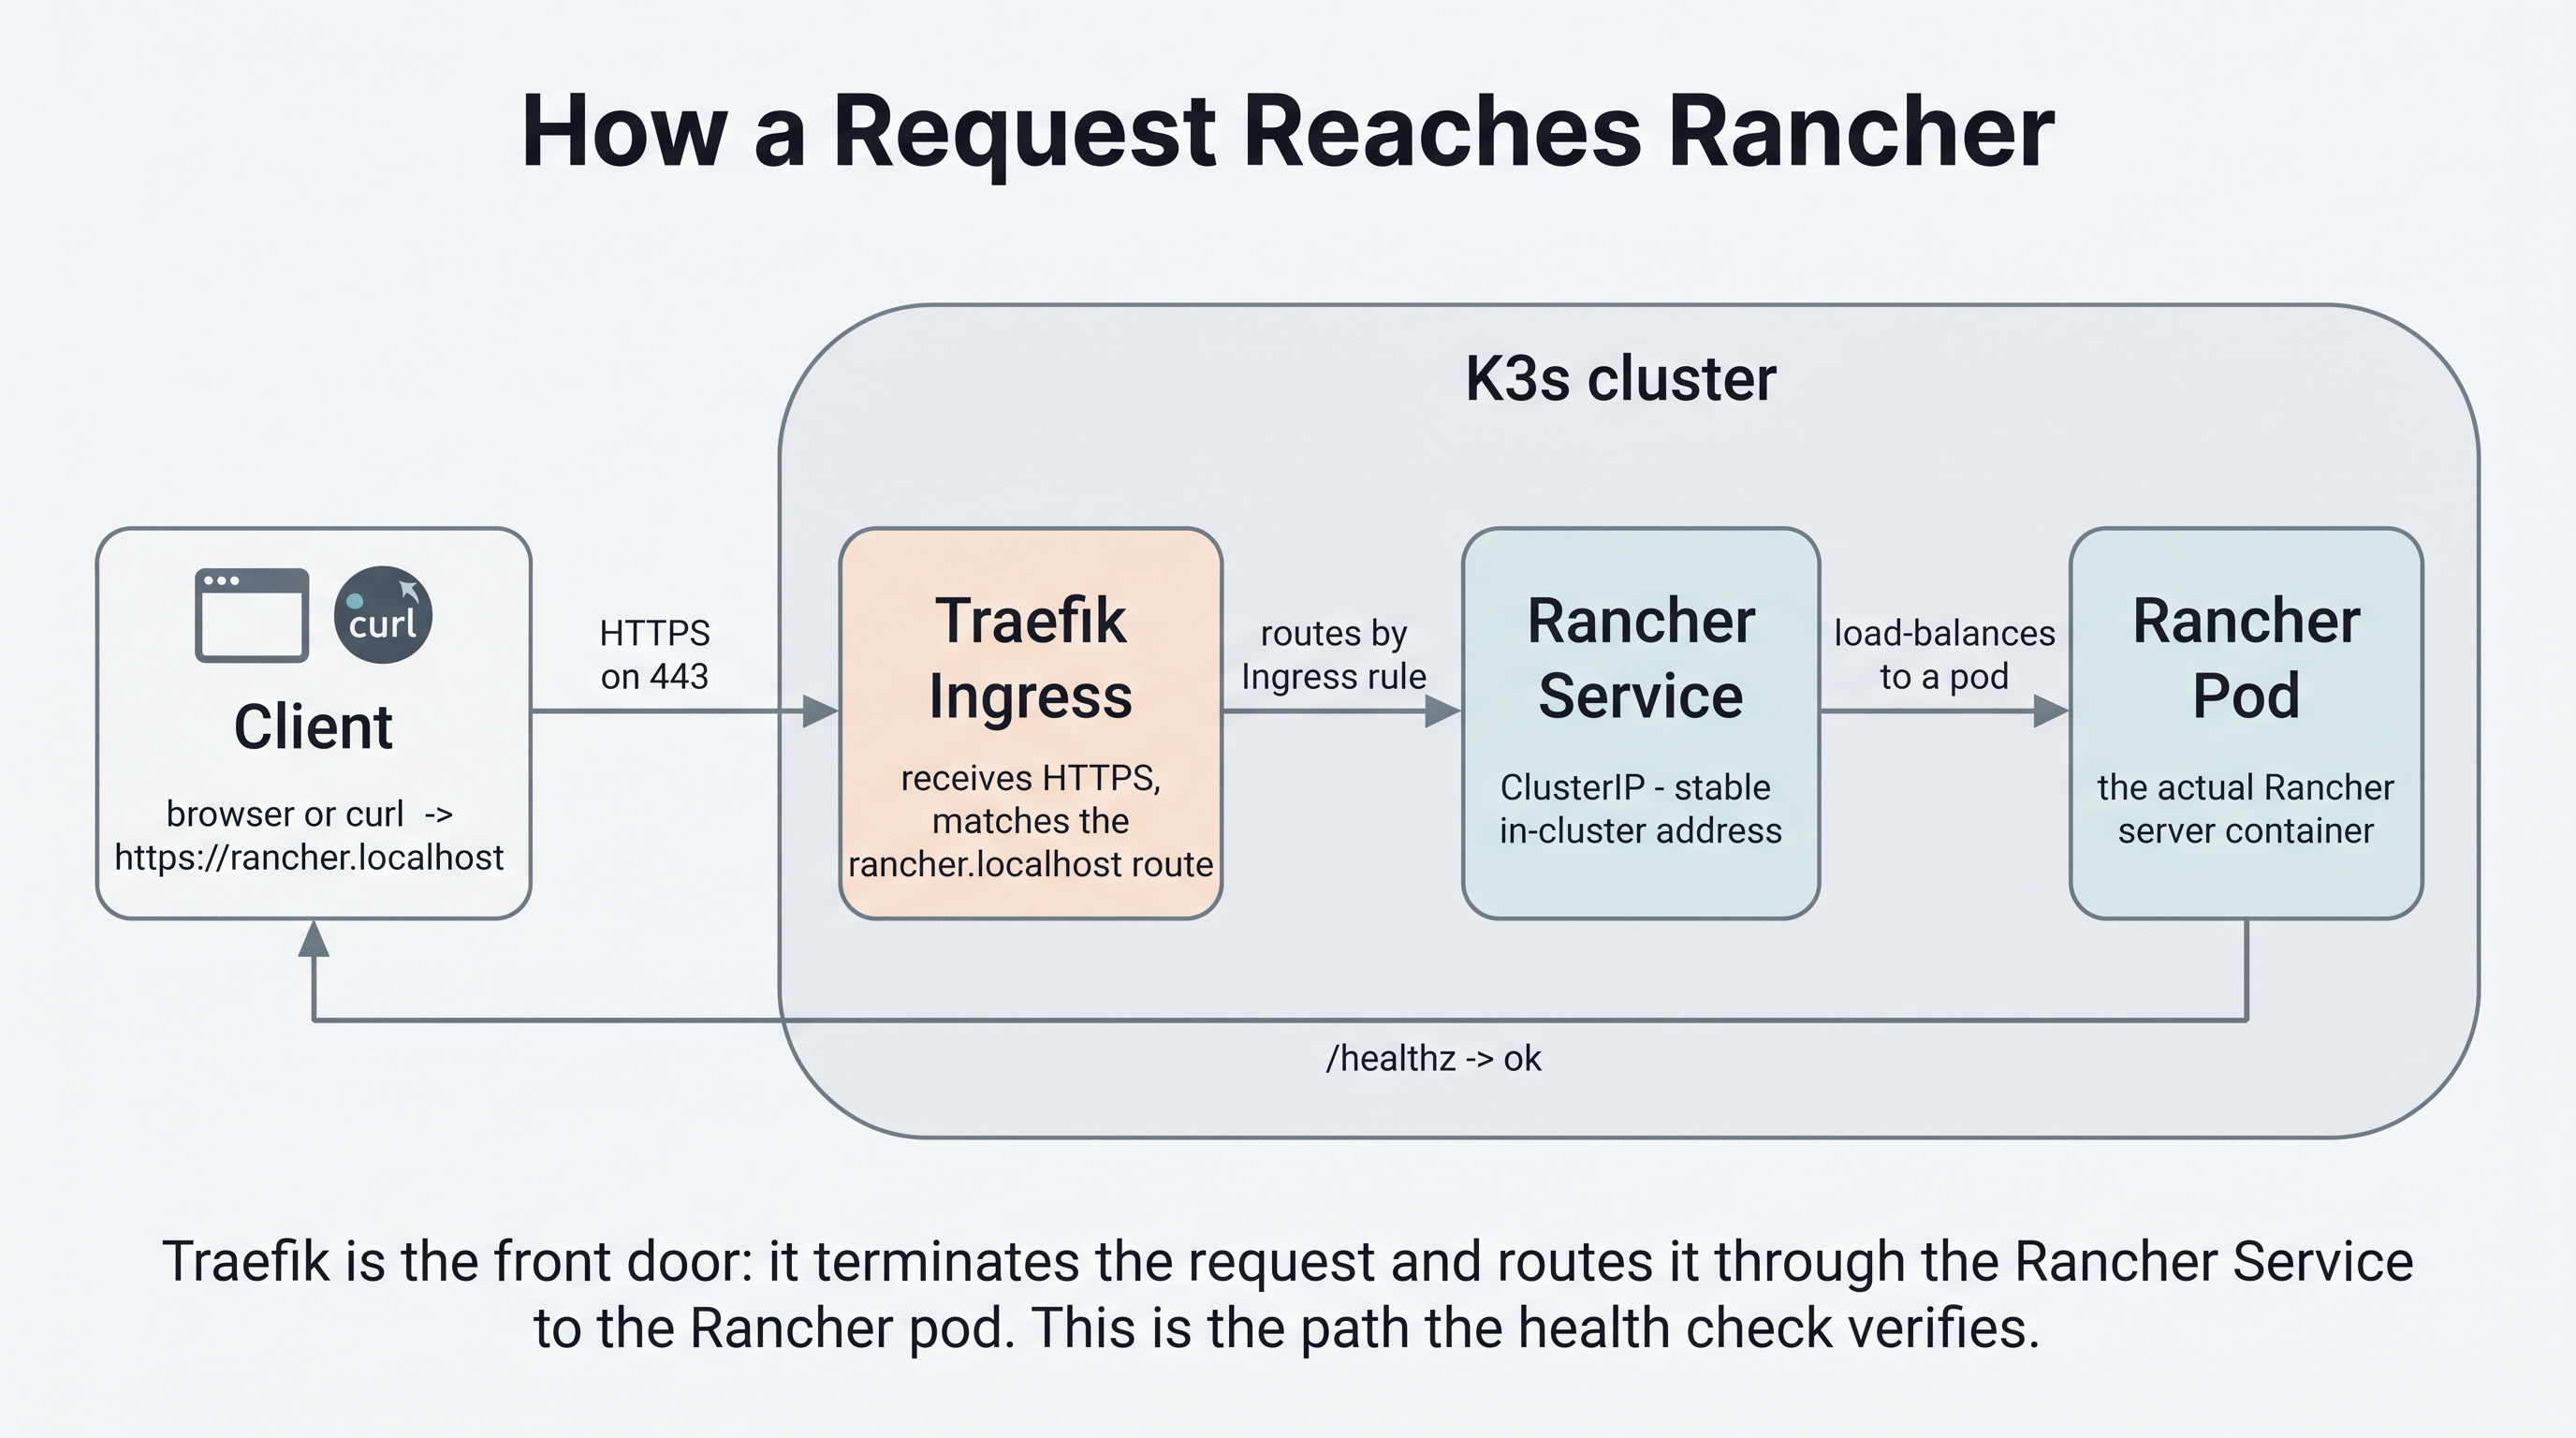
Finally, check that Rancher answers on its health endpoint. From your workstation, rancher.localhost is not a real DNS name, so tell curl to resolve it to the control-plane IP:
curl -sk --resolve rancher.localhost:443:172.16.0.2 https://rancher.localhost/healthz
A response of ok means Rancher is up and serving requests.
Rancher needs at least 2 CPU and 4 GB of RAM to run comfortably. If pods stay in Pending, check node capacity with kubectl describe node.
You're Done
You installed cert-manager, deployed Rancher with Helm behind Traefik, and verified from the command line that it is up and serving requests. That is the complete, production-shaped Rancher installation flow.
The healthz response above confirms Rancher is live. You will log into the Rancher UI and explore the dashboard in the next lesson, where we set up browser access to it properly.
When the final check below turns green, this lesson is complete. Your progress is tracked automatically, so you can move straight on to the next lesson.
Community edition vs. Rancher Prime
The Rancher you just installed is the free, open-source community edition. SUSE's commercial offering, Rancher Prime, is built on the same core and adds enterprise-oriented extras. The everyday management experience is nearly identical - the differences matter mostly for production and support, not for learning.
| Aspect | Community (this course) | Rancher Prime |
|---|---|---|
| License | Apache 2.0, free | Commercial subscription |
| Support | Community (GitHub, forums, Slack) | SUSE enterprise support with SLAs |
| Container images | Public registry (Docker Hub / GHCR) | Hardened images from SUSE's private registry (registry.rancher.com) |
| Extras | Core features | Extended features, SUSE AI/Observability add-ons, certified integrations |
| Lifecycle | Community release cadence | Prime support and extended lifecycle windows |
For learning, experimentation, and even many production setups, the community edition is fully capable. Rancher Prime is aimed at organizations that need vendor support, hardened supply-chain images, and contractual guarantees.
This is a general summary, not legal or purchasing advice.
- Previous lesson
- Introduction to Rancher
- Next lesson
- Exploring the Rancher UI