Launch a Multi-Container Web Application, Then Upgrade Its Backend

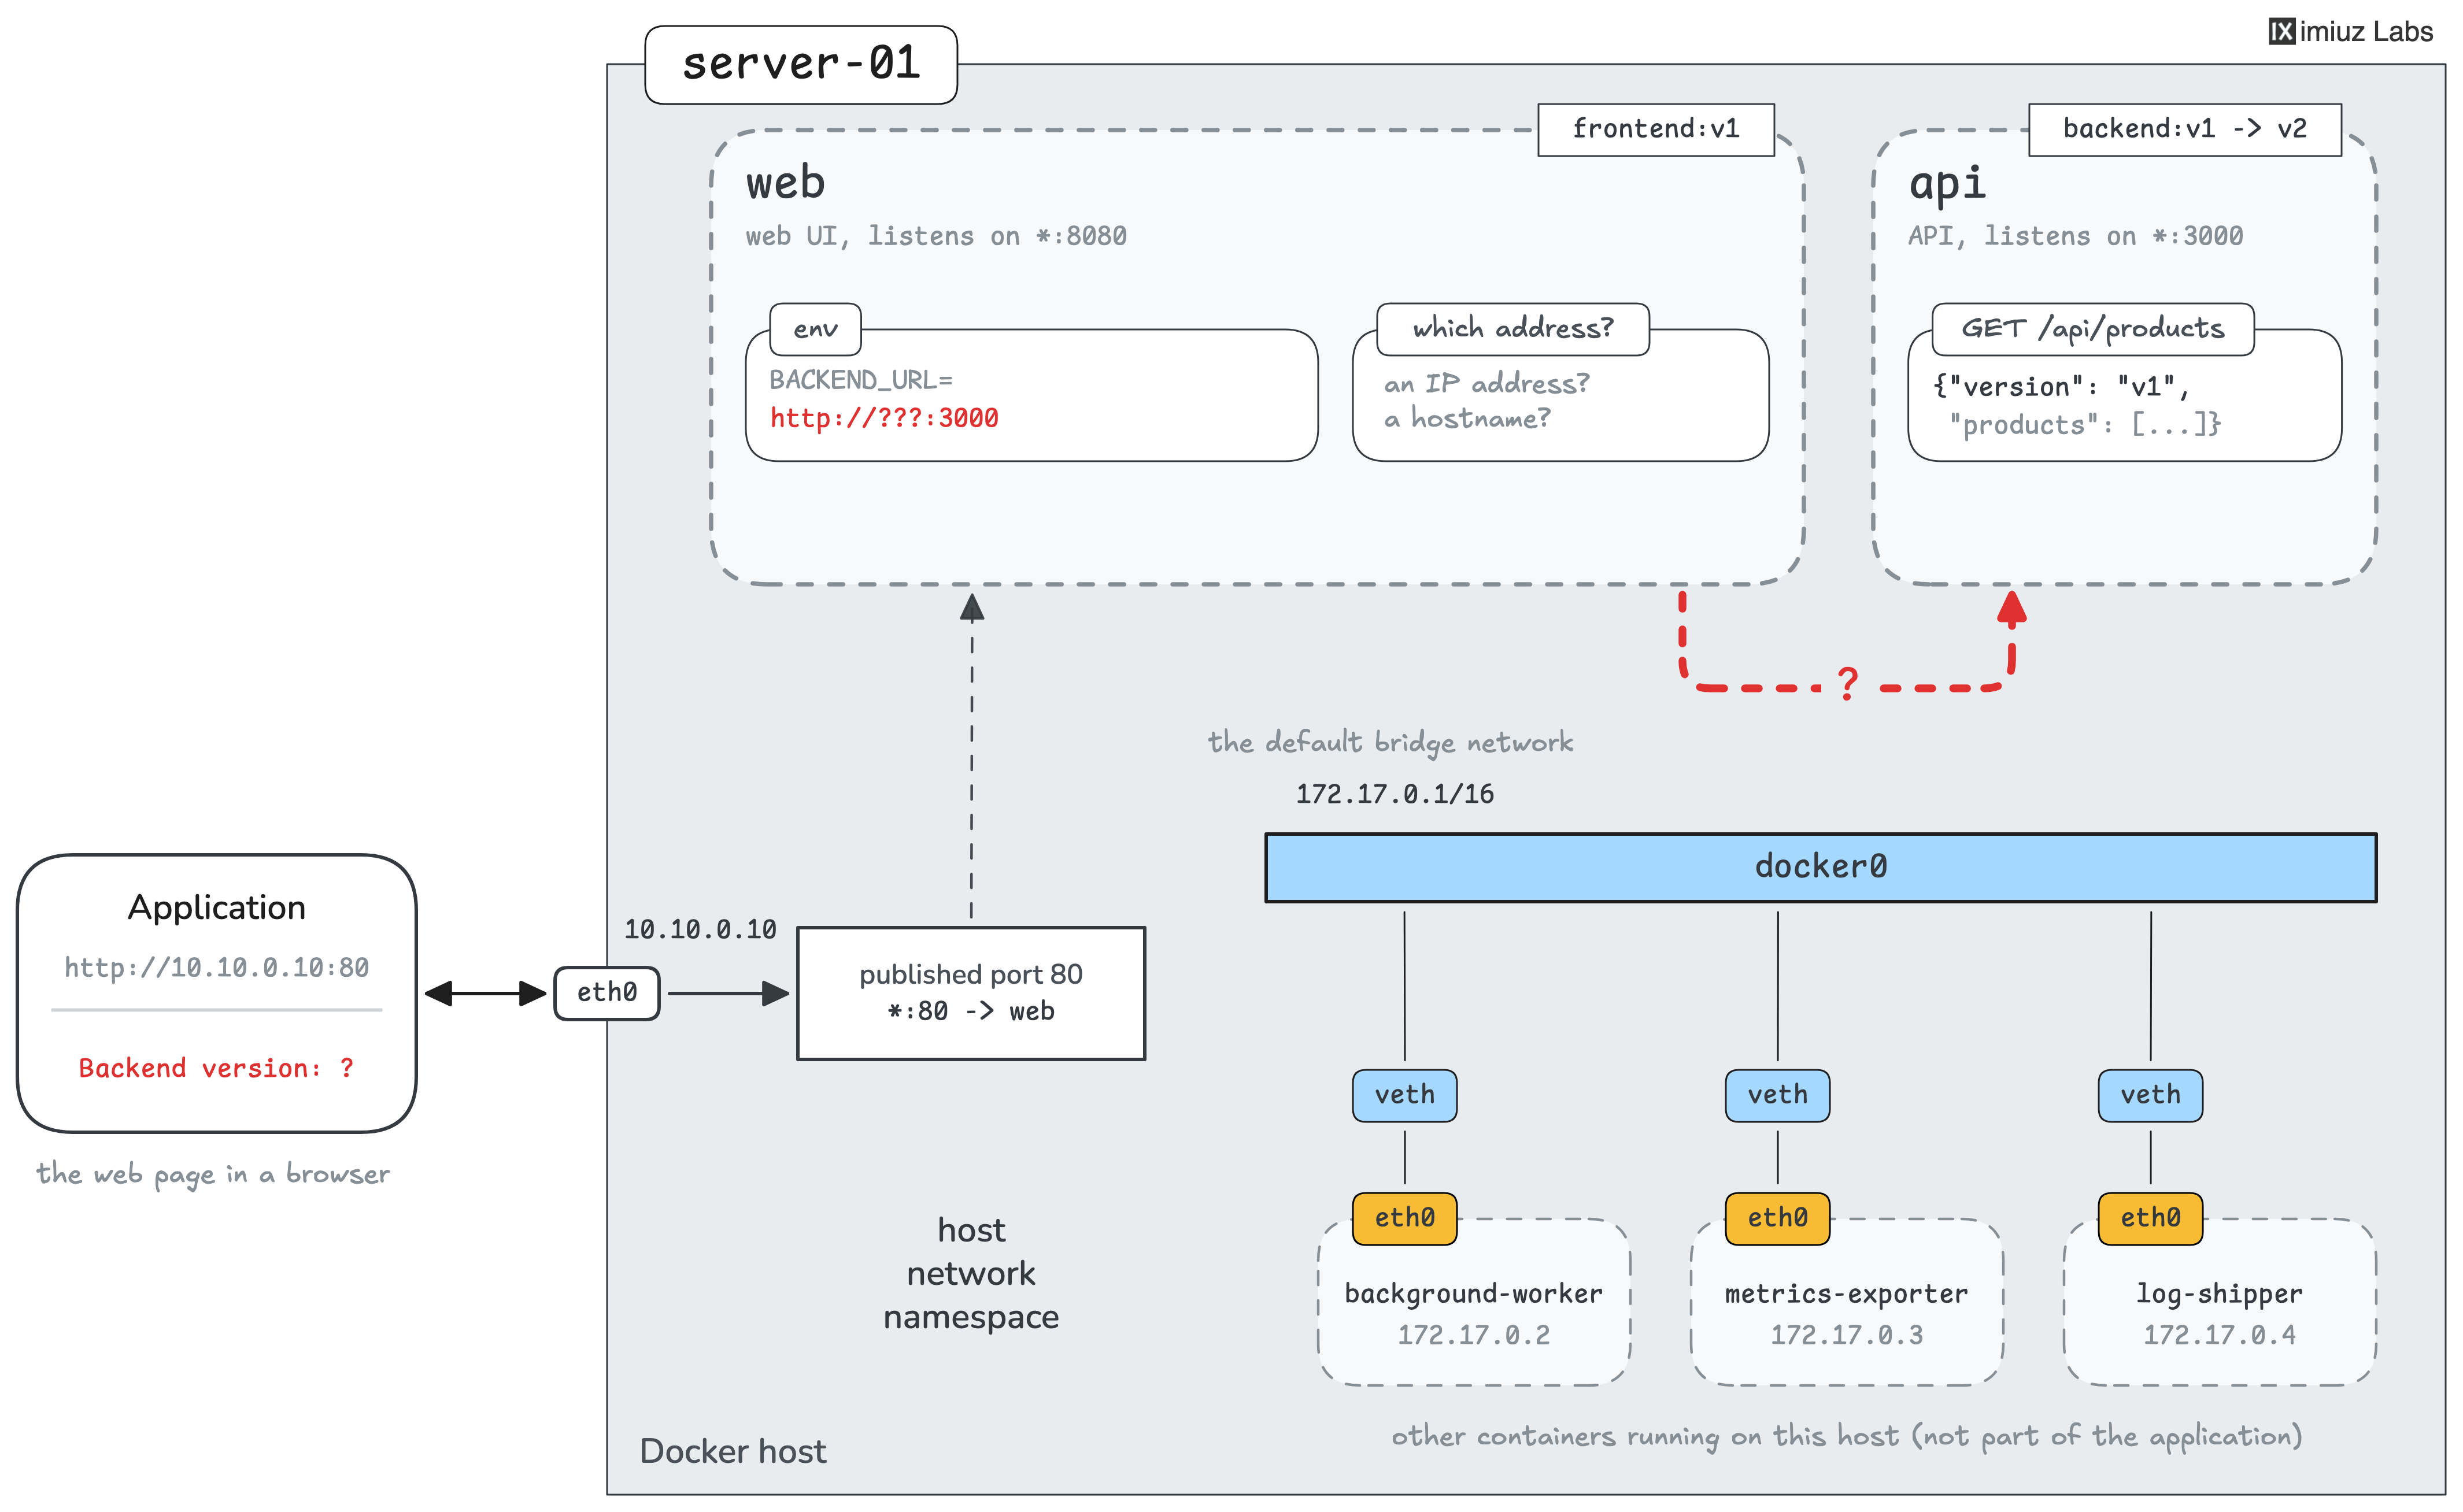
In this challenge, you'll launch a small web application consisting of two containers: a UI frontend and an API backend.
Both components are already packaged as Docker images.
You'll run them on an existing Docker host, server-01, using plain Docker commands.
For educational purposes, Docker Compose and container orchestrators aren't available in this environment.
To make things a little bit more realistic, the server also runs containers unrelated to the application, including a log shipper, a metrics collector, and a background worker. You'll be sharing the Docker host with these workloads, so leave them running and avoid changing their configuration.
The following images are available:
frontend- The web UI. It listens on port 8080 and fetches products from the URL specified by theBACKEND_URLenvironment variable (http://ADDR:PORT).backend- The API backend. It listens on port 3000 and requires no extra configuration.
1. Deploy the application
Start the frontend:v1 and backend:v1 containers and make the frontend available on port 80 of server-01.
The Application page should display the products served by backend v1.
You can choose how the frontend connects to the backend. The only requirement is that the web UI is accessible from outside the Docker host - the backend doesn't need to be exposed.
Hint 1
Every Docker container has its own network stack, including its own IP addresses and ports.
By default, Docker attaches new containers to a network called bridge.
Containers on this network can communicate directly using their IP addresses - no port publishing or extra network configuration is required.
See Docker 101: List Docker Networks and Inspect the Default Bridge for more.
Hint 2
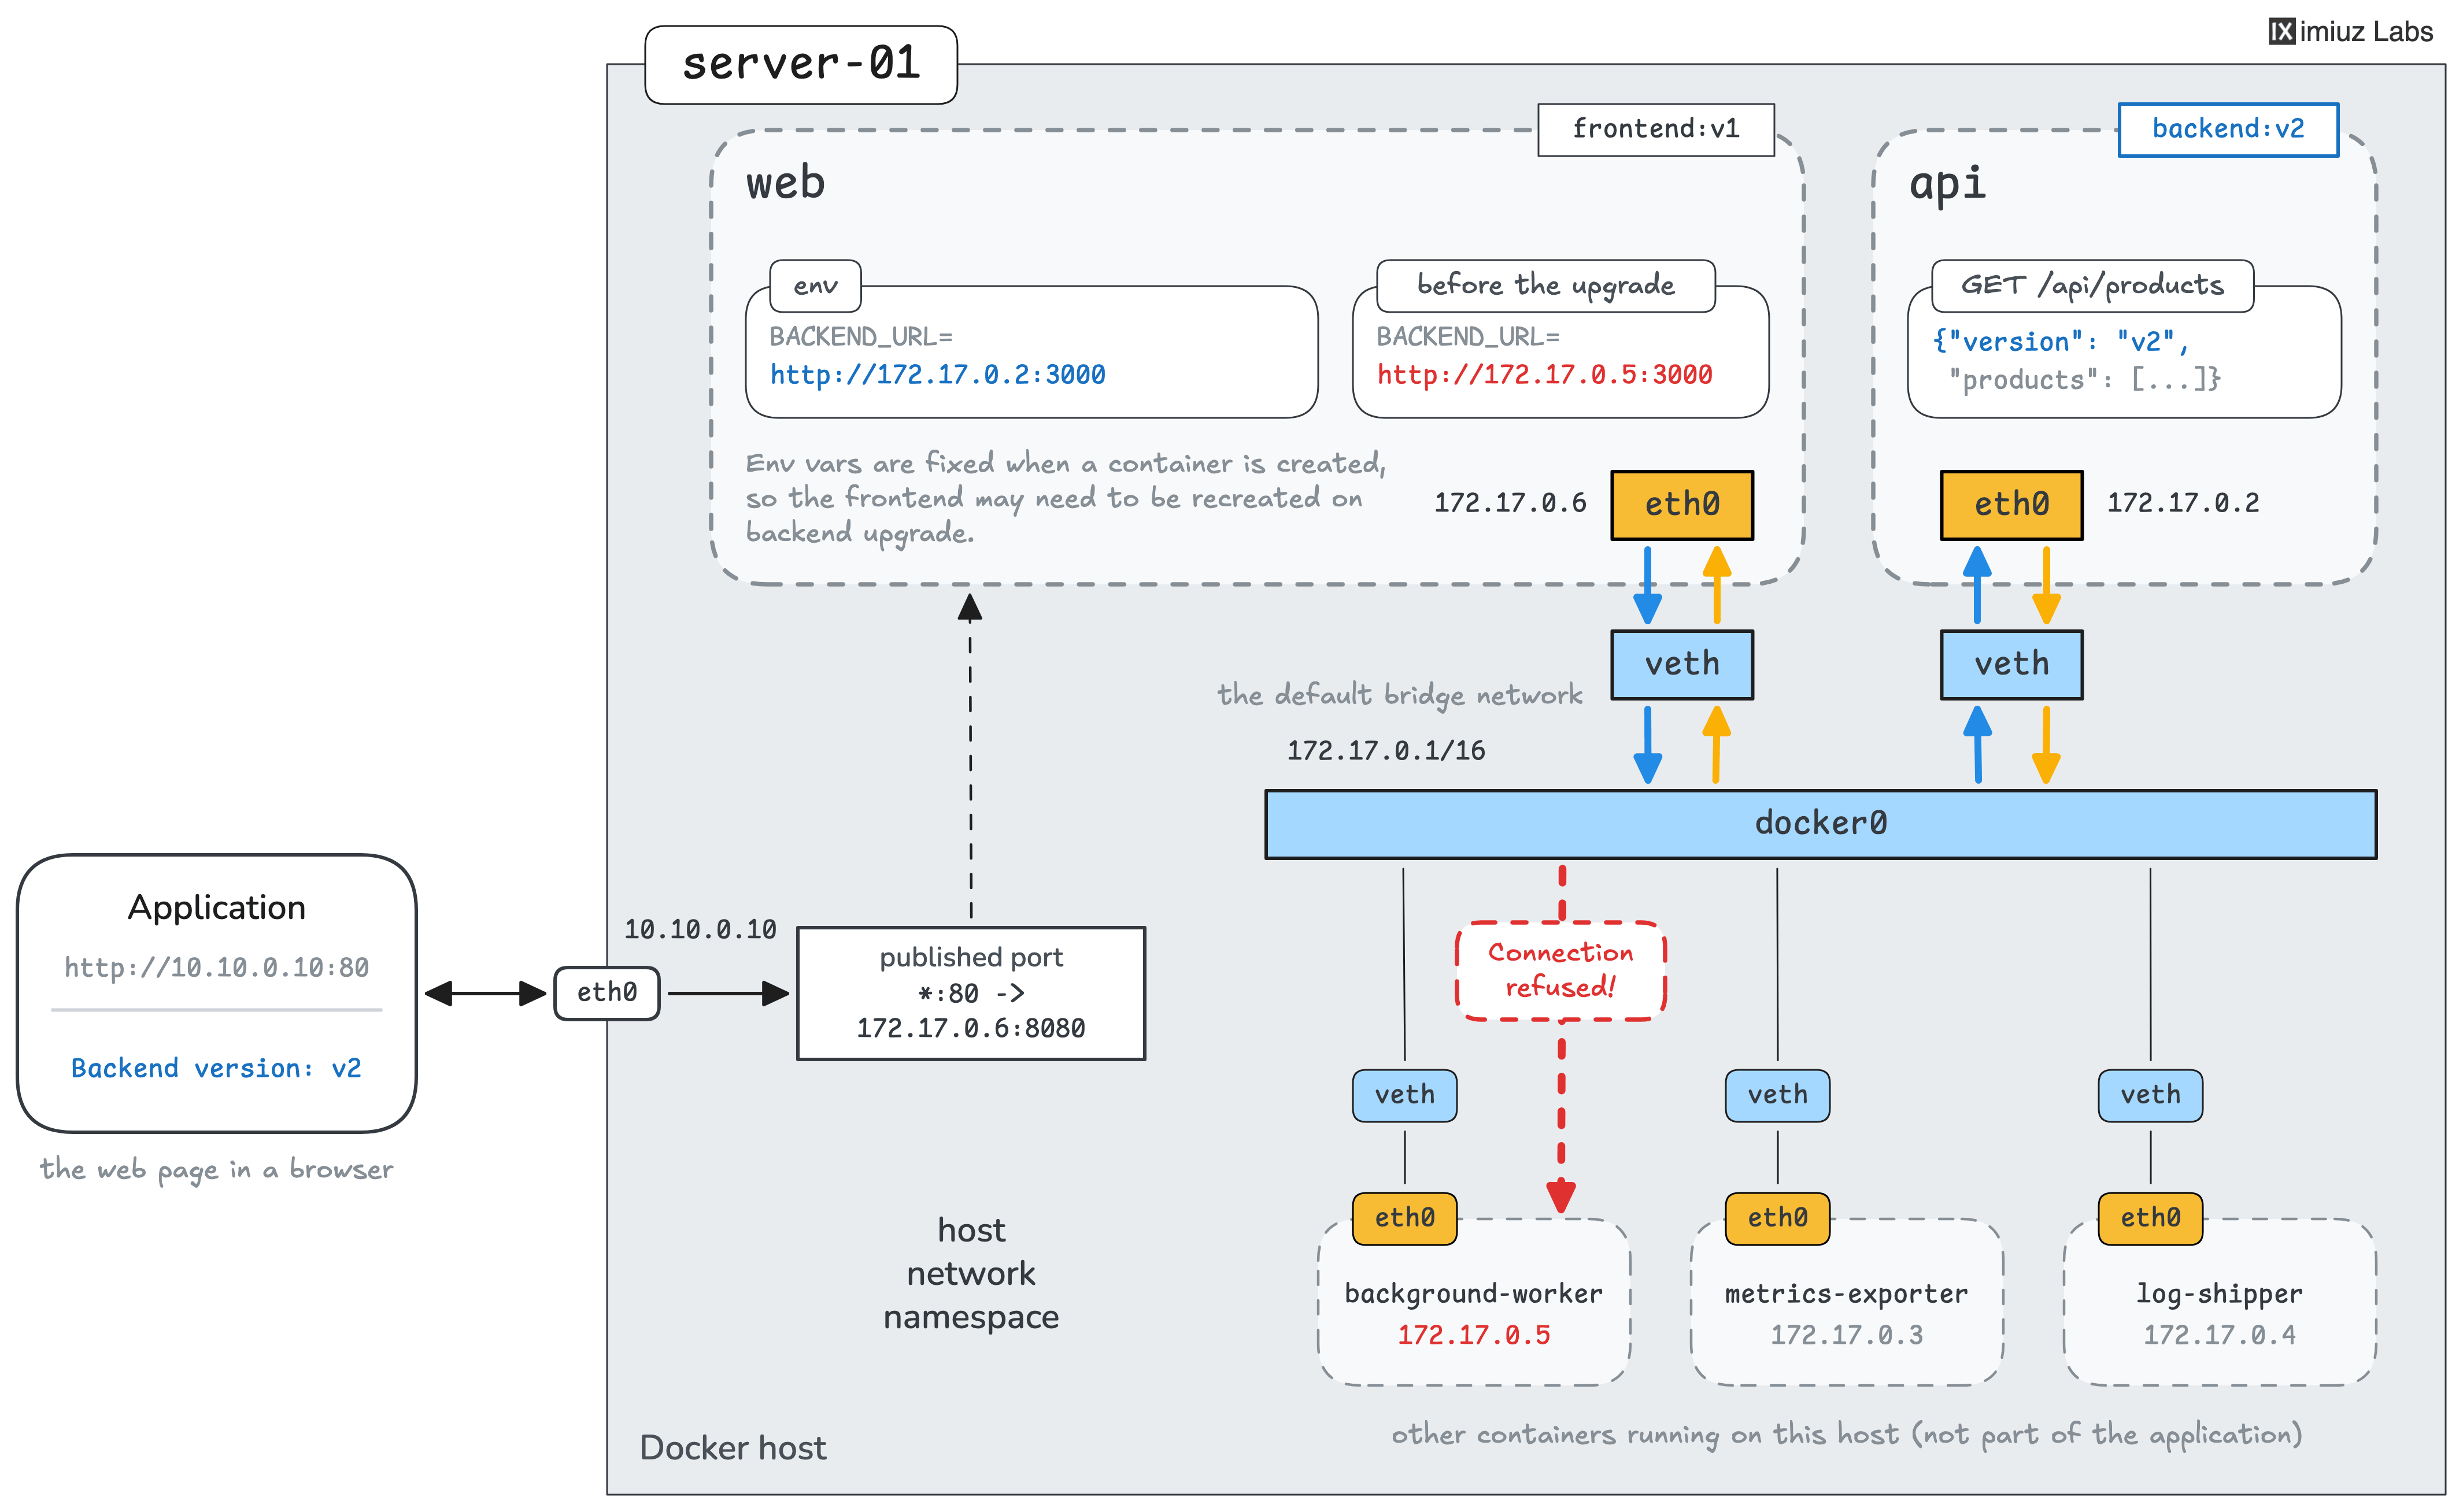
One way to connect the frontend to the backend is to start the backend first,
find its container IP address, and pass that address to the frontend through BACKEND_URL.
The docker inspect command shows a container's network settings, including its IP address.
If the backend container is named api, run:
docker inspect api
For example, if the backend has the address 172.17.0.9, you can configure the frontend with:
BACKEND_URL=http://172.17.0.9:3000
See Docker 101: Reach a Container Without Publishing a Port for more on direct container IP connectivity.
Hint 3
Containers on a bridge network can reach each other by IP, but machines outside the Docker host normally cannot reach these addresses directly.
To make the frontend accessible through port 80 of server-01, you need to publish its listening port.
The -p flag of docker run maps a port on the host to a port inside the container:
-p HOST_PORT:CONTAINER_PORT
The frontend listens on port 8080, so publish that port on port 80 of the host.
See Docker 101: Publish a Container Port to Access the App from the Host.
2. Remove the old backend
Now that the application is working, it's time to upgrade its backend. The upgrade starts with retiring the old version.
Stop and remove the backend:v1 container.
To keep the Docker host tidy, don't leave the stopped container behind.
Hint 4
A docker restart doesn't upgrade a container.
Each container is created from a particular image, and restarting it doesn't change that image.
To upgrade the backend, stop and remove the old container using docker stop and docker rm.
You'll then be able to create a new container using backend:v2.
If you gave the old container a name such as api, removing it also frees that name for the replacement.
3. Start the new backend
Start the backend:v2 container.
The application should work again and display the products served by backend v2.
You may need to adjust how the containers connect to each other, depending on the approach you chose in the first step.
Hint 5
When a container is removed, Docker releases its IP address back to the network's address pool. That address can then be assigned to another container.
Since server-01 also runs unrelated workloads, don't assume that the new backend will get the same address as the old one.
If the frontend was configured to connect directly to the backend's IP address, check whether that address has changed. You can inspect the new backend container to find its current address:
docker inspect api
Then compare it with the value of BACKEND_URL in the frontend container:
docker inspect web
A container's environment variables are fixed when it is created.
If BACKEND_URL still points to the old backend IP, you'll need to recreate the frontend with the new address.
Hint 6
Direct container IP addresses aren't the only option to connect containers.
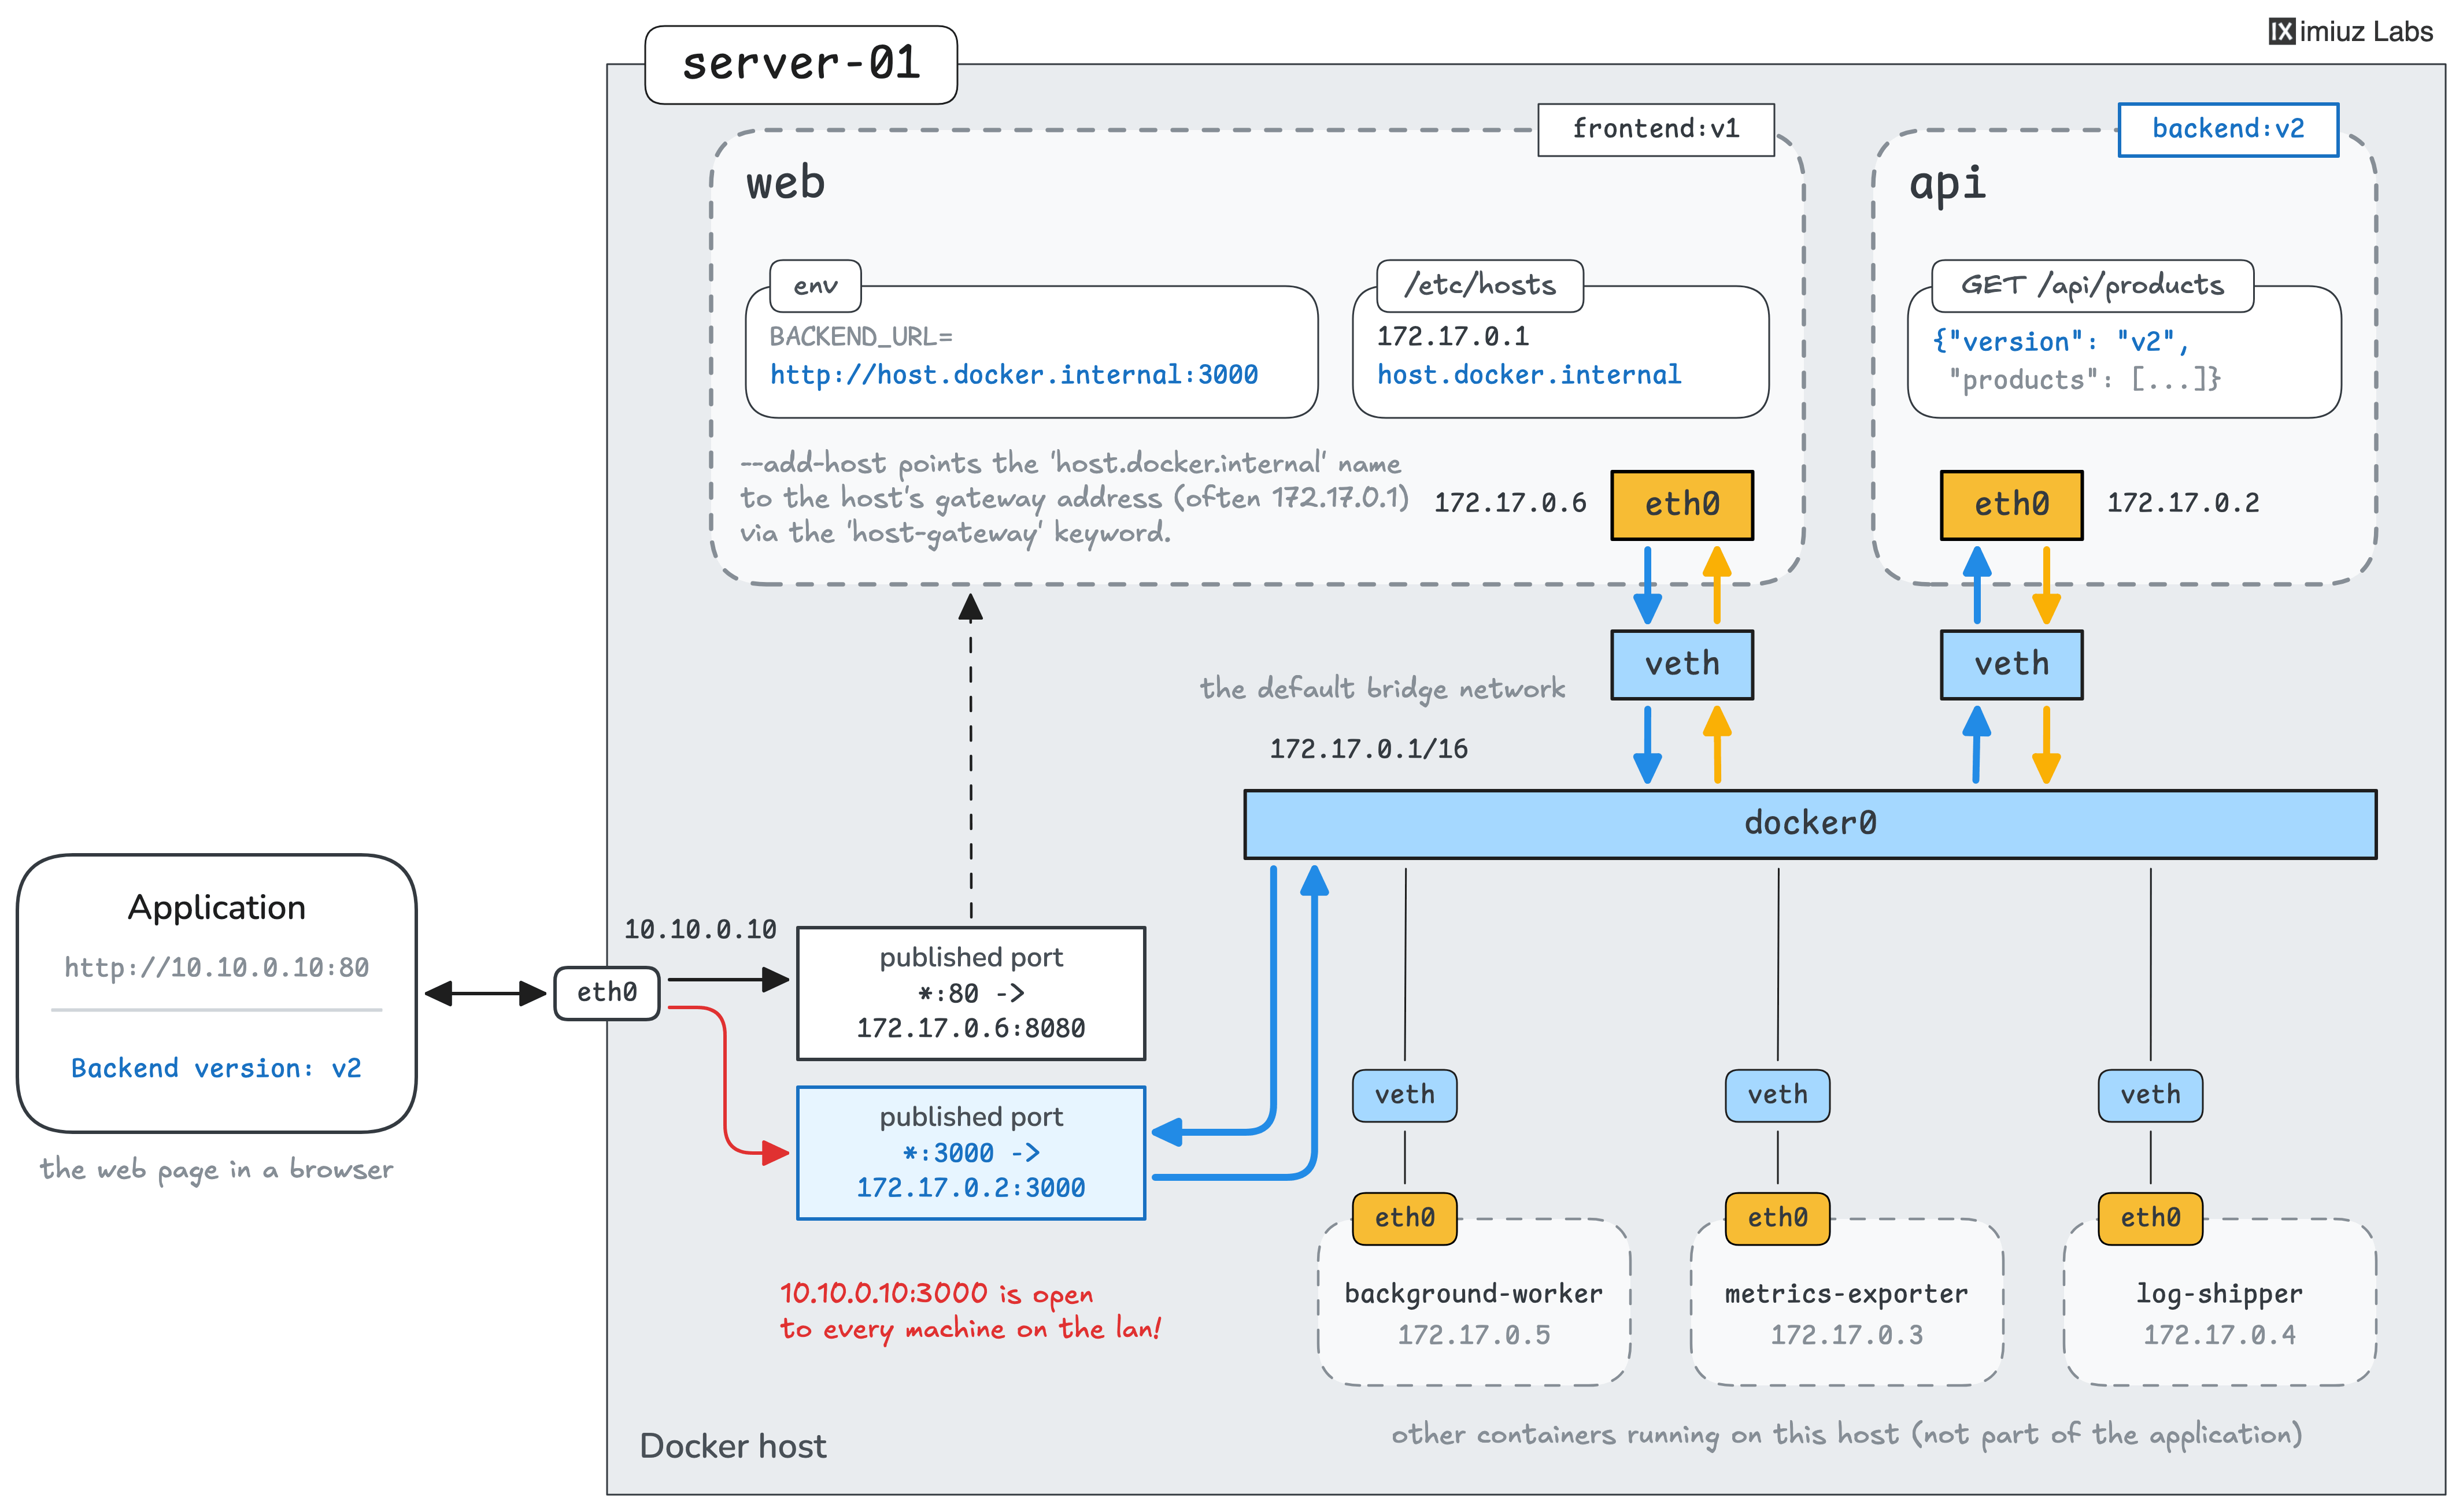
You can also publish the backend's port on the Docker host and configure the frontend to connect through that published port.
For example, publishing the backend with -p 3000:3000 makes its port 3000 available through the host's addresses.
Containers on the bridge network can access a gateway address that belongs to the Docker host (often 172.17.0.1),
and Docker also provides a special host-gateway value for the --add-host option to avoid hardcoding such an address:
--add-host=host.docker.internal:host-gateway
With this option, the frontend can use:
BACKEND_URL=http://host.docker.internal:3000
This is a valid way to connect the containers, and it spares you the need to reconfigure the frontend if the backend's IP changes. But it has significant drawbacks:
- Publishing the backend port on all host interfaces may also expose it to other undesired clients.
- Manual port management can lead to port conflicts, especially when the number of services on the Docker host grows.
- Traffic through published ports undergoes NAT, so some performance overhead is expected.
For a closer look at host-gateway, see Connect a Container to a Service Running on the Docker Host.
Hint 7
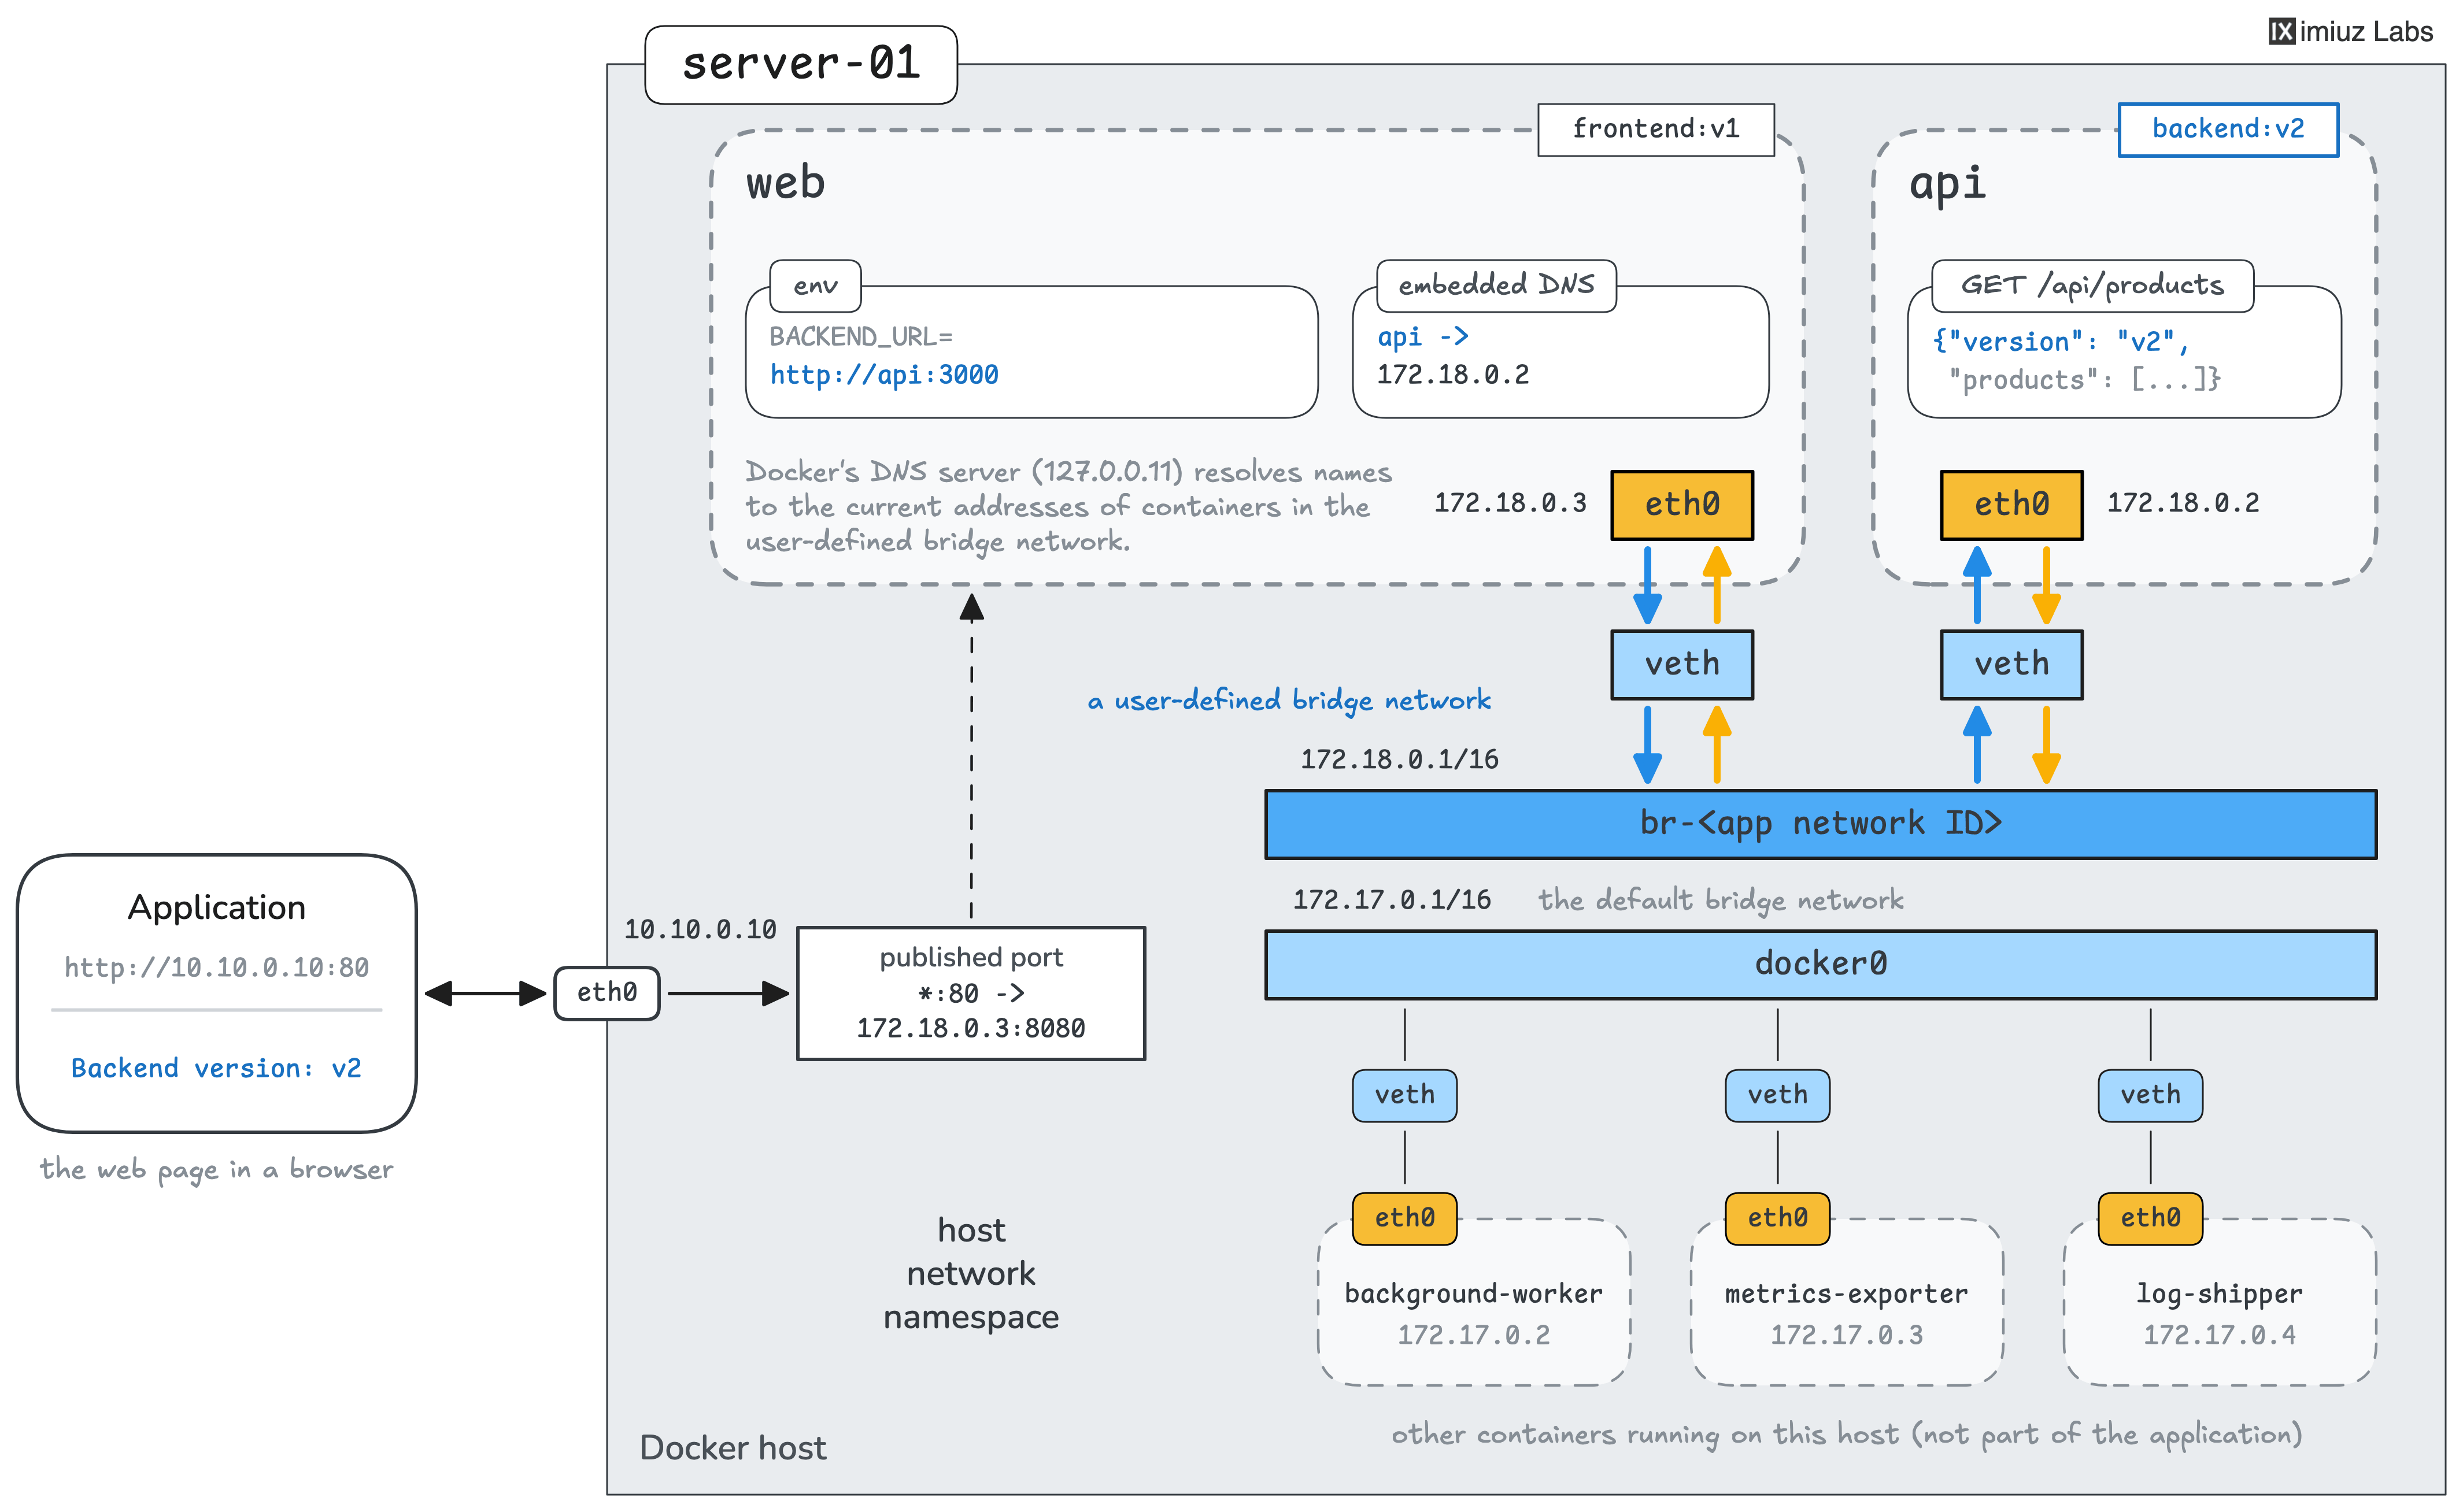
Docker also supports user-defined bridge networks, which is probably the best way forward for this task.
Unlike the default bridge network, they provide automatic name resolution between containers.
You can create a new network with:
docker network create app-net
Then attach containers to it when starting them:
docker run --network app-net --name api ...
Docker's embedded DNS server lets other containers on app-net reach this container by the name api, without looking up its IP address.
If you start both the frontend and backend on app-net, the frontend can use:
BACKEND_URL=http://api:3000
The default bridge network doesn't support this kind of automatic name resolution, even though containers on it can communicate by IP addresses.
Hint 8
Before user-defined networks and automatic DNS were introduced, Docker provided the --link option to help containers on the default bridge network find each other by name. For example:
docker run --link api:api frontend:v1
Docker would add the backend's address to the frontend container's /etc/hosts file and update it when the linked container restarted.
However, legacy links don't handle container replacement well, and Docker has deprecated them on the default bridge network.
You may still encounter --link in old tutorials or deployment scripts, but for new applications, prefer user-defined bridge networks and their built-in DNS.