Docker Scout Tutorial - Container Security Made Simple

Welcome to this hands-on tutorial on Docker Scout! You'll learn how to identify, analyze, and fix security vulnerabilities in your container images using Docker's powerful security scanning tool.
What is Docker Scout?
Docker Scout is a comprehensive container security platform that helps developers and teams proactively enhance their software supply chain security. It provides:
- Vulnerability Detection: Automatically identifies known security vulnerabilities in your container images
- Base Image Recommendations: Suggests more secure base images
- Policy Evaluation: Enforces security policies across your development workflow
- Remediation Guidance: Provides actionable fixes for identified vulnerabilities

Docker Scout provides comprehensive security insights for your container images.
💡 Docker Scout is integrated directly into Docker Desktop and the Docker CLI, making security scanning a seamless part of your development workflow.
Prerequisites
Before we begin, make sure you have:
- A Docker Hub account (create one at hub.docker.com if needed)
- Basic familiarity with Docker commands
- Understanding of containerization concepts
Let's get started!
Step 1: Installing and Verifying Docker Scout
Docker Scout CLI comes pre-installed with Docker Desktop, but let's verify the installation and set up our environment.
First, let's check if Docker Scout is available. Run this command in the docker-01:
docker scout version
If Docker Scout isn't installed, you can install it manually:
# Create Docker config directory
mkdir -p $HOME/.docker

# Install Docker Scout CLI
curl -sSfL https://raw.githubusercontent.com/docker/scout-cli/main/install.sh | sh -s --
Step 2: Setting Up the Demo Application
We'll use a sample Node.js application to demonstrate Docker Scout's capabilities. This application intentionally contains some vulnerabilities that we'll identify and fix.
The demo repository should already be available in your home directory. Let's navigate to it:
cd /home/laborant/scout-demo-service
Take a look at the application structure:
ls -la
You'll see a typical Node.js application with a package.json, Dockerfile, and source code.
Step 3: Configure Your Docker Hub Organization
Before we build images, we need to set up your Docker Hub organization name. This will allow us to tag and potentially push images to your registry.
Now let's export this as an environment variable for this session:
export ORG=$(cat /tmp/docker-org.txt)
echo "Using Docker Hub org: $ORG"
Let's verify the environment variable is set correctly:
Make sure you're in the correct directory:
cd /home/laborant/scout-demo-service
pwd
Step 4: Build Your First Image
Let's build the initial version of our application:
# Make sure we're in the right directory
cd /home/laborant/scout-demo-service

# Set the ORG variable if not already set
export ORG=$(cat /tmp/docker-org.txt)

# Build the image
docker build -t $ORG/scout-demo:v1.0 .
This command builds a Docker image using the Dockerfile in the current directory and tags it with your organization name.
Verify the image was built:
docker images | grep scout-demo
Now let's verify that the build completed successfully:
Step 5: Perform Initial Security Scan
Now comes the exciting part - let's scan our newly built image for vulnerabilities!
Run the quickview command to get an overview of your image's security posture:
# Make sure we have the ORG variable set
export ORG=$(cat /tmp/docker-org.txt)

# Run the quickview scan
docker scout quickview $ORG/scout-demo:v1.0
This will show you a summary of:
- Critical and high severity vulnerabilities
- Package count and vulnerable packages
- Base image recommendations
⚠️ You'll likely see several vulnerabilities detected. Don't worry - this is intentional for learning purposes!
Step 6: Detailed Vulnerability Analysis
Let's get more detailed information about the vulnerabilities in our image:
Run this command to see only the vulnerable packages:
# Make sure we have the ORG variable set
export ORG=$(cat /tmp/docker-org.txt)

# Scan for vulnerabilities
docker scout cves --only-vuln-packages --format only-packages $ORG/scout-demo:v1.0
This command will show you:
- Which packages have vulnerabilities
- The severity of each vulnerability
- Available fixes

Example output showing vulnerabilities found in the Express.js package.
Step 7: Fix Application Dependencies
One of the common vulnerabilities you'll see is in the Express.js package. Let's fix this by updating the package version.
First, let's see the current Express version:
cd /home/laborant/scout-demo-service
grep "express" package.json
Update the Express version in package.json to a more secure version:
# Update Express to version 4.19.2 (or newer)
sed -i 's/"express": "4\.17\.1"/"express": "4.19.2"/' package.json
Verify the change:
grep "express" package.json
You should see that Express has been updated to version 4.19.2.
Now let's verify the fix was applied:
Step 8: Build and Scan Updated Image
Now let's build a new version of our image with the fixed dependency:
# Make sure we're in the right directory
cd /home/laborant/scout-demo-service

# Set the ORG variable
export ORG=$(cat /tmp/docker-org.txt)

# Build version 2
docker build -t $ORG/scout-demo:v2.0 .
Let's verify the v2 image was built successfully:
Now let's compare the vulnerabilities between v1.0 and v2.0:
# Check v1 vulnerabilities
echo "=== Version 1 Vulnerabilities ==="
docker scout cves --only-vuln-packages --format only-packages $ORG/scout-demo:v1.0

# Check v2 vulnerabilities
echo "=== Version 2 Vulnerabilities ==="
docker scout cves --only-vuln-packages --format only-packages $ORG/scout-demo:v2.0
You should see fewer vulnerabilities in v2.0!
💡 Notice how fixing one package dependency reduced the overall vulnerability count. This demonstrates the importance of keeping dependencies up to date.
Step 9: Fix Base Image Vulnerabilities
Many vulnerabilities come from the base image. Let's update to a more secure base image:
First, let's see the current base image:
cd /home/laborant/scout-demo-service
head -n 1 Dockerfile
Update the Dockerfile to use a newer, more secure base image:
# Update to Alpine 3.18
sed -i '1s/^FROM.*/FROM alpine:3.18/' Dockerfile
Verify the change:
head -n 1 Dockerfile
You should see the Dockerfile now starts with FROM alpine:3.18.
Let's verify the base image was updated:
Step 10: Build Final Secure Image
Let's build our final, more secure version:
# Make sure we're in the right directory
cd /home/laborant/scout-demo-service

# Set the ORG variable
export ORG=$(cat /tmp/docker-org.txt)

# Build version 3
docker build -t $ORG/scout-demo:v3.0 .
Let's verify the final image was built successfully:
Now let's compare all three versions:
echo "=== Comparing All Versions ==="

echo "V1 Vulnerability Count:"
docker scout cves --only-vuln-packages --format only-packages $ORG/scout-demo:v1.0 2>/dev/null | wc -l

echo "V2 Vulnerability Count:"
docker scout cves --only-vuln-packages --format only-packages $ORG/scout-demo:v2.0 2>/dev/null | wc -l

echo "V3 Vulnerability Count:"
docker scout cves --only-vuln-packages --format only-packages $ORG/scout-demo:v3.0 2>/dev/null | wc -l
Step 11: Advanced Docker Scout Features
Docker Scout offers several additional features for comprehensive security management:
Policy Evaluation
You can define and evaluate security policies:
# Check if image meets security policies
export ORG=$(cat /tmp/docker-org.txt)
docker scout policy $ORG/scout-demo:v3.0
Recommendations
Get recommendations for improving your image:
# Get base image recommendations
docker scout recommendations $ORG/scout-demo:v3.0
SBOM Generation
Generate a Software Bill of Materials (SBOM):
# Generate SBOM in SPDX format
docker scout sbom $ORG/scout-demo:v3.0
Best Practices for Container Security
Based on what we've learned, here are key security practices:
🔒 Security Best Practices
- Scan Early and Often: Integrate scanning into your CI/CD pipeline
- Keep Dependencies Updated: Regularly update package dependencies
- Use Minimal Base Images: Choose Alpine or distroless images when possible
- Monitor Continuously: Set up alerts for new vulnerabilities
- Implement Policies: Define and enforce security policies across teams ::
Integrating with CI/CD
Here's how you can integrate Docker Scout into your CI/CD pipeline:
name: Security Scan
on: [push, pull_request]

jobs:
  security-scan:
    runs-on: ubuntu-latest
    steps:
    - uses: actions/checkout@v3

    - name: Build image
      run: docker build -t myapp:${{ github.sha }} .

    - name: Scan with Docker Scout
      run: |
        docker scout cves myapp:${{ github.sha }}
        docker scout policy myapp:${{ github.sha }}
Troubleshooting Common Issues
Common Docker Scout Issues and Solutions
Issue: Docker Scout command not found
Solution: Install Docker Scout CLI or update Docker Desktop
Issue: Authentication errors when accessing private registries
Solution: Ensure you're logged in with docker login
Issue: No vulnerabilities found in obviously vulnerable image
Solution: Update vulnerability database with docker scout update
Issue: Scan takes too long for large images
Solution: Use --only-fixed flag to focus on actionable vulnerabilities
Issue: Environment variable not set
Solution: Run export ORG=$(cat /tmp/docker-org.txt) before Docker commands
What's Next?
Congratulations! You've successfully learned how to:
✅ Install and configure Docker Scout
✅ Scan container images for vulnerabilities
✅ Fix application and base image vulnerabilities
✅ Compare security posture across image versions
✅ Use advanced Docker Scout features
Continue Your Security Journey
- Explore Docker Scout Dashboard: Visit scout.docker.com for advanced analytics
- Set Up Continuous Monitoring: Enable monitoring for your production repositories
- Define Security Policies: Create custom policies for your organization
- Integrate with CI/CD: Add security scanning to your deployment pipelines
Pro Tip
Set up Docker Scout in your development workflow from day one. It's much easier to prevent vulnerabilities than to fix them later in production!
Additional Resources
Happy securing! 🔒🐳
About the Author

More tutorials you might like
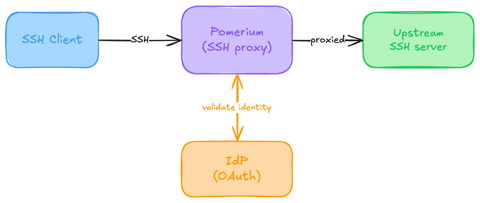
Native SSH Access with Pomerium
Pomerium can be used as a native SSH reverse proxy, adding OAuth authentication and flexible Pomerium policy enforcement to standard SSH connections, without the need for tunnels, or custom clients or servers.

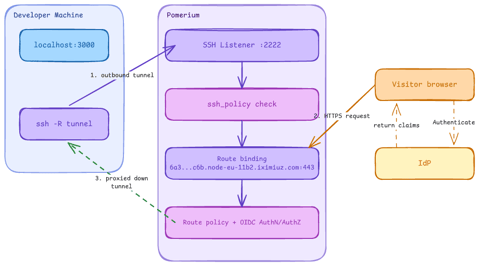
Native SSH Reverse Tunneling with Pomerium
Use Pomerium's native SSH support to publish a local service through a standard reverse SSH tunnel, with OpenID Connect (OIDC) authentication and continuous authorization on every request. Reach services behind Network Address Translation (NAT) without firewall holes or custom agents, and control both who can use the service and who can open the tunnel. Application traffic stays on infrastructure you control.
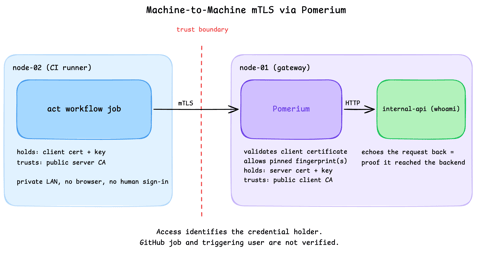
Secure Machine-to-Machine Access with mTLS and Pomerium
Run a GitHub Actions-compatible continuous integration (CI) job on a private runner and protect its internal API call with mutual TLS (mTLS) and Pomerium. Build separate server and client trust chains, authorize one machine certificate by fingerprint, then revoke, restore, and rotate its credentials through live policy changes.
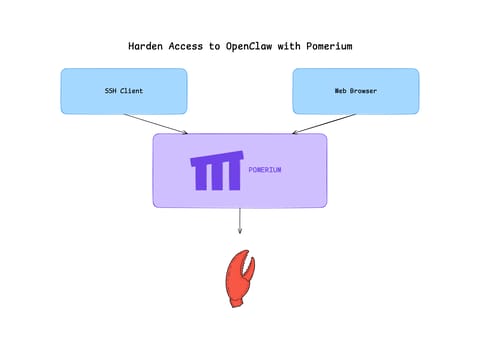
Harden Access to OpenClaw with Pomerium
Put OpenClaw, a self-hosted AI assistant with shell and file access, behind a web route and an SSH route, both gated by the same identity and Pomerium's context-aware policy. OpenClaw runs in trusted-proxy mode, trusting signed identity headers instead of its own login, while Pomerium's native SSH proxy signs short-lived certificates for shell access.
Learn by doing, not just by reading or watching
Sign up for a free account to start a VM playground right on this page, track your progress, and get notified about new learning materials.