Managing Podman Instances Remotely
Podman as a Remote Control
podman CLI provides a great feature which can be used to manage containers, images, volumes
and other artifacts on remote servers where podman is already installed.
The feature encapsulates some core features like:
- Connectivity + SSH Lifecycle Management
- Calling
podmanon Remote Servers
This feature helps developers and administrators alike, by avoiding writing scripts where
one needs to ssh into a machine and execute podman commands.
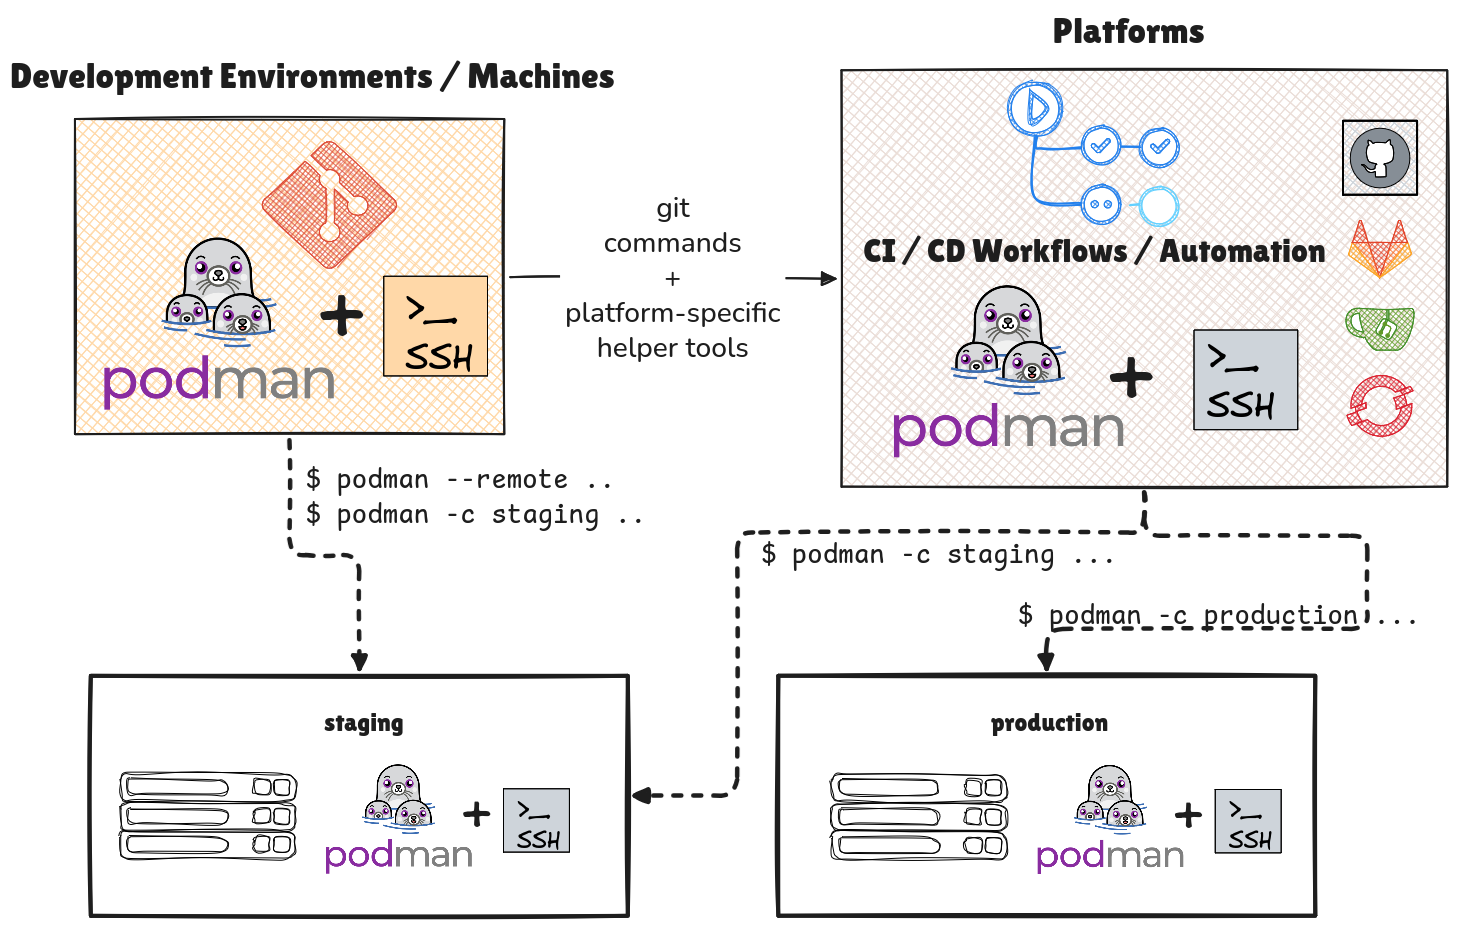
Using podman remote feature, on development machines and platforms to deploy and manage
containers, images on remote servers
Tutorial Environment
This tutorial provides the following environment:
| Environment Name | Purpose |
|---|---|
| controller | main environment to control other podman environments |
| production | example podman production environment |
| staging | example podman staging / testing environment |
Aim and Usage
- Use the controller to deploy applications, perform check on the other two environments.
- Configure the production and staging to make sure we can control them from our controller environment.
- Install the Docker Compose Plugin on the controller which we will leverage to deploy application stacks to our remote environments.
We will use the podman compose command to use the Docker Compose plugin.
We will NOT be using podman-compose tool.
Please not the usage of space and not the -
in the tutorial.
Podman Remote Internals
podman integrates with systemd in order to achieve remote management functionality.
The following services are needed to be started and enabled on the remote environments:
sshd.service(as root user)podman.sock(as rootless user for this tutorial)
The podman.sock can also be started as rootful user but you need to know
which Linux namespaces and rootful or rootless containers you wish to run on the
remote environments. For the sake of simplicity we will use the rootless socket.
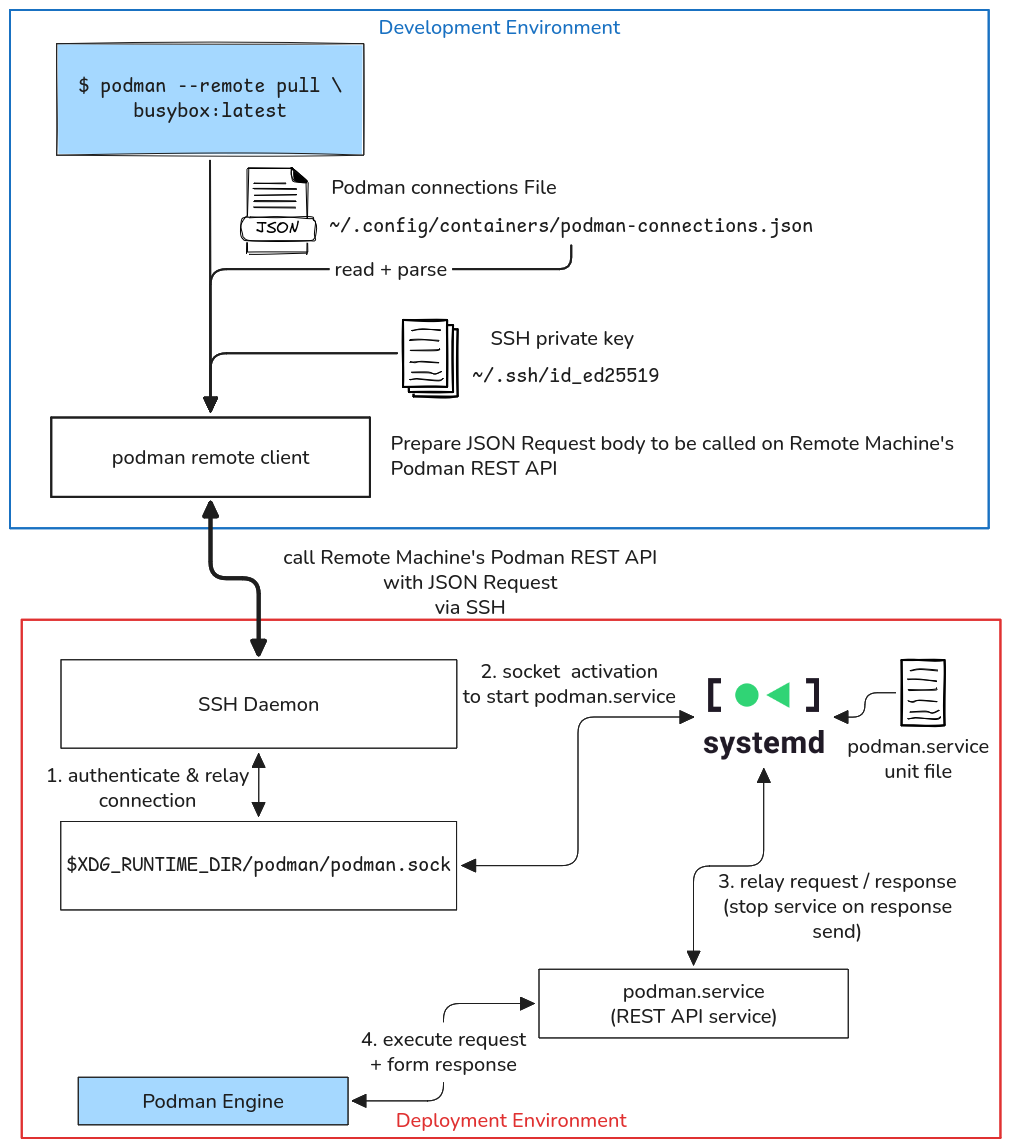
How a podman --remote command trigger, works as a SSH client to interact with a remote podman
instance
The podman --remote CLI tells the local Podman engine that the image busybox:latest needs
to be pulled on a remote machine not on the local one.
In order for that to happen, the local machine acts as an SSH client and sends a JSON request to communicate with the remote Podman instance over SSH.
On the remote end, the SSH daemon verifies and passes the connection to the local podman.sock
running which is configured to a systemd Socket-Activation application.
Upon getting the connect, the podman.service is started by the remote systemd instance.
The connection and the JSON payload is passed further.
The podman.service is a REST API server that handles the management of the remote requests
and pulls the busybox:latest image.
The podman.service and podman system service
The podman.service is configured to NOT be long-running service.
This means if it is idle after sometime (no connections or requests) it will shutdown.
This design over SSH provides some valuable benefits:
- SSH covers the security and network protocol coverage
- Socket-Activation and limited-timed
podman.serviceavoids misusing the REST API
We can check the short-lived podman.service logic by performing the following
either on production or staging:
systemctl --user start podman.service
systemctl --user status podman.service
Wait for 6-10 seconds and check the status again:
systemctl --user status podman.service
The Active values should be inactive (dead).
This is because the inherent command in the service
podman system service has a default alive time of 5 seconds.
You can try it out locally also:
podman --debug system service # after 5 seconds it exits automatically
Remote Environment Configuration
In order for our controller environment to interact with the remote podman environments, we need to configure these remote environments first.
SSH daemon
We need to start and enable the ssh daemon on our remote environments.
Perform the following commands on:
- staging
- production
sudo systemctl enable --now sshd.service
Verify using:
sudo systemctl status sshd
Podman Socket
We need to start and enable the rootless Podman socket on our remote environments.
Perform the following commands on:
- staging
- production
systemctl --user enable --now podman.socket
Verify using:
systemctl --user status podman.socket
the socket is available under:
ls $XDG_RUNTIME_DIR/podman/podman.sock
Configuring Podman / Docker compatibility
We need to configure the remote environments to make sure that the Compose plugin
from the controller is able to spoof a call to podman CLI and not docker CLI on these remote machines.
In order to do that we just need to install the following package on:
- staging
- production
sudo dnf install -y podman-docker
That's it! We have configured the remote environments.
Connection Lifecycle Management
Before we start deploying on our remote environments, we need to create connections on our controller.
Connections provide context to the local podman CLI on how to reach these
remote environments.
These connections persist in the following default location for rootless user:
~/.config/containers/podman-connections.json
Creating Connections
On controller add the connections for our staging, and production:
This lab environment is already configured to allow passwordless SSH into
staging and production from the controller.
In practical scenarios, you will need to:
- generate SSH keys for different environments
- Copy the identity keys to them and check connectivity accordingly
Check connectivity to staging:
ping -c 3 staging
Add the staging environment:
podman system connection add \
  --identity ~/.ssh/id_ed25519 \
  staging-env \
  ssh://laborant@staging
Check connectivity to production:
ping -c 3 production
Add the production environment:
podman system connection add \
  --identity ~/.ssh/id_ed25519 \
  production-env \
  ssh://laborant@production
Listing Available Connections
To see the added connections on controller:
podman system connection list
It will dump all the known connections on the controller.
Note that addresses also have the path to the podman.sock attached to them:
ssh://laborant@staging:22/run/user/1001/podman/podman.sock
If the podman socket is on a different location we can use the --socket-path flag:
podman system connection add \
  --identity ~/.ssh/id_ed25519 \
  --socket-path /tmp/podman-test.sock \
  test-env \
  ssh://laborant@Some-Env
Renaming Connections
You can use rename sub-command to rename a connection.
On controller rename the production-env
to prod-env:
podman system connection rename \
    production-env \
    prod-env
Verify again using:
podman system connection list
Removing Connections
Removal of a connection is as simple as:
podman system connection remove some-env
Setting a Default Connection
podman CLI provides --remote flag that can be used to execute commands
on a remote machine.
But if there are multiple connections, you can set a connection to be a default one. This helps avoid causing any misconfigurations or mis-triggered commands on wrong environments.
On controller let's configure
staging-env as the default connection to avoid problems on production:
podman system connection default staging-env
Verify using:
podman system connection list -f '{{ .Name }} {{ .Default }}'
Now any podman --remote command will always be triggered on staging-env:
Try pulling a busybox:latest image with --remote flag from the controller:
podman --remote pull busybox:latest
Verify that the image exists only on the staging-env:
podman --remote images
And not locally:
podman images
Explicit Connections
When you have more connections you use the --connection / -c flag
to perform actions on specific environments.
From controller,
let's explicitly start a container called prod-alpine with alpine:latest image on prod-env:
podman --connection prod-env \
    run --rm \
    --name prod-alpine \
    --detach \
    alpine:latest sleep infinity
Verify using:
podman -c prod-env ps -a
Remote Stack Applications Deployment
With the --connection and --remote flags we can deploy containers easily and at this
point one might be tempted to wrap shell scripts around such commands.
However, we an leverage using Docker Compose plugin along with podman to make the experience even better.
Why podman compose and not podman-compose?
We will leverage the Docker Compose Plugin developed
by Docker team and not the python podman-compose
for some opinionated reasons:
- Docker Compose is superior in terms of its usage experience and is packed with features
podman composealready has a Go-plugin logic in-built for leveraging itpodman-composeis slow in incremental update, bug-ridden and hacky pythonic wrapper aroundpodman(personal opinion)
Installing Docker Compose on Controller
We need to install the Compose plugin ONLY on the controller as follows:
Create the default folder where the compose plugin will be downloaded:
mkdir -p ~/.docker/cli-plugins
Download the plugin from GitHub:
wget \
  https://github.com/docker/compose/releases/download/v5.3.1/docker-compose-linux-x86_64 \
  -O ~/.docker/cli-plugins/docker-compose
Make it executable:
chmod +x ~/.docker/cli-plugins/docker-compose
Verify the version by calling if from podman:
podman compose version
Should display:
>>>> Executing external compose provider "/home/laborant/.docker/cli-plugins/docker-compose". Please see podman-compose(1) for how to disable this message. <<<<

Docker Compose version v5.3.1
We are now ready to deploy our applications using standard Compose YAML files.
Deploying a Stack
On the controller let's create identical Compose apps:
compose.prod.ymlcompose.staging.yml
Both have the same images but different container, service names and exposed ports:
# compose.prod.yml
services:
    prod-proxy-svc:
        image: docker.io/library/nginx:latest
        container_name: prod-nginx
        ports:
            - "18080:80"
    prod-ubuntu-svc:
        image: docker.io/library/ubuntu:latest
        container_name: prod-ubuntu
        command: 'sleep infinity'
Create these files in the /home/laborant/stacks directory:
mkdir -p ~/stacks
touch ~/stacks/compose.{prod,staging}.yml
and copy the YAML content respectively into the files.
Let's deploy the production stack:
podman --connection prod-env compose \
  -f ~/stacks/compose.prod.yml \
  up -d
Let's deploy the staging stack:
podman --connection staging-env compose \
  -f ~/stacks/compose.staging.yml \
  up -d
You can also use --remote flag instead of --connection since we
have staging-env as our default connection.
Verify the containers are running:
podman -c prod-env compose \
  -f ~/stacks/compose.prod.yml \
  ps -a
podman -c staging-env compose \
  -f ~/stacks/compose.staging.yml \
  ps -a
Verify the nginx instances are reachable on controller:
curl http://production:18080
curl http://staging:28080
Inference
By leveraging Podman Remote feature you can design automated CI/CD systems where:
- your CI/CD environment can setup remote podman machine connections using
podman-connections.jsonfile and dedicated SSH identity files - based on your CI/CD tasks your Compose YAML files can easily be verified locally using:
podman compose \
  -f ~/stacks/compose.staging.yml \
  config --quiet # NOTE: locally not remotely
- once validation is successful, you can deploy to environments based on the connections using:
podman -c staging-env compose \
  -f ~/stacks/compose.staging.yml \
  up -d
The commands are simple enough to be accommodated in any Automation Platform tools (Gitlab CI/CD, GitHub Actions etc.)
Break free from your bash scripts with ssh USER@DEST 'podman ...' and use podman --connection
instead like a Pro!
Resources
- GitHub Discussion on Podman Compose Compatibility
- podman-remote Documentation
- Podman in Action by Daniel Welsh. Manning Publications
Podman Tutorials on iximiuz Labs
About the Author

Shan Desai
Software guy who loves making generic things out of specific things, loves learning new things and helping fellow engineers out.
Writes about
Frequently covers
More tutorials you might like
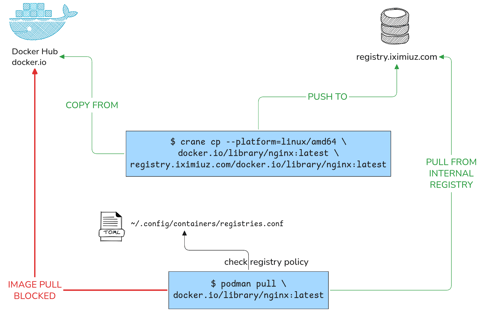
Podman Configuration: Registries, Runtimes and Containers Without a Restart
This tutorial will help you configure your rootless podman instance to pull from only from specific registries, using different OCI runtimes as well as configure all containers to have specific attributes all without any daemon restarts or sudo calls.
Podman with Kubernetes: Play Before You Apply
This tutorial provides an in-depth know-how of working with Pods (group of container) with Podman. It also gives insights into how the podman CLI works well with Kubernetes, albeit in limited capacity to develop better Container Workflows.
Podman Containers with systemd
Learn how to manage Podman containers using systemd on your host machine.
Systemd Inside Containers Using Podman
Learn how to use systemd inside containers and manage their lifecycle with podman.
Learn by doing, not just by reading or watching
Sign up for a free account to start a VM playground right on this page, track your progress, and get notified about new learning materials.