Podman with Kubernetes: Play Before You Apply
Podman = Pod + Manager
podman CLI isn't just for working with containers, but if you were to combine group of containers logically into Pods,
it will manage those pods for you as well.
Although compatible with Pods,podman as a tool is opinionated; it is developed not to replace Kubernetes as an
Orchestration tool.
A few cases where Podman Pods can be useful:
- Your container application needs to ported to a Kubernetes Cluster and you need
to work on testing the application locally without an actual cluster or
kubectltoolbox available. - You wish to debug or fix some Kubernetes artifacts locally, without having to create single-node clusters or dismantle the Pod into individual containers.
This tutorial will help you master the podman CLI's cool features that work well alongside Kubernetes.
You will also learn how to develop and test Pods locally without any complicated K8s setups before
actual deployments.
Finally you will see how podman can become a swiss-knife when it comes to K8s deployment.
If you wish to learn more about Podman and its features, check out some other tutorials on iximiuz Labs:
Infra Containers
Podman leverages the concept of creating an Infra container whenever a pod is created.
The Infra container's responsibility to create and maintain the required Linux Namespace for the containers in the pod to be used and shared. Once the pod is removed the infra container removes the namespace and the resources too.
Each container is monitored using conmon that is fork / exec'd by the OCI
runtime.
conmon is responsible for the following two main tasks:
- handling interaction everytime the user attaches to the container's STDOUT, STDERR.
- capture and pass the exit codes of the containers back to
podman
Each container has its own conmon and each pod has its own Infra container.
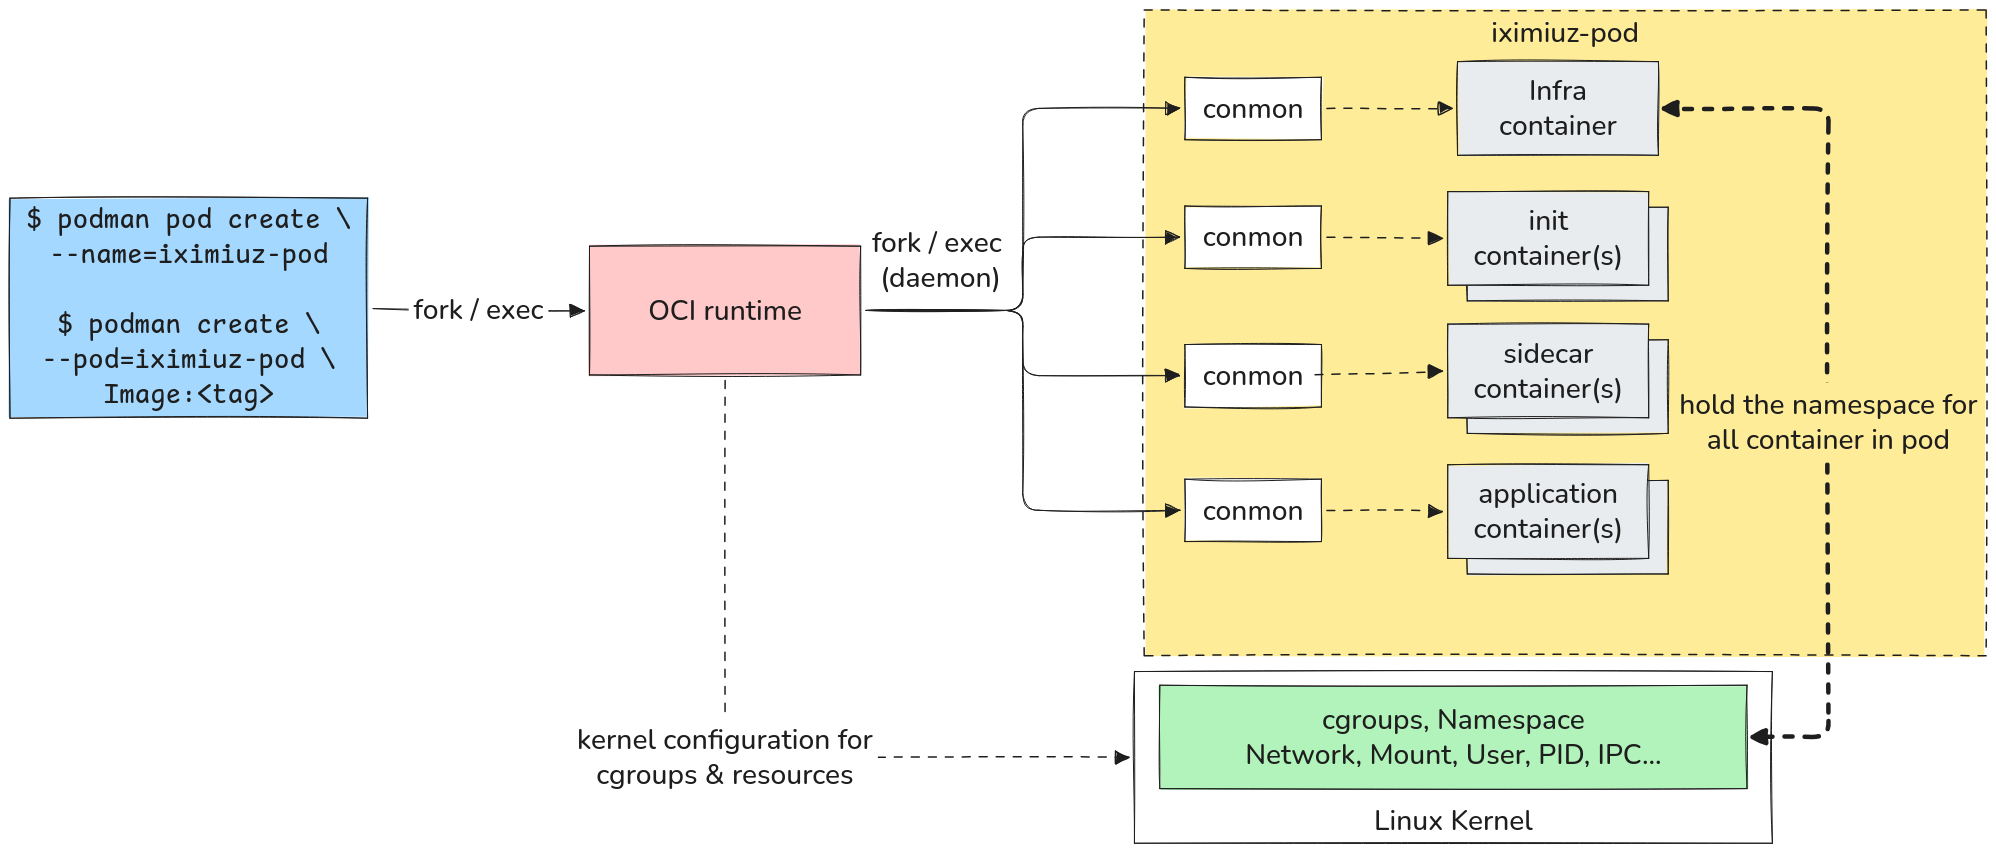
Diagram describing how podman pod creates infra, init, sidecar and application containers.
Creating an Infra Container
Let's create a pod and observe its infra container:
podman pod create --name=iximiuz-pod
Check the created pod using:
podman pod ps
You will already observe that the # of CONTAINERS column is already 1.
Inspecting Deeper
Let's check the infra container in detail:
podman ps --pod -a
will already show you a <hash>-infra container created.
Let's inspect the container:
INFRA_CTR=$(podman inspect --type pod iximiuz-pod -f '{{ .InfraContainerID }}')
podman inspect $INFRA_CTR -f '{{ .Config.Entrypoint }}\n {{ .ImageName }}'
Note that there is no container image for Infra container -
it uses catatonit container init binary.
Different Infra Container Image
Infra containers are not very different from Kubernetes Pause Containers. In fact, you can create a pod with an Infra container to use a specific image:
podman pod create \
  --name=infra-k8s-pause \
  --infra-image=registry.k8s.io/pause:latest
and inspect the container:
INFRA_CTR=$(podman inspect --type pod infra-k8s-pause -f '{{ .InfraContainerID }}')
podman inspect $INFRA_CTR -f '{{ .Config.Entrypoint }}\n, {{ .ImageName }}'
This time you should see /pause and registry.k8s.io/pause:latest respectively.
Without Infra Containers
you can even create a pod without any infra container:
podman pod create --name=no-infra-pod --infra=false
Running a pod without an infra container, may work well for pods that are planned to be run in absolute isolation. Since there is no infra container holding the namespace, no container in the pod can see the other containers or connect via the network namespace.
Upon checking the pod creation state:
podman pod ps
You will observe # OF CONTAINERS for no-infra-pod is 0.
Let's inspect the shared Namespaces of the no-infra-pod with iximiuz-pod.
podman pod inspect iximiuz-pod -f '{{ .SharedNamespaces }}'
should show [ipc net uts]
podman pod inspect no-infra-pod -f '{{ .SharedNamespaces }}'
should show []. Complete Isolation between containers.
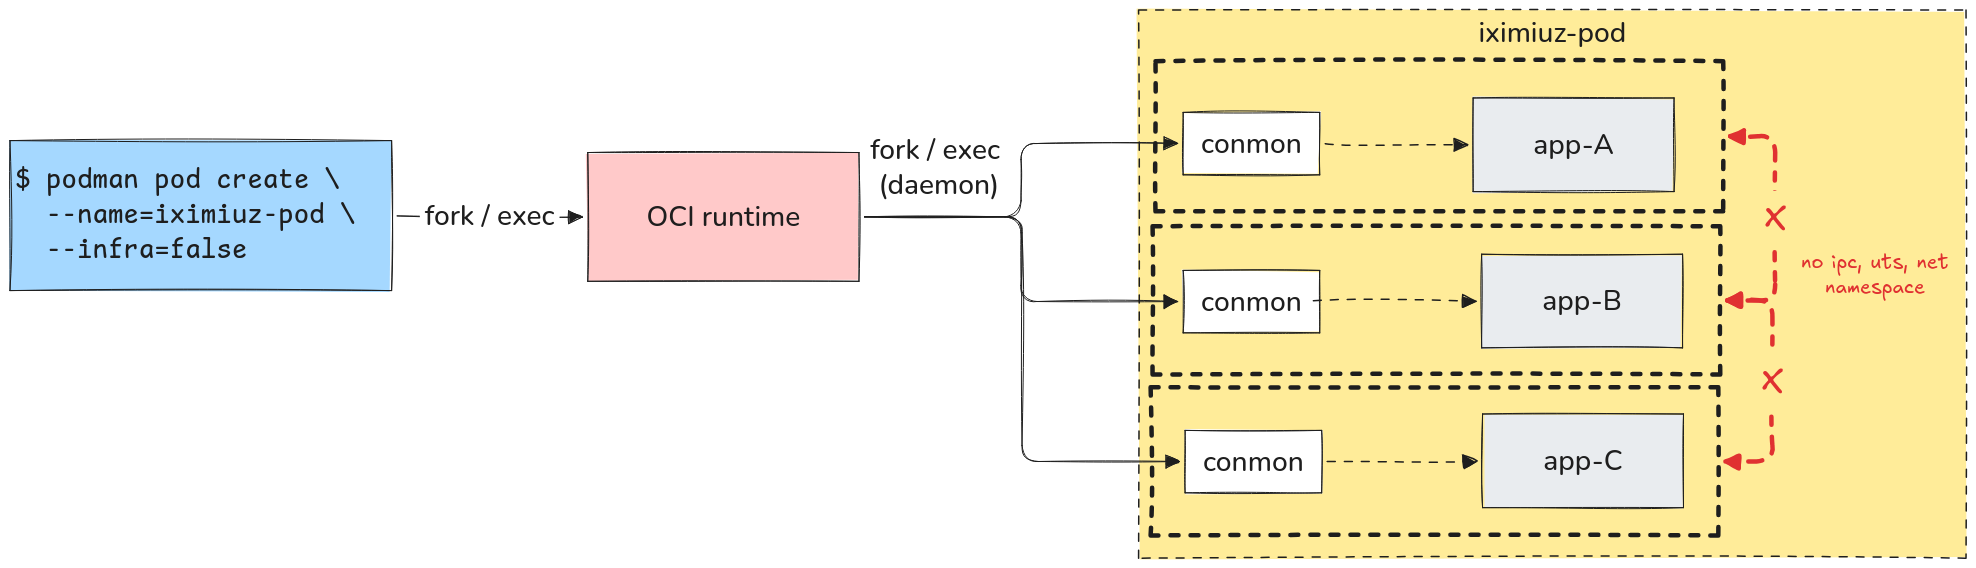
Podman pod without any infra container creates a pod with no shared namespaces, providing complete isolation
Pod Lifecycle Management
We already saw the podman pod create command to create pods. Let's look into other commands to manage
pods as well as adding containers to them.
Adding Containers to Pods
We use the same command as creating a container with addition of --pod <podName> flag.
Let's add an nginx container alongwith a alpine container which keeps listening forever to iximiuz-pod:
podman create \
  --pod=iximiuz-pod \
  --name=iximiuz-alpine \
  alpine:latest sleep infinity

podman create \
  --pod=iximiuz-pod \
  --name=iximiuz-nginx \
  nginx:latest
we are using podman create not podman pod create here
List Containers in Pods
Use the following command to list all containers in all pods:
podman pod ps --ctr-names
List containers in a specific pod:
podman ps -a --filter pod=iximiuz-pod
Running a Pod
run the pod using:
podman pod start iximiuz-pod
Pod Logs
You can view the overall logs of the pods:
podman pod logs iximiuz-pod
Or see logs of a specific container in the pod:
podman pod logs iximiuz-pod -c iximiuz-nginx
Stopping / Removing Pod
to stop a pod:
podman pod stop iximiuz-pod
to remove / cleanup a pod:
podman pod rm iximiuz-pod
Podman Quadlets
All the commands above were imperative type i.e., where we had to create a pod first and then add containers to them.
We can leverage Podman Quadlets to create and run pods in a declarative fashion by using
.pod and .container files.
Let's start with creating the directory where the Quadlet files will persist:
mkdir -p ~/.config/containers/systemd/
We will create a iximiuz-quadlet.pod file in the directory with following
content:
cat > ~/.config/containers/systemd/iximiuz-quadlet.pod << _EOF
[Pod]
PublishPort=18080:80
_EOF
We will add an nginx container to the pod by using a separate web.container file:
cat > ~/.config/containers/systemd/web.container << _EOF
[Container]

Image=docker.io/library/nginx:latest
Pod=iximiuz-quadlet.pod

[Service]
Restart=always

[Install]
WantedBy=default.target
_EOF
Pod property let's podman know that web container is part of
iximiuz-quadlet pod.
Reload the User's System Daemon:
systemctl --user daemon-reload
Check by listing the Quadlets for the user:
podman quadlet list
Start the pod and perform a local test:
systemctl --user start iximiuz-quadlet-pod
Check if the nginx container is reachable:
curl http://localhost:18080
Stop the pod completely using:
systemctl --user stop iximiuz-quadlet-pod
Generating K8S Artifacts with Podman
Podman provides helpful CLI commands that can generate Kubernetes-specific artifacts from already created pods.
Currently following kinds can be generated:
- K8s Pod (default)
- K8s Deployment
- K8s Job
- K8s Daemonset
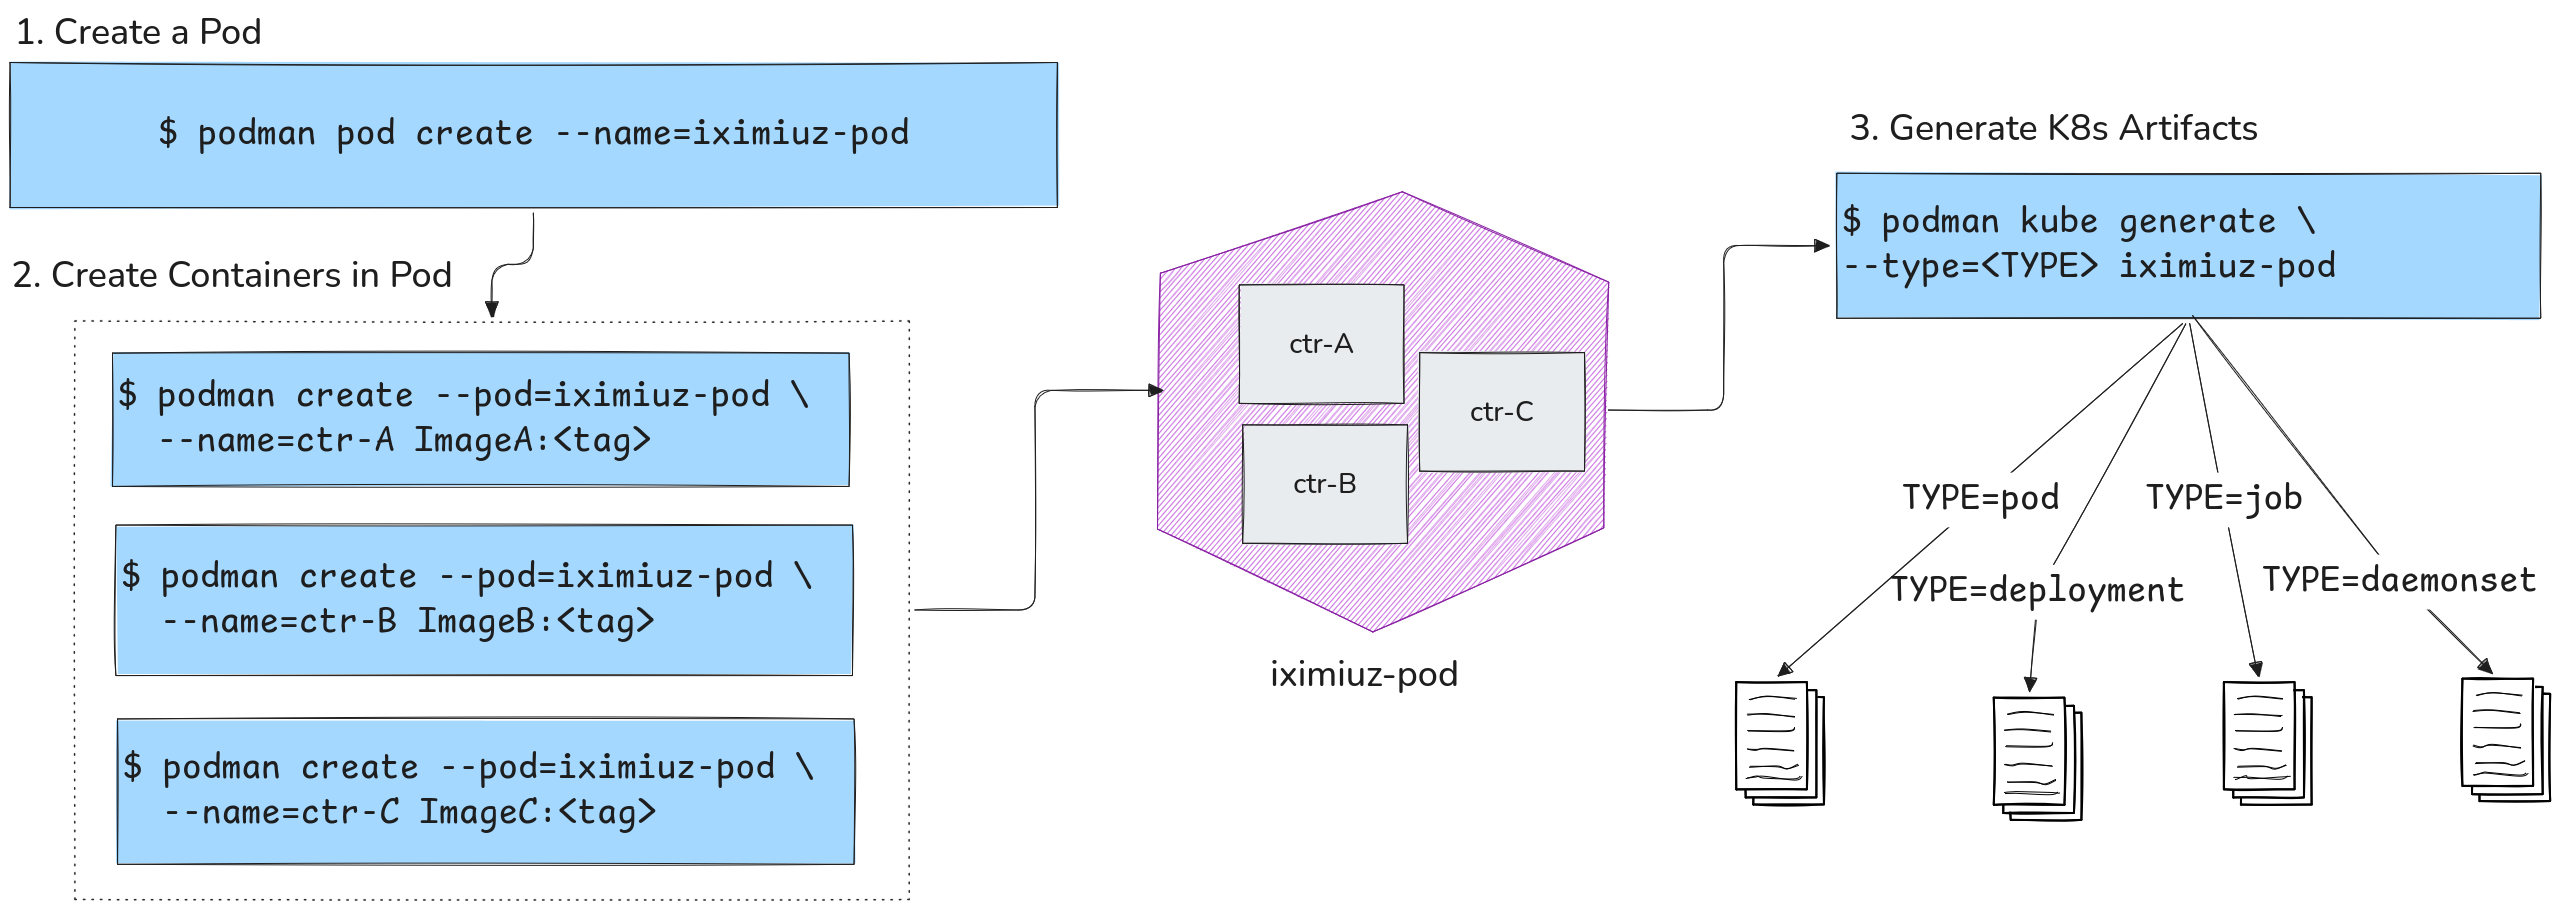
Generate K8S YAML files for different types from an existing pod
Use the podman kube generate CLI to create the respective YAML files:
podman kube generate \
  --type={daemonset,deployment,job,pod} \
  -f k8s.yml
  pod_name
Use the -f flag to store the YAML configuration
in a specific file. If not specified the configuration will be displayed on STDOUT.
Pod YAML file
podman kube generate iximiuz-pod
podman kube generate --type=pod iximiuz-pod
The default type will be a Pod.
Daemonset YAML file
podman kube generate --type=daemonset iximiuz-pod
Deployment YAML file
podman kube generate --type=deployment iximiuz-pod
You can explicitly specify replicas for the deployment using the --replicas flag.
podman kube generate \
  --type=deployment \
  --replicas=2 \
  iximiuz-pod
Job YAML file
podman kube generate \
  --type=job \
  iximiuz-pod
Service YAML file
You can also generate a K8s Service file to expose ports for pods.
Let's create a pod that exposes port 8080 on host:
podman pod create \
  --name=iximiuz-pod-ports \
  -p 8080:80
Add an nginx container to the pod:
podman create \
  --name=iximiuz-nginx-ports \
  --pod=iximiuz-pod-ports \
  nginx:latest
Generate a service YAML file using:
podman kube generate --service iximiuz-pod-ports
This will generate a service YAML + Pod spec (default).
We can combine the service YAML file with different types:
podman kube generate \
  --service \
  --type=deployment \
  iximiuz-pod-ports
Persistent Volume Claim YAML file
You can create simple PersistentVolumeClaim from a podman volume:
podman volume create iximiuz-volume
podman kube generate iximiuz-volume
Development / Deployment / Testing Workflow with podman kube
We saw how we can leverage podman kube generate to develop K8s artifacts (albeit limited kinds).
The podman kube subcommand CLIs provide additional features:
podman kube play: Testing external K8s Artifacts locally without a K8s Cluster
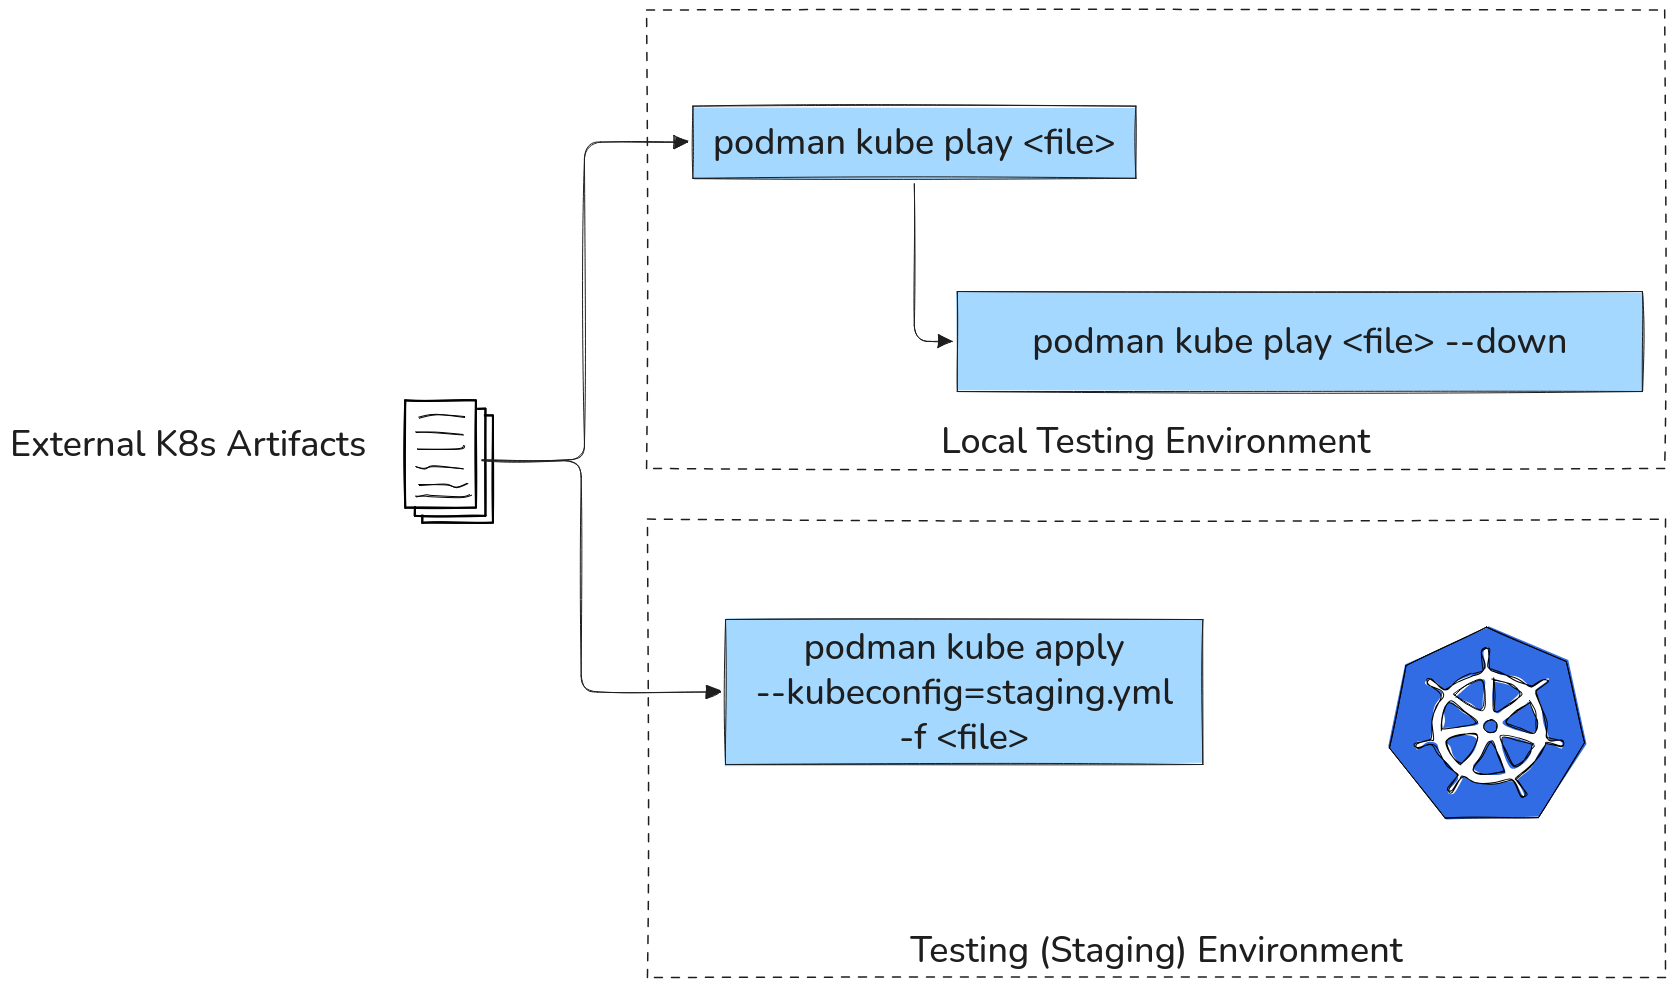
Potential Testing Workflow with Podman
podman kube apply: deploying local Artifacts to actual K8s Clusters
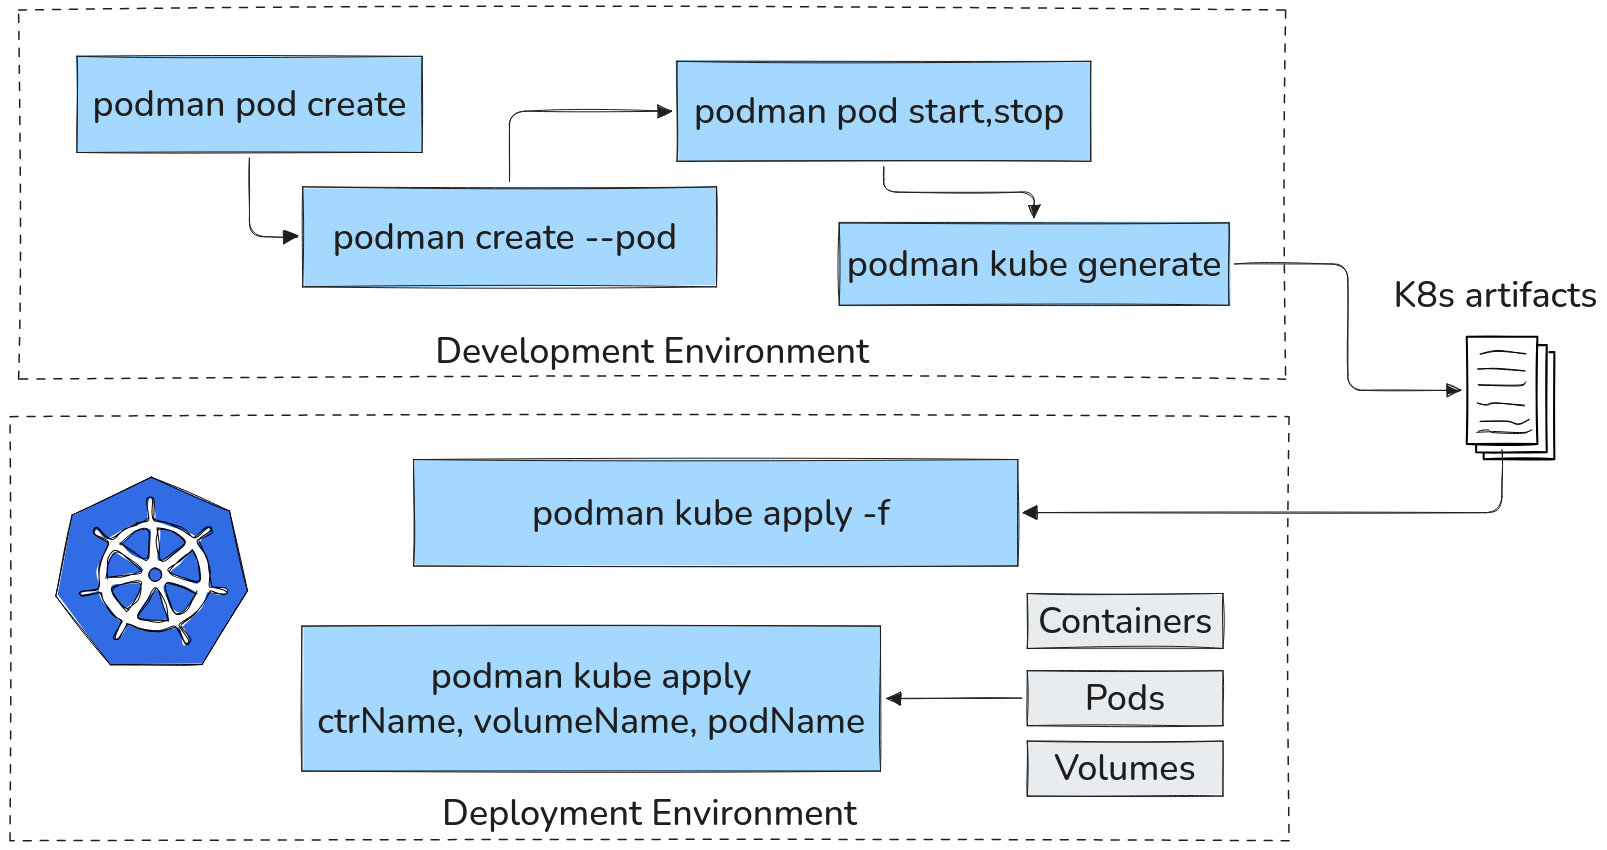
Development / Deployment Workflow with podman kube
Local Testing Without a Cluster
By using podman kube play command, we can test artifacts locally without
any K8s cluster.
This is valuable when you have K8s artifacts file that you wish to run locally to understand, debug behavior without using tools like kind or setting up virtual machines locally.
Currently only the following type of K8s Kinds are supported:
- Pod
- Deployment
- PersistentVolumeClaim
- ConfigMap
- Secret
- DaemonSet
- Job
Podman is opinionated as a tool, and its developers know that they are not planning to recreate functionalities provided already by Kubernetes, hence currently only limited K8s kinds are available.
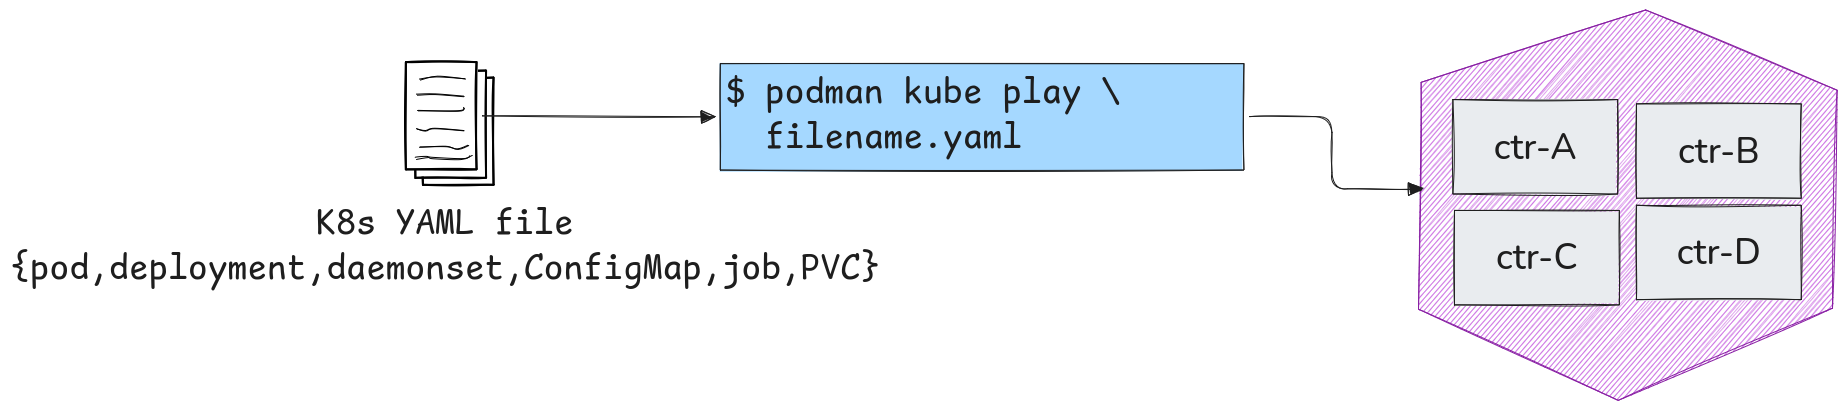
Use podman kube play on an existing k8s artifact YAML file to test locally without a cluster
Assume this is a deployemnt YAML file you wish to test locally without a cluster:
cat > test-deployment.yml << _EOF
apiVersion: apps/v1
kind: Deployment
metadata:
  name: demo-nginx
spec:
  replicas: 2
  selector:
    matchLabels:
      app: demo-nginx
  template:
    metadata:
      labels:
        app: demo-nginx
    spec:
      containers:
        - name: nginx
          image: docker.io/library/nginx:stable
          ports:
            - containerPort: 80
_EOF
We can deploy it locally with:
podman kube play test-deployment.yml
podman kube play will only allow one replica even through
we explicitly mention replicas: 2. Remember podman kube play
is only for testing purposes.
Deploying to a Cluster with Podman
You can also deploy K8s kinds directly to a cluster via the podman kube apply CLI.
The CLI can ONLY deploy podman containers, pods or volumes directly to a cluster.
You can deploy pods, volumes, and containers without having to generate YAML files for them first.
Setup Phase
We need to provide our Development Environment the Deployment Environment's K8s configuration.
We have two tabs:
- dev-env: Development Environment (only podman available)
- deploy-env: Deployment Environment (only kubernetes available)
deploy-env:
Copy the content of following file:
/home/laborant/.kube/config
dev-env:
Paste the content into a config file
using a text editor of your choice (nano, vim):
mkdir -p /home/laborant/.kube
touch /home/laborant/.kube/config
# vim or nano ~/.kube/config
Locate the following line in the content:
server: https://127.0.0.1:6443
Replace the value to:
server: https://kubernetes:6443
We are ready to deploy!
Deploy a Pod to a Cluster
Let's deploy a production nginx pod to the deployment environment.
dev-env:
- create a pod called
prod-pod:
podman pod create \
  --name=prod-pod \
  -p 28080:80
- add an
nginxcontainer toprod-podcalledprod-nginx:
podman create \
  --pod=prod-pod \
  --name=prod-nginx \
  nginx:latest
- deploy
prod-podto deployment environment:
podman kube apply \
  --kubeconfig ~/.kube/config \
  prod-pod
deploy-env:
Perform checks in deployment environment:
kubectl get pods
kubectl describe pods prod-pod
You should be able to see the prod-pod deployed.
Deploy a Volume to a Cluster
dev-env:
- Create a Volume
podman volume create deployment-volume
- Deploy the Volume
podman kube apply \
  --kubeconfig ~/.kube/config \
  deployment-volume
deploy-env:
kubectl get pvc
kubectl describe pvc deployment-volume
Deploy a Container to a Cluster
dev-env:
Create an prod-alpine container:
podman create \
  --name=prod-alpine \
  alpine:latest sleep infinity
Deploy the container to the pod:
podman kube apply \
  --kubeconfig ~/.kube/config \
  prod-alpine
deploy-env:
Note that a single container will also be deployed as a pod.
In our case prod-alpine-pod (with the -pod suffix)
kubectl get pods
kubectl describe pods prod-alpine-pod
Similarly, by using -f you can deploy artifacts in YAML files with kubectl kube apply -f.
Inference
Leveraging podman CLI with Kubernetes adds a positive Developer Experience (DX)
since it tends to provide a lot of helpful utilities that would otherwise
require juggling with many tools back-and-forth.
podman scores high in terms of integration with systemd as well Kubernetes, making it a good tool to have in a developer's arsenal.
Resources
Podman in Action by Daniel Welsh. Manning Publications
About the Author

Shan Desai
Software guy who loves making generic things out of specific things, loves learning new things and helping fellow engineers out.
Writes about
Frequently covers
More tutorials you might like
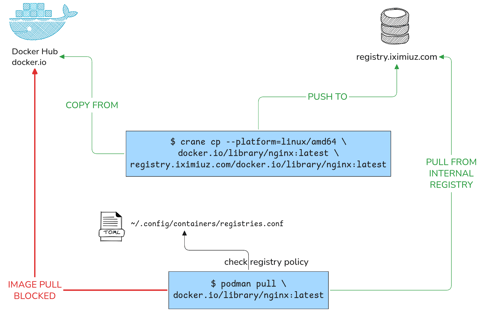
Podman Configuration: Registries, Runtimes and Containers Without a Restart
This tutorial will help you configure your rootless podman instance to pull from only from specific registries, using different OCI runtimes as well as configure all containers to have specific attributes all without any daemon restarts or sudo calls.
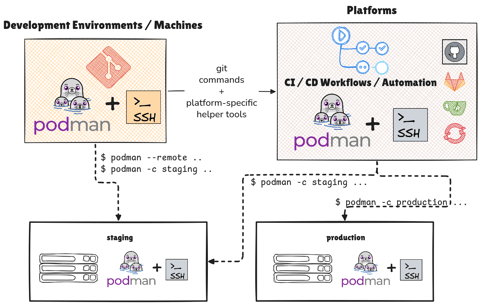
Managing Podman Instances Remotely
Learn how you can control multiple podman instances on remote machines without SSHing into them manually. Also learn to deploy your Compose application stacks without SCP / SSH with podman remote feature and Docker Compose v2
Podman Containers with systemd
Learn how to manage Podman containers using systemd on your host machine.
Systemd Inside Containers Using Podman
Learn how to use systemd inside containers and manage their lifecycle with podman.
Learn by doing, not just by reading or watching
Sign up for a free account to start a VM playground right on this page, track your progress, and get notified about new learning materials.