Podman and Linux Namespaces

podman is a very well-known tool for container management in the DevOps space alongside docker.
This tutorial does an architectural deep-dive into podman and provides some interesting Linux administrative insights on concepts like
Linux User namespaces.
Since podman follows the Open Container Initiative (OCI) for running and managing containers, the User Experience of using it is not very different than docker.
Architecture
One of the most common differences between podman and docker is that podman is daemonless by architecture. It is easier to install,
has lesser moving parts in terms of software unlike docker.
Installing podman does not require you update your package managers sources lists (/etc/apt/sources.list.d) and is widely available on
all major Linux distribution systems.
This is due the the fork / exec model is it designed on where as, docker is designed using a client-server
model which requires two SystemD services (dockerd, containerd) to manage containers.
podman relies on the fork/exec model for running containers, which means the container process is a child of podman process itself which is the child of the User's process.
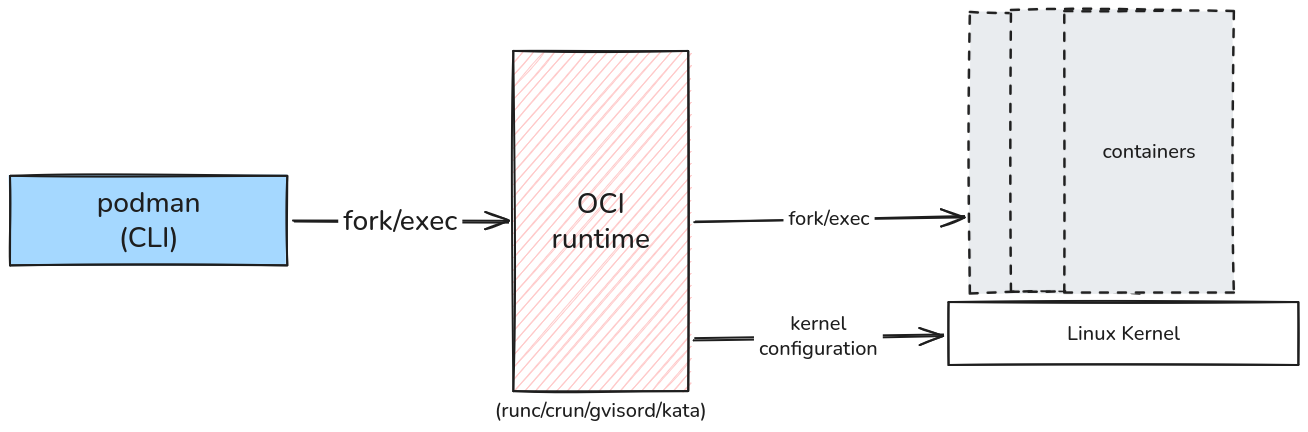
Podman's fork/exec model
Linux User Namespaces
By leveraging Linux User Namespaces, podman provides the processes within a container an environment that can be re-mapped on the host
machine to a non-root host user.
In a nutshell, within a User namespace you can act as root, outside it you are just a normal Linux user without privileges.
This is very useful since users can have their dedicated User namespaces which do not cause conflicts or security issues on commonly shared
Linux machines. This is one of the main reasons High-Performance Computing (HPC) environments have started using podman over docker.
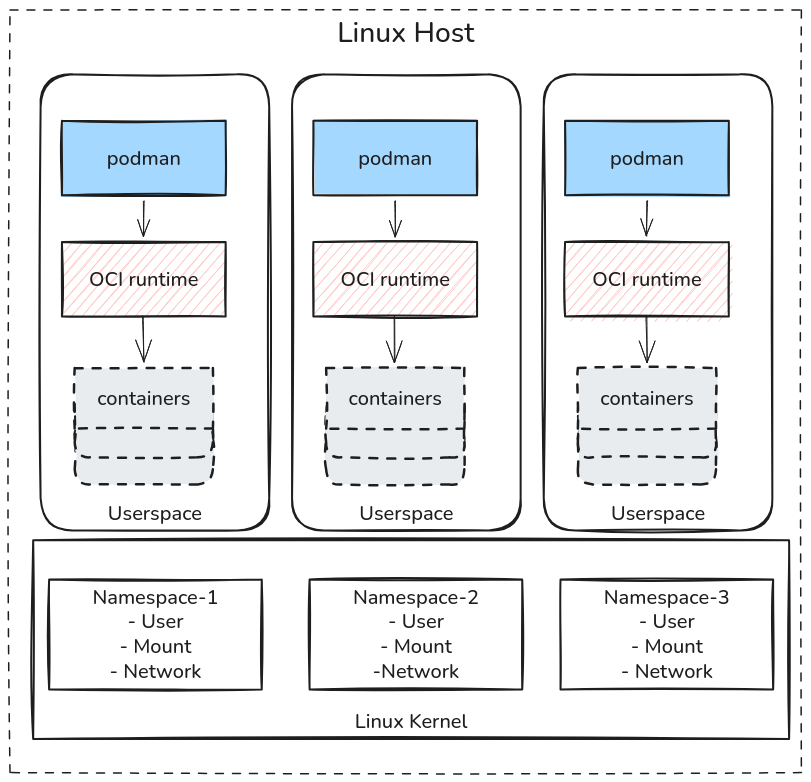
Each user triggers their container workloads in their own userspace
Understanding Users and Groups from the container's image
Linux processes are assigned User Identifiers (UIDs) and Group Identifiers (GIDs) and stored on filesystem along with permissions values. Linux uses Discretionary Access Control which means who gets to access what - is based on the UIDs and GIDs and what permissions they have.
In our Playground we are logged into as laborant user. To determine what our UID is use the following command:
id
which shows we are UID 1001 on the machine. Similar each new user created on the machine
get their own set of unique UID / GID.
Linux allows UIDs ranging from 0 to 232(4,294,967,296).
However, a container image can be created within multiple users that maybe needed to run the final container process.
Let's find all available users in a standard ubuntu:latest container image:
podman run \
    --user=root \
    --rm ubuntu:latest \
    bash -c "find / -mount -printf \"%U=%u\n\" | sort -un"
You will observe more than one user as part of the image. In the image you need _apt user to run the apt-get command,
which are not accessible to a non-root user like ubuntu.
As non-privileged user Linux will not allow user accounts from using more than one UID -
user 1001 is allowed to only to be 1001 and not 0, or 42, or even your neighbour 1000 and won't be allowed to
create files / directories or changes with such UIDs.
User Namespaces Mapping
The way Linux will allow using different UIDs / GIDs is by mapping the current UID/GID of the user on the host machine to a different range of UIDs / GIDs inside the namespace.
The idea is that a process can have a normal, unprivileged UID outside a user namespace, while within the namespace the process can have UID 0 (root).
The information about the UIDs exist in the /etc/passwd and GIDs in /etc/group.
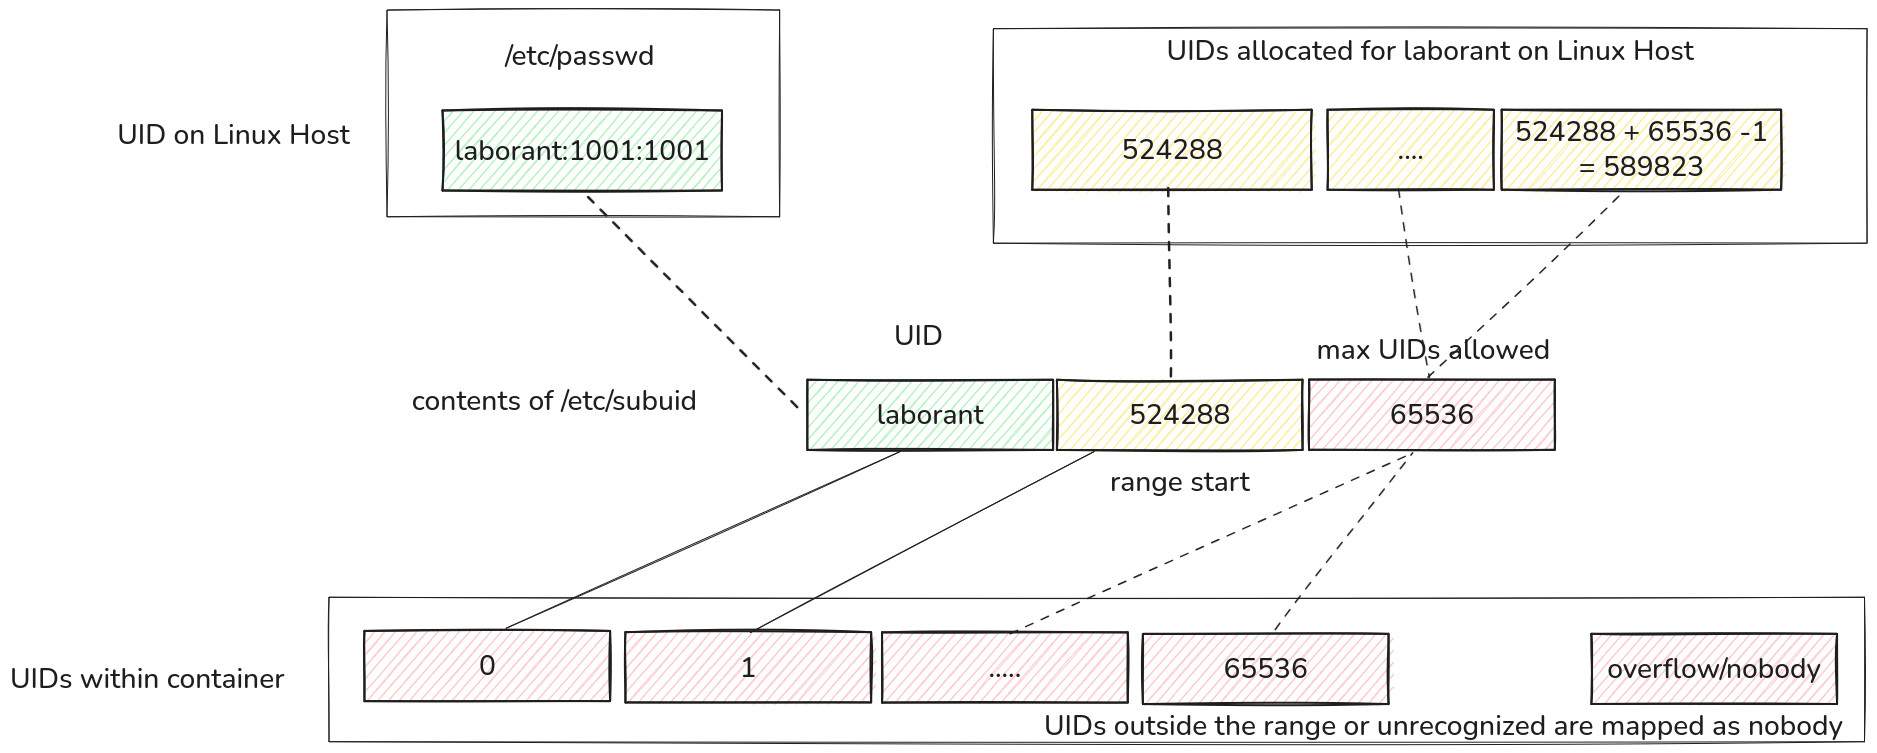
The mapping information for UIDs exists in /etc/subuid and GIDs in /etc/subgid.
The way to read the subuid and subgid file content is described in the diagram.
User Namespace mapping for podman on the machine
The mapping shows that within the user namespace - we can access UIDs 1001 as well as
524288, 524289, etc. all the way upto 524288 + 65536 - 1 = 589283 UIDs.
Similarly for /etc/subgid the same GID ranges and mapping exist.
The mapping within our ubuntu:latest environment would mean:
| Within Container | In Namespace | On Host |
|---|---|---|
0=root | 1001=laborant | 1001=laborant |
42=apt | 524288+42-1=524329 | 524329 |
1000=ubuntu | 524288+1000-1=525287 | 525287 |
Try this out by creating files in the ubuntu container using the following commands
and verify on the host machine:
podman run --rm \
    --user=root \
    -v ${PWD}:/tmp \
    ubuntu:latest \
    bash -c "touch /tmp/test_root; ls -l /tmp/test_root"
this creates a file on the host machine but as laborant UID / GID not as root.
ls -l
Similarly create files as ubuntu user in the container:
podman run --rm \
    --user=root\
    -v ${PWD}:/tmp \
    ubuntu:latest \
    bash -c "touch /tmp/test_ubuntu; chown ubuntu:ubuntu /tmp/test_ubuntu; ls -l /tmp/test_ubuntu"
this creates a file on the host machine but as 525287 UID / GID not as user 1000.
Verify on the host machine using:
ls -l
the -1 in the calculation is because root always starts with UID 0. So simple arithmetic.
Entering User namespaces with podman unshare
podman CLI is well-integrated with Linux Namespaces that it provides a special unshare
sub-command even to enter a namespace without spawning a container.
podman unshare allows you to enter a user namespace to examine the current state in the namespace and what is going on in it.
The syntax is quite simple:
podman unshare COMMAND
As an example, let's see what the UID mapping looks like on the host machine:
cat /proc/self/uid_map
and the same command within the namespace:
podman unshare cat /proc/self/uid_map
The output in the namespace tells you:
- root(
0) is mapped to one-and-only one user1001 - UIDs starting from
1in the namespaces start with524288with max range upto65536
As mentioned in the Namespace mapping diagram, any unrecognized UID not in the mapping is reported as a nobody user.
A simple example, would be trying to work with Host's root user files:
ls -lha / # on host
will show root ownership, but the same files in the namespaces will show nobody ownership.
podman unshare ls -lha /
Because the host UID 0 is not mapped into laborant's Userspace - the kernel reports
as nobody user.
This makes working with podman extremely secure because any changes within the namespace to such files will not be allowed.
Example, try changing the /etc/passwd file which is an extremely sensitive file:
podman unshare bash -c "ls -la /etc/passwd; touch /etc/passwd"
this should throw a permission denied error.
The UID mapping is easily verified by checking that root in the container is just the Linux UID:
ls -la /home/laborant # ownership: laborant
and within the namespace:
podman unshare ls -la /home/laborant # ownership: root
To remove files created in the namespace - simply perform the cleanup within the namespace:
podman unshare rm -rf test_*
Rootless Container with podman and namespaces
The most important technology that podman banks on is the use of Linux Namespaces for running rootless containers.
A rootless container is as the word mentions - without root, implying running without root privileges and using unprivileged Linux Kernel's features to make running containerized workloads secure.
Podman does the following steps in order to provide the containers to be run in a namespace as rootless containers:
- The very first time when a podman command is run, it reads the
/etc/subuid& the/etc/subgidfiles to lookup the current user's UID or username in them. - Upon finding the entry, it uses the content of these files as well as the current UID, GID of the user to create a Namespace.
- Podman then launches a special podman pause process (not to be confused with
podman pausecommand) whose responsibility is to keep the created Namespace open. This process can be viewed as follows:
podman info # trigger a podman command
journalctl | grep "podman-pause-*"
journalctl | grep ".scope"
the podman pause scope process only ever starts after the very first podman CLI
is called. If you start a machine fresh / user has just logged in - this process will
not exist.
podman-pause process keeps running till the user logs out. To explicitly remove this
process:
podman system migrate
Upon checking the journald entries again we will see a new podman-process- scope started
with a different end number / hash.
journalctl | grep ".scope"
- any subsequent containers run or spun up by
podmanCLI will join the namespace created by thepodman-pause-scope process.
Adding / Updating UID Mappings
In most Linux distributions, upon adding new user using useradd the /etc/subuid and /etc/subgid
is automatically updated by picking the very next UID after the previous user's range.
Verify by adding a new laborant2 user to the machine:
sudo useradd -m -s /bin/bash laborant2 # add new user
cat /etc/subuid /etc/subgid
You can also verify the mappings via podman info for the current User:
podman info --format json | jq '.host.idMappings'
Updating UID/GID mappings
one can easily change the mappings by editing the /etc/subuid and /etc/subgid files for the starting UID
or even change the allowed range of UIDs.
When remapping always make sure you are using NON-ALLOCATED UIDs, hence always use larger UIDs whenever possible. It could cause serious issues when already setup UIDs are allocated for ranges.
Let's change our mappings so that:
laborantuser uses100000:65536
NOTE:
/etc/subuidand/etc/subgidfiles needsudoprivileges to be edited
the file should look like:
laborant:100000:65536
verify using:
podman info --format json | jq '.host.idMappings'
Gotchas when changing mappings
It is vital to remember that the podman-pause process hold the created Namespace for the user till they log out.
This process runs the very first time any podman CLI is called.
If you have already run a podman commands in the current session and then subsequently changed the mappings,
the podman info will still show stale mapping values because the pause process still hold the old Namespace.
podman info --format json | jq '.host.idMappings'

sudo vim /etc/subuid # changed uid values

podman info # will still show the old mappings
To perform a remapping either login afresh or use:
podman system migrate
to stop the pause process and start a new one. Now the mappings for the user should be refreshed.
Verify using:
podman info --format json
Sources
About the Author
Shan Desai
Software guy who loves making generic things out of specific things, loves learning new things and helping fellow engineers out.
Writes about
Frequently covers