Kubernetes Security Compliance Best Practices

Kubernetes Security Compliance Best Practices
Kubernetes has become the de-facto standard for container orchestration, but its complex nature creates a wide attack surface. This tutorial will guide you through essential security compliance standards and teach you how to implement practical security measures to protect your containerized workloads.
Understanding Kubernetes Security Compliance Standards
Kubernetes security compliance involves adhering to industry standards and best practices to ensure your clusters are protected against threats. Several key frameworks provide guidance:
Major security compliance frameworks for Kubernetes environments
Key Security Frameworks for Kubernetes
- CIS Kubernetes Benchmark - Security configuration best practices developed by the Center for Internet Security
- NIST SP 800-190 - Application Container Security Guide from the National Institute of Standards and Technology
- MITRE ATT&CK for Containers - Tactics and techniques used by adversaries targeting containerized environments
- Kubernetes Pod Security Standards - Built-in Kubernetes security controls (replacing Pod Security Policies)
CIS Kubernetes Benchmark Scanning
The CIS Kubernetes Benchmark provides configuration guidelines for securing Kubernetes components. Let's use kube-bench to scan our cluster against these standards.
Running a CIS Benchmark Scan with kube-bench
Run the following command to scan the master node components:
kube-bench run --targets=master --benchmark cis-1.23
You'll see results similar to:
[INFO] 1 Control Plane Security Configuration
[PASS] 1.1.1 Ensure that the API server pod specification file permissions are set to 644 or more restrictive (Automated)
[FAIL] 1.1.2 Ensure that the API server pod specification file ownership is set to root:root (Automated)
...
kube-bench automatically detects your Kubernetes version and applies the appropriate CIS benchmark tests. The scan results indicate which configurations pass or fail the security recommendations.
Understanding and Remediating Findings
Let's review the major categories of CIS Benchmark findings:
- Control Plane Security - Configurations for API server, controller manager, scheduler
- Worker Node Security - Kubelet and container runtime configurations
- Policies - Network policies, RBAC, and service accounts
- Authentication and Authorization - Secure access to the API server
Common remediation steps for CIS findings
- API Server Security:
--anonymous-auth=false --authorization-mode=RBAC --enable-admission-plugins=NodeRestriction,PodSecurityPolicy - Kubelet Security:
--anonymous-auth=false --authorization-mode=Webhook --protect-kernel-defaults=true - ETCD Security:
--client-cert-auth=true
--peer-client-cert-auth=true
--auto-tls=false
Image Vulnerability Scanning
Container images may contain vulnerable packages that attackers can exploit. Let's use Trivy to scan images for vulnerabilities.
Scanning the Container Image
Run a scan on the vulnerable deployment we created:
trivy image nginx:1.14.2
The output shows detected vulnerabilities categorized by severity:
2025-03-30T12:34:56.789Z        INFO    Number of language-specific files: 0
2025-03-30T12:34:56.789Z        INFO    Detecting OS vulnerabilities...
2025-03-30T12:34:56.789Z        INFO    Detected OS: debian
2025-03-30T12:34:56.789Z        WARN    This OS version is no longer supported by the distribution: debian 9.6
2025-03-30T12:34:56.789Z        WARN    The vulnerability detection may be insufficient because security updates are not provided

nginx:1.14.2 (debian 9.6)

Total: 152 (UNKNOWN: 0, LOW: 20, MEDIUM: 82, HIGH: 43, CRITICAL: 7)
...
The older nginx:1.14.2 image contains numerous vulnerabilities. In production, you should use up-to-date images with security patches applied.
Implementing a Secure Image Policy
To enforce secure container images, you can:
- Use trusted base images with minimal attack surface
- Implement a CI/CD pipeline that scans images before deployment
- Use admission controllers like OPA Gatekeeper to enforce image policies
Here's an example policy that requires images to be from a trusted registry:
apiVersion: constraints.gatekeeper.sh/v1beta1
kind: K8sTrustedImages
metadata:
  name: trusted-images
spec:
  match:
    kinds:
      - apiGroups: [""]
        kinds: ["Pod"]
    namespaces: ["default"]
  parameters:
    repositories:
      - "gcr.io/my-project"
      - "docker.io/library/nginx"
Kubernetes Resource Security Auditing
Let's audit our cluster resources for security issues using kubeaudit:
kubeaudit all -n default
You might see output like:
ERRO[0000] Container 'nginx' of deployment 'vulnerable-app' is running as root
     -> KubeAuditInfo[default/vulnerable-app-74d6b5b989/nginx]

ERRO[0000] Container 'nginx' of deployment 'vulnerable-app' is privileged
     -> KubeAuditInfo[default/vulnerable-app-74d6b5b989/nginx]

ERRO[0000] Pod uses the host network, which gives the pod access to the loopback device and services listening on localhost of the host
     -> KubeAuditInfo[default/vulnerable-app-74d6b5b989]
Common Security Issues and Remediation
Let's fix the security issues in our vulnerable deployment:
apiVersion: apps/v1
kind: Deployment
metadata:
  name: secure-app
  namespace: default
spec:
  replicas: 1
  selector:
    matchLabels:
      app: secure-app
  template:
    metadata:
      labels:
        app: secure-app
    spec:
      containers:
      - name: nginx
        image: nginx:latest
        ports:
        - containerPort: 80
        securityContext:
          privileged: false
          runAsNonRoot: true
          runAsUser: 1000
          allowPrivilegeEscalation: false
          capabilities:
            drop:
            - ALL
        resources:
          limits:
            cpu: "0.5"
            memory: "512Mi"
          requests:
            cpu: "0.2"
            memory: "256Mi"
      securityContext:
        runAsUser: 1000
        runAsGroup: 3000
        fsGroup: 2000
The secure deployment addresses multiple security issues:
- Uses non-root user (1000)
- Disables privileged mode
- Drops all Linux capabilities
- Prevents privilege escalation
- Doesn't use host namespaces
Implementing Pod Security Standards
Kubernetes v1.25+ replaced Pod Security Policies with Pod Security Standards. The three security levels are:
- Privileged - Unrestricted policy with no security controls
- Baseline - Minimally restrictive policy that prevents known privilege escalation
- Restricted - Heavily restricted policy following security best practices
Let's create a namespace with the restricted profile:
kubectl create namespace secure-workloads

kubectl label --overwrite ns secure-workloads \
  pod-security.kubernetes.io/enforce=restricted \
  pod-security.kubernetes.io/warn=restricted \
  pod-security.kubernetes.io/audit=restricted
Now let's try to deploy our vulnerable workload to this namespace:
kubectl apply -f /tmp/vulnerable-deployment.yaml -n secure-workloads
You'll see an error because the Pod doesn't meet the restricted security requirements:
Error from server (Forbidden): error when creating "/tmp/vulnerable-deployment.yaml": pods "vulnerable-app" is forbidden: violates PodSecurity "restricted:latest": privileged (container "nginx" must not set securityContext.privileged=true), hostNetwork (pod must not set spec.hostNetwork=true), hostProcess (pod must not set spec.hostProcess=true)
Network Security with Network Policies
By default, Kubernetes allows all pods to communicate with each other. Let's create a network policy to restrict traffic:
apiVersion: networking.k8s.io/v1
kind: NetworkPolicy
metadata:
  name: default-deny-all
  namespace: default
spec:
  podSelector: {}
  policyTypes:
  - Ingress
  - Egress
This policy denies all traffic to and from pods in the default namespace. Now let's create a more granular policy:
apiVersion: networking.k8s.io/v1
kind: NetworkPolicy
metadata:
  name: allow-nginx
  namespace: default
spec:
  podSelector:
    matchLabels:
      app: secure-app
  policyTypes:
  - Ingress
  ingress:
  - from:
    - podSelector:
        matchLabels:
          role: frontend
    ports:
    - protocol: TCP
      port: 80
This allows only pods with the label role: frontend to access our secure-app pods on port 80.
RBAC and Service Account Security
Role-Based Access Control (RBAC) is essential for limiting access to Kubernetes resources. Let's create a restricted service account:
apiVersion: v1
kind: ServiceAccount
metadata:
  name: restricted-sa
  namespace: default
---
apiVersion: rbac.authorization.k8s.io/v1
kind: Role
metadata:
  name: pod-reader
  namespace: default
rules:
- apiGroups: [""]
  resources: ["pods"]
  verbs: ["get", "watch", "list"]
---
apiVersion: rbac.authorization.k8s.io/v1
kind: RoleBinding
metadata:
  name: read-pods
  namespace: default
subjects:
- kind: ServiceAccount
  name: restricted-sa
  namespace: default
roleRef:
  kind: Role
  name: pod-reader
  apiGroup: rbac.authorization.k8s.io
This creates a service account that can only read pods in the default namespace.
Never use overly permissive service accounts, especially for production workloads. Always apply the principle of least privilege.
Security Compliance Checklist
Use this checklist to ensure your Kubernetes clusters meet security compliance requirements:
- ✅ Run CIS Benchmark scans regularly
- ✅ Scan all container images for vulnerabilities
- ✅ Implement Pod Security Standards
- ✅ Use Network Policies to restrict traffic
- ✅ Configure RBAC with least privilege principles
- ✅ Encrypt sensitive data using Secrets and encryption
- ✅ Implement strong authentication methods
- ✅ Enable audit logging for all cluster activities
- ✅ Use admission controllers to enforce security policies
- ✅ Perform regular security assessments and penetration tests
Conclusion
Kubernetes security compliance requires a multi-layered approach addressing various aspects of the container ecosystem. By implementing the techniques covered in this tutorial, you can significantly improve your cluster's security posture.
Remember that security is a continuous process, not a one-time task. Regularly review and update your security measures as new vulnerabilities and threats emerge.
For additional resources, check out:
About the Author

More tutorials you might like
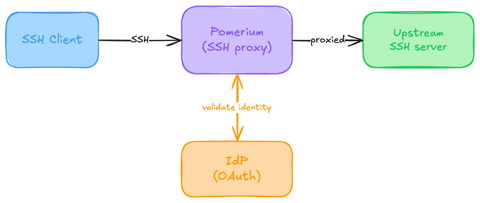
Native SSH Access with Pomerium
Pomerium can be used as a native SSH reverse proxy, adding OAuth authentication and flexible Pomerium policy enforcement to standard SSH connections, without the need for tunnels, or custom clients or servers.

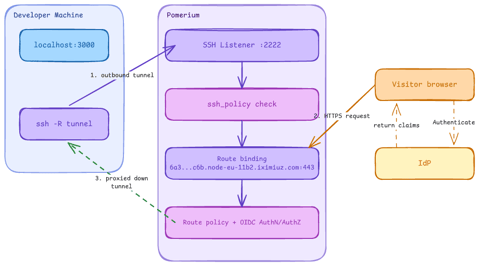
Native SSH Reverse Tunneling with Pomerium
Use Pomerium's native SSH support to publish a local service through a standard reverse SSH tunnel, with OpenID Connect (OIDC) authentication and continuous authorization on every request. Reach services behind Network Address Translation (NAT) without firewall holes or custom agents, and control both who can use the service and who can open the tunnel. Application traffic stays on infrastructure you control.
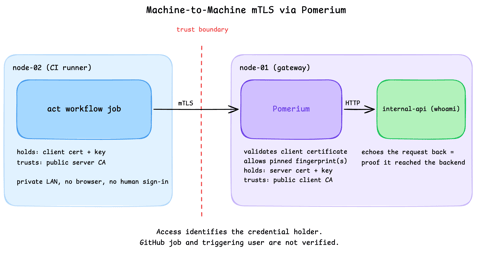
Secure Machine-to-Machine Access with mTLS and Pomerium
Run a GitHub Actions-compatible continuous integration (CI) job on a private runner and protect its internal API call with mutual TLS (mTLS) and Pomerium. Build separate server and client trust chains, authorize one machine certificate by fingerprint, then revoke, restore, and rotate its credentials through live policy changes.
Harden Access to OpenClaw with Pomerium
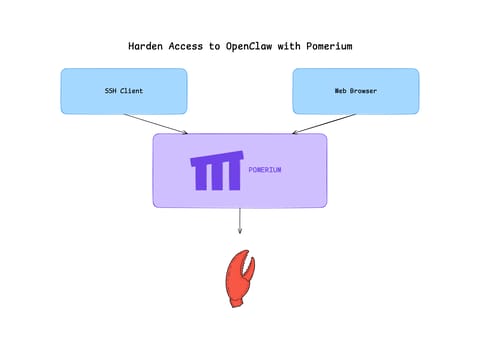
Put OpenClaw, a self-hosted AI assistant with shell and file access, behind a web route and an SSH route, both gated by the same identity and Pomerium's context-aware policy. OpenClaw runs in trusted-proxy mode, trusting signed identity headers instead of its own login, while Pomerium's native SSH proxy signs short-lived certificates for shell access.
Learn by doing, not just by reading or watching
Sign up for a free account to start a VM playground right on this page, track your progress, and get notified about new learning materials.