Deploy basic addons into the simplified kubernetes cluster
Install Core Kubernetes Addons
In this unit, you will gain hands-on experience verifying the installation and operation of critical Kubernetes add-ons, ensuring your cluster is ready for real-world workloads.
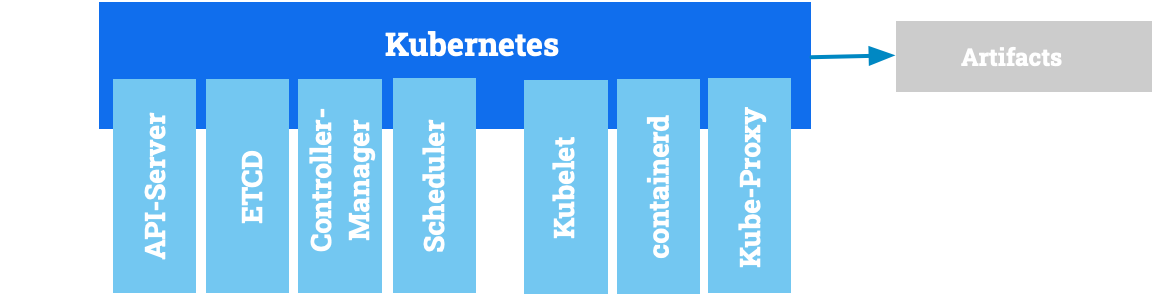
git clone https://github.com/bee-infraverse/kubernetes-the-hard-way-simplified.git
cd ~/kubernetes-the-hard-way-simplified/bootstrap
# check env.sh and overwrite versions
# Need time to download, deploy binaries and start the services!
./bootstrap.sh
Prepare your env add deploy the core addons coredns, metrics-server and local path provisioner.
Prepare and check the available kubernetes cluster
source ~/.bashrc
k get nodes
k get pods -A
# check network setup
ssh root@server ip route
Now the cluster is ready. You can start really from scratch!
Deploy Add Ons
In this unit, you will work through tasks that ensure your Kubernetes cluster and its essential add-ons are fully installed and functioning as expected.
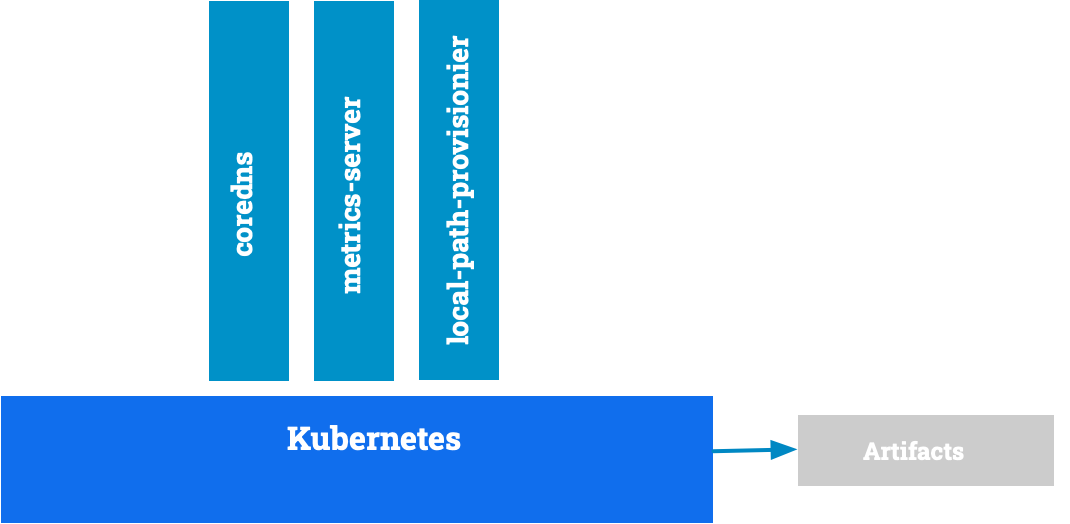
Why Install These Kubernetes Add-ons?
A vanilla Kubernetes cluster is minimal by default. To make it usable for real workloads, we add some essential and optional components:
Core Add-ons (Highly Recommended)
- Helm
- Helm is the package manager for Kubernetes.
- It simplifies installing, upgrading, and managing applications using reusable charts.
- Think of it like apt or brew, but for Kubernetes.
- CoreDNS ConfigMap
- CoreDNS provides DNS-based service discovery inside the cluster.
- The ConfigMap lets you customize how names are resolved (e.g., internal hostnames, stub domains).
- Required if you want service lookups like myservice.default.svc.cluster.local to work.
- Metrics Server
- Collects resource usage data (CPU/memory) from nodes and pods.
- Needed for kubectl top, HPA (Horizontal Pod Autoscaler), and dashboards.
- Requires enabling API server flags:
--kubelet-preferred-address-types=InternalIP
--kubelet-insecure-tls=true
- Local Path Provisioner
- Provides a simple way to support dynamic volume provisioning using the local disk.
- Good for development or single-node clusters without cloud storage backends.
- Check usage of PersistentVolumeClaim
- Access Services by Name
- Kubernetes lets you access services via DNS names.
- Ensure CoreDNS is running and configured properly so that
curl <my-service>.<namespace>.svcworks.
Optional and dosen't part of this lab add these powerful platform services
- Gitops - (e.g. FluxCD, ArgoCD)
- Pull-based deployment workflow: The desired cluster state is defined in Git and continuously reconciled by the controller.
- Minimal drift: Ensures that the actual cluster state always matches the version-controlled source of truth.
- Auditability & history: All changes are tracked via Git commits, enabling rollback and compliance.
- Declarative & automated: Infrastructure and applications are managed as code with automated synchronization.
- Secure and scalable: Reduces the need for direct API access to clusters and works well across environments.
- Ingress Controller (e.g., Traefik, NGINX Ingress, Envoy Gateway)
- Routes HTTP(S) traffic from outside into your cluster.
- Supports host-based routing, TLS, path-based routing.
- MetalLB
- Enables LoadBalancer services in bare-metal environments.
- Assigns external IPs to services when you’re not using a cloud provider.
- Cert-Manager
- Automates creation and renewal of TLS certificates.
- Works with Let’s Encrypt or internal CAs.
- Integrates with Ingress for HTTPS out-of-the-box.
- ExternalDNS
- Automatically manages DNS records in external DNS providers (e.g., Route53, Cloudflare) for Kubernetes services and Ingresses.
- External Secrets Operator / Manager
- Syncs secrets from external stores (e.g., Vault, AWS Secrets Manager) into Kubernetes.
- Keeps secrets out of Git, and automatically updates them.
- Change CNI to Cilium
- Speed up your network communication based on eBPF
- Use Service Mesh to secure communication
- Observability with Hubble
- Use Envoy with Gateway API
- Multi Cluster Support
- Use eBPF based Kubeproxy
- Improve CSI Provider
- Use Longhorn, Ceph or Linstor
- Add velero for backup/restore
14: Add Database Operators and Message Bus to your platform
- CloudNativePG Postgres Operator
- Nats Operator
- Kafka Operator
- MySQL or Maria DB Operator
15: Add Observabilty Stack to your platform
- Opentelemetry Collector
- Prometheus
- Grafana
- Loki
- Jaeger
- Fluentbit
Start your kubernetes cluster addons journey with three simple ones
Now start by deploying the essential Kubernetes base addons: CoreDNS, metrics-server, and local-path-provisioner.
- CoreDNS provides internal DNS so pods can resolve service names like
my-service.default.svc.cluster.local. - The metrics-server enables resource metrics (CPU/memory) for use by tools like kubectl top and the Horizontal Pod Autoscaler.
- local-path-provisioner offers simple dynamic volume provisioning using local storage, ideal for development and small clusters.
Together, these components establish the minimal functionality needed for a usable, observable Kubernetes cluster.
Deploy Kubernetes Addons - coredns
In this unit you will complete a series of tasks to ensure your Kubernetes cluster add the coredns installed and working correctly.
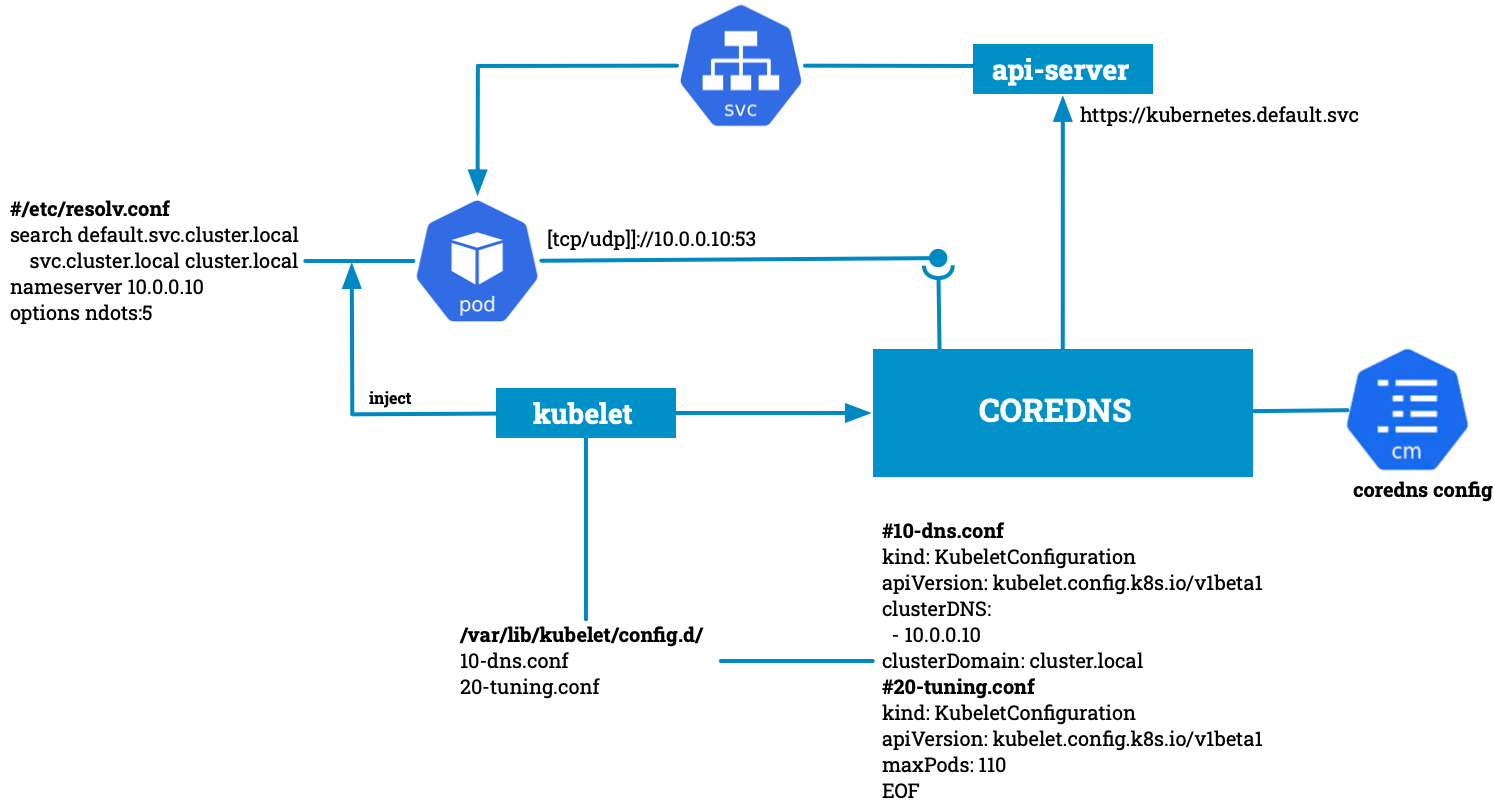
CoreDNS is the default DNS service in Kubernetes that resolves service names (like my-service.default.svc.cluster.local) to cluster IPs. It runs as a deployment in the kube-system namespace and handles DNS queries for all pods. CoreDNS is modular and configured via a Corefile, which defines plugins such as kubernetes, forward, and log. It watches the Kubernetes API to dynamically serve DNS records based on current cluster state. This enables seamless service discovery and internal communication between applications in the cluster.
Prepare Kubelet for use CoreDNS
Adding the DNS service configuration to the KubeletConfiguration is essential to ensure that Pods can resolve service names and discover other services in the cluster.
Kubernetes assigns each Service a stable DNS name, like my-service.my-namespace.svc.cluster.local.
Pods rely on the kubelet to inject the correct DNS configuration into their /etc/resolv.conf.
Without proper kubelet DNS configuration:
- Pods won't know which DNS server to use (for internal Kubernetes DNS).
- Service discovery (
*.svc.cluster.local) will fail inside pods. - You’ll see DNS resolution errors like host not found, NXDOMAIN, or timeouts.
Add DNS Service to kubelet setup
Switch to jumpbox machine:
Check current kubelet config and see...
kubectl get --raw /api/v1/nodes/node-0/proxy/configz | jq -r .kubeletconfig.clusterDNS
# []
kubectl get --raw /api/v1/nodes/node-0/proxy/configz | jq -r .kubeletconfig.resolvConf
# /etc/resolv.conf
kubectl get --raw /api/v1/nodes/node-0/proxy/configz | jq -r .kubeletconfig.maxPods
# 16
Create the an upgrade to the current kubelet configs:
cd ~/kubernetes-the-hard-way/configs
cat >10-dns.conf <<EOF
kind: KubeletConfiguration
apiVersion: kubelet.config.k8s.io/v1beta1
clusterDNS:
  - 10.0.0.10
clusterDomain: cluster.local
EOF
cat >20-tuning.conf <<EOF
kind: KubeletConfiguration
apiVersion: kubelet.config.k8s.io/v1beta1
maxPods: 110
EOF
Transfer files and restart kubelet to the addon directory:
cd ~/kubernetes-the-hard-way
for host in node-0 node-1; do
  scp configs/10-dns.conf configs/20-tuning.conf \
    root@${host}:/var/lib/kubelet/config.d/
  ssh root@${host} "systemctl restart kubelet"
done
Deploy coredns with helm
CoreDNS can be deployed via Helm to provide DNS-based service discovery in Kubernetes.
It runs as a Deployment and is exposed internally as a Kubernetes Service.
The service listens on the cluster DNS IP (e.g., 10.0.0.10) and responds to DNS queries from pods.
Helm makes it easy to configure options like replicas, domain name, and upstream resolvers.
helm repo add coredns https://coredns.github.io/helm
helm repo update

helm upgrade --install coredns coredns/coredns \
  --namespace kube-system \
  --set isClusterService=true \
  --set service.clusterIP="10.0.0.10" \
  --set service.name="kube-dns" \
  --set replicaCount=2 \
  --set k8sAppLabelOverride="kube-dns"
# needs time...
kubectl wait --for=condition=available --timeout=180s deployment/coredns -n kube-system
Check that core dns pods are available
kubectl get pods -n kube-system -l k8s-app=kube-dns
Output
NAME                      READY   STATUS    RESTARTS   AGE
coredns-668995bff-fj9ts   1/1     Running   0          42s
coredns-668995bff-jd4tv   1/1     Running   0          42s
kubectl logs -n kube-system -l k8s-app=kube-dns
Output:
maxprocs: Updating GOMAXPROCS=1: using minimum allowed GOMAXPROCS
.:53
[INFO] plugin/reload: Running configuration SHA512 = cfd56c206ccbbdea008ddd4fa4a14b69eaa78f9a4c962a7cc2a3f344b7af42877db2c3155b6344d714532048aeee383a00f9975e39be93df741ba25039d1d793
CoreDNS-1.13.1
linux/amd64, go1.25.2, 1db4568
maxprocs: Updating GOMAXPROCS=1: using minimum allowed GOMAXPROCS
.:53
[INFO] plugin/reload: Running configuration SHA512 = cfd56c206ccbbdea008ddd4fa4a14b69eaa78f9a4c962a7cc2a3f344b7af42877db2c3155b6344d714532048aeee383a00f9975e39be93df741ba25039d1d793
CoreDNS-1.13.1
linux/amd64, go1.25.2, 1db4568
Verify to access app service via DNS
Create a service for existing nginx deployment.
kubectl create deployment nginx --image=nginx
kubectl expose deployment nginx --port=80
Check the DNS records:
kubectl run -it --rm --restart=Never --image=infoblox/dnstools:latest dnstools
nslookup nginx
Output:
Server:         10.0.0.10
Address:        10.0.0.10#53

Name:   nginx.default.svc.cluster.local
Address: 10.0.0.237
Exist dnstools:
exit
Access servcice from other pod:
kubectl run curl --image curlimages/curl -- /bin/sh -c "sleep infinity"
kubectl wait --for=condition=Ready pod -l run=curl --timeout=30s
Access Service by name
kubectl exec curl -- nslookup nginx
kubectl exec curl -- curl nginx
Check the DNS injection for ClusterFirst pod inside etc/resolv.conf
kubectl exec -it curl -- cat /etc/resolv.conf
Output:
search default.svc.cluster.local svc.cluster.local cluster.local
nameserver 10.0.0.10
options ndots:5
Check kubelet config:
kubectl get --raw /api/v1/nodes/node-0/proxy/configz | jq .kubeletconfig.clusterDNS
Tipps to better DNS Performance
It’s a good idea to review your coredns configuration if you often need to reach external services.
Prepare you for AIRGap Installation
When working with Kubernetes or container-based environments, container images are constantly pulled from registries like Docker Hub or public GitHub/GCR registries. However, each image pull introduces latency and external dependencies, especially in repeated development or multiple kubernetes cluster setups.
You can prepare your lab registry before your deploy the coredns service with Crane.
Check this:
CRANE_VERSION=$(curl -s https://api.github.com/repos/google/go-containerregistry/releases/latest | grep tag_name | cut -d '"' -f 4)
curl -sL https://github.com/google/go-containerregistry/releases/download/${CRANE_VERSION}/go-containerregistry_Linux_x86_64.tar.gz  | sudo tar -xz -C /usr/local/bin crane
chmod +x /usr/local/bin/crane
Copy CoreDNS images to your playground registry.iximiuz.com registry
APP_VERSION="$(helm show chart coredns/coredns |yq .appVersion)"
crane copy --platform=linux/amd64 coredns/coredns:${APP_VERSION} \
  registry.iximiuz.com/coredns/coredns:${APP_VERSION}
Check with crane the catalog and list the tags
crane catalog registry.iximiuz.com
crane ls registry.iximiuz.com/coredns/coredns
Solve this challenges:
Reuse your coredns helm chart
helm upgrade coredns coredns/coredns \
  --namespace kube-system \
  --set image.repository=registry.iximiuz.com/coredns/coredns \
  --set image.tag=${APP_VERSION} \
  --reuse-values \
  --wait
Deploy Addons - Metrics Server
In this unit you will complete a series of tasks to ensure your Kubernetes cluster add the metrics-server installed and working correctly.
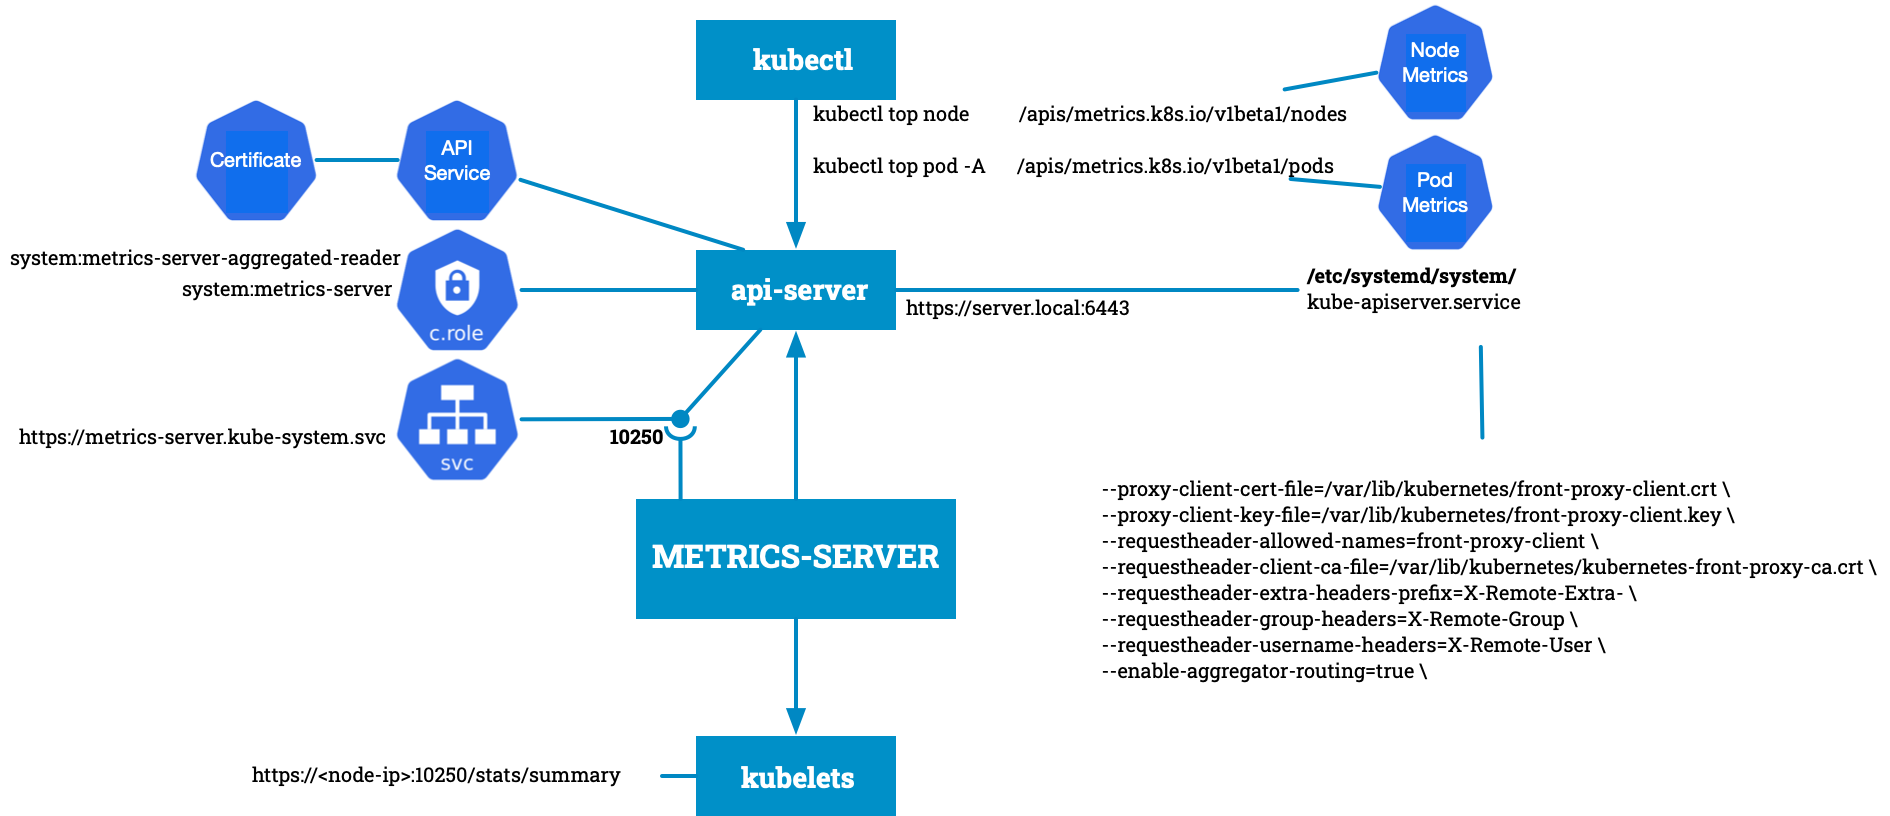
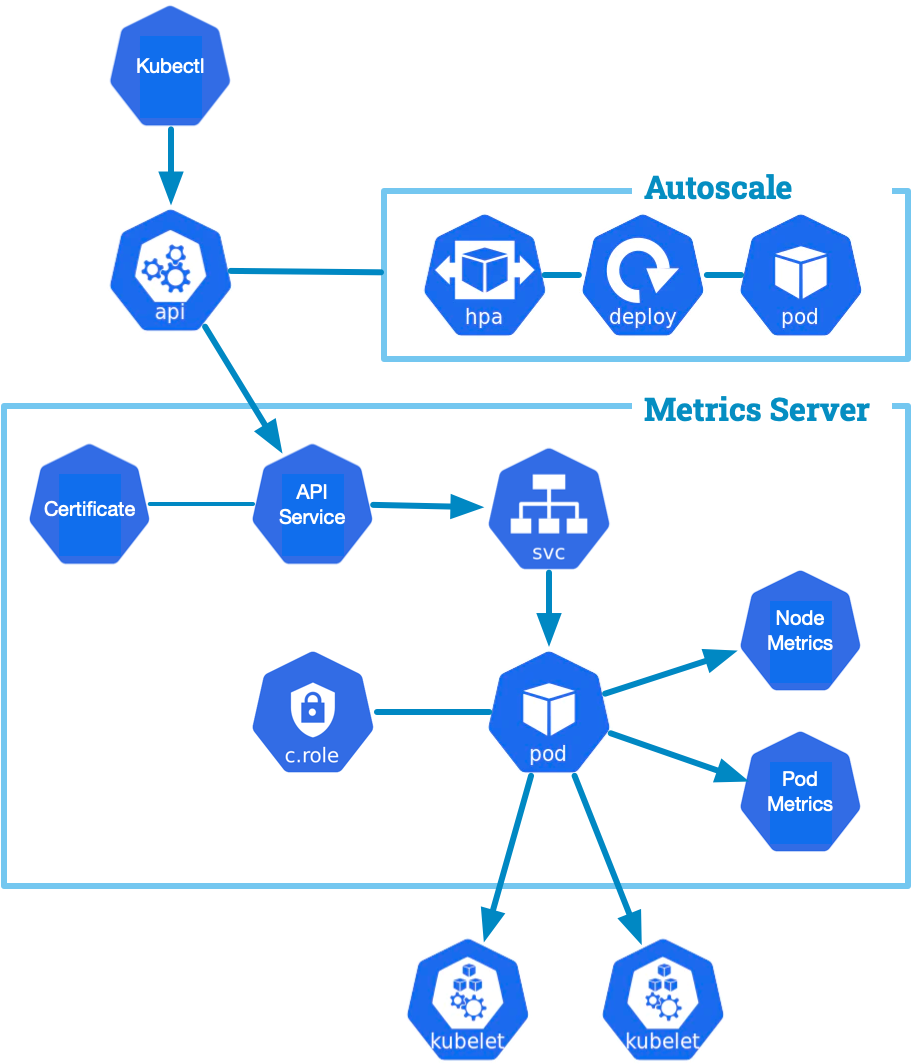
The metrics-server is an example of Kubernetes Aggrgation Layer addon that collects resource usage data—like CPU and
memory—from each node and pod in the cluster. It scrapes this data from the Kubelet’s /stats/summary endpoint and aggregates
it for use by the Kubernetes control plane. Unlike Prometheus, metrics-server does not store historical metrics—it
only provides current, in-memory metrics. This data powers features like kubectl top,
Horizontal Pod Autoscaler (HPA), and Vertical Pod Autoscaler (VPA). It is a lightweight and essential component
for autoscaling and real-time resource monitoring in Kubernetes.
Enable the Aggregation Layer
The Aggregation Layer enables Kubernetes to expose additional APIs by proxying external services through the main API server. These services, called aggregated API servers, can implement custom APIs that behave like native Kubernetes resources. To trust and route requests, the API server must be configured with request header certificates and proxy settings. Aggregated services must use TLS with a certificate signed by the cluster’s front-proxy CA. Once deployed and registered via an APIService object, their APIs become available under the Kubernetes API path /apis/<group>/<version>.
Prepare the API Server to use the Aggregation Layer
To enable the Kubernetes Aggregation Layer, we begin by generating the required front-proxy certificates, which are used to securely authenticate requests between the API server and aggregated API services. The kube-apiserver must then be configured with appropriate flags to support proxying, such as --requestheader-client-ca-file and --proxy-client-cert-file. After preparing the API server configuration and ensuring certificate trust is established, we proceed to deploy the metrics-server using Helm. This deployment registers the metrics.k8s.io API group via an APIService object. Once complete, the cluster can access resource metrics using commands like kubectl top nodes.
Create the front proxy certs definition:
cd ~/kubernetes-the-hard-way
cat >front-ca.conf <<'EOF'
[req]
distinguished_name = req_distinguished_name
prompt             = no
x509_extensions    = ca_x509_extensions

[ca_x509_extensions]
basicConstraints = CA:TRUE
keyUsage         = cRLSign, keyCertSign

[req_distinguished_name]
C   = DE
ST  = NRW
L   = Bochum
CN  = CA

# front-proxy-client
[front-proxy-client]
distinguished_name = front-proxy-client_distinguished_name
prompt             = no
req_extensions     = front-proxy-client_req_extensions

[front-proxy-client_req_extensions]
basicConstraints     = CA:FALSE
extendedKeyUsage     = clientAuth, serverAuth
keyUsage             = critical, digitalSignature, keyEncipherment
nsCertType           = client
nsComment            = "front-proxy-client Certificate"
subjectAltName       = DNS:front-proxy-client
subjectKeyIdentifier = hash

[front-proxy-client_distinguished_name]
CN = front-proxy-client
O  = front-proxy-client
C  = DE
ST = NRW
L  = Bochum
EOF
Generate the certs with openssl:
cd ~/kubernetes-the-hard-way/certs
openssl genrsa -out kubernetes-front-proxy-ca.key 4096
openssl req -x509 -new -sha512 -noenc \
  -key kubernetes-front-proxy-ca.key -days 3653 \
  -config ../front-ca.conf \
  -out kubernetes-front-proxy-ca.crt

openssl genrsa -out "front-proxy-client.key" 4096

openssl req -new -key "front-proxy-client.key" -sha256 \
  -config "../front-ca.conf" -section front-proxy-client \
  -out "front-proxy-client.csr"

openssl x509 -req -days 90 -in "front-proxy-client.csr" \
  -copy_extensions copyall \
  -sha256 -CA "kubernetes-front-proxy-ca.crt" \
  -CAkey "kubernetes-front-proxy-ca.key" \
  -CAcreateserial \
  -out "front-proxy-client.crt"
Prepare your api-server to use some aggregation API services:
cd ~/kubernetes-the-hard-way/units
cat >kube-apiserver.service <<'EOF'
[Unit]
Description=Kubernetes API Server
Documentation=https://github.com/kubernetes/kubernetes

[Service]
ExecStart=/usr/local/bin/kube-apiserver \
  --allow-privileged=true \
  --audit-log-maxage=30 \
  --audit-log-maxbackup=3 \
  --audit-log-maxsize=100 \
  --audit-log-path=/var/log/audit.log \
  --authorization-mode=Node,RBAC \
  --bind-address=0.0.0.0 \
  --client-ca-file=/var/lib/kubernetes/ca.crt \
  --enable-admission-plugins=NamespaceLifecycle,NodeRestriction,LimitRanger,ServiceAccount,DefaultStorageClass,ResourceQuota \
  --etcd-servers=http://127.0.0.1:2379 \
  --event-ttl=1h \
  --encryption-provider-config=/var/lib/kubernetes/encryption-config.yaml \
  --kubelet-certificate-authority=/var/lib/kubernetes/ca.crt \
  --kubelet-client-certificate=/var/lib/kubernetes/kube-api-server.crt \
  --kubelet-client-key=/var/lib/kubernetes/kube-api-server.key \
  --runtime-config='api/all=true' \
  --service-account-key-file=/var/lib/kubernetes/service-accounts.crt \
  --service-account-signing-key-file=/var/lib/kubernetes/service-accounts.key \
  --service-account-issuer=https://server.local:6443 \
  --service-node-port-range=30000-32767 \
  --tls-cert-file=/var/lib/kubernetes/kube-api-server.crt \
  --tls-private-key-file=/var/lib/kubernetes/kube-api-server.key \
  --proxy-client-cert-file=/var/lib/kubernetes/front-proxy-client.crt \
  --proxy-client-key-file=/var/lib/kubernetes/front-proxy-client.key \
  --requestheader-allowed-names=front-proxy-client \
  --requestheader-client-ca-file=/var/lib/kubernetes/kubernetes-front-proxy-ca.crt \
  --requestheader-extra-headers-prefix=X-Remote-Extra- \
  --requestheader-group-headers=X-Remote-Group \
  --requestheader-username-headers=X-Remote-User \
  --enable-aggregator-routing=true \
  --v=2
Restart=on-failure
RestartSec=5

[Install]
WantedBy=multi-user.target
EOF
Copy the certificates and appropriate system units to the server machine:
cd ~/kubernetes-the-hard-way
scp \
  certs/kubernetes-front-proxy-ca.key certs/kubernetes-front-proxy-ca.crt \
  certs/front-proxy-client.key certs/front-proxy-client.crt \
  root@server:/var/lib/kubernetes
scp \
  units/kube-apiserver.service \
  root@server:/etc/systemd/system/kube-apiserver.service
ssh root@server "systemctl daemon-reload && systemctl restart kube-apiserver"
Deploy the Metrics Server
The metrics-server is a small, cluster-scoped agent that creeps quietly through the cluster, knocking on each node’s kubelet
to ask “how busy are your CPUs and how thirsty are your memory pages?” It collects short-lived, rolling snapshots of CPU and memory usage
via the kubelet Summary API, aggregates those values, and answers questions from the control plane and users: HorizontalPodAutoscalers consult it when deciding to scale,
kubectl top asks it for on-demand metrics, and controllers use its view for cluster observability.
It intentionally keeps only recent samples and never stores long-term history; it talks to kubelets with TLS
and RBAC, handles heterogeneous node responses (sometimes relaxing strict kubelet TLS checks when necessary),
and exposes the metrics API under metrics.k8s.io so the rest of Kubernetes can treat usage metrics as first-class,
ephemeral telemetry.
helm repo add metrics-server https://kubernetes-sigs.github.io/metrics-server/
helm repo update
Prefer an AirGAP Installation
Prepare and install yq
curl -sL https://github.com/mikefarah/yq/releases/latest/download/yq_linux_amd64 -o yq
chmod +x yq
sudo mv yq /usr/local/bin/yq
Copy all images to your AirGAP playground registry
cd ~/kubernetes-the-hard-way
helm template metrics-server/metrics-server \
    | yq '..|.image? | select(.)' \
    | sort \
    | uniq >images.txt

# transport all images to your airgap container registry
while IFS=' ' read -r IMAGE; do
   IMAGE_DST=$(echo -n "$IMAGE" | sed -E 's|^([a-zA-Z0-9.-]+)(:[0-9]+)?/||')
   crane copy --platform linux/amd64 --insecure ${IMAGE} registry.iximiuz.com/${IMAGE_DST}
done < images.txt
Install Metrics Server to your cluster:
helm upgrade --install metrics-server metrics-server/metrics-server \
  --namespace kube-system \
  --set args='{--kubelet-insecure-tls,--kubelet-preferred-address-types=InternalIP}' \
  --set image.repository=registry.k8s.io/metrics-server/metrics-server \
  --wait
kubectl wait --for=condition=available --timeout=180s deployment/metrics-server -n kube-system
Check metrics after 30 seconds the first metrics results are available!
kubectl get deployment metrics-server -n kube-system
# after a minute the metrics are accessable
kubectl top nodes
kubectl get nodes.metrics.k8s.io  -o yaml
kubectl top pods -A
kubectl get pods.metrics.k8s.io  -o yaml
To scrape metrics-server with Prometheus, use --set metrics.enabled=true if supported!
Check Aggregation Layer Resources
Check that the Metrics API CRDs are avialable:
kubectl get apiservices | grep metrics
Check the metrics RBAC Cluster Roles:
kubectl describe clusterrole system:metrics-server-aggregated-reader
kubectl describe clusterrole system:metrics-server
kubectl get clusterrolebinding metrics-server:system:auth-delegator
Check prometheus endpoint of kubelets and via API Server Aggregation:
kubectl get nodes -o jsonpath="{.items[].metadata.name}" && echo ""
kubectl get --raw /api/v1/nodes/node-0/proxy/metrics
kubectl get --raw /api/v1/nodes/node-1/proxy/metrics
# api services aggregation
kubectl get --raw /apis/metrics.k8s.io/v1beta1/nodes | jq
kubectl get --raw /apis/metrics.k8s.io/v1beta1/namespaces/kube-system/pods | jq
More Metrics Server Challenges
Deploy sample app and use a HPA:
The Horizontal Pod Autoscaler (HPA) automatically adjusts the number of pod replicas in a deployment or replica set based on observed CPU utilization or other custom metrics. Essentially, HPA helps maintain the right number of pods to handle varying loads efficiently.
Deploy a simple nginx and add a HPA Controller:
kubectl create namespace nginx
kubectl ns nginx
kubectl create deployment nginx --image=nginx:1.31.1
kubectl expose deployment nginx --port 80 --target-port=80 --name nginx
# set resource limits
kubectl set resources deployment nginx \
  --limits=cpu=200m,memory=512Mi \
  --requests=cpu=100m,memory=256Mi
# Create a HPA
kubectl autoscale deployment nginx --min=2 --max=10
Generate http work load with one of these generator tools:
Create http load and see autoscaling of nginx pods works:
kubectl run hey --image=williamyeh/hey \
 --command -- /bin/sh -c "sleep 999999999"

# start load
kubectl exec -it hey -- ./hey -n 1000 -c 10 http://nginx

# more load
kubectl exec hey -- ./hey -n 1000000 -c 10 http://nginx &
kubectl top pods -l app=nginx
kubectl get pods -l app=nginx -w
or start a batch job with multiple load generators inplace:
cat >hey-nginx.yaml<<EOF
apiVersion: batch/v1
kind: Job
metadata:
  name: hey-nginx
spec:
  template:
    spec:
      containers:
      - name: hey
        image: williamyeh/hey
        command: ["/hey",  "-n", "100000", "-c", "10", "http://nginx"]
      restartPolicy: Never
  backoffLimit: 0
  parallelism: 2
  completions: 10
EOF
kubectl create -f hey-nginx.yaml
kubectl replace --force -f hey-nginx.yaml
kubectl get hpa -w
Create Certs for metrics-server and use it
Running metrics-server without proper TLS (using --kubelet-insecure-tls or skipping certificate validation)
exposes sensitive node metrics over an unauthenticated channel, weakening cluster security.
Using secure TLS with valid certificates ensures data integrity, confidentiality, and trusted communication
between metrics-server and kubelets.
- kubelet-serving-cert-approver
- Manually tls approver
- How to install metrics server
- Don't --kubelet-insecure-tls
Note for cluster built the hard way:
Metrics server needs to know these:
--tls-cert-file=/certs/metrics-server.crt- tls crt to be use by metrics server to master secure transfer
--tls-private-key-file=/certs/metrics-server.key- key for the above crt
--requestheader-client-ca-file=/certs/kubernetes-front-proxy-ca.crt- Same as the one used in api server service args on master. Also used to sign
tls.crtabove.
- Same as the one used in api server service args on master. Also used to sign
--kubelet-certificate-authority=/certs/ca.crt- Used by api server ca to talk to kubelet
cd ~/kubernetes-the-hard-way
cat >>front-ca.conf <<EOF

[metrics-server]
distinguished_name = metrics-server_distinguished_name
prompt             = no
req_extensions     = metrics-server_req_extensions

[metrics-server_req_extensions]
basicConstraints     = CA:FALSE
extendedKeyUsage     = clientAuth, serverAuth
keyUsage             = critical, digitalSignature, keyEncipherment
nsCertType           = client, server
nsComment            = "Metrics Server Certificate"
subjectAltName       = @metrics-server_alt_names
subjectKeyIdentifier = hash

[metrics-server_alt_names]
IP.0  = 127.0.0.1
DNS.0 = metrics-server
DNS.1 = metrics-server.kube-system
DNS.2 = metrics-server.kube-system.svc
DNS.3 = metrics-server.kube-system.svc.cluster
DNS.4 = metrics-server.kube-system.svc.cluster.local

[metrics-server_distinguished_name]
CN = kubernetes
C  = DE
ST = NRW
L  = Bochum
EOF
cd ~/kubernetes-the-hard-way/certs
openssl genrsa -out "metrics-server.key" 4096

openssl req -new -key "metrics-server.key" -sha256 \
  -config "../front-ca.conf" -section metrics-server \
  -out "metrics-server.csr"

openssl x509 -req -days 90 -in "metrics-server.csr" \
  -copy_extensions copyall \
  -sha256 -CA "kubernetes-front-proxy-ca.crt" \
  -CAkey "kubernetes-front-proxy-ca.key" \
  -CAcreateserial \
  -out "metrics-server.crt"

kubectl create secret generic metrics-server-certs \
  --from-file=kubernetes-front-proxy-ca.crt \
  --from-file=ca.crt \
  --from-file=metrics-server.key \
  --from-file=metrics-server.crt \
  -n kube-system

cd ~/kubernetes-the-hard-way

cat >metrics-server-values.yaml <<EOF
defaultArgs:
  - --cert-dir=/certs
  - --kubelet-preferred-address-types=Hostname
  - --tls-cert-file=/certs/metrics-server.crt
  - --tls-private-key-file=/certs/metrics-server.key
  - --requestheader-client-ca-file=/certs/kubernetes-front-proxy-ca.crt
  - --kubelet-certificate-authority=/certs/ca.crt
  - --kubelet-use-node-status-port
  - --metric-resolution=15s
image:
  repository: registry.k8s.io/metrics-server/metrics-server
extraVolumes:
  - name: metrics-server-certs
    secret:
      secretName: metrics-server-certs
extraVolumeMounts:
  - name: metrics-server-certs
    mountPath: /certs
    readOnly: true
EOF

helm upgrade --install metrics-server metrics-server/metrics-server \
  --namespace kube-system \
  --values=metrics-server-values.yaml
However, hostname resolution at default CoreDNS config is not currently enabled. To make it work, you must also update the CoreDNS configuration so that hostnames can be properly resolved.
cd ~/kubernetes-the-hard-way-simplified/bootstrap/day2-panic
./430-update-coredns.sh

# check that metrics server pod are available:
kubectl get -n kube-system pods -A -w
Access Metrics Server:
kubectl get --raw /api/v1/nodes/node-0/proxy/metrics
kubectl get --raw /api/v1/nodes/node-1/proxy/metrics
Setup custom prometheus metrics to control a HPA
Exposing custom metrics from Prometheus to the metrics-server (via the Custom Metrics API) allows Kubernetes Horizontal Pod Autoscaler and other controllers to scale workloads based on real application or business metrics instead of only CPU and memory, enabling more precise and efficient autoscaling.
Deploy Addons - Local Path Provisioner
In this unit you will complete a series of tasks to ensure your Kubernetes cluster add the local path provisioner installed and working correctly.
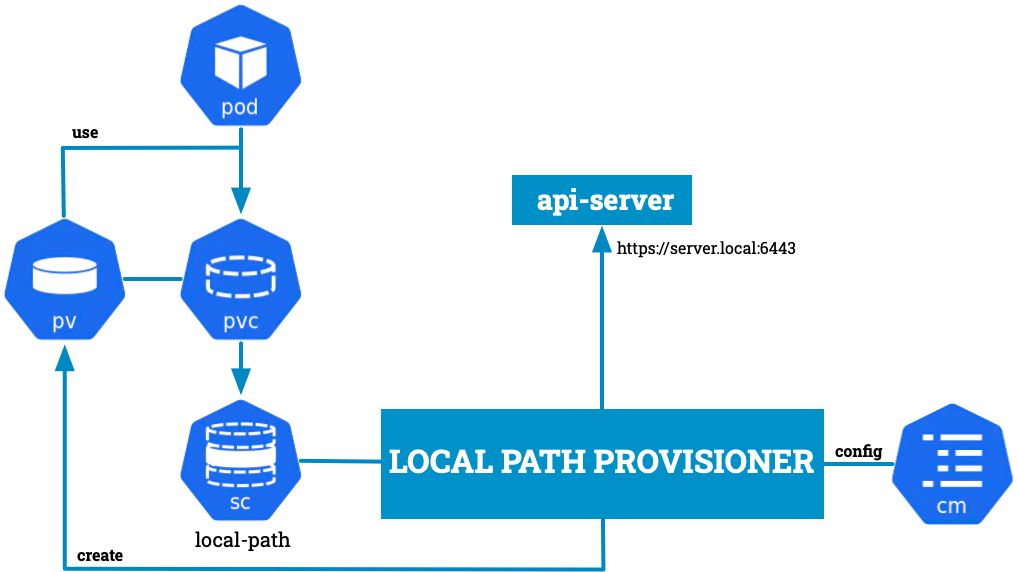
The Local Path Provisioner is a simple Kubernetes storage provisioner that dynamically creates persistent volumes using local disk paths on the node. When a pod requests storage via a PVC (PersistentVolumeClaim), it allocates a folder (like /opt/local-path-provisioner) on the node to fulfill that request. It’s ideal for single-node or bare-metal clusters where shared network storage isn’t available. Each volume is only accessible by pods on the same node (due to the local nature of the storage). This makes it a lightweight and easy-to-use solution for development and testing environments.
Prepare local path provisioner to copy image
At the moment, there is no officially published Helm chart artifact for the Local Path Provisioner. Let’s clone the project repository and deploy it directly from source.
cd ~/kubernetes-the-hard-way
git clone https://github.com/rancher/local-path-provisioner.git

# get all images from chart
helm template local-path-provisioner/deploy/chart/local-path-provisioner \
    | yq '..|.image? | select(.)' \
    | sort \
    | uniq >images.txt

# transport all images to your airgap container registry
while IFS=' ' read -r IMAGE; do
   IMAGE_DST=$(echo -n "$IMAGE" | sed -E 's|^([a-zA-Z0-9.-]+)(:[0-9]+)?/||')
   crane copy --platform linux/amd64 --insecure ${IMAGE} registry.iximiuz.com/${IMAGE_DST}
done < images.txt
Deploy with Provisioner with helm chart
helm install local-path-storage local-path-provisioner/deploy/chart/local-path-provisioner \
  --namespace kube-system \
  --set storageClass.defaultClass=true \
  --set nodePath="/opt/local-path-provisioner" \
  --set image.repository=registry.iximiuz.com/rancher/local-path-provisioner
Verify the installation:
kubectl get pods -n kube-system
kubectl get storageclass
kubectl get -n kube-system configmap local-path-config -o yaml
Deploy a Pod and use a PersistentVolumeClaim
A PersistentVolumeClaim (PVC) is a request for storage by a Kubernetes pod. It abstracts storage details, allowing pods to use volumes without knowing how or where they’re provisioned.
cat >local-path-pvc.yaml <<EOF
apiVersion: v1
kind: PersistentVolumeClaim
metadata:
  name: test-pvc
spec:
  accessModes:
    - ReadWriteOnce
  storageClassName: local-path
  resources:
    requests:
      storage: 1Gi
EOF

kubectl apply -f local-path-pvc.yaml
Deploy Test pods to use PVC:
cat >pod-using-pvc.yaml<<EOF
apiVersion: v1
kind: Pod
metadata:
  name: test-pod
spec:
  containers:
  - name: test-container
    image: busybox
    command: ["sleep", "3600"]
    volumeMounts:
    - mountPath: "/data"
      name: test-storage
  volumes:
  - name: test-storage
    persistentVolumeClaim:
      claimName: test-pvc
EOF
kubectl apply -f pod-using-pvc.yaml
kubectl wait --for=condition=Ready \
  pod/test-pod \
  --timeout=10s
kubectl exec test-pod -- touch /data/hello.txt
kubectl get pv
Check file are really exists:
NODE_NAME=$(kubectl get pods test-pod -o jsonpath="{.spec.nodeName}")

PV_NAME=$(kubectl get pvc test-pvc -o jsonpath="{.spec.volumeName}")
# or
PVC_NAME=test-pvc
PV_NAME=$(kubectl get pv -o jsonpath="{.items[?(@.spec.claimRef.name=='$PVC_NAME')].metadata.name}")

PV_NODE=$(kubectl get pv $PV_NAME -o jsonpath="{.spec.nodeAffinity.required.nodeSelectorTerms[0].matchExpressions[0].values[0]}")
PV_PATH=$(kubectl get pv $PV_NAME -o jsonpath="{.spec.hostPath.path}")
ssh root@$PV_NODE "ls $PV_PATH"
Teardown:
kubectl delete pod test-pod
kubectl delete pvc test-pvc --wait=true
# wait a little bit
kubectl get pv,pvc
# check that PV directory is deleted
ssh root@$PV_NODE "ls $PV_PATH"
Output:
ls: cannot access '/opt/local-path-provisioner/pvc-564fa29c-d64a-4a91-b0c1-2701bff356e3_default_test-pvc': No such file or directory
Summary
The Rancher Local Path Provisioner can be installed either by applying its Kubernetes manifest directly from GitHub or by using the included Helm chart. It enables dynamic provisioning of local storage on each node using host paths. The example demonstrates an air-gapped installation and shows how to create a test pod with dynamically allocated storage via a PersistentVolumeClaim (PVC).
More advanced challenges can be solve
- Use StatefulSets with PVCs
- Migrate PVCs between different nodes, clusters or storage classes
- Backup and Restore PVC data
- Setup CSI Provider like Longhorn, OpenEBS, Rook-Ceph
Kubernetes AddOns Summary
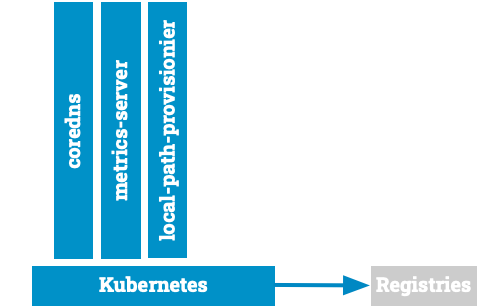
Kubernetes the Hard Way – AddOns is a hands-on extension of the original tutorial that guides you through manually installing and configuring essential Kubernetes components, including CoreDNS, Metrics Server, and Local Path Provisioner. It deepens your understanding of how Kubernetes AddOns integrate with the control plane and what configurations are required to make them work reliably.
What You Learn as a Trainee?
After completing this tutorial, trainees will be able to:
- Install Kubernetes the Hard Way — Simplified using automation scripts.
- Understand and review the provisioning of Kubernetes control plane and worker nodes.
- Deploy essential Kubernetes AddOns and prepare cluster components accordingly:
- CoreDNS – requires specific Kubelet configuration.
- Metrics Server – depends on the API server’s Aggregation Layer being properly configured.
- Local Path Provisioner – needs local disk space on each node; advanced CSI drivers are recommended for production.
- Use Helm to deploy and customize Kubernetes applications.
- Use Crane to manage container images and start planning effective artifact and registry strategies.
- Troubleshoot and debug AddOn issues at a low level — without relying on high-level abstraction tools.
What You Can Do Next?
After completing the basics, you can take your Kubernetes journey further by exploring:
- Day 2 Operations and GitOps workflows to manage ongoing changes and updates declaratively.
- Installing more AddOns and extending your cluster’s capabilities, such as:
- Choosing a CNI plugin like Flannel, Calico, or Cilium for advanced networking.
- Trying out CSI drivers like OpenEBS, Ceph, or Longhorn for persistent storage.
- Adding accessibility with tools like Ingress Controllers, Cert-Manager, ExternalDNS, and MetalLB for load balancing and TLS.
- Improving security and control with NetworkPolicies, fine-grained RBAC, or a Policy Controller (like Kyverno or OPA/Gatekeeper).
- Deploying an Observability Stack (e.g. Prometheus, Grafana, Loki) for monitoring and alerting.
References
- Kubernetes the Hard Way Playground, by Márk Sági-Kazár
- Kubernetes Conformance Tests (Sonobuoy)
- Kubernetes the hard Way - Keyley Hightower
- Kubernetes The Hard Way - simplified
Recommended Projects to Explore Next
GitOps & Operations
Storage (CSI Drivers)
Networking (CNI Plugins)
Network Accessibility
Policy & Security
Observability
Regards,
├─☺︎─┤ The Humble Sign Painter - Peter Rossbach
- Previous lesson
- Prepare and deploy a kubernetes cluster
- Next lesson
- Day 2 Operations – Why They Matter