Day 2 Operations – Why They Matter
Day 2 Operations – Why They Matter
Most tutorials stop once Kubernetes is running. But real-world reliability starts after Day 1 — when things break, need to be upgraded, or must be recovered.
In this module, we go beyond the initial setup to focus on Day 2 Operations: everything that ensures your Kubernetes cluster remains healthy, secure, and recoverable.
You’ll learn how to:
- Back up and restore etcd — the single source of truth for your cluster state.
- Reissue and rotate TLS certificates for control-plane, ensuring secure communication remains intact.
- Simulate failure scenarios by stopping all control plane components — and understand the impact.
- Try deploying a pod and service while the API server is down — and see what fails.
- Restart components step-by-step (etcd → API server → controller-manager → scheduler) and validate recovery.
- Inspect how Kubernetes behaves under partial availability.
- Learn to separate stateless workloads from cluster-critical services.
- Use tools like kubectl, systemd logs, and health endpoints for deep diagnosis.
- Review service availability even during control plane outages.
- Config audit logs policy
- Build confidence in operating Kubernetes under real-world pressure.
This module builds your muscle memory for disaster recovery and teaches you to operate Kubernetes with intent, not fear. It’s not just theory — it’s survival skills for anyone serious about running production clusters.
Prepare for Day2Operations
In this unit you will complete a series of tasks to ensure your Kubernetes cluster is important add ons are installed and working correctly.
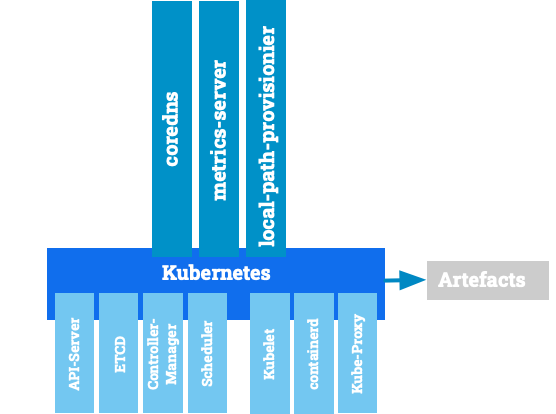
Kubernetes the Hard Ways Simpified
Bootstrap kubernetes with script at jumpbox machine.
git clone https://github.com/bee-infraverse/kubernetes-the-hard-way-simplified.git
cd ~/kubernetes-the-hard-way-simplified/bootstrap
# check env.sh and overwrite versions
# Need time to download, deploy binaries and start the services!
./bootstrap.sh
Prepare your env add deploy the core addons coredns, metrics-server and local path provisoner.
Prepare and check the available kubernets cluster
source ~/.bashrc
k get nodes
k get pods -A
# check network setup
ssh root@server ip route
Now the cluster is ready. You can start really from scratch!
Backup and Restore Kubernetes with etcd
In this unit, you’ll learn how to back up and restore the full state of a Kubernetes cluster using etcd — the key-value store that serves as the single source of truth for Kubernetes.
Why this matters?
etcd holds everything Kubernetes needs to rebuild its internal state:
deployments, services, config maps, secrets, persistent volume claims, RBAC, and more.
Importance of backup
If etcd is lost and no backup exists, your entire Kubernetes cluster’s control plane state is gone — even if nodes and pods are still running.
Unlike backup methods that save only manifest files or etc., a snapshot of etcd ensures a complete and consistent view of your cluster — including live object states that may not be represented in YAML files alone.
This approach is often sufficient and complete, especially for small to medium-sized clusters, lab environments, and CI disaster recovery scenarios.
Backup etcd
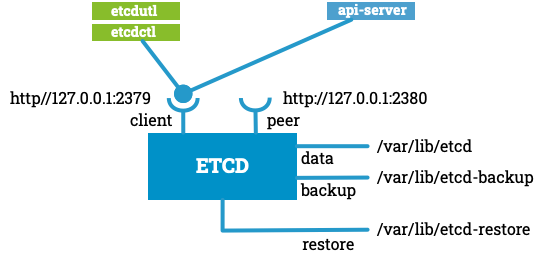
ETCD Backup and Restore
Go to server box!
ssh root@server
Check etcd available:
etcdctl \
  --endpoints=http://127.0.0.1:2379 \
  member list
Create a snapshot using etcdctl:
BACKUP_DATE=$(date +%Y%m%d-%H)
etcdctl \
  --endpoints=http://127.0.0.1:2379 \
  snapshot save /var/lib/etcd-backup/backup-$BACKUP_DATE.db
ETCD release with version 3.6 add the new tool etcdutl 🤯
etcdutl is a newer utility, introduced in etcd v3.5+, focused on administrative and offline tasks, like:
- Restoring snapshots (same as etcdctl snapshot restore)
- Checking snapshot integrity
- Migrating data directories
- Working with etcd data structures without a running etcd
Think of it as a lightweight tool for offline or forensic recovery — mostly useful inside automation or containerized environments.
Usage:
  etcdutl snapshot [command]

Available Commands:
  restore     Restores an etcd member snapshot to an etcd directory
  status      Gets backend snapshot status of a given file
mkdir -p /var/lib/etcd-backup
etcdutl \
  --write-out=table \
  snapshot status /var/lib/etcd-backup/backup-$BACKUP_DATE.db
Restore from ETCD backup
Stop your running etcd process before performing a restore!
Stop the services kube-apiserver and etcd:
systemctl stop kube-apiserver
systemctl stop etcd
Restore at a new directory
mkdir -p /var/lib/etcd-restore
etcdutl snapshot restore \
  /var/lib/etcd-backup/backup-$BACKUP_DATE.db \
  --data-dir=/var/lib/etcd-restore
Then update the etcd systemd unit or manifest to point to the restored data directory:
sed -i 's|--data-dir=/var/lib/etcd|--data-dir=etcd-restore|' \
  /etc/systemd/system/etcd.service
Reload and start etcd:
systemctl daemon-reexec
systemctl daemon-reload
systemctl start etcd
After restoring etcd, the cluster doesn't appear fully functional.
Some nodes or system components may not report Ready, and workloads might be missing or unavailable.
It is essential to carefully verify node status, system pods, and API responsiveness before considering the cluster operational.
systemctl stop etcd
sed -i "s|--data-dir=/var/lib/etcd-restore|--data-dir=/var/lib/etcd|" \
  /etc/systemd/system/etcd.service
systemctl daemon-reexec
systemctl daemon-reload
systemctl start etcd
Check the etcd status again!
Don't restore cluster with the same data directory, as it will overwrite the existing data!
Check that etcd is running and the data directory is correct:
etcdctl \
  --endpoints=http://127.0.0.1:2379 \
  member list
etcdctl \
  --endpoints=http://127.0.0.1:2379 \
  endpoint status --write-out=table
Start the kube-apiserver
systemctl start kube-apiserver
Validate Cluster State
After restoring, check that Kubernetes is fully functional again
export KUBECONFIG="/root/admin.kubeconfig"
kubectl get nodes
kubectl get cs   # Component statuses
kubectl get pods --all-namespaces
Summary
- etcd stores the full runtime state of Kubernetes — not just core manifests files
- An etcd snapshot is a reliable and complete backup of the control plane
- Restoring from a snapshot brings the cluster back to a known-good state
- This method avoids the need for YAML repos, GitOps, or external backup tools in small setups
Why etcd backup alone isn’t enough?
While an etcd snapshot captures all Kubernetes API objects, it doesn’t include Persistent Volume data, container images, or your infrastructure-as-code (like Helm charts or YAML manifests). This makes it insufficient for fully restoring real-world workloads — especially for stateful applications like databases.
For true disaster recovery, you also need:
- Persistent Volume backups (e.g., CSI snapshots to S3) to recover critical app data
- GitOps (e.g., ArgoCD or FluxCD) to reapply your cluster’s declarative state
- External storage (e.g., object stores) for geo-redundant, durable storage of backups
- Service availability checks to ensure critical services are running after recovery
Outdated backups quickly become irrelevant, as the cluster state changes frequently with each deployment, configuration update, or workload change. To ensure meaningful recovery, backups must be kept current and aligned with the latest operational state.
Only by combining etcd backups, volume snapshots, and GitOps-based redeployment can you ensure your Kubernetes cluster is rebuildable, reliable, and resilient. This unit demonstrates the fundamental process of backing up and restoring etcd for Kubernetes, but real-world disaster recovery requires a more comprehensive strategy.
Prepare your etcd server and use a client certifcate at your API Server
In this unit, you’ll complete a series of tasks to ensure that etcd communicates over mTLS and that secure API server access is correctly configured.
In this lab, you’ll work through a hands-on Kubernetes control plane maintenance scenario. You’ll generate and distribute certificates, deploy and transfer them between nodes, gracefully stop critical components like etcd and the API server, update their systemd configurations, restart services, and verify the cluster’s health. By the end, you’ll have gained practical experience in securely managing and recovering essential Kubernetes infrastructure.
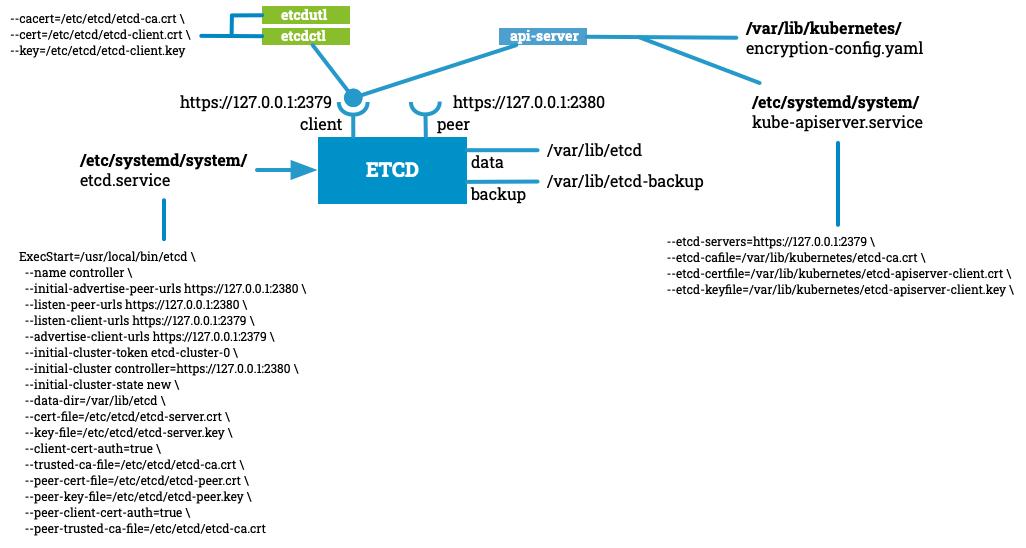
Update etcd systemd unit with new certificates
Add or replace certs, adjust the systemd unit file to reference the updated paths, reload systemd, and restart etcd to apply the changes.
[Unit]
Description=etcd
Documentation=https://github.com/etcd-io/etcd

[Service]
Type=notify
ExecStart=/usr/local/bin/etcd \
  --name controller \
  --initial-advertise-peer-urls https://127.0.0.1:2380 \
  --listen-peer-urls https://127.0.0.1:2380 \
  --listen-client-urls https://127.0.0.1:2379 \
  --advertise-client-urls https://127.0.0.1:2379 \
  --initial-cluster-token etcd-cluster-0 \
  --initial-cluster controller=https://127.0.0.1:2380 \
  --initial-cluster-state new \
  --data-dir=/var/lib/etcd \
  --cert-file=/etc/etcd/etcd-server.crt \
  --key-file=/etc/etcd/etcd-server.key \
  --client-cert-auth=true \
  --trusted-ca-file=/etc/etcd/etcd-ca.crt \
  --peer-cert-file=/etc/etcd/etcd-peer.crt \
  --peer-key-file=/etc/etcd/etcd-peer.key \
  --peer-client-cert-auth=true \
  --peer-trusted-ca-file=/etc/etcd/etcd-ca.crt
Restart=on-failure
RestartSec=5

[Install]
WantedBy=multi-user.target
Update API server etcd client certificates
Add or replace the API server’s etcd client cert and key, update the API server manifest or configuration to reference the new files, then restart the API server to establish a secure connection with etcd.
Add this changes to the api-server systemd unit file:
  --etcd-servers=https://127.0.0.1:2379 \
  --etcd-cafile=/var/lib/kubernetes/etcd-ca.crt \
  --etcd-certfile=/var/lib/kubernetes/etcd-apiserver-client.crt \
  --etcd-keyfile=/var/lib/kubernetes/etcd-apiserver-client.key \
Bootstrap etcd mTLS with a script
Automate the generation of CA, server, and peer certificates, distribute them to all etcd nodes, and configure etcd for mutual TLS to ensure secure peer-to-peer and client-to-server communication from API Server.
Kubernetes Cluster Security Domains
├── Cluster CA (/var/lib/kubernetes/ca.crt)
│   ├── API Server certificate (server authentication)
│   ├── kubectl client certificates (admin access)
│   ├── kubelet certificates (node communication)
│   ├── kube proxy certificates (node communication)
│   ├── Controller manager certificates (control plane)
│   ├── Scheduler certificates (workload placement)
│   └── Service Accounts (pod communication with api-server)
│
└── etcd CA (/etc/etcd/ca.crt)
    ├── etcd server certificates (database access)
    ├── etcd peer certificates (cluster replication)
    └── etcd client certificates (API server → etcd)
Navigate to your day2 bootstrap scripts and run the etcd certs script:
cd ~/kubernetes-the-hard-way/bootstrap/day2
./300-day2-certs.sh
Etcd check with mTLS
Verify etcd health and connectivity using mutual TLS by running etcdctl with the CA, client certificate, and client key, ensuring all endpoints respond as healthy.
etcdctl --cacert=/etc/etcd/etcd-ca.crt \
  --cert=/etc/etcd/etcd-client.crt \
  --key=/etc/etcd/etcd-client.key \
  --endpoints=https://127.0.0.1:2379 member list
Discuss loopback vs mTLS for etcd in a single-node-setup
Loopback-only communication (127.0.0.1)
Features:
- etcd binds exclusively to the local loopback interface (127.0.0.1).
- Suitable for single-host control plane deployments.
- Prevents any network-based access from other nodes or external processes.
- Security advantage: completely isolated from the network layer.
- Operational simplicity: mTLS can be omitted, as there’s no remote client-server communication.
Drawbacks:
- Not flexible: can’t add other nodes without reconfiguration
- No authentication between API server ↔ etcd unless mTLS is used
- Assumes tight local system trust (e.g., root is trusted)
mTLS (Mutual TLS) between API Server and etcd
Features:
- Required in multi-node clusters or for stronger local security
- Uses client certificates to authenticate and encrypt traffic between API server and etcd
- Ensures that only the legitimate API server can talk to etcd
Benefits:
- Adds cryptographic trust boundaries
- Validates and encrypts all API server <-> etcd communication
- Prepares your setup for multi-node expansion
Overhead:
- Slightly more complexity in bootstrapping
- You must maintain a CA and issue certificates
- Distribute to every etcd data node
- Certificate rotation
Summary – Setting up etcd with mTLS
To secure etcd communication with mutual TLS, you first generate a dedicated Certificate Authority (CA) and use it to issue server, peer, and client certificates. These certificates must be distributed to all etcd members and any clients (e.g., the Kubernetes API server) that connect to etcd. The etcd configuration is updated to reference the CA, cert, and key files for both peer-to-peer and client-to-server communication. After restarting etcd, all connections are encrypted and authenticated, ensuring only trusted members and clients can join or query the cluster. This setup is essential for multi-node deployments where network exposure requires strong authentication and confidentiality.
Day2Operations - Certificate rotations
In this unit you will complete a series of tasks to ensure your Kubernetes cluster add the coredns installed and working correctly.
- Manual Rotation of CA Certificates
- Kubernetes Certificate Management: From Outages to Automation
- Manage TLS Certificates in a Cluster
Prepare your cluster for Rotations
Rotate all Kubernetes certificates by reuse existing CA and component certs:
- Kube-Api-Server
- Serviceaccount
- Components kubeconfigs
- kubelet, kube-proxy
- frontend proxy aggreation layer
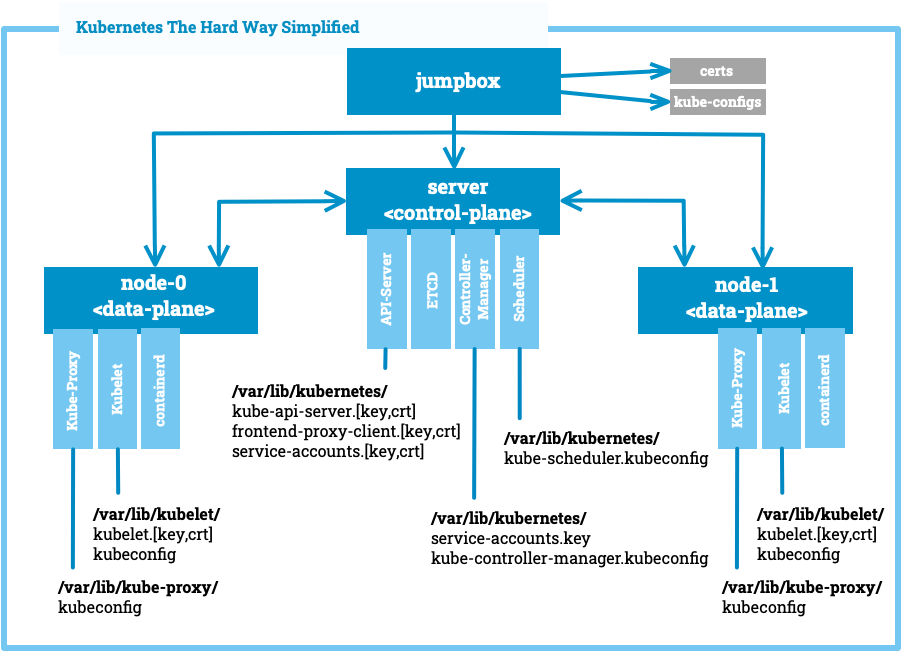
Quick inventory of your cluster check at jumpbox.
cd ~/kubernetes-the-hard-way/certs
find . -name "*.crt" -exec echo "{}" \; -exec openssl x509 -in {} -subject -noout \;

# check spezial certs
openssl x509 -in kube-apiserver.crt \
  -text -noout | grep "Not After"
Prepare for certs rotation
Backup existing kubernetes certs:
cd ~/kubernetes-the-hard-way
export CERTS_DATE=$(date +%Y-%m-%d)
mkdir -p backups/certs-$CERTS_DATE
cp -r certs/ backups/certs-$CERTS_DATE
Check Certs dates and the CA dates:
openssl x509 -in certs/kube-apiserver.crt -noout -dates

# check that your ca's are correct
openssl x509 -in certs/ca.crt -noout -dates
openssl x509 -in certs/kubernetes-front-proxy-ca.crt -noout -dates
openssl x509 -in certs/etcd-ca.crt -noout -dates
Generate new Kubernetes certificates in a separate directory:
cd ~/kubernetes-the-hard-way
DIR_CERTS=certs-$CERTS_DATE
mkdir -p ${DIR_CERTS}
cd ${DIR_CERTS}

certs=(
  "admin" "node-0" "node-1"
  "kube-proxy" "kube-scheduler"
  "kube-controller-manager"
  "kube-api-server"
  "service-accounts"
)
for i in ${certs[*]}; do
  openssl genrsa -out "${i}.key" 4096

  openssl req -new -key "${i}.key" -sha256 \
    -config "../ca.conf" -section ${i} \
    -out "${i}.csr"

  openssl x509 -req -days 90 -in "${i}.csr" \
    -copy_extensions copyall \
    -sha256 -CA "../certs/ca.crt" \
    -CAkey "../certs/ca.key" \
    -CAcreateserial \
    -out "${i}.crt"
done
Create API Aggregations front proxy certs:
openssl genrsa -out "front-proxy-client.key" 4096

openssl req -new -key "front-proxy-client.key" -sha256 \
  -config "../front-ca.conf" -section front-proxy-client \
  -out "front-proxy-client.csr"

openssl x509 -req -days 90 -in "front-proxy-client.csr" \
  -copy_extensions copyall \
  -sha256 -CA "../certs/kubernetes-front-proxy-ca.crt" \
  -CAkey "../certs/kubernetes-front-proxy-ca.key" \
  -CAcreateserial \
  -out "front-proxy-client.crt"
Create kubernetes components kube-configs
- kube-scheduler
- kube-controller-manager
- kubelets
- kube-proxy
- admin
cd ~/kubernetes-the-hard-way-simpilify/bootstrap/
export CERTS_DIR="$HOME/kubernetes-the-hard-way/certs-$CERTS_DATE"
export KUBE_CONFIGS_DIR="$HOME/kubernetes-the-hard-way/kubeconfig-$CERTS_DATE"
mkdir -p $CERTS_DIR $KUBE_CONFIGS_DIR
scripts/040-kubeconfigs.sh
Distribute and restart components
Checks this and restart all components
- Service Account regeneration
- Automatically inject in all components
- kube-public cm/cluster-info certs
- Restart component controller
Never rotate etcd same time as controlplane or worker certs
Controlplane Certs Rotation
ssh root@server <<'EOF'
systemctl stop kube-scheduler
systemctl stop kube-controller-manager
systemctl stop kube-apiserver
EOF

# overwrite with new certs
cd $CERTS_DIR
scp \
  kube-api-server.key kube-api-server.crt \
  service-accounts.key service-accounts.crt \
  front-proxy-client.key front-proxy-client.crt \
  root@${host}:/var/lib/kubernetes

# copy kubeconfig
ssh root@server EOF
mv *.kubeconfig /var/lib/kubernetes
EOF

# start services
ssh root@server <<'EOF'
systemctl start kube-apiserver
systemctl start kube-controller-manager
systemctl start kube-scheduler"
EOF
At this state some controllers inside your cluster, Addons CNI didn't function well....
Worker nodes cert rotation
for host in node-0 node-1; do
  ssh root@${host} "systemctl stop kubelet"
  ssh root@${host} "systemctl stop kubeproxy"

  scp ${host}.crt \
    root@${host}:/var/lib/kubelet/kubelet.crt
  scp ${host}.key \
    root@${host}:/var/lib/kubelet/kubelet.key
  scp $KUBE_CONFIGS_DIR/kube-proxy.kubeconfig root@${host}:/var/lib/kube-proxy/kubeconfig
  scp $KUBE_CONFIGS_DIR/${host}.kubeconfig root@${host}:/var/lib/kubelet/kubeconfig

  ssh root@${host} "systemctl start kubeproxy"
  ssh root@${host} "systemctl start kubelet"

done
Componenten Health checks
- Complete health of the cluster components
- Check that workload available again
kubectl get nodes
kubectl get deployments,daemonsets,statefulsets --all-namespaces
kubectl get pods --all-namespaces -o wide
At this state some controllers inside your cluster must be restarted, like coredns, metrics-server, cni or csi driver, etc.
Tryout with new workload
- Start a new deploymet and check avaiable pods
- Create a new service and check the endpoints
kubectl create namespace test
kubectl config set-context --current --namespace=test
kubectl create deployment nginx --image=nginx
kubectl expose deployment nginx --port=80 --type=ClusterIP
kubectl get svc nginx
kubectl get endpoints nginx
kubectl port-forward svc/nginx 8080:80 &
curl http://127.0.0.1:8080
Summary
This lab unit demonstrates manual Kubernetes certificate rotation for both control-plane and worker nodes, without relying on automation tooling. The same Certificate Authority (CA) is retained, but new certificates are issued for all components. From the jumpbox, we regenerate all certificates for the control-plane — including the API server, controller manager, scheduler, and admin client — while worker nodes renew only the kubelet and kube-proxy certificates. Updated kubeconfig files are generated, and systemd services are restarted to apply the new credentials. After rotation, the cluster remains fully operational, with all nodes showing a Ready status.
Day2Operations - Config Kubernetes Audit logs
Kubernetes audit logging provides a detailed trail of every request to the API server, allowing you to track who did what, when, and where. To configure it, you set up an audit policy and tell the API server how to log and store the events.
Here’s how it works conceptually:
First, create an audit policy file (YAML) that defines what to record — for example only metadata, or full request and response bodies — and at which stages (like request received, response sent). Then, configure the API server flags to point to that file using parameters such as:
--audit-policy-file--audit-log-path--audit-log-maxage--audit-log-maxsize--audit-log-maxbackup
When enabled, the API server writes audit events to the specified log file or streams them to a webhook backend for external processing. These logs show details like user, verb, resource, namespace, IP, and time, which are essential for security reviews and compliance.
Simple config pod metadata audit
Define a simple audit policy:
cd ~/kubernetes-the-hard-way/configs
cat >audit-policy.yaml <<EOF
apiVersion: audit.k8s.io/v1
kind: Policy
rules:
  - level: Metadata
    resources:
    - group: ""
      resources: ["pods"]
EOF
scp audit-policy.yaml root@server:/var/lib/kubernetes/audit-policy.yaml
Add audit policy to api server systemd unit and restart service
cd ~/kubernetes-the-hard-way/units
sed -i 's#--audit-log-path=/var/log/audit.log#--audit-log-path=/var/log/audit.log --audit-policy-file=/var/lib/kubernetes/audit-policy.yaml#' \
  kube-apiserver.service
scp kube-apiserver.service root@server:/etc/systemd/system/kube-apiserver.service
ssh root@server
Restart apiserver
systemctl daemon-reload
systemctl restart kube-apiserver
exit
Start test pods at jumpbox:
kubectl config set-context --current --namespace default
kubectl run httpd --image=httpd:2.4
Access audit event stream:
ssh root@server tail -f /var/log/audit.log | jq
Sample Output:
{
  "kind": "Event",
  "apiVersion": "audit.k8s.io/v1",
  "level": "Metadata",
  "auditID": "17bc4e5c-87e6-4958-a9b6-e6292fec58ee",
  "stage": "ResponseComplete",
  "requestURI": "/api/v1/namespaces/default/pods/httpd",
  "verb": "get",
  "user": {
    "username": "system:node:node-0",
    "groups": [
      "system:nodes",
      "system:authenticated"
    ],
    "extra": {
      "authentication.kubernetes.io/credential-id": [
        "X509SHA256=a806dfe80e6a2aff69a48bcec2590cce8f9a194f14c1a431b4efd9afa5db754c"
      ]
    }
  },
  "sourceIPs": [
    "172.16.0.4"
  ],
  "userAgent": "kubelet/v1.34.0 (linux/amd64) kubernetes/f28b4c9",
  "objectRef": {
    "resource": "pods",
    "namespace": "default",
    "name": "httpd",
    "apiVersion": "v1"
  },
  "responseStatus": {
    "metadata": {},
    "code": 200
  },
  "requestReceivedTimestamp": "2025-09-11T15:45:37.268174Z",
  "stageTimestamp": "2025-09-11T15:45:37.269263Z",
  "annotations": {
    "authorization.k8s.io/decision": "allow",
    "authorization.k8s.io/reason": ""
  }
}
Day2Operations - Summary
Day 2 Kubernetes operations focus on keeping your cluster healthy, secure, and recoverable after initial deployment. You learn to back up and restore etcd, manage TLS certificates, and handle failures across control plane and worker nodes. Persistent Volume backups and GitOps become essential to ensure full recovery and repeatable configurations. Observability, security policies, and automated upgrades are key to maintaining production readiness. Mastering Day 2 skills turns you from a cluster user into a resilient Kubernetes operator.
What You Learn as a Trainee?
What You Learn in Day 2 Kubernetes Operations:
etcd Backup & Restore
- How to back up the Kubernetes control plane state
- How to restore from failure (partial or full)
- Why snapshots alone aren’t enough without volume/data recovery
Essential for disaster recovery and rebuilding clusters.
Certificate Management
- Configuring etcd with mutual TLS authentication
- Rotate expired TLS certificates (kubelets, apiserver, etcd)
- Understand what breaks when certs expire
- Regenerate or renew CA-signed components
Keeps your cluster secure and functional over time.
Graceful Component Failure & Restart
- Stop and start kube-apiserver, scheduler, controller-manager, etcd
- Stop and start kubelet, containerd and kube-proxy
- Understand what services depend on which components
- Learn to bootstrap a broken control plane
Teaches resilience and deep troubleshooting skills.
What You Can Do Next?
After completing the basics of day2 operations, you can take your Kubernetes journey further by exploring:
Day 2 Ops isn’t about just surviving — it’s about operating Kubernetes with confidence and automation. These tools help you move from fire-fighting to resilient, observable, and reproducible operations.
Kubernetes Day 2 Operations - Recommended Projects & References
A curated list of essential tools and projects to explore after learning Kubernetes fundamentals, focusing on backup, restore, observability, policy enforcement, and GitOps.
Backup & Restore
| Project | Description |
|---|---|
| Velero | Backup and restore Kubernetes cluster resources and persistent volumes |
| Kasten K10 | Enterprise Kubernetes data protection |
| Stash | Backup tool with native support for popular databases |
| ETCDCTL & ETCDUTL | CLI for snapshot and restore of etcd database |
Security & Policy Enforcement
| Project | Description |
|---|---|
| OPA/Gatekeeper | Policy as code with CRDs to enforce rules |
| Kyverno | Kubernetes-native policy engine and mutation controller |
| cert-manager | Automate the management and issuance of TLS certificates |
| Trivy | Vulnerability scanner for containers and Kubernetes clusters |
Observability & Monitoring
| Project | Description |
|---|---|
| Prometheus | Monitoring and alerting toolkit |
| Grafana | Visualize Prometheus metrics and more |
| Loki | Log aggregation system designed for Kubernetes logs |
| Kube-state-metrics | Exposes resource state metrics for Prometheus |
| metrics-server | Lightweight resource usage metrics provider |
Storage & Volume Snapshots
| Project | Description |
|---|---|
| OpenEBS | Local PV and CSI-based storage engine |
| Longhorn | Lightweight cloud-native distributed block storage |
| Rook + Ceph | Storage orchestration for Ceph and other systems |
| CSI Snapshots | Kubernetes-native volume snapshots and restore support |
GitOps & Automation
| Project | Description |
|---|---|
| FluxCD | GitOps controller for Kubernetes |
| ArgoCD | Declarative GitOps for Kubernetes applications |
| Renovate | Automates dependency and Helm chart updates |
| Kustomize | Customize Kubernetes YAML without templating |
| Helm | Package manager for Kubernetes applications |
Troubleshooting & Debugging
| Project | Description |
|---|---|
| K9s | Terminal UI for Kubernetes management |
| Stern | Multi-pod log tailing and filtering |
| Kubectl-debug | Launch ephemeral containers for pod debugging |
| Netshoot | Container with useful networking and debugging tools |
Advanced Tools
| Project | Description |
|---|---|
| Cluster API | Declarative Kubernetes cluster lifecycle management |
| Kubevela | Modern application delivery system with policy integration |
| Kubewatch | Kubernetes watcher for Slack/email notifications |
Regards,
├─☺︎─┤ The Humble Sign Painter - Peter Rossbach
- Previous lesson
- Deploy basic addons into the simplified kubernetes cluster
- Next lesson
- Day 2 Operations – Some Components are offline