Prepare and deploy a kubernetes cluster
Intro of the Kubernetes The Hard Way Course
This course brings Kelsey Hightower’s classic “Kubernetes the Hard Way” into a fully interactive and streamlined environment powered by iximiuz labs.
You’ll build a Kubernetes cluster from scratch, step by step, learning how each component fits together — without relying on installers like kubeadm. Along the way, you’ll gain a deep understanding of the Kubernetes control plane, networking, security, and operational essentials.
Perfect for DevOps engineers, cloud-native learners, and platform builders who want to master Kubernetes by doing.
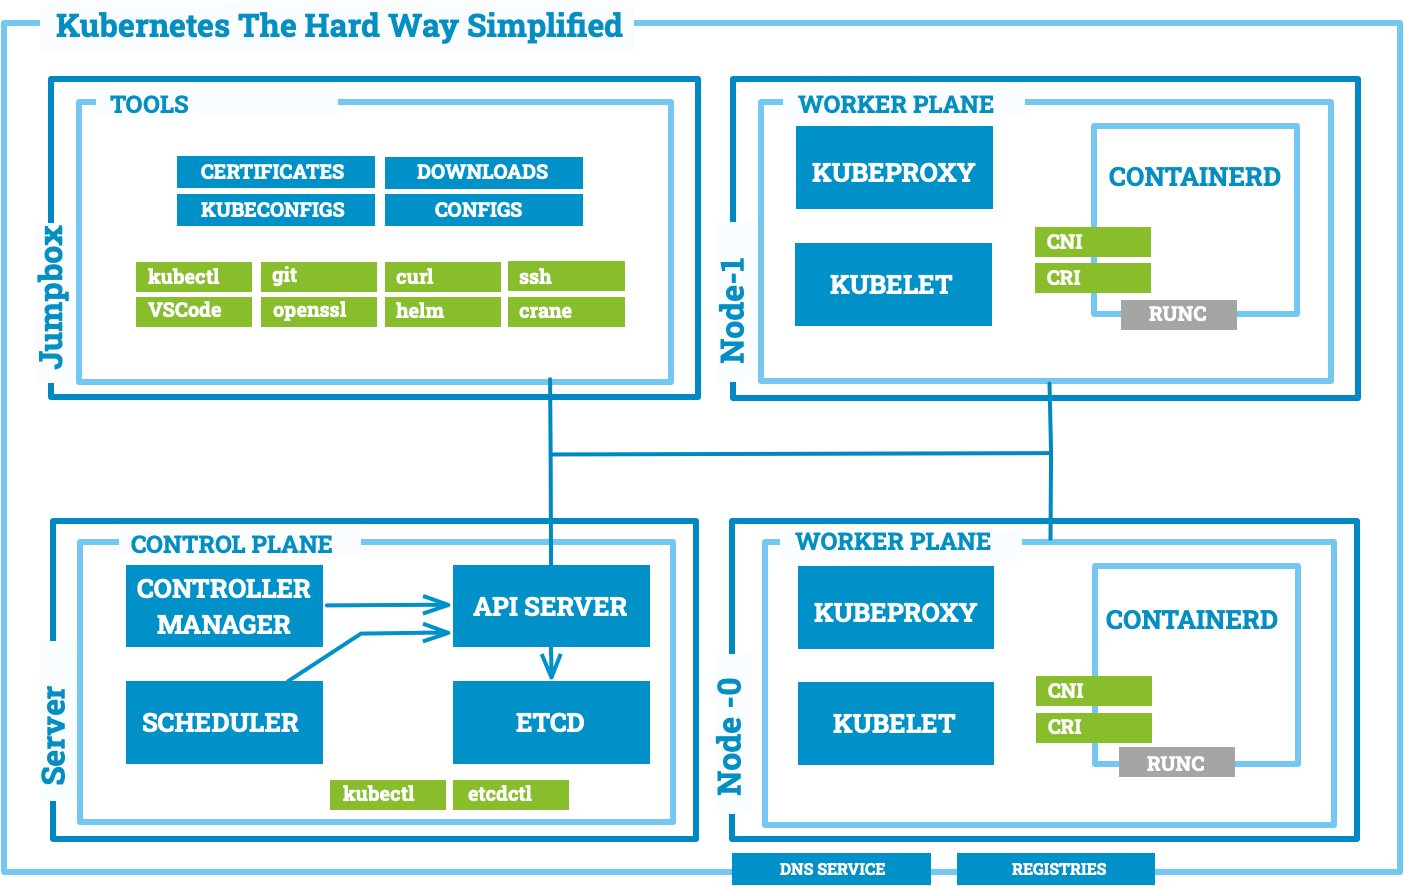
Kelsey Hightower published at the year 2015 his legendary Kubernetes the Hard Way tutorial — a hands-on deep dive into building Kubernetes from the ground up. It became a foundational learning experience for thousands of cloud-native practitioners.
I had the privilege of attending one of Kelsey’s very first workshops at DockerCon San Francisco 2015, and that experience left a lasting impact. So first: Thank you, Kelsey, for your generosity, clarity, and passion for teaching!
This course is my humble attribute: a simplified and interactive version of Kubernetes the Hard Way hosted on iximiuz labs. It’s designed to illustrate key concepts more clearly and make the journey more accessible and quicker to start — especially for those who want to explore the internals without fighting infrastructure setup.
Whether you’re a DevOps engineer, platform builder, or just curious about how Kubernetes really works under the hood — this course is for you.
Great job, Kelsey. I hope many more will follow the path you paved and continue the journey into the world of cloud native.
Regards,
Peter
Prepare the Kubernetes Machine Set from Jumpbox
In this unit you will set up one of the four machines to be a jumpbox. This machine will be used to run commands throughout this tutorial. While a dedicated machine is being used to ensure consistency, these commands can also be run from just about any machine including your personal workstation running macOS VM or pure Debian Linux.
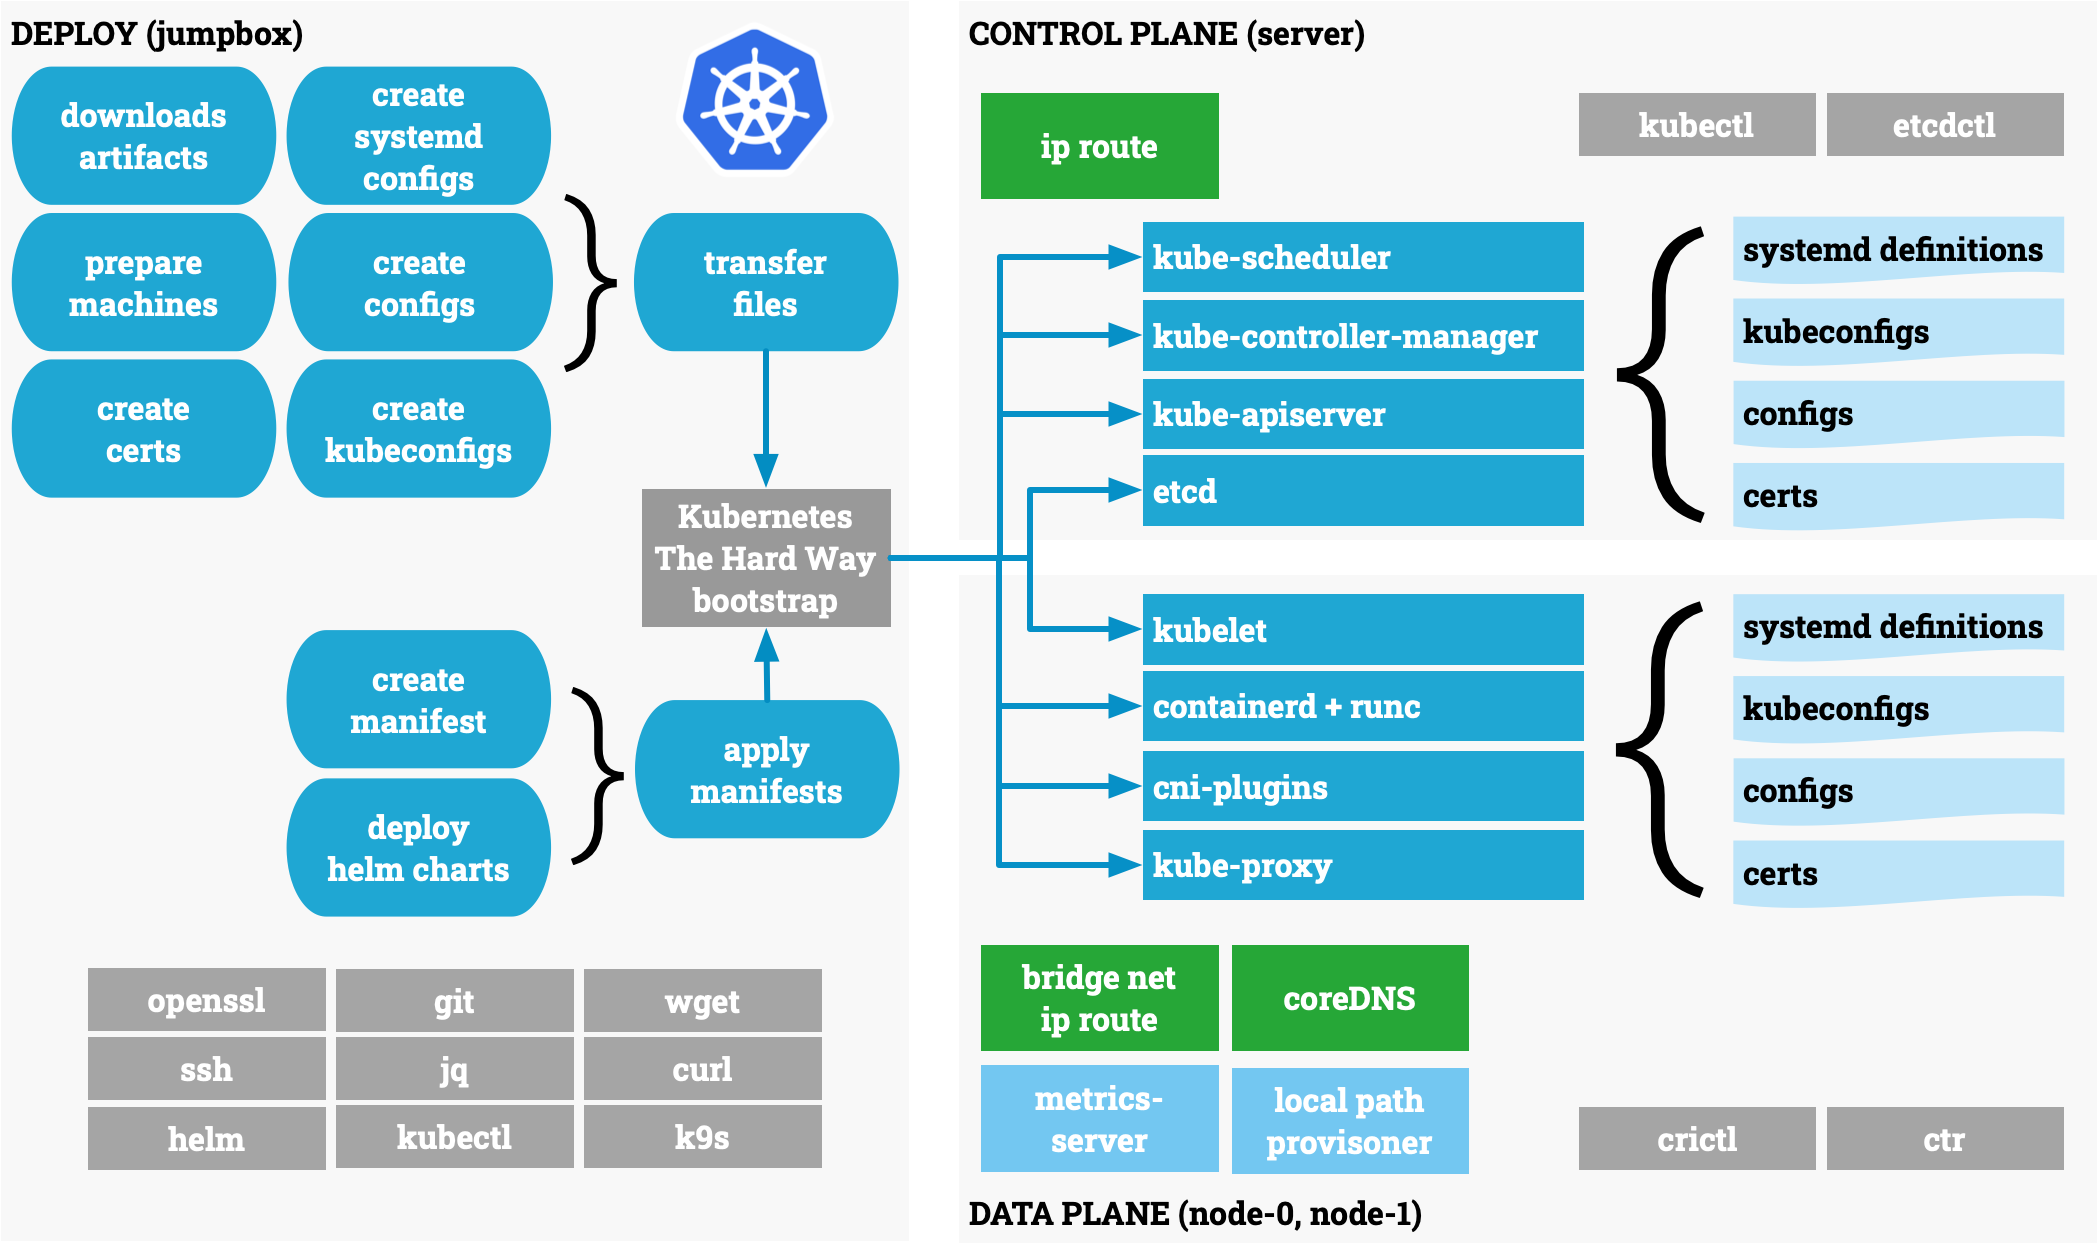
Think of the jumpbox as the administration machine that you will use as a home base when setting up your Kubernetes cluster from the ground up. Before we get started we need to install a few command line utilities and create some additional configuration files that will be used to configure various Kubernetes components throughout this tutorial.
Log in to the jumpbox:
Some commands must be run as the root user!
Install Command Line Utilities
Now that you are logged into the jumpbox machine as the laborant user, you will install the command line utilities that will be used to preform various tasks throughout the tutorial.
sudo apt-get update
sudo apt-get -y install wget curl vim openssl git
Download the Binaries
In this unit you will download the binaries for the various Kubernetes components. The binaries will be stored in the downloads directory on the jumpbox, which will reduce the amount of internet bandwidth required to complete this tutorial as we avoid downloading the binaries multiple times for each machine in our Kubernetes cluster.
The binaries that will be downloaded are listed in either the downloads-amd64.txt file depending on your hardware architecture, which you can create with following cat command:
mkdir -p ~/kubernetes-the-hard-way
cd ~/kubernetes-the-hard-way

ARCH=$(dpkg --print-architecture)
K8S_VERSION=v1.36.1
CRICTL_VERSION=v1.36.0
RUNC_VERSION=v1.4.2
CNI_PLUGINS=v1.9.1
CONTAINERD_VERSION=2.3.1
ETCD_VERSION=v3.6.12

cat >downloads-${ARCH}.txt <<EOF
https://dl.k8s.io/${K8S_VERSION}/bin/linux/${ARCH}/kubectl
https://dl.k8s.io/${K8S_VERSION}/bin/linux/${ARCH}/kube-apiserver
https://dl.k8s.io/${K8S_VERSION}/bin/linux/${ARCH}/kube-controller-manager
https://dl.k8s.io/${K8S_VERSION}/bin/linux/${ARCH}/kube-scheduler
https://dl.k8s.io/${K8S_VERSION}/bin/linux/${ARCH}/kube-proxy
https://dl.k8s.io/${K8S_VERSION}/bin/linux/${ARCH}/kubelet
https://github.com/kubernetes-sigs/cri-tools/releases/download/${CRICTL_VERSION}/crictl-${CRICTL_VERSION}-linux-${ARCH}.tar.gz
https://github.com/opencontainers/runc/releases/download/${RUNC_VERSION}/runc.${ARCH}
https://github.com/containernetworking/plugins/releases/download/${CNI_PLUGINS}/cni-plugins-linux-${ARCH}-${CNI_PLUGINS}.tgz
https://github.com/containerd/containerd/releases/download/v${CONTAINERD_VERSION}/containerd-${CONTAINERD_VERSION}-linux-${ARCH}.tar.gz
https://github.com/etcd-io/etcd/releases/download/${ETCD_VERSION}/etcd-${ETCD_VERSION}-linux-${ARCH}.tar.gz
EOF
Download the binaries into a directory called downloads using the wget command:
wget -q --show-progress \
  --https-only \
  --timestamping \
  -P downloads \
  -i downloads-$(dpkg --print-architecture).txt
Depending on your internet connection speed it may take a while to download over 500 megabytes of binaries, and once the download is complete, you can list them using the ls command:
ls -oh downloads
Extract the component binaries from the release archives and organize them under the downloads directory.
ARCH=$(dpkg --print-architecture)
mkdir -p downloads/{client,cni-plugins,controller,worker}
tar -xvf downloads/crictl-${CRICTL_VERSION}-linux-${ARCH}.tar.gz \
  -C downloads/worker/
tar -xvf downloads/containerd-${CONTAINERD_VERSION}-linux-${ARCH}.tar.gz \
  --strip-components 1 \
  -C downloads/worker/
tar -xvf downloads/cni-plugins-linux-${ARCH}-${CNI_PLUGINS}.tgz \
  -C downloads/cni-plugins/
tar -xvf downloads/etcd-${ETCD_VERSION}-linux-${ARCH}.tar.gz \
  -C downloads/ \
  --strip-components 1 \
  etcd-${ETCD_VERSION}-linux-${ARCH}/etcdctl \
  etcd-${ETCD_VERSION}-linux-${ARCH}/etcdutl \
  etcd-${ETCD_VERSION}-linux-${ARCH}/etcd
mv downloads/{etcdctl,etcdutl,kubectl} downloads/client/
mv downloads/{etcd,kube-apiserver,kube-controller-manager,kube-scheduler} \
  downloads/controller/
mv downloads/{kubelet,kube-proxy} downloads/worker/
mv downloads/runc.${ARCH} downloads/worker/runc
rm -rf downloads/*gz downloads/cni-plugins/README.md downloads/cni-plugins/LICENSE
Make the binaries executable.
chmod +x downloads/{client,cni-plugins,controller,worker}/*
This are the different tool and kubernetes components for the different node roles.
tree .
├── downloads
│   ├── client
│   │   ├── etcdctl
│   │   ├── etcdutl
│   │   └── kubectl
│   ├── cni-plugins
│   │   ├── bandwidth
│   │   ├── bridge
│   │   ├── dhcp
│   │   ├── dummy
│   │   ├── firewall
│   │   ├── host-device
│   │   ├── host-local
│   │   ├── ipvlan
│   │   ├── loopback
│   │   ├── macvlan
│   │   ├── portmap
│   │   ├── ptp
│   │   ├── sbr
│   │   ├── static
│   │   ├── tap
│   │   ├── tuning
│   │   ├── vlan
│   │   └── vrf
│   ├── controller
│   │   ├── etcd
│   │   ├── kube-apiserver
│   │   ├── kube-controller-manager
│   │   └── kube-scheduler
│   └── worker
│       ├── containerd
│       ├── containerd-shim-runc-v2
│       ├── containerd-stress
│       ├── crictl
│       ├── ctr
│       ├── kube-proxy
│       ├── kubelet
│       └── runc
└── downloads-amd64.txt
Install kubectl
In this section you will install the kubectl, the official Kubernetes client command line tool, on the jumpbox machine. kubectl will be used to interact with the Kubernetes control plane once your cluster is provisioned later in this tutorial.
Use the chmod command to make the kubectl binary executable and move it to the /usr/local/bin/ directory:
sudo cp downloads/client/kubectl /usr/local/bin/
sudo chown root:root /usr/local/bin/kubectl
Define the k-aliases for kubectl command:
echo 'source <(kubectl completion bash)' >>~/.bashrc
echo 'alias k=kubectl' >>~/.bashrc && echo 'complete -o default -F __start_kubectl k' >>~/.bashrc
source ~/.bashrc
At this point kubectl is installed and can be verified by running the kubectl command:
kubectl version --client
Client Version: v1.36.1
Kustomize Version: v5.8.1
At this point the jumpbox has been set up with all the command line tools and utilities necessary to complete the units in this tutorial.
Prepare Kubernetes Cluster Machines
Kubernetes requires a set of machines to host the Kubernetes control plane and the worker nodes where containers are ultimately run. In this unit you will provision the machines required for setting up a Kubernetes cluster.
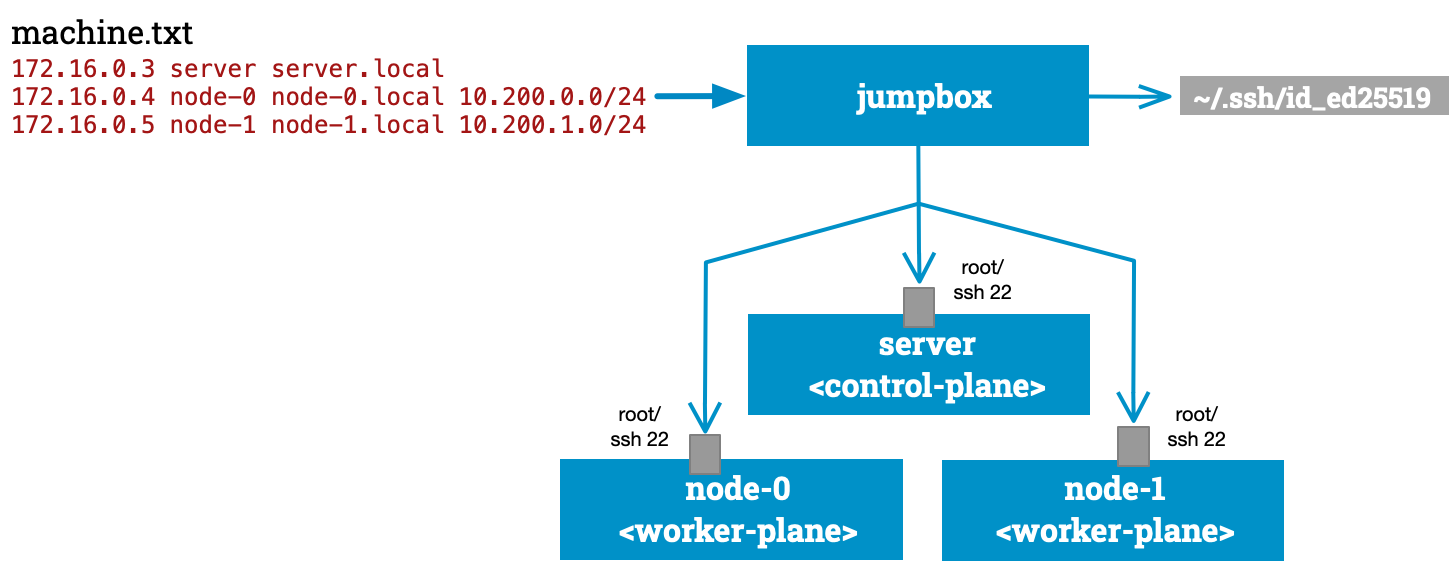
Define Machine Config Database
This tutorial will leverage a text file, which will serve as a machine database, to store the various machine attributes that will be used when setting up the Kubernetes control plane and worker nodes. The following schema represents entries in the machine database, one entry per line:
IPV4_ADDRESS FQDN HOSTNAME POD_SUBNET
Each of the columns corresponds to a machine IP address IPV4_ADDRESS, fully qualified domain name FQDN, host name HOSTNAME, and the IP subnet POD_SUBNET. Kubernetes assigns one IP address per pod and the POD_SUBNET represents the unique IP address range assigned to each machine in the cluster for doing so.
Here is an example machine database similar to the one used when creating this tutorial. Notice the IP addresses have been masked out. Your machines can be assigned any IP address as long as each machine is reachable from each other and the jumpbox.
Check DNS Setup
cat /etc/hosts
output:
172.16.0.2 jumphost jumphost.local
172.16.0.3 server server.local
172.16.0.4 node-0 node-0.local
172.16.0.5 node-1 node-1.local
Prepare a machines.txt configuration file.
In this file, specify for each machine its setup parameters
— such as hostname, role, IP address
— and define the corresponding pod network configuration.
cd ~/kubernetes-the-hard-way
cat >machines.txt <<EOF
172.16.0.3 server server.local
172.16.0.4 node-0 node-0.local 10.200.0.0/24
172.16.0.5 node-1 node-1.local 10.200.1.0/24
EOF
Add ssh permissions to easier root access
Establish terminal root access from the jumpbox to all Kubernetes cluster nodes in order to install,
configure, and later manage the entire cluster from a central deployment host. Use the machines.txt
definition file, create a dedicated deployment SSH key, distribute it to all nodes, and ensure proper
permissions are set
cd ~/kubernetes-the-hard-way
while IFS=' ' read -r IP HOST FQDN SUBNET; do
    if ssh-keygen -F "$HOST" > /dev/null 2>&1; then
      echo "  -> $HOST already in known_hosts, skipping SSH config."
      continue
    fi
    ssh-keyscan "$HOST" >> ~/.ssh/known_hosts 2>/dev/null
    ssh laborant@$HOST "sudo /bin/sh -c 'echo \"PermitRootLogin yes\" > /etc/ssh/sshd_config.d/lab.conf'" </dev/null
    ssh laborant@$HOST "sudo systemctl restart sshd" 2>/dev/null </dev/null
    {
    echo ""
    grep flexbox ~/.ssh/authorized_keys
    } | ssh laborant@$HOST "sudo tee -a /root/.ssh/authorized_keys >/dev/null"
done < machines.txt
Check that all machines now root ssh accessable!
while read IP HOST FQDN SUBNET; do
  ssh -n root@${HOST} hostname
done < machines.txt
At this stage, we generate TLS certificates for every Kubernetes component to secure their communication, and then create the kubeconfig files each component will use for authentication.
Provisioning a CA and Generating TLS Certificates
In this unit you will provision a PKI Infrastructure using openssl to bootstrap a Certificate Authority
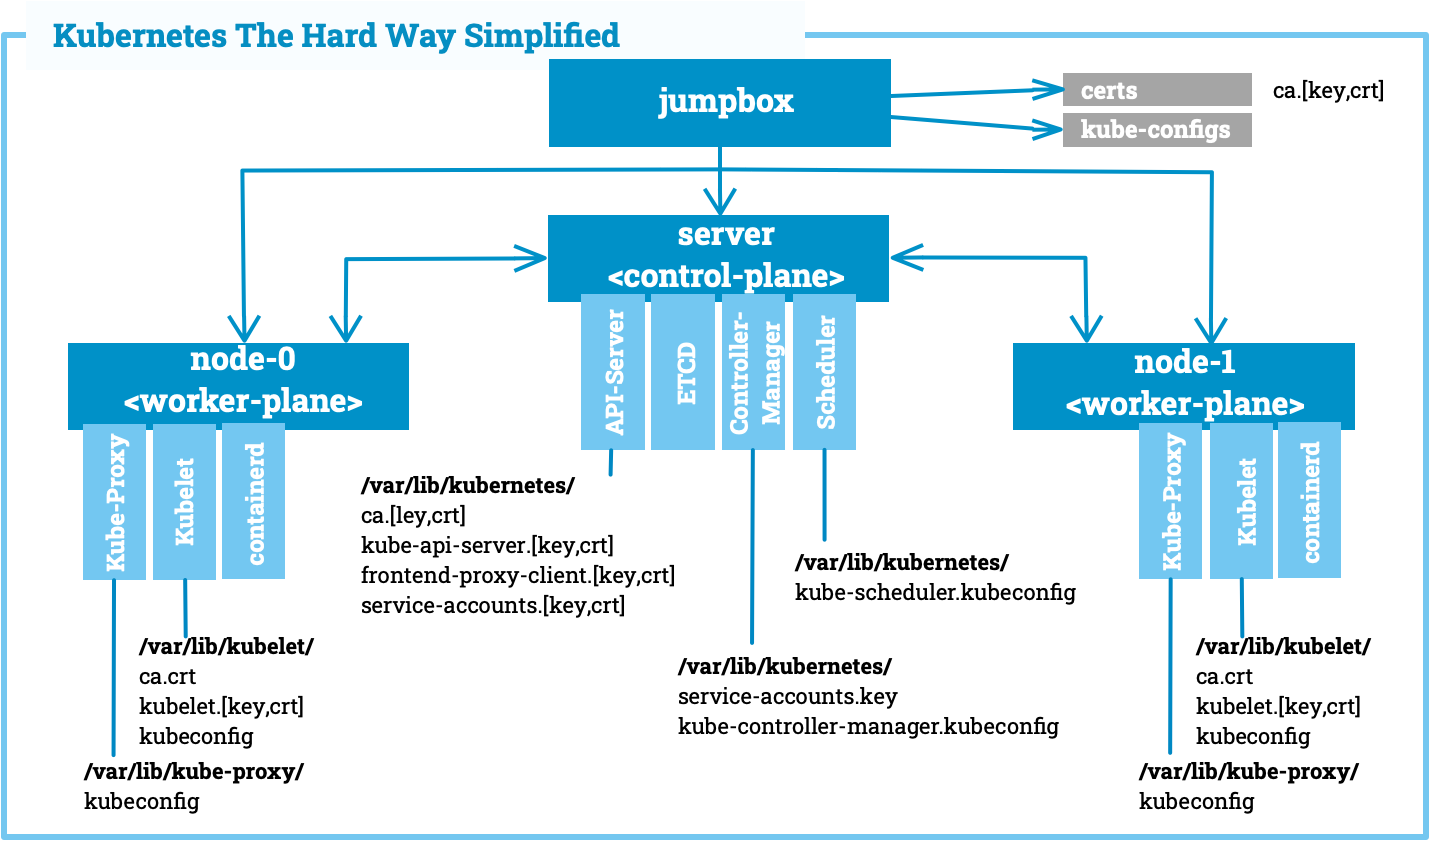
Create TLS certificates for each of the following Kubernetes components:
- kube-apiserver
- kube-controller-manager
- kube-scheduler
- kubelet (node-0 and node-1)
- kube-proxy (node-0 and node-1)
- service accounts
- admin account
Log in to the jumpbox:
Some commands must be run as the root user!
Define your Cluster Certificate Authority
In this section you will provision a Certificate Authority that can be used to generate additional TLS certificates for the other Kubernetes components. Setting up CA and generating certificates using openssl can be time-consuming, especially when doing it for the first time. To streamline this lab, I've included an openssl configuration file ca.conf, which defines all the details needed to generate certificates for each Kubernetes component.
Take a moment to create and review the ca.conf configuration file:
cat >ca.conf <<'EOF'
[req]
distinguished_name = req_distinguished_name
prompt             = no
x509_extensions    = ca_x509_extensions

[ca_x509_extensions]
basicConstraints = CA:TRUE
keyUsage         = cRLSign, keyCertSign

[req_distinguished_name]
C   = DE
ST  = NRW
L   = Bochum
CN  = CA

[admin]
distinguished_name = admin_distinguished_name
prompt             = no
req_extensions     = default_req_extensions

[admin_distinguished_name]
CN = admin
O  = system:masters

# Service Accounts
#
# The Kubernetes Controller Manager leverages a key pair to generate
# and sign service account tokens as described in the
# [managing service accounts](https://kubernetes.io/docs/admin/service-accounts-admin/)
# documentation.

[service-accounts]
distinguished_name = service-accounts_distinguished_name
prompt             = no
req_extensions     = default_req_extensions

[service-accounts_distinguished_name]
CN = service-accounts

# Worker Nodes
#
# Kubernetes uses a [special-purpose authorization mode](https://kubernetes.io/docs/admin/authorization/node/)
# called Node Authorizer, that specifically authorizes API requests made
# by [Kubelets](https://kubernetes.io/docs/concepts/overview/components/#kubelet).
# In order to be authorized by the Node Authorizer, Kubelets must use a credential
# that identifies them as being in the `system:nodes` group, with a username
# of `system:node:<nodeName>`.

[node-0]
distinguished_name = node-0_distinguished_name
prompt             = no
req_extensions     = node-0_req_extensions

[node-0_req_extensions]
basicConstraints     = CA:FALSE
extendedKeyUsage     = clientAuth, serverAuth
keyUsage             = critical, digitalSignature, keyEncipherment
nsCertType           = client
nsComment            = "Node-0 Certificate"
subjectAltName       = DNS:node-0, IP:127.0.0.1, IP:172.16.0.4
subjectKeyIdentifier = hash

[node-0_distinguished_name]
CN = system:node:node-0
O  = system:nodes
C  = DE
ST = NRW
L  = Bochum

[node-1]
distinguished_name = node-1_distinguished_name
prompt             = no
req_extensions     = node-1_req_extensions

[node-1_req_extensions]
basicConstraints     = CA:FALSE
extendedKeyUsage     = clientAuth, serverAuth
keyUsage             = critical, digitalSignature, keyEncipherment
nsCertType           = client
nsComment            = "Node-1 Certificate"
subjectAltName       = DNS:node-1, IP:127.0.0.1, IP:172.16.0.5
subjectKeyIdentifier = hash

[node-1_distinguished_name]
CN = system:node:node-1
O  = system:nodes
C  = DE
ST = NRW
L  = Bochum


# Kube Proxy Section
[kube-proxy]
distinguished_name = kube-proxy_distinguished_name
prompt             = no
req_extensions     = kube-proxy_req_extensions

[kube-proxy_req_extensions]
basicConstraints     = CA:FALSE
extendedKeyUsage     = clientAuth, serverAuth
keyUsage             = critical, digitalSignature, keyEncipherment
nsCertType           = client
nsComment            = "Kube Proxy Certificate"
subjectAltName       = DNS:kube-proxy, IP:127.0.0.1
subjectKeyIdentifier = hash

[kube-proxy_distinguished_name]
CN = system:kube-proxy
O  = system:node-proxier
C  = DE
ST = NRW
L  = Bochum


# Controller Manager
[kube-controller-manager]
distinguished_name = kube-controller-manager_distinguished_name
prompt             = no
req_extensions     = kube-controller-manager_req_extensions

[kube-controller-manager_req_extensions]
basicConstraints     = CA:FALSE
extendedKeyUsage     = clientAuth, serverAuth
keyUsage             = critical, digitalSignature, keyEncipherment
nsCertType           = client
nsComment            = "Kube Controller Manager Certificate"
subjectAltName       = DNS:kube-controller-manager, IP:127.0.0.1
subjectKeyIdentifier = hash

[kube-controller-manager_distinguished_name]
CN = system:kube-controller-manager
O  = system:kube-controller-manager
C  = DE
ST = NRW
L  = Bochum


# Scheduler
[kube-scheduler]
distinguished_name = kube-scheduler_distinguished_name
prompt             = no
req_extensions     = kube-scheduler_req_extensions

[kube-scheduler_req_extensions]
basicConstraints     = CA:FALSE
extendedKeyUsage     = clientAuth, serverAuth
keyUsage             = critical, digitalSignature, keyEncipherment
nsCertType           = client
nsComment            = "Kube Scheduler Certificate"
subjectAltName       = DNS:kube-scheduler, IP:127.0.0.1
subjectKeyIdentifier = hash

[kube-scheduler_distinguished_name]
CN = system:kube-scheduler
O  = system:system:kube-scheduler
C  = DE
ST = NRW
L  = Bochum


# API Server
#
# The Kubernetes API server is automatically assigned the `kubernetes`
# internal dns name, which will be linked to the first IP address (`172.16.0.3`)
# from the address range (`172.16.0.0/24`) reserved for internal cluster
# services.

[kube-api-server]
distinguished_name = kube-api-server_distinguished_name
prompt             = no
req_extensions     = kube-api-server_req_extensions

[kube-api-server_req_extensions]
basicConstraints     = CA:FALSE
extendedKeyUsage     = clientAuth, serverAuth
keyUsage             = critical, digitalSignature, keyEncipherment
nsCertType           = client, server
nsComment            = "Kube API Server Certificate"
subjectAltName       = @kube-api-server_alt_names
subjectKeyIdentifier = hash

[kube-api-server_alt_names]
IP.0  = 127.0.0.1
IP.1  = 172.16.0.3
IP.2  = 10.0.0.1
DNS.0 = kubernetes
DNS.1 = kubernetes.default
DNS.2 = kubernetes.default.svc
DNS.3 = kubernetes.default.svc.cluster
DNS.4 = kubernetes.svc.cluster.local
DNS.5 = server.local
DNS.6 = api-server.local

[kube-api-server_distinguished_name]
CN = kubernetes
C  = DE
ST = NRW
L  = Bochum


[default_req_extensions]
basicConstraints     = CA:FALSE
extendedKeyUsage     = clientAuth
keyUsage             = critical, digitalSignature, keyEncipherment
nsCertType           = client
nsComment            = "Admin Client Certificate"
subjectKeyIdentifier = hash
EOF
You don't need to understand everything in the ca.conf file to complete this tutorial, but you should consider it a starting point for learning openssl and the configuration that goes into managing certificates at a high level.
Every certificate authority starts with a private key and root certificate. In this section we are going to create a self-signed certificate authority, and while that's all we need for this tutorial, this shouldn't be considered something you would do in a real-world production environment.
Generate the CA configuration file, certificate, and private key:
mkdir -p ~/kubernetes-the-hard-way/certs && cd ~/kubernetes-the-hard-way/certs
openssl genrsa -out ca.key 4096
openssl req -x509 -new -sha512 -noenc \
  -key ca.key -days 3653 \
  -config ../ca.conf \
  -out ca.crt
Check Certs:
ls ~/kubernetes-the-hard-way/certs
Output:
ca.crt ca.key
Create Client and Server Certificates
In this section you will generate client and server certificates for each Kubernetes component and a client certificate for the Kubernetes admin user.
Generate the certificates and private keys:
certs=(
  "admin" "node-0" "node-1"
  "kube-proxy" "kube-scheduler"
  "kube-controller-manager"
  "kube-api-server"
  "service-accounts"
)
for i in ${certs[*]}; do
  openssl genrsa -out "${i}.key" 4096

  openssl req -new -key "${i}.key" -sha256 \
    -config "../ca.conf" -section ${i} \
    -out "${i}.csr"

  openssl x509 -req -days 3653 -in "${i}.csr" \
    -copy_extensions copyall \
    -sha256 -CA "ca.crt" \
    -CAkey "ca.key" \
    -CAcreateserial \
    -out "${i}.crt"
done
The results of running the above command will generate a private key, certificate request, and signed SSL certificate for each of the Kubernetes components. You can list the generated files with the following command:
ls -1 *.crt *.key *.csr
Distribute the Client and Server Certificates
In this section you will copy the various certificates to every machine at a path where each Kubernetes component will search for its certificate pair. In a real-world environment these certificates should be treated like a set of sensitive secrets as they are used as credentials by the Kubernetes components to authenticate to each other.
Copy the appropriate certificates and private keys to the node-0 and node-1 machines:
for host in node-0 node-1; do
  ssh root@${host} mkdir -p /var/lib/kubelet/

  scp ca.crt root@${host}:/var/lib/kubelet/

  scp ${host}.crt \
    root@${host}:/var/lib/kubelet/kubelet.crt

  scp ${host}.key \
    root@${host}:/var/lib/kubelet/kubelet.key
done
Copy the appropriate certificates and private keys to the server machine:
scp \
  ca.key ca.crt \
  kube-api-server.key kube-api-server.crt \
  service-accounts.key service-accounts.crt \
  root@server:~/
The
kube-proxy,kube-controller-manager,kube-scheduler, andkubeletclient certificates will be used to generate client authentication configuration files in the next unit.
Generating Kubernetes Configuration Files for Authentication
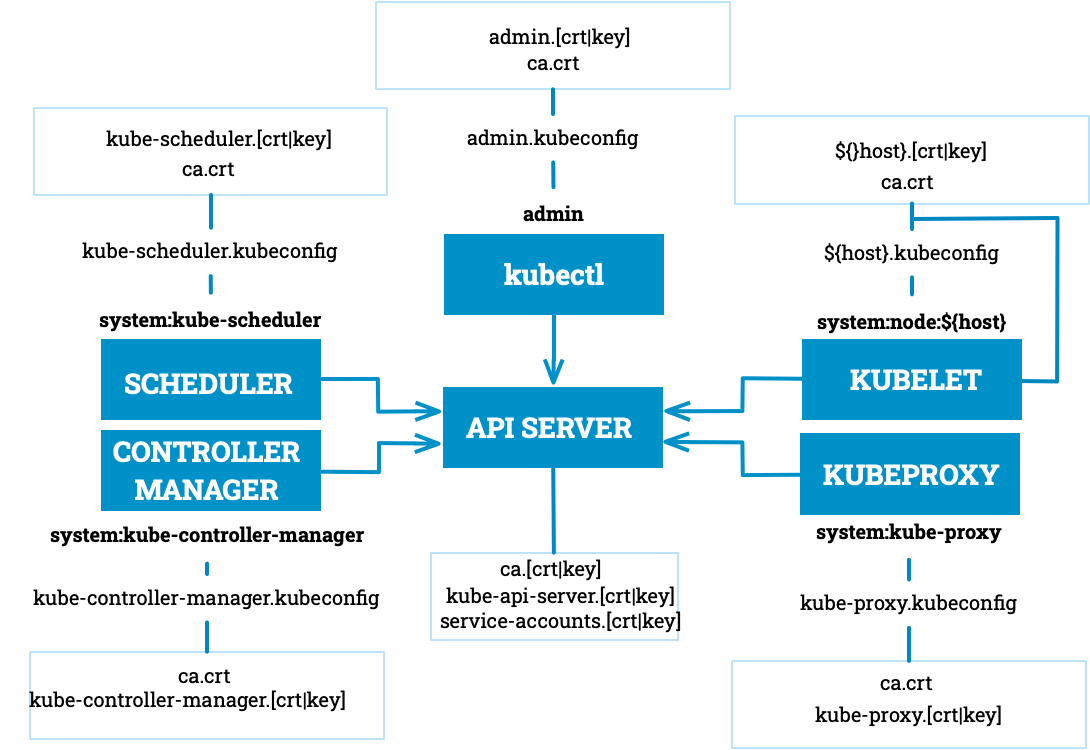
In this unit you will generate Kubernetes client configuration files, typically called kubeconfigs, which configure Kubernetes clients to connect and authenticate to Kubernetes API Servers.
In this unit you will generate kubeconfig files for the kubelet and the admin user.
The Kubelet Node Kubernetes Configuration Files
When generating kubeconfig files for Kubelets the client certificate matching the Kubelet's node name must be used. This will ensure Kubelets are properly authorized by the Kubernetes Node Authorizer.
The following commands must be run in the same directory used to generate the SSL certificates during the Generating TLS Certificates lab.
Generate a kubeconfig file for the node-0 and node-1 worker nodes:
mkdir -p ~/kubernetes-the-hard-way/kube-configs
cd ~/kubernetes-the-hard-way/kube-configs

for host in node-0 node-1; do
  kubectl config set-cluster kubernetes-the-hard-way \
    --certificate-authority=../certs/ca.crt \
    --embed-certs=true \
    --server=https://server.local:6443 \
    --kubeconfig=${host}.kubeconfig

  kubectl config set-credentials system:node:${host} \
    --client-certificate=../certs/${host}.crt \
    --client-key=../certs/${host}.key \
    --embed-certs=true \
    --kubeconfig=${host}.kubeconfig

  kubectl config set-context default \
    --cluster=kubernetes-the-hard-way \
    --user=system:node:${host} \
    --kubeconfig=${host}.kubeconfig

  kubectl config use-context default \
    --kubeconfig=${host}.kubeconfig
done
Check configs
ls -l ~/kubernetes-the-hard-way/kube-configs
Output:
node-0.kubeconfig
node-1.kubeconfig
The Kube-proxy Kubernetes Configuration File
Generate a kubeconfig file for the kube-proxy service:
kubectl config set-cluster kubernetes-the-hard-way \
  --certificate-authority=../certs/ca.crt \
  --embed-certs=true \
  --server=https://server.local:6443 \
  --kubeconfig=kube-proxy.kubeconfig

kubectl config set-credentials system:kube-proxy \
  --client-certificate=../certs/kube-proxy.crt \
  --client-key=../certs/kube-proxy.key \
  --embed-certs=true \
  --kubeconfig=kube-proxy.kubeconfig

kubectl config set-context default \
  --cluster=kubernetes-the-hard-way \
  --user=system:kube-proxy \
  --kubeconfig=kube-proxy.kubeconfig

kubectl config use-context default \
  --kubeconfig=kube-proxy.kubeconfig
Check configs
ls -l ~/kubernetes-the-hard-way/kube-configs
Output:
kube-proxy.kubeconfig
The kube-controller-manager Kubernetes Configuration File
Generate a kubeconfig file for the kube-controller-manager service:
kubectl config set-cluster kubernetes-the-hard-way \
  --certificate-authority=../certs/ca.crt \
  --embed-certs=true \
  --server=https://127.0.0.1:6443 \
  --kubeconfig=kube-controller-manager.kubeconfig

kubectl config set-credentials system:kube-controller-manager \
  --client-certificate=../certs/kube-controller-manager.crt \
  --client-key=../certs/kube-controller-manager.key \
  --embed-certs=true \
  --kubeconfig=kube-controller-manager.kubeconfig

kubectl config set-context default \
  --cluster=kubernetes-the-hard-way \
  --user=system:kube-controller-manager \
  --kubeconfig=kube-controller-manager.kubeconfig

kubectl config use-context default \
  --kubeconfig=kube-controller-manager.kubeconfig
Check configs
ls -l ~/kubernetes-the-hard-way/kube-configs
Output:
kube-controller-manager.kubeconfig
The kube-scheduler Kubernetes Configuration File
Generate a kubeconfig file for the kube-scheduler service:
kubectl config set-cluster kubernetes-the-hard-way \
  --certificate-authority=../certs/ca.crt \
  --embed-certs=true \
  --server=https://127.0.0.1:6443 \
  --kubeconfig=kube-scheduler.kubeconfig

kubectl config set-credentials system:kube-scheduler \
  --client-certificate=../certs/kube-scheduler.crt \
  --client-key=../certs/kube-scheduler.key \
  --embed-certs=true \
  --kubeconfig=kube-scheduler.kubeconfig

kubectl config set-context default \
  --cluster=kubernetes-the-hard-way \
  --user=system:kube-scheduler \
  --kubeconfig=kube-scheduler.kubeconfig

kubectl config use-context default \
  --kubeconfig=kube-scheduler.kubeconfig
Check configs
ls -l ~/kubernetes-the-hard-way/kube-configs
Output:
kube-scheduler.kubeconfig
The admin Kubernetes Configuration File
Generate a kubeconfig file for the admin user:
kubectl config set-cluster kubernetes-the-hard-way \
  --certificate-authority=../certs/ca.crt \
  --embed-certs=true \
  --server=https://127.0.0.1:6443 \
  --kubeconfig=admin.kubeconfig

kubectl config set-credentials admin \
  --client-certificate=../certs/admin.crt \
  --client-key=../certs/admin.key \
  --embed-certs=true \
  --kubeconfig=admin.kubeconfig

kubectl config set-context default \
  --cluster=kubernetes-the-hard-way \
  --user=admin \
  --kubeconfig=admin.kubeconfig

kubectl config use-context default \
  --kubeconfig=admin.kubeconfig
Results:
admin.kubeconfig
Distribute the Kubernetes Configuration Files
Copy the kubelet and kube-proxy kubeconfig files to the node-0 and node-1 machines:
for host in node-0 node-1; do
  ssh root@${host} "mkdir -p /var/lib/{kube-proxy,kubelet}"

  scp kube-proxy.kubeconfig \
    root@${host}:/var/lib/kube-proxy/kubeconfig \

  scp ${host}.kubeconfig \
    root@${host}:/var/lib/kubelet/kubeconfig
done
Copy the kube-controller-manager and kube-scheduler kubeconfig files to the server machine:
scp admin.kubeconfig \
  kube-controller-manager.kubeconfig \
  kube-scheduler.kubeconfig \
  root@server:~/
Generating the Data Encryption Config and Key
Kubernetes stores a variety of data including cluster state, application configurations, and secrets. Kubernetes supports the ability to encrypt cluster data at rest.
In this lab you will generate an encryption key and an encryption config suitable for encrypting Kubernetes Secrets.
Generate an encryption key:
mkdir -p ~/kubernetes-the-hard-way/configs && cd ~/kubernetes-the-hard-way/configs
export ENCRYPTION_KEY=$(head -c 32 /dev/urandom | base64)
Create the encryption-config.yaml encryption config file template:
cat >encryption-config.yaml <<'EOF'
kind: EncryptionConfiguration
apiVersion: apiserver.config.k8s.io/v1
resources:
  - resources:
      - secrets
    providers:
      - aescbc:
          keys:
            - name: key1
              secret: ${ENCRYPTION_KEY}
      - identity: {}
EOF
The simple envsubst CLI tool can replaces environment variables in text or files using the current shell environment. It’s useful for templating configuration files like YAMLs before applying them.
sudo apt install -y gettext
cd $HOME
envsubst < ~/kubernetes-the-hard-way/configs/encryption-config.yaml \
  > ~/kubernetes-the-hard-way/encryption-config.yaml
Copy the encryption-config.yaml encryption config file to the controlplane machine server:
scp ~/kubernetes-the-hard-way/encryption-config.yaml root@server:~/
Bootstrapping the ETCD Service
Kubernetes components are stateless and store cluster state in etcd. In this unit you will bootstrap a single node etcd instance without mTLS.
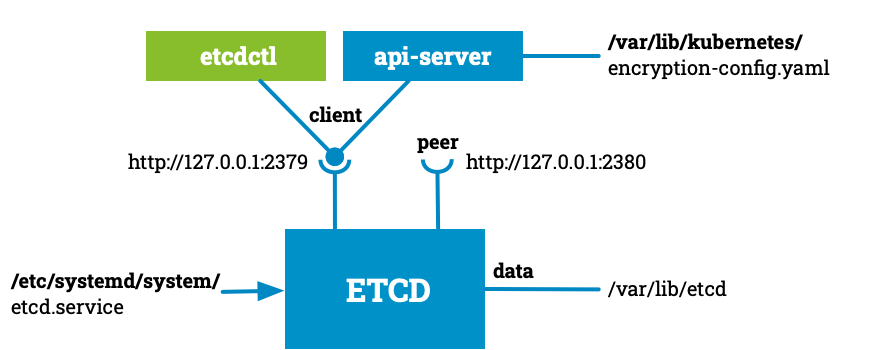
etcd is the distributed key-value store that acts as Kubernetes’ central database. It stores all the cluster’s configuration data, state, and metadata in a consistent and reliable way. This includes information about nodes, pods, ConfigMaps, Secrets, ServiceAccounts, and every other API object. etcd is designed to be highly available and fault-tolerant, using the Raft consensus algorithm to ensure that writes are consistent across all cluster members. When the Kubernetes API server receives a change (like creating a new Pod), it writes the change to etcd, which then replicates it to other etcd members. When other components like controllers or the scheduler need to know the cluster’s state, they query the API server, which retrieves the information from etcd. This makes etcd the source of truth for Kubernetes — if etcd is unavailable or corrupted, the cluster loses its authoritative state. Because of this, etcd is usually run on dedicated nodes with backups and secured connections (TLS) to protect its sensitive data. In short, etcd is the heart of Kubernetes’ state management and consistency.
Create binaries and deploy ETCD
Copy etcd binaries and systemd unit files to the server machine:
mkdir -p ~/kubernetes-the-hard-way/units
cd ~/kubernetes-the-hard-way/units

cat >etcd.service <<EOF
[Unit]
Description=etcd
Documentation=https://github.com/etcd-io/etcd

[Service]
Type=notify
ExecStart=/usr/local/bin/etcd \
  --name controller \
  --initial-advertise-peer-urls http://127.0.0.1:2380 \
  --listen-peer-urls http://127.0.0.1:2380 \
  --listen-client-urls http://127.0.0.1:2379 \
  --advertise-client-urls http://127.0.0.1:2379 \
  --initial-cluster-token etcd-cluster-0 \
  --initial-cluster controller=http://127.0.0.1:2380 \
  --initial-cluster-state new \
  --data-dir=/var/lib/etcd
Restart=on-failure
RestartSec=5

[Install]
WantedBy=multi-user.target
EOF
cd ~/kubernetes-the-hard-way
scp \
  downloads/controller/etcd \
  downloads/client/etcdctl \
  units/etcd.service \
  root@server:~/
The commands in this lab must be run on the server machine. Login to the server machine using the ssh command. Example:
ssh root@server
Bootstrapping an etcd Cluster
Extract and install the etcd service and the etcdctl command line utility:
mv etcd etcdctl /usr/local/bin/
Configure the etcd service
mkdir -p /etc/etcd /var/lib/etcd
chmod 700 /var/lib/etcd
cp ca.crt kube-api-server.key kube-api-server.crt \
  /etc/etcd/
Each etcd member must have a unique name within an etcd cluster. Set the etcd name to match the hostname of the current compute instance:
Create the etcd.service systemd unit file:
mv etcd.service /etc/systemd/system/
Start the etcd service
systemctl daemon-reload
systemctl enable etcd
systemctl start etcd
Manually verification of running ETCD members
ETCD_ENDPOINTS=http://127.0.0.1:2379
etcdctl --command-timeout=1s --endpoints="${ETCD_ENDPOINTS}" endpoint health
Output:
http://127.0.0.1:2379 is healthy: successfully committed proposal: took = 1.023108ms
List the etcd cluster members:
etcdctl member list
Output:
6702b0a34e2cfd39, started, controller, http://127.0.0.1:2380, http://127.0.0.1:2379, false
Log in to the jumpbox:
Leave the ssh shell at server!
exit
Bootstrapping the Kubernetes Control Plane
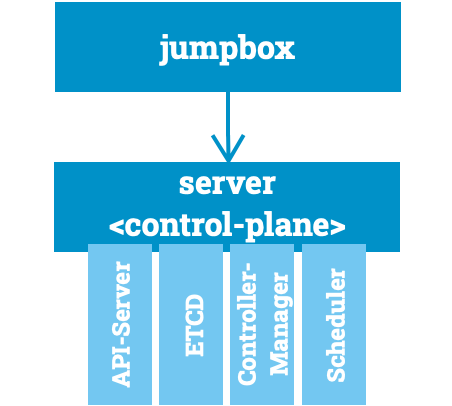
In this unit you will bootstrap the Kubernetes control plane. The following components will be installed on the server machine: Kubernetes API Server, Scheduler, and Controller Manager.
Connect to the jumpbox and copy Kubernetes binaries and systemd unit files to the server machine:
Log in to the jumpbox:
Some commands at server machine must be run as the root user!
Create controlplane systemd units files and configs
mkdir -p ~/kubernetes-the-hard-way/units
cd ~/kubernetes-the-hard-way/units
kube-apiserver.service
cat >kube-apiserver.service <<EOF
[Unit]
Description=Kubernetes API Server
Documentation=https://github.com/kubernetes/kubernetes

[Service]
ExecStart=/usr/local/bin/kube-apiserver \
  --allow-privileged=true \
  --audit-log-maxage=30 \
  --audit-log-maxbackup=3 \
  --audit-log-maxsize=100 \
  --audit-log-path=/var/log/audit.log \
  --authorization-mode=Node,RBAC \
  --bind-address=0.0.0.0 \
  --client-ca-file=/var/lib/kubernetes/ca.crt \
  --enable-admission-plugins=NamespaceLifecycle,NodeRestriction,LimitRanger,ServiceAccount,DefaultStorageClass,ResourceQuota \
  --etcd-servers=http://127.0.0.1:2379 \
  --event-ttl=1h \
  --encryption-provider-config=/var/lib/kubernetes/encryption-config.yaml \
  --kubelet-certificate-authority=/var/lib/kubernetes/ca.crt \
  --kubelet-client-certificate=/var/lib/kubernetes/kube-api-server.crt \
  --kubelet-client-key=/var/lib/kubernetes/kube-api-server.key \
  --runtime-config='api/all=true' \
  --service-account-key-file=/var/lib/kubernetes/service-accounts.crt \
  --service-account-signing-key-file=/var/lib/kubernetes/service-accounts.key \
  --service-account-issuer=https://server.local:6443 \
  --service-node-port-range=30000-32767 \
  --tls-cert-file=/var/lib/kubernetes/kube-api-server.crt \
  --tls-private-key-file=/var/lib/kubernetes/kube-api-server.key \
  --v=2
Restart=on-failure
RestartSec=5

[Install]
WantedBy=multi-user.target
EOF
kube-controller-manager.service
cat >kube-controller-manager.service <<EOF
[Unit]
Description=Kubernetes Controller Manager
Documentation=https://github.com/kubernetes/kubernetes

[Service]
ExecStart=/usr/local/bin/kube-controller-manager \
  --bind-address=127.0.0.1 \
  --cluster-cidr=10.200.0.0/16 \
  --cluster-name=kubernetes \
  --cluster-signing-cert-file=/var/lib/kubernetes/ca.crt \
  --cluster-signing-key-file=/var/lib/kubernetes/ca.key \
  --kubeconfig=/var/lib/kubernetes/kube-controller-manager.kubeconfig \
  --root-ca-file=/var/lib/kubernetes/ca.crt \
  --service-account-private-key-file=/var/lib/kubernetes/service-accounts.key \
  --service-cluster-ip-range=10.32.0.0/24 \
  --use-service-account-credentials=true \
  --v=2
Restart=on-failure
RestartSec=5

[Install]
WantedBy=multi-user.target
EOF
kube-scheduler.service
cat >kube-scheduler.service <<EOF
[Unit]
Description=Kubernetes Scheduler
Documentation=https://github.com/kubernetes/kubernetes

[Service]
ExecStart=/usr/local/bin/kube-scheduler \
  --bind-address=127.0.0.1 \
  --config=/etc/kubernetes/config/kube-scheduler.yaml \
  --v=2
Restart=on-failure
RestartSec=5

[Install]
WantedBy=multi-user.target
EOF
Create folder for config files:
mkdir -p ~/kubernetes-the-hard-way/configs
cd ~/kubernetes-the-hard-way/configs
Create Kubernetes components configuration files:
kube-scheduler.yaml:
cat >kube-scheduler.yaml <<EOF
apiVersion: kubescheduler.config.k8s.io/v1
kind: KubeSchedulerConfiguration
clientConnection:
  kubeconfig: "/var/lib/kubernetes/kube-scheduler.kubeconfig"
leaderElection:
  leaderElect: true
EOF
kube-apiserver-to-kubelet.yaml:
cat >kube-apiserver-to-kubelet.yaml <<EOF
apiVersion: rbac.authorization.k8s.io/v1
kind: ClusterRole
metadata:
  annotations:
    rbac.authorization.kubernetes.io/autoupdate: "true"
  labels:
    kubernetes.io/bootstrapping: rbac-defaults
  name: system:kube-apiserver-to-kubelet
rules:
  - apiGroups:
      - ""
    resources:
      - nodes/proxy
      - nodes/stats
      - nodes/log
      - nodes/spec
      - nodes/metrics
    verbs:
      - "*"
---
apiVersion: rbac.authorization.k8s.io/v1
kind: ClusterRoleBinding
metadata:
  name: system:kube-apiserver
  namespace: ""
roleRef:
  apiGroup: rbac.authorization.k8s.io
  kind: ClusterRole
  name: system:kube-apiserver-to-kubelet
subjects:
  - apiGroup: rbac.authorization.k8s.io
    kind: User
    name: kubernetes
EOF
Deploy binaries and config files to server
cd ~/kubernetes-the-hard-way

scp \
  downloads/controller/kube-apiserver \
  downloads/controller/kube-controller-manager \
  downloads/controller/kube-scheduler \
  downloads/client/kubectl \
  units/kube-apiserver.service \
  units/kube-controller-manager.service \
  units/kube-scheduler.service \
  configs/kube-scheduler.yaml \
  configs/kube-apiserver-to-kubelet.yaml \
  root@server:~/
The commands in this unit must be run on the server machine as root. Login to the server machine using the ssh command. Example:
ssh root@server
Provision the Kubernetes Control Plane
Create the Kubernetes configuration directory:
mkdir -p /etc/kubernetes/config
Install the Kubernetes binaries:
mv kube-apiserver \
  kube-controller-manager \
  kube-scheduler kubectl \
  /usr/local/bin/
Configure the Kubernetes API Server
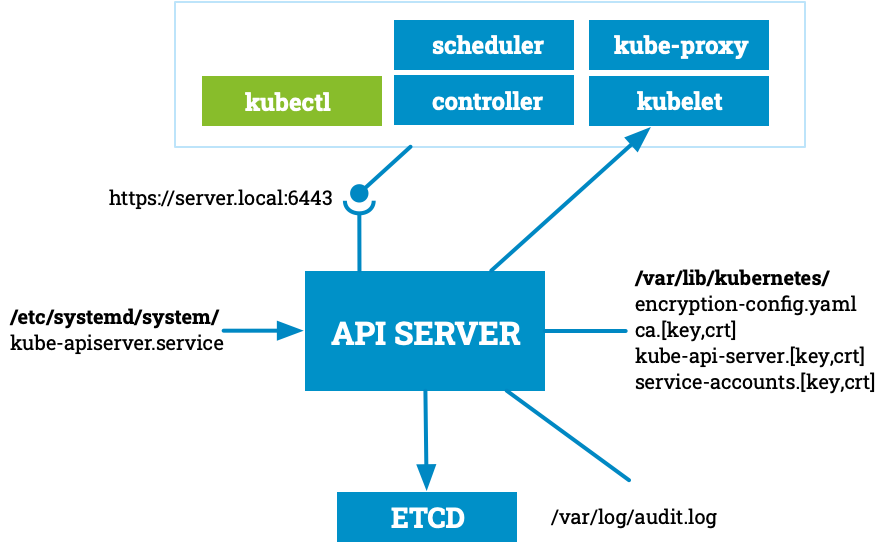
The Kubernetes API server is the central control plane component that exposes the Kubernetes API. It acts as the main communication hub between users, tools, and internal components. All cluster operations—like deploying applications or scaling—go through the API server. It validates requests, updates the cluster state in etcd, and triggers controllers. Essentially, it’s the brain and gatekeeper of a Kubernetes cluster.
mkdir -p /var/lib/kubernetes/

mv ca.crt ca.key \
  kube-api-server.key kube-api-server.crt \
  service-accounts.key service-accounts.crt \
  encryption-config.yaml \
  /var/lib/kubernetes/
Create the kube-apiserver.service systemd unit file:
mv kube-apiserver.service \
  /etc/systemd/system/kube-apiserver.service
Configure the Kubernetes Controller Manager
The Kubernetes Controller Manager runs background processes called controllers, which continuously monitor the cluster state. Each controller watches the API server for desired state changes—like Deployments, Nodes, or ReplicaSets. When the actual state diverges from the desired state, the controller takes action to reconcile it (e.g., by creating or rescheduling pods). It ensures the system remains self-healing and consistent. In essence, the Controller Manager automates and enforces the cluster’s intended behavior.
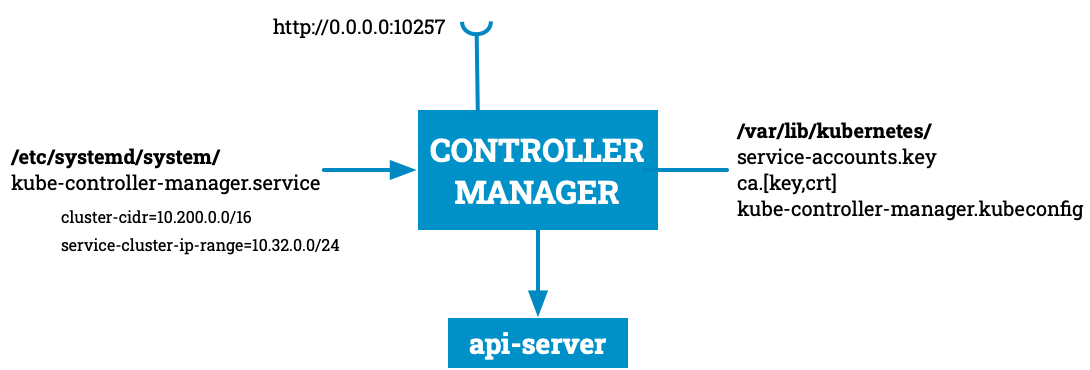
Move the kube-controller-manager kubeconfig into place:
mv kube-controller-manager.kubeconfig /var/lib/kubernetes/
Create the kube-controller-manager.service systemd unit file:
mv kube-controller-manager.service /etc/systemd/system/
Configure the Kubernetes Scheduler
The Kubernetes Scheduler assigns newly created pods to suitable nodes in the cluster. It watches the API server for unscheduled pods and evaluates where to place them based on resource availability, policies, and constraints (like CPU, memory, taints, and affinities). Once it selects the best node, it updates the pod’s spec with the node name. The scheduler doesn’t run the pod—it just decides where it should run. It’s essential for balancing workloads and optimizing resource use across the cluster.
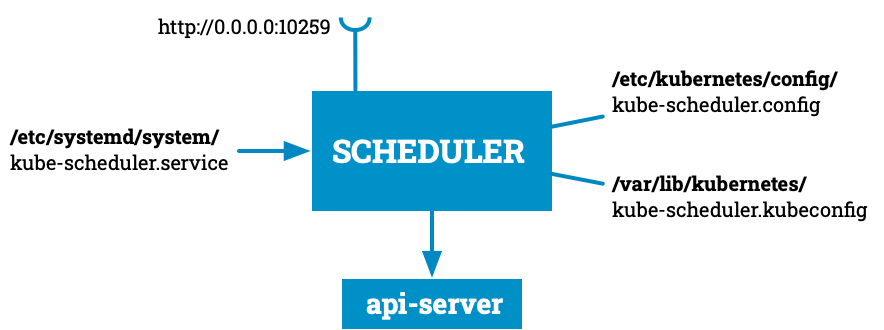
Move the kube-scheduler kubeconfig into place:
mv kube-scheduler.kubeconfig /var/lib/kubernetes/
Create the kube-scheduler.yaml configuration file:
mv kube-scheduler.yaml /etc/kubernetes/config/
Create the kube-scheduler.service systemd unit file:
mv kube-scheduler.service /etc/systemd/system/
Start the Controlplane Services
systemctl daemon-reload

systemctl enable kube-apiserver \
  kube-controller-manager kube-scheduler

systemctl start kube-apiserver \
  kube-controller-manager kube-scheduler
Allow up to 10 seconds for the Kubernetes API Server to fully initialize.
You can check if any of the control plane components are active using the systemctl command. For example, to check if the kube-apiserver fully initialized, and active, run the following command:
systemctl is-active kube-apiserver
For a more detailed status check, which includes additional process information and log messages, use the systemctl status command:
systemctl status kube-apiserver
If you run into any errors, or want to view the logs for any of the control plane components, use the journalctl command. For example, to view the logs for the kube-apiserver run the following command:
journalctl -u kube-apiserver --no-pager
Verify all controlplane components
At this point the Kubernetes control plane components should be up and running. Verify this using the kubectl command line tool:
kubectl cluster-info \
  --kubeconfig admin.kubeconfig
Kubernetes control plane is running at https://127.0.0.1:6443
Define RBAC for Kubelet Authorization
In this section you will configure RBAC permissions to allow the Kubernetes API Server to access the Kubelet API on each worker node. Access to the Kubelet API is required for retrieving metrics, logs, and executing commands in pods.
This tutorial sets the Kubelet
--authorization-modeflag toWebhook. Webhook mode uses the SubjectAccessReview API to determine authorization.
The commands in this section will affect the entire cluster and only need to be run on the server machine.
ssh root@server
Create the system:kube-apiserver-to-kubelet ClusterRole with permissions to access the Kubelet API and perform most common tasks associated with managing pods:
kubectl apply -f kube-apiserver-to-kubelet.yaml \
  --kubeconfig admin.kubeconfig
At this point the Kubernetes control plane is up and running.
Verify cluster admin access from jumpbox machine
Log in to the jumpbox:
Some commands must be run as the root user!
Exist from server
exit
whoami
Output:
laborant
Make a HTTP request for the Kubernetes version info:
curl -s --cacert ~/kubernetes-the-hard-way/certs/ca.crt \
  https://server.local:6443/version
{
  "major": "1",
  "minor": "36",
  "emulationMajor": "1",
  "emulationMinor": "36",
  "minCompatibilityMajor": "1",
  "minCompatibilityMinor": "35",
  "gitVersion": "v1.36.1",
  "gitCommit": "756939600b9a7180fc2df6550a4585b638875e67",
  "gitTreeState": "clean",
  "buildDate": "2026-05-12T09:51:34Z",
  "goVersion": "go1.26.2",
  "compiler": "gc",
  "platform": "linux/amd64"
}
Bootstrapping the Kubernetes Worker Nodes - Preparing
In this unit you will bootstrap two Kubernetes worker nodes. The following components will be installed:
The commands in this section must be run from the jumpbox.
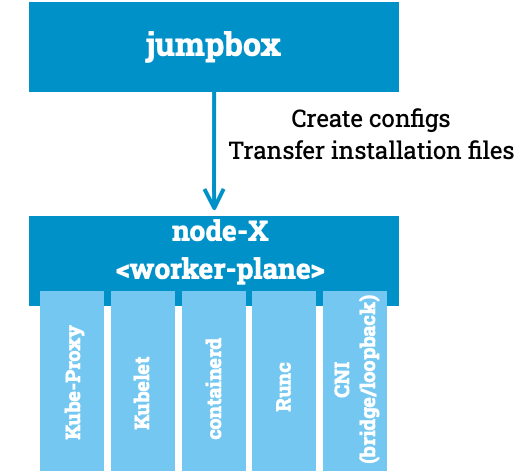
Create network cni and kubelet config files
CNI (Container Network Interface) is a specification and set of libraries for configuring container networking. Kubernetes itself does not implement container networking — instead, it delegates network setup to CNI plugins.
When a pod is scheduled, the kubelet calls the configured CNI plugin to:
- Create a network namespace for the pod.
- Attach a network interface to that namespace.
- Assign IP addresses and routes.
- Configure DNS if needed.
This design makes Kubernetes flexible — you can swap networking solutions without changing Kubernetes core.
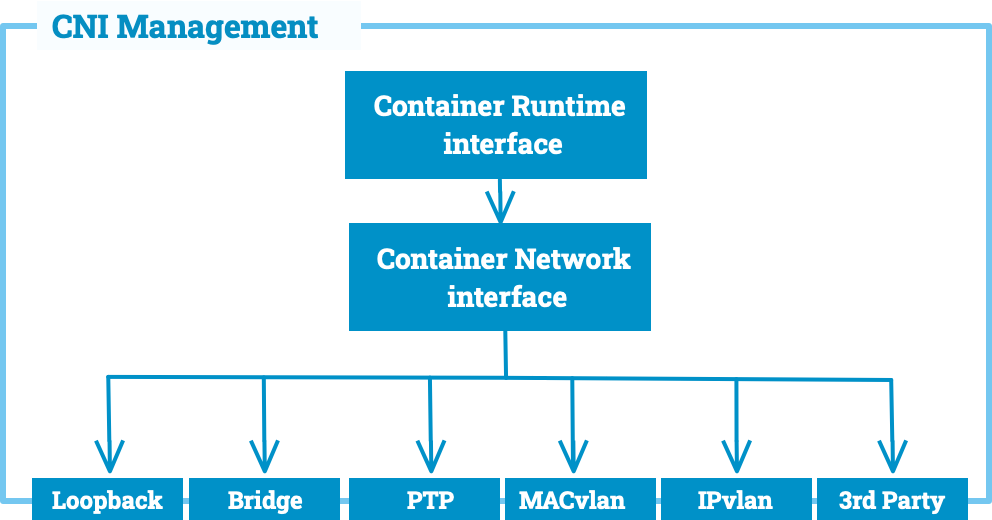
cd ~/kubernetes-the-hard-way/configs
Bridge Plugin in Kubernetes
The bridge plugin sets up a Linux bridge (often cni0 by default) on the host.
- Each pod gets a veth pair: one end in the pod’s network namespace, the other end attached to the bridge in the host.
- The bridge acts like a virtual switch, connecting all pods on the same node.
- IPAM allocates an IP address to the pod’s interface.
- This is how single-node clusters like minikube or kind provide pod-to-pod networking without a full SDN.
- Later, we’ll demonstrate how easy it is to route traffic between these bridges across Kubernetes nodes.
10-bridge.conf
cat >10-bridge.conf<<EOF
{
  "cniVersion": "1.0.0",
  "name": "bridge",
  "type": "bridge",
  "bridge": "cni0",
  "isGateway": true,
  "ipMasq": true,
  "ipam": {
    "type": "host-local",
    "ranges": [
      [{"subnet": "SUBNET"}]
    ],
    "routes": [{"dst": "0.0.0.0/0"}]
  }
}
EOF
Loopback Plugin in Kubernetes
The loopback plugin configures the lo (127.0.0.1) interface inside each pod’s network namespace. It’s essential because containers rely on localhost to communicate with processes inside the same pod. Kubernetes automatically invokes the loopback plugin for every pod alongside the main plugin.
cat >99-loopback.conf<<EOF
{
  "cniVersion": "1.1.0",
  "name": "lo",
  "type": "loopback"
}
EOF
When Kubernetes launches a pod:
The kubelet creates a network namespace.
It calls the CNI plugin configured on the node (e.g., bridge).
The plugin:
- Adds the pod’s interface to the node’s bridge.
- Allocates an IP from IPAM.
- The loopback plugin is invoked to ensure the lo interface exists inside the pod.
- Kubernetes then updates the Pod’s status with the assigned IP.
This modular design allows Kubernetes to remain agnostic to the underlying networking model, while CNI plugins handle the heavy lifting.
Kubelet Config
The kubelet configuration defines how the kubelet runs on each node, including pod runtime settings,
authentication, authorization, cgroups, eviction policies, and integration with CNI and CRI.
It’s usually managed via a YAML file /var/lib/kubelet/config.yaml or command-line flags and controls
node-level behavior in Kubernetes.
kubelet-config.yaml
cat >kubelet-config.yaml <<EOF
kind: KubeletConfiguration
apiVersion: kubelet.config.k8s.io/v1beta1
address: "0.0.0.0"
authentication:
  anonymous:
    enabled: false
  webhook:
    enabled: true
  x509:
    clientCAFile: "/var/lib/kubelet/ca.crt"
authorization:
  mode: Webhook
cgroupDriver: systemd
containerRuntimeEndpoint: "unix:///var/run/containerd/containerd.sock"
enableServer: true
failSwapOn: false
maxPods: 16
memorySwap:
  swapBehavior: NoSwap
port: 10250
resolvConf: "/etc/resolv.conf"
registerNode: true
runtimeRequestTimeout: "15m"
tlsCertFile: "/var/lib/kubelet/kubelet.crt"
tlsPrivateKeyFile: "/var/lib/kubelet/kubelet.key"
EOF
Transfer configs to nodes
Copy the Kubernetes binaries and systemd unit files to each worker instance:
- Replace
machine.txtpod subnet per node!
cd ~/kubernetes-the-hard-way
for HOST in node-0 node-1; do
  SUBNET=$(grep ${HOST} machines.txt | cut -d " " -f 4)
  sed "s|SUBNET|$SUBNET|g" \
    configs/10-bridge.conf > 10-bridge.conf

  sed "s|SUBNET|$SUBNET|g" \
    configs/kubelet-config.yaml > kubelet-config.yaml

  scp 10-bridge.conf kubelet-config.yaml \
    root@${HOST}:~/
done
Create containerd and kube-proxy config files:
containerd-config.toml
cd ~/kubernetes-the-hard-way/configs
cat >containerd-config.toml<<EOF
version = 2

[plugins."io.containerd.grpc.v1.cri"]
  [plugins."io.containerd.grpc.v1.cri".containerd]
    snapshotter = "overlayfs"
    default_runtime_name = "runc"
  [plugins."io.containerd.grpc.v1.cri".containerd.runtimes.runc]
    runtime_type = "io.containerd.runc.v2"
  [plugins."io.containerd.grpc.v1.cri".containerd.runtimes.runc.options]
    SystemdCgroup = true
[plugins."io.containerd.grpc.v1.cri".cni]
  bin_dir = "/opt/cni/bin"
  conf_dir = "/etc/cni/net.d"
EOF
kube-proxy-config.yaml
cat >kube-proxy-config.yaml<<EOF
kind: KubeProxyConfiguration
apiVersion: kubeproxy.config.k8s.io/v1alpha1
clientConnection:
  kubeconfig: "/var/lib/kube-proxy/kubeconfig"
mode: "iptables"
clusterCIDR: "10.200.0.0/16"
EOF
Create systemd Units for containerd, kubelet and kube-proxy
containerd.service
cd ~/kubernetes-the-hard-way/units

cat >containerd.service<<EOF
[Unit]
Description=containerd container runtime
Documentation=https://containerd.io
After=network.target

[Service]
ExecStartPre=/sbin/modprobe overlay
ExecStart=/bin/containerd
Restart=always
RestartSec=5
Delegate=yes
KillMode=process
OOMScoreAdjust=-999
LimitNOFILE=1048576
LimitNPROC=infinity
LimitCORE=infinity

[Install]
WantedBy=multi-user.target
EOF
kubelet.service
cat >kubelet.service<<EOF
[Unit]
Description=Kubernetes Kubelet
Documentation=https://github.com/kubernetes/kubernetes
After=containerd.service
Requires=containerd.service

[Service]
ExecStart=/usr/local/bin/kubelet \
  --config=/var/lib/kubelet/kubelet-config.yaml \
  --config-dir=/var/lib/kubelet/config.d/ \
  --kubeconfig=/var/lib/kubelet/kubeconfig \
  --v=2
Restart=on-failure
RestartSec=5

[Install]
WantedBy=multi-user.target
EOF
kube-proxy.service
cat >kube-proxy.service<<EOF
[Unit]
Description=Kubernetes Kube Proxy
Documentation=https://github.com/kubernetes/kubernetes

[Service]
ExecStart=/usr/local/bin/kube-proxy \
  --config=/var/lib/kube-proxy/kube-proxy-config.yaml
Restart=on-failure
RestartSec=5

[Install]
WantedBy=multi-user.target
EOF
Transfer the binaries, configs and systemd units
cd ~/kubernetes-the-hard-way

for HOST in node-0 node-1; do
  scp \
    downloads/worker/* \
    downloads/client/kubectl \
    configs/99-loopback.conf \
    configs/containerd-config.toml \
    configs/kube-proxy-config.yaml \
    configs/kubelet-config.yaml \
    units/containerd.service \
    units/kubelet.service \
    units/kube-proxy.service \
    root@${HOST}:~/
done
for HOST in node-0 node-1; do
  scp \
    downloads/cni-plugins/* \
    root@${HOST}:~/cni-plugins/
done
Bootstrapping the Kubernetes Worker Nodes - Start Workers
In this unit you will bootstrap two Kubernetes worker nodes. The following components will be installed:
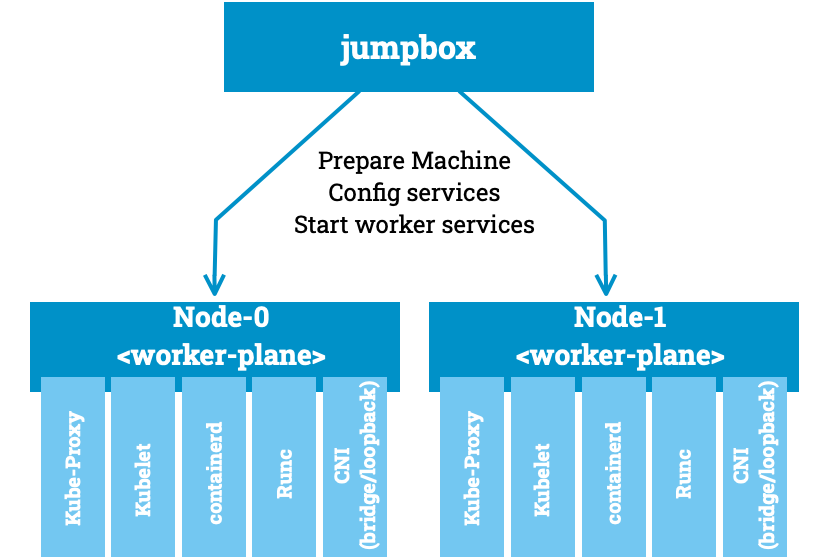
Installing Kubernetes from scratch on a worker node with system services starts with preparing the operating system and ensuring all required dependencies are present. You configure the host by setting up networking, disabling swap, and loading kernel modules to support container networking and storage. Next, you install and configure a container runtime such as containerd or CRI-O to provide the execution environment for pods. The Kubernetes binaries like kubelet and kube-proxy are downloaded and placed in system paths for direct use. Systemd units are then created for kubelet, containerd and kube-proxy to ensure they start automatically and recover on failure. Your need some configuration files and the certs to communicate with the control-plane. After initialization, you apply the necessary networking add-on so pods across nodes can communicate. The kubelet service is monitored through systemd to verify that it stays healthy and connected to the API server. Logs and status checks confirm that the node registers successfully with the cluster. In the end, the node becomes a functional part of the Kubernetes cluster, running workloads managed entirely by system services.
The commands in the next section must be run on each worker instance: node-0, node-1.
Login to the worker instance using the ssh command. Example:
ssh root@node-0
ssh root@node-1
Provisioning a Kubernetes Worker Node
Install the OS dependencies:
apt-get update
apt-get -y install socat conntrack ipset kmod
The socat binary enables support for the
kubectl port-forwardcommand.
Disable Swap:
Kubernetes has limited support for the use of swap memory, as it is difficult to provide guarantees and account for pod memory utilization when swap is involved.
Verify that swap is disabled:
swapon --show
If output is empty then swap is disabled. If swap is enabled run the following command to disable swap immediately:
swapoff -a
To ensure swap remains off after reboot consult your Linux distro documentation.
sudo sed -i.bak '/ swap / s/^/#/' /etc/fstab
Create the installation directories:
mkdir -p \
  /etc/cni/net.d \
  /opt/cni/bin \
  /var/lib/kubelet \
  /var/lib/kubelet/config.d \
  /var/lib/kube-proxy \
  /var/lib/kubernetes \
  /var/run/kubernetes
Install the worker binaries:
mv crictl ctr kube-proxy kubelet runc \
  /usr/local/bin/
mv containerd containerd-shim-runc-v2 containerd-stress /bin/
mv cni-plugins/* /opt/cni/bin/
Configure CNI Networking
Create the bridge network configuration file:
mv 10-bridge.conf 99-loopback.conf /etc/cni/net.d/
To ensure network traffic crossing the CNI bridge network is processed by iptables, load and configure the br-netfilter kernel module:
modprobe br-netfilter
modprobe overlay
cat >>/etc/modules-load.d/modules.conf <<EOF
br-netfilter
overlay
EOF
echo "net.bridge.bridge-nf-call-iptables = 1" \
  >> /etc/sysctl.d/kubernetes.conf
echo "net.bridge.bridge-nf-call-ip6tables = 1" \
  >> /etc/sysctl.d/kubernetes.conf
echo "net.ipv4.ip_forward = 1" \
  >> /etc/sysctl.d/kubernetes.conf
sysctl -p /etc/sysctl.d/kubernetes.conf
Configure containerd
Install the containerd configuration files:
mkdir -p /etc/containerd/
mv containerd-config.toml /etc/containerd/config.toml
mv containerd.service /etc/systemd/system/
Configure the Kubelet
Create the kubelet-config.yaml configuration file:
mv kubelet-config.yaml /var/lib/kubelet/
mv kubelet.service /etc/systemd/system/
Configure the Kubernetes Proxy
mv kube-proxy-config.yaml /var/lib/kube-proxy/
mv kube-proxy.service /etc/systemd/system/
Start the Kubelet and containerd services
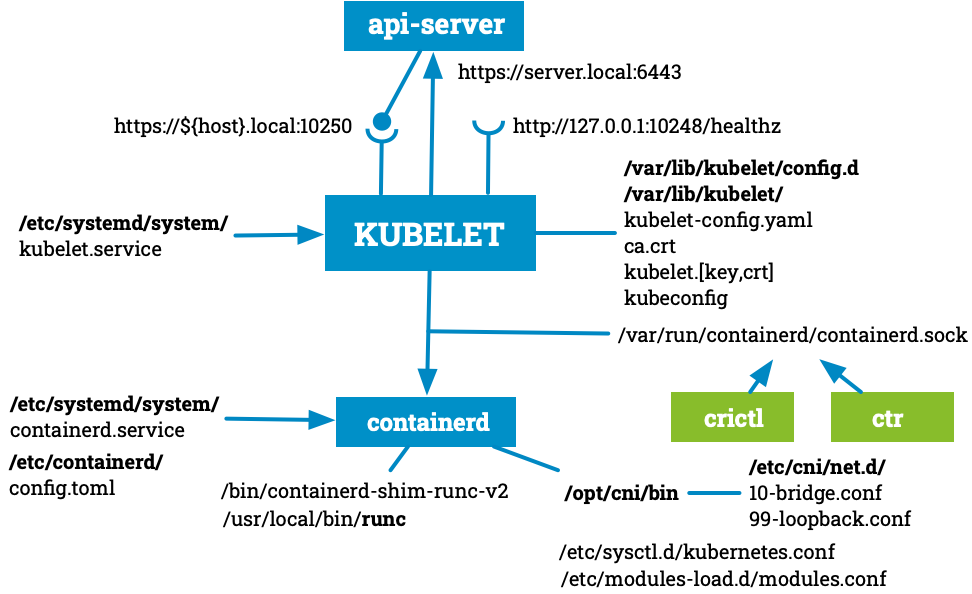
On every Kubernetes node, the Kubelet plays a central role in keeping workloads running as intended by the cluster. Instead of passively waiting for instructions, it actively watches the API server, ensures pods are scheduled, and makes sure they stay healthy over time. Deeply integrated with the host system via systemd, the kubelet starts automatically with the node, making it a reliable and persistent part of the Kubernetes runtime. It’s responsible not only for launching containers but also for mounting volumes, injecting secrets, and reporting node status back to the control plane.
Working alongside the kubelet is containerd, a lightweight yet powerful container runtime built for performance and simplicity. Managed as its own systemd service, containerd is responsible for pulling images, creating containers, and managing their execution, storage, and networking. It doesn’t try to do too much — just the essential tasks of running containers efficiently and reliably. The kubelet talks to containerd using the standardized Container Runtime Interface (CRI), which allows Kubernetes to remain flexible while maintaining a clean separation of concerns. Together, these two components form the trusted foundation that turns a basic Linux machine into a fully functional Kubernetes node.
systemctl daemon-reload
systemctl enable containerd kubelet
systemctl start containerd kubelet
Check if the kubelet service is running:
systemctl is-active containerd
systemctl is-active kubelet
active
Be sure to complete the steps in this section on each worker node, node-0 and node-1,
before moving on to the next section.
Start Kube Proxy
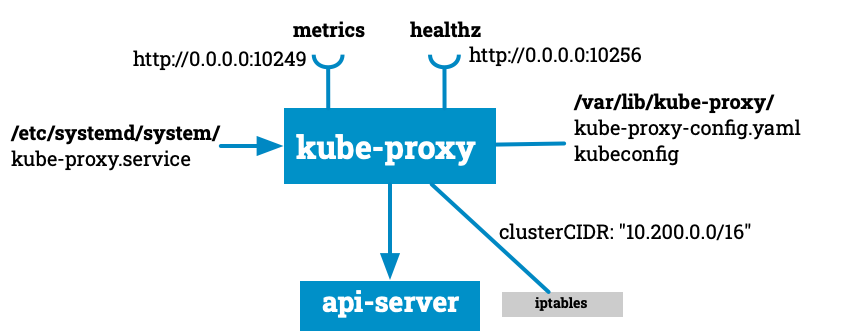
The kube-proxy is a network component that runs on every Kubernetes node. It ensures that services are reachable by managing the network rules that route traffic to the correct backend pods. Using either iptables, ipvs, or user-space mode, kube-proxy watches the API server for changes to Service and Endpoint objects. When a request is made to a service IP or cluster DNS name, kube-proxy handles forwarding it to one of the matching pods. It plays a key role in load balancing, service discovery, and network abstraction within the cluster.
systemctl daemon-reload
systemctl enable kube-proxy
systemctl start kube-proxy
Check if the kubelet service is running:
systemctl is-active kube-proxy
active
Verify kubectl access from jumpbox
Run the following commands from the jumpbox machine.
List the registered Kubernetes nodes:
ssh root@server \
  "kubectl get nodes \
  --kubeconfig admin.kubeconfig"
NAME     STATUS   ROLES    AGE    VERSION
node-0   Ready    <none>   1m     v1.36.1
node-1   Ready    <none>   10s    v1.36.1
Tryout to access Containerd directly
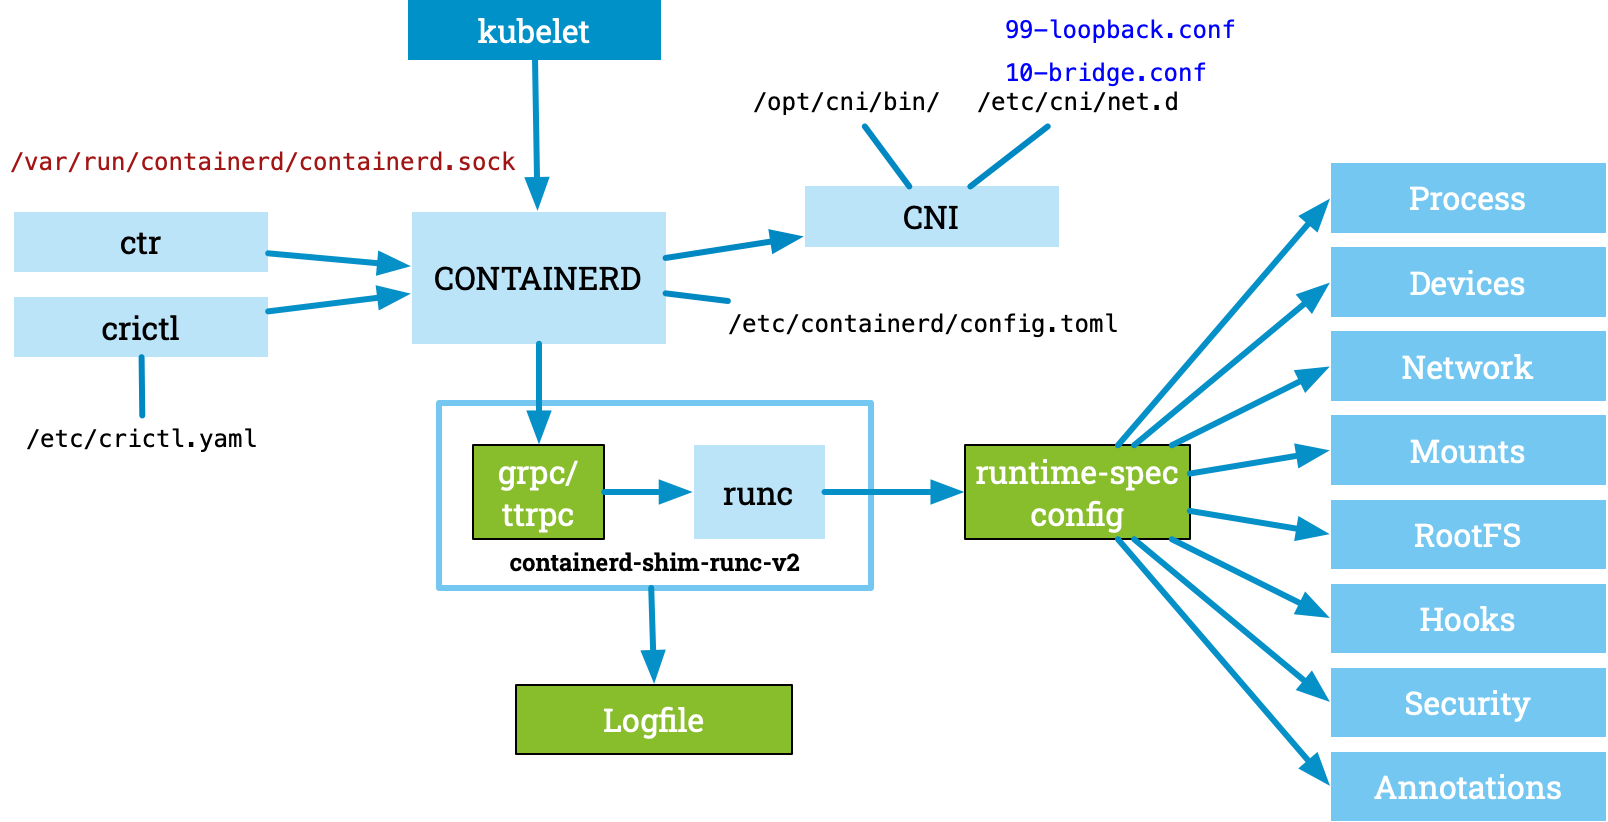
Kubelet manages the lifecycle of containers on each Kubernetes node. It communicates with the container runtime using the Container Runtime Interface (CRI). Containerd acts as the high-level container runtime that kubelet interacts with through CRI. When kubelet schedules a Pod, it asks containerd to create and manage the containers for that Pod. Containerd then uses runc, a low-level OCI runtime, to create and run the actual Linux containers. This separation lets Kubernetes remain runtime-agnostic while still supporting standards like OCI. Kubelet also relies on containerd to handle image pulls, container start/stop, and resource isolation. Together, kubelet, containerd, and runc provide a layered but efficient way to launch and control containers in Kubernetes.
ssh root@node-0
Available Native CLIs Tools:
- crictl is a command-line tool for interacting directly with the Container Runtime Interface (CRI)
on Kubernetes nodes. It lets you inspect, debug, and manage containers and pods at the runtime level without
going through kubectl. With commands like
crictl ps,crictl images, orcrictl logs, you can see what’s running, check images, and troubleshoot container issues on a node. - ctr is the low-level command-line client shipped with containerd, used to interact directly with the containerd daemon. It lets you pull images, create containers, run tasks, and inspect snapshots without any higher-level orchestration. Because it’s meant mainly for debugging and development, ctr exposes almost all of containerd’s internal APIs but doesn’t provide the friendly abstractions or compatibility layers that tools like Docker or Kubernetes use.
systemctl status containerd
cat >/etc/crictl.yaml<<EOF
runtime-endpoint: unix:///var/run/containerd/containerd.sock
image-endpoint: unix:///var/run/containerd/containerd.sock
timeout: 5
debug: false
EOF
crictl info
ctr -n k8s.io containers ls
Check Health form kubelet
sudo systemctl status kubelet
curl -I http://127.0.0.1:10248/healthz
go back to jumpbox:
exit
Check Health and Metrics from Kubelet
Check Health:
ssh root@server \
  kubectl --kubeconfig admin.kubeconfig \
    get --raw /api/v1/nodes/node-0/proxy/healthz
Check Metrics:
ssh root@server \
  kubectl --kubeconfig admin.kubeconfig \
    get --raw /api/v1/nodes/node-0/proxy/metrics
Check Health from kube-proxy
ssh root@node-0 <<'EOF'
sudo systemctl status kube-proxy
curl -s http://127.0.0.1:10256/healthz | jq
curl -s http://127.0.0.1:10249/metrics
EOF
Conclusion
Kubelet and containerd are up and running — nodes register correctly, pods can be scheduled, and workloads start without issues.
Configuring kubectl for Remote Access
In this unit you will generate a kubeconfig file for the kubectl command line utility based on the admin user credentials.
Log in to the jumpbox:
Some commands must be run as the root user!
The Admin Kubernetes Configuration File
Each kubeconfig requires a Kubernetes API Server to connect to.
You should be able to ping server.local based on the /etc/hosts DNS entry from a previous lab.
curl --cacert ~/kubernetes-the-hard-way/certs/ca.crt \
  https://server.local:6443/version
{
  "major": "1",
  "minor": "36",
  "emulationMajor": "1",
  "emulationMinor": "36",
  "minCompatibilityMajor": "1",
  "minCompatibilityMinor": "35",
  "gitVersion": "v1.36.1",
  "gitCommit": "756939600b9a7180fc2df6550a4585b638875e67",
  "gitTreeState": "clean",
  "buildDate": "2026-05-12T09:51:34Z",
  "goVersion": "go1.26.2",
  "compiler": "gc",
  "platform": "linux/amd64"
}
Generate a kubeconfig file suitable for authenticating as the admin user:
cd $HOME

kubectl config set-cluster kubernetes-the-hard-way \
  --certificate-authority=/home/laborant/kubernetes-the-hard-way/certs/ca.crt \
  --embed-certs=true \
  --server=https://server.local:6443

kubectl config set-credentials admin \
  --client-certificate=/home/laborant/kubernetes-the-hard-way/certs/admin.crt \
  --client-key=/home/laborant/kubernetes-the-hard-way/certs/admin.key

kubectl config set-context kubernetes-the-hard-way \
  --cluster=kubernetes-the-hard-way \
  --user=admin

kubectl config use-context kubernetes-the-hard-way
The results of running the command above should create a kubeconfig file in the default location ~/.kube/config used by the kubectl commandline tool. This also means you can run the kubectl command without specifying a config.
Verify kubectl access
Check the version of the remote Kubernetes cluster:
kubectl version
Output:
Client Version: v1.36.1
Kustomize Version: v5.8.1
Server Version: v1.36.1
List the nodes in the remote Kubernetes cluster:
kubectl get nodes
Output:
NAME     STATUS   ROLES    AGE    VERSION
node-0   Ready    <none>   10m   v1.36.1
node-1   Ready    <none>   10m   v1.36.1
Provisioning Pod Network Routes
Pods scheduled to a node receive an IP address from the node's Pod CIDR range. At this point pods can not communicate with other pods running on different nodes due to missing network routes.
In this lab you will create a route for each worker node that maps the node's Pod CIDR range to the node's internal IP address.
There are other ways to implement the Kubernetes networking model.
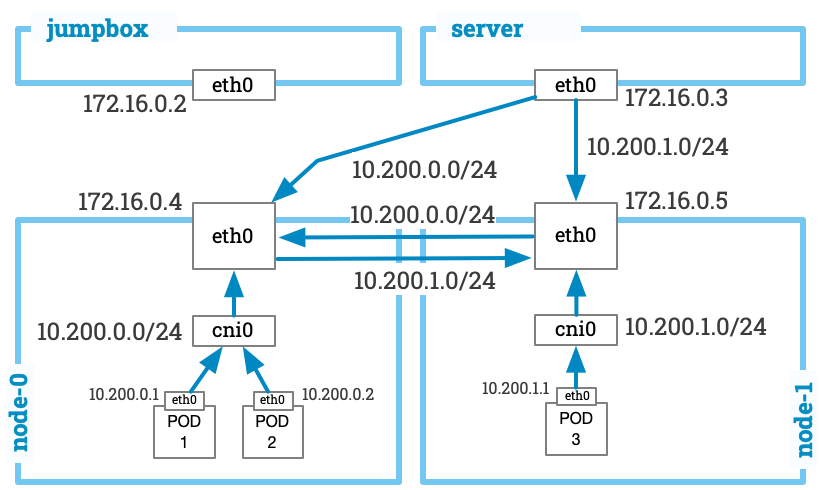
In this section you will gather the information required to create routes in the kubernetes-the-hard-way POD network.
Configure this at jumpbox machine.
Print the internal IP address and Pod CIDR range for each worker instance:
cd ~/kubernetes-the-hard-way
cat machines.txt
Output:
172.16.0.3 server server.local
172.16.0.4 node-0 node-0.local 10.200.0.0/24
172.16.0.5 node-1 node-1.local 10.200.1.0/24
Create Network Routes
Define Network:
cd ~/kubernetes-the-hard-way
SERVER_IP=$(grep server machines.txt | cut -d " " -f 1)
NODE_0_IP=$(grep node-0 machines.txt | cut -d " " -f 1)
NODE_0_SUBNET=$(grep node-0 machines.txt | cut -d " " -f 4)
NODE_1_IP=$(grep node-1 machines.txt | cut -d " " -f 1)
NODE_1_SUBNET=$(grep node-1 machines.txt | cut -d " " -f 4)
Set IP routes for Cluster Network at server to node-0 and node-1
ssh -T root@server <<EOF
  ip route show ${NODE_0_SUBNET} | grep -q "via ${NODE_0_IP}" || ip route add ${NODE_0_SUBNET} via ${NODE_0_IP}
EOF
ssh -T root@server <<EOF
  ip route show ${NODE_1_SUBNET} | grep -q "via ${NODE_1_IP}" || ip route add ${NODE_1_SUBNET} via ${NODE_1_IP}
EOF
Set IP routes for Cluster Network at node-0 to node-1
ssh -T root@node-0 <<EOF
  ip route show ${NODE_1_SUBNET} | grep -q "via ${NODE_1_IP}" || ip route add ${NODE_1_SUBNET} via ${NODE_1_IP}
EOF
Set IP routes for Cluster Network at node-1 to node-0
ssh -T root@node-1 <<EOF
  ip route show ${NODE_0_SUBNET} | grep -q "via ${NODE_0_IP}" || ip route add ${NODE_0_SUBNET} via ${NODE_0_IP}
EOF
Verify Routes
Check route at server can access Cluster Network directly to access Webhooks and Aggregation Services.
ssh root@server ip route
Output:
default via 172.16.0.1 dev eth0
10.200.0.0/24 via 172.16.0.4 dev eth0
10.200.1.0/24 via 172.16.0.5 dev eth0
172.16.0.0/24 dev eth0 proto kernel scope link src 172.16.0.3
Check route at node-0 to access node-1 pods!
ssh root@node-0 ip route
Output:
default via 172.16.0.1 dev eth0
10.200.1.0/24 via 172.16.0.5 dev eth0
172.16.0.0/24 dev eth0 proto kernel scope link src 172.16.0.4
Check route at node-1 to access node-0 pods
ssh root@node-1 ip route
Output:
default via 172.16.0.1 dev eth0
10.200.0.0/24 via 172.16.0.4 dev eth0
172.16.0.0/24 dev eth0 proto kernel scope link src 172.16.0.5
Kubernetes Smoke Test
In this unit you will complete a series of tasks to ensure your Kubernetes cluster is functioning correctly.
Check Data Encryption before use productive Secrets
In this section you will verify the ability to encrypt secret data at rest.
Create a generic secret:
kubectl create secret generic kubernetes-the-hard-way \
  --from-literal="mykey=mydata"
Print a hexdump of the kubernetes-the-hard-way secret stored in etcd:
ssh root@server \
  'etcdctl get /registry/secrets/default/kubernetes-the-hard-way --print-value-only'
k8s:enc:aescbc:v1:key1:
                       %R%)_vZCw{J?3G|$6V\B
v*[DpzNC7JϦ}<V_FsF!$tN%r%yB#r}ݐTCyu3tnVOș5<b=D؆)"?)7[!t4ð
h:
  .'
Decode secrets via API Server
kubectl get secrets kubernetes-the-hard-way \
  -o jsonpath="{.data.mykey}" | base64 -d && echo
mydata
The etcd key should be prefixed with k8s:enc:aescbc:v1:key1, which indicates the aescbc provider was used to encrypt the data with the key1 encryption key.
Check Deployments and Access NodePort Services
In this section you will verify the ability to create and manage Deployments.
Create a deployment for the nginx web server:
kubectl create deployment nginx \
  --image=nginx:latest
List the pod created by the nginx deployment:
kubectl get pods -l app=nginx
NAME                     READY   STATUS    RESTARTS   AGE
nginx-56fcf95486-c8dnx   1/1     Running   0          8s
Show cni bridge
POD_HOST=$(kubectl get pods -l app=nginx -o jsonpath="{.items[0].spec.nodeName}")
ssh root@$POD_HOST ip -br link show type bridge
cni0 UP 66:6b:3f:ec:01:08 <BROADCAST,MULTICAST,UP,LOWER_UP>
Port Forwarding
In this section you will verify the ability to access applications remotely using port forwarding.
Retrieve the full name of the nginx pod:
POD_NAME=$(kubectl get pods -l app=nginx \
  -o jsonpath="{.items[0].metadata.name}")
Forward port 8080 on your local machine to port 80 of the nginx pod:
kubectl port-forward $POD_NAME 8080:80 &
Forwarding from 127.0.0.1:8080 -> 80
Forwarding from [::1]:8080 -> 80
Send a HTTP request using the forwarding address:
curl --head http://127.0.0.1:8080
Output:
Handling connection for 8080
HTTP/1.1 200 OK
Server: nginx/1.31.1
Date: Sat, 13 Jun 2026 15:34:30 GMT
Content-Type: text/html
Content-Length: 896
Last-Modified: Fri, 22 May 2026 12:50:47 GMT
Connection: keep-alive
ETag: "6a105127-380"
Accept-Ranges: bytes
Switch back to background forward and stop the port forwarding to the nginx pod:
fg
CTRL-C
Output:
Forwarding from 127.0.0.1:8080 -> 80
Forwarding from [::1]:8080 -> 80
Handling connection for 8080
Logs
In this section you will verify the ability to retrieve container logs.
Print the nginx pod logs:
kubectl logs $POD_NAME --tail 1
Output:
...
127.0.0.1 - - [15/Jun/2026:08:56:49 +0000] "HEAD / HTTP/1.1" 200 0 "-" "curl/8.14.1" "-"
Start a process inside a POD Container
In this section you will verify the ability to execute commands in a container.
Print the nginx version by executing the nginx -v command in the nginx container:
kubectl exec -ti $POD_NAME -- nginx -v
Output:
nginx version: nginx/1.31.1
Create a Services
In this section you will verify the ability to expose applications using a Service.
Expose the nginx deployment using a NodePort service:
kubectl expose deployment nginx \
  --port 80 --type NodePort
The LoadBalancer service type can not be used because your cluster is not configured with cloud provider integration. Setting up cloud provider integration is out of scope for this tutorial.
Retrieve the node port assigned to the nginx service:
NODE_PORT=$(kubectl get svc nginx \
  --output=jsonpath='{range .spec.ports[0]}{.nodePort}')
Retrieve the hostname of the node running the nginx pod:
NODE_NAME=$(kubectl get pods \
  -l app=nginx \
  -o jsonpath="{.items[0].spec.nodeName}")
Make an HTTP request using the IP address and the nginx node port:
curl -I http://${NODE_NAME}:${NODE_PORT}
Output:
HTTP/1.1 200 OK
Server: nginx/1.31.1
Date: Sat, 13 Jun 2026 15:35:47 GMT
Content-Type: text/html
Content-Length: 896
Last-Modified: Fri, 22 May 2026 12:50:47 GMT
Connection: keep-alive
ETag: "6a105127-380"
Accept-Ranges: bytes
Summary
“Kubernetes the Hard Way” is a hands-on tutorial that walks you through manually setting up a Kubernetes cluster from scratch—without using kubeadm or managed services. It helps you understand the inner workings of Kubernetes by building each control plane and worker component step by step, including etcd, API server, kubelet, kube-proxy, and TLS certificates.
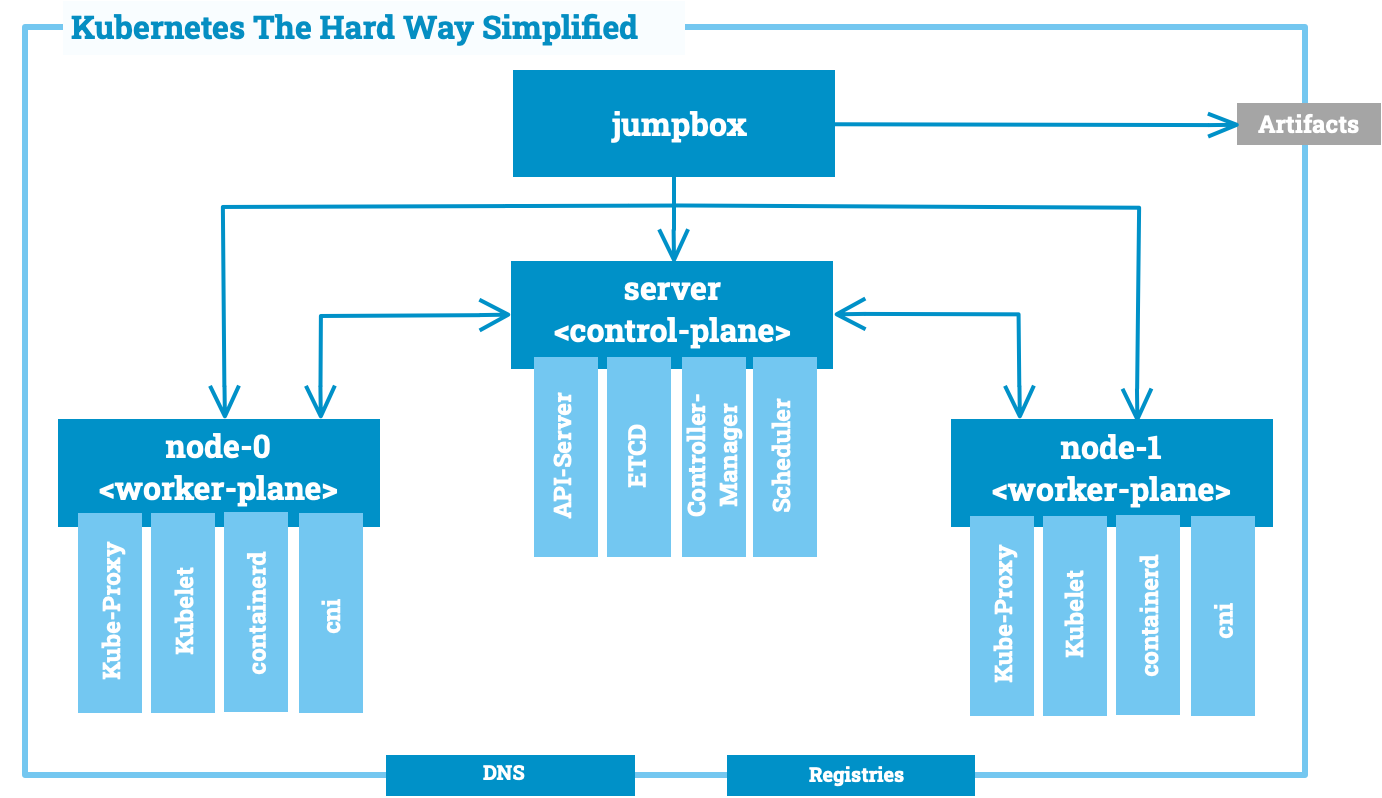
What You Learn as a Trainee?
After completing the tutorial, a trainee will be able to:
- Manually provision a Kubernetes control plane and worker nodes
- Understand TLS certificates, client auth, and API server internals
- Configure networking, container runtimes, and kubelet communication
- Debug cluster issues at a low level without relying on high-level tools
What You Can Do Next?
Here you go with clean Markdown links: • kubeadm • k3s • kind
Do you want me to also add a one-liner description under each link (what it’s for), so it’s easier to compare? After mastering the manual installation process, you are well prepared to:
- Use kubeadm, k3s, or kind with deeper insight into how they work
- Set up production-grade clusters with high availability
- Secure clusters using admission controllers and RBAC
- Extend Kubernetes with metrics-server, ingress controllers, CSI drivers, and external-dns
- Backup/Restore your ETCD Data
- Provision Cluster with Gitops (FluxCD or ArgoCD)
- Prepare you for Day2Operations
- Add more advanced Network like Cilium or Calico
- Add professional Shared Storage Provider like Ceph, LongHorn or OpenEBS
- Prepare you for disaster recovery, and backup your data
- Add Security
- Add Monitoring
- Train your debug skills
- Setup real applications and think about eaiser setup with CRDs!
- Tryout Cloud and OnPrem Kubernetes Installation
Solve the next lesson and install core kubernetes addons
Once the base cluster is working, you should learn to add:
- CoreDNS – for internal service discovery
- metrics-server – for resource metrics and HPA
- local-path-provisioner – for simple dynamic persistent volumes
References
- Kubernetes the Hard Way Playground, by Márk Sági-Kazár
- Kubernetes the Hard Way (GitHub) by Kelsey Hightower
- Kubernetes Docs
- etcd
- TLS Tools
- Kubernetes Conformance Tests (Sonobuoy)
Regards,
├─☺︎─┤ The Humble Sign Painter - Peter Rossbach