Day 2 Operations – Some Components are offline
Day 2 Operations – Why analyse the Role of Components
Most tutorials stop once Kubernetes is running. But real-world reliability starts after Day 1 — when things break, need to be upgraded, or must be recovered.
In this module, we go beyond the initial setup to focus on Day 2 Operations: everything that ensures your Kubernetes cluster remains healthy, secure, and recoverable.
You’ll learn how to:
- Role of the Kubernetes Components
- Build confidence in operating Kubernetes under real-world pressure.
- Deploy a Content Publisher with remote git content
This module builds your muscle memory for disaster recovery and teaches you to operate Kubernetes with intent, not fear. It’s not just theory — it’s survival skills for anyone serious about running production clusters.
Deploy content delivery site with Hugo and Git-Sync
In this unit you will complete a series of tasks to ensure your Kubernetes cluster is important add ons are installed and working correctly.
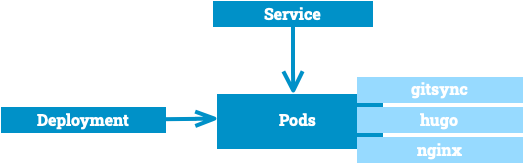
The bootstrap scripts create a kubernetes cluster with core components and a few addons.
Wait a minute until the cluster is ready.
Prepare addons and check the available kubernetes cluster.
source ~/.bashrc
cd kubernetes-the-hard-way-simplified/bootstrap
# start core addons: coredns, metrics-server, local-path-provisioner
./addons.sh
Check the available kubernetes cluster addons manually
source ~/.bashrc
k get nodes
k get pods -A
k top pods -A
k get pods -n local-path-storage
# check network setup
ssh root@server ip route
Now the cluster is ready. You can start really from scratch!
Deploy website publisher application
In this unit you will complete a series of tasks to ensure you that you understand what you are deploy.
Imagine you’ve just deployed a Kubernetes cluster and set up your content pipeline. You rely on Git-sync to pull updates from your central repository so your content publisher can serve the latest articles. Everything looks fine, pods are running, but suddenly Git-sync fails to fetch the repository. Curl requests to the external Git server time out, and logs show “host not found” errors.
The culprit? DNS. In Kubernetes, every pod depends on the cluster’s DNS service (usually CoreDNS) to resolve both internal and external addresses. Without proper DNS, even perfectly healthy pods become isolated islands. Git-sync can’t pull updates, and your content publisher can’t serve fresh content to users. Suddenly, tasks as simple as updating a page or syncing new posts turn into frustrating dead ends.
This shows how critical DNS is: without it, access to external services — and the entire content delivery workflow — can break completely.
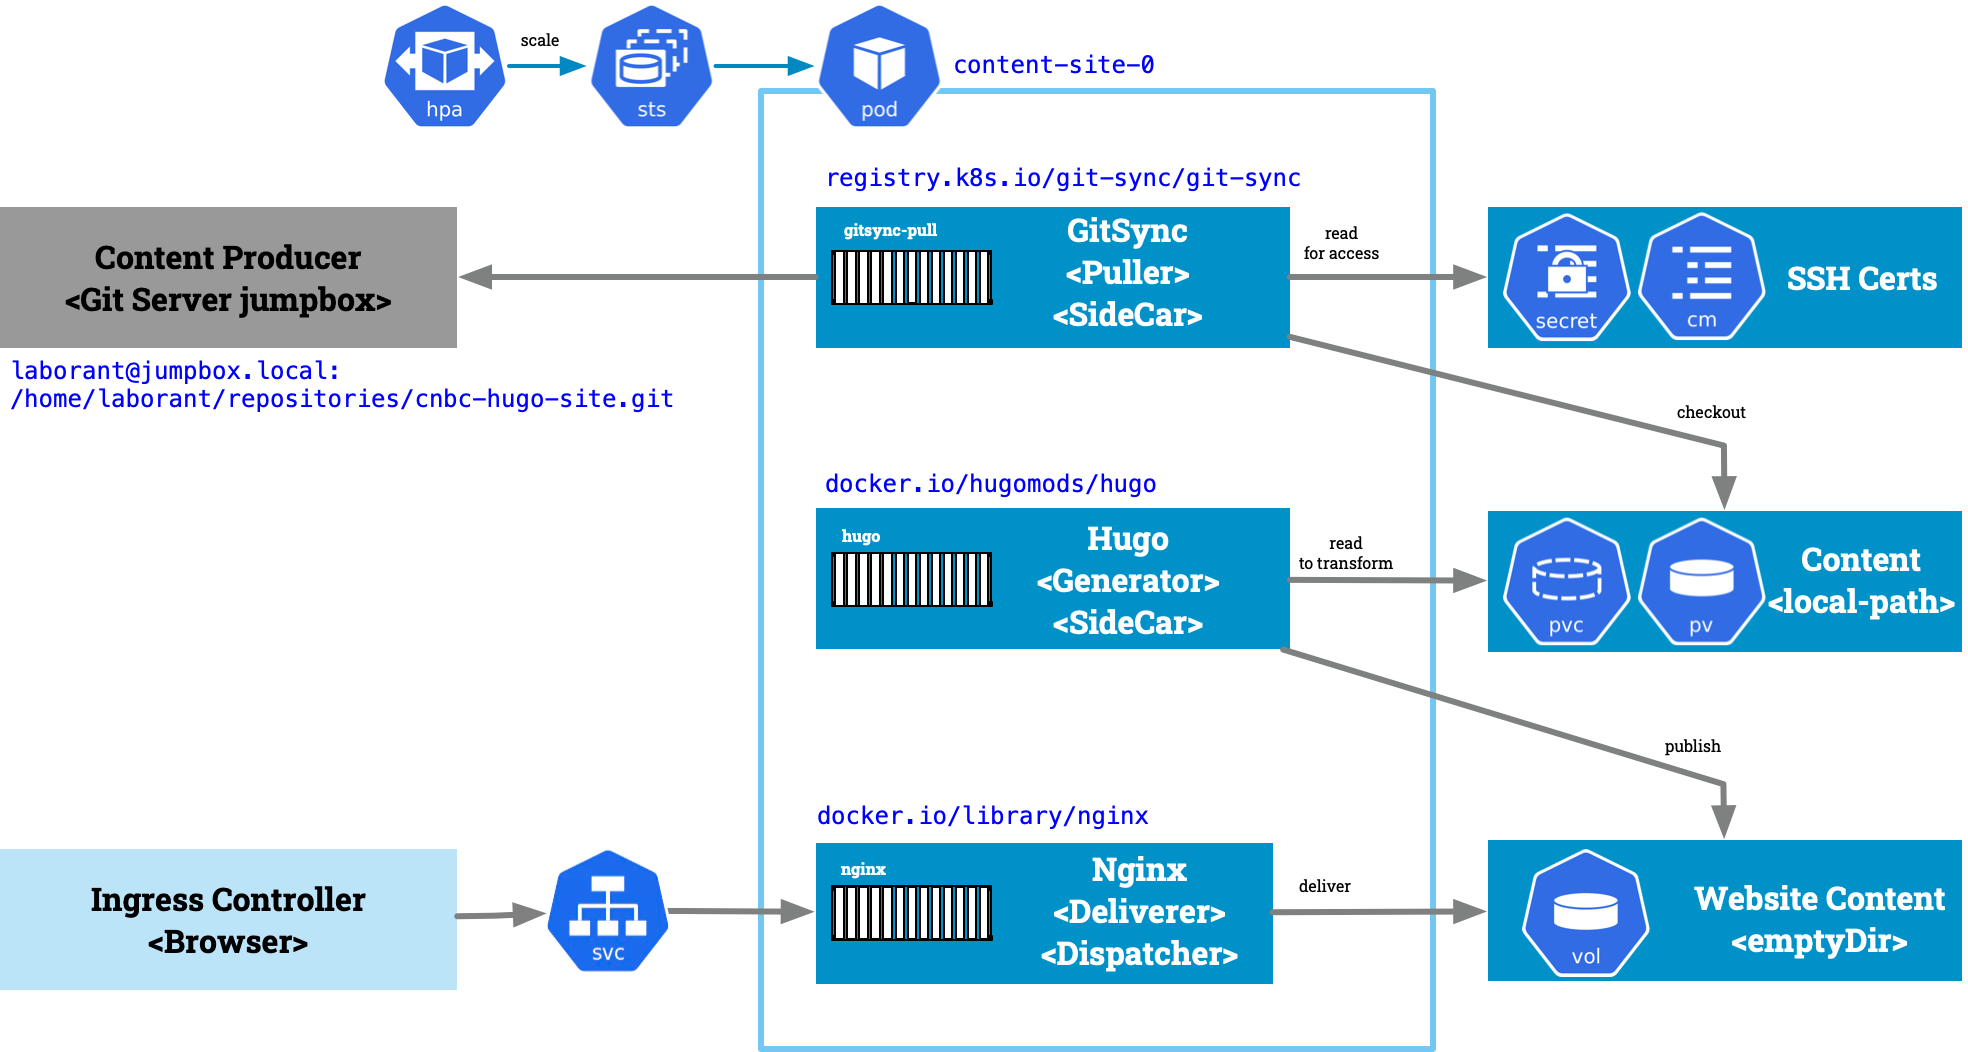
Explain shortly Content Site Components:
- Gitsync
- A Kubernetes sidecar container that continuously clones or pulls a git repository, ensuring your workload always has the latest content or configuration.
- Hugo Website generator
- A fast static site generator written in Go that converts Markdown and templates into a complete HTML website.
- Hugomods container
- A prebuilt Docker image bundling Hugo with useful modules and tools, simplifying reproducible site builds and deployments.
- Nginx
- A high-performance web server and reverse proxy that serves static files, balances traffic, and secures HTTP(S) requests.
Deploy Content Site Delivery Application
Prepare environment and create site repo
cd ~/kubernetes-the-hard-way-simplified/bootstrap/day2-panic

# start docker to start hugomods site initalise container
./400-bootstrap-docker.sh
# start a local gitserver
./410-bootstrap-gitserver.sh
# create git project to sync content
./420-bootstrap-content-site-repo.sh
source ~/.bashrc
Deploy content delivery site with hugo and gitsync sidecar
# deploy app
kubectl ns content-site
# check that access secrets to jumpbox gitserver is available
kubectl get secrets
# apply content site deployment
kubectl -n content-site apply -k base/hugo

# check rollout state of sts
kubectl wait \
  --for=jsonpath='{.status.readyReplicas}'=1 \
  --timeout=30s \
  statefulset/content-site \
  -n content-site
Gitpull syncer sidecar running inside a crash loop!
Analyse the problem:
CONTENT_POD=content-site-0
kubectl get pod $CONTENT_POD -o wide
kubectl describe pod $CONTENT_POD
# check failed containers
kubectl get events \
  --sort-by=.metadata.creationTimestamp \
  --field-selector=involvedObject.name=$CONTENT_POD
#hugo,nginx
TARGET=gitsync-pull
kubectl logs $CONTENT_POD -c $TARGET
Check log output of gitsync-pull sidecar container:
INFO: detected pid 1, running init handler
{"logger":"","ts":"2026-06-09 12:50:09.655399","caller":{"file":"main.go","line":626},"level":0,"msg":"starting up","version":"v4.4.3","pid":12,"uid":65533,"gid":65533,"home":"/tmp","flags":["--depth=1","--link=repo","--period=30s","--ref=main","--repo=$GIT_REPO","--root=/git/root"]}
{"logger":"","ts":"2026-06-09 12:50:09.659322","caller":{"file":"main.go","line":731},"level":0,"msg":"git version","version":"git version 2.39.5"}
{"logger":"","ts":"2026-06-09 12:50:09.689248","caller":{"file":"main.go","line":924},"msg":"too many failures, aborting","error":"Run(git fetch $GIT_REPO main --verbose --no-progress --prune --no-auto-gc --depth 1): exit status 128: { stdout: \"\", stderr: \"fatal: '$GIT_REPO' does not appear to be a git repository\\nfatal: Could not read from remote repository.\\n\\nPlease make sure you have the correct access rights\\nand the repository exists.\" }","failCount":1}
Why jumpbox gitserver isn't available for pods?
Start a test pod and see that DNS resolution for jumpbox.local not working!
kubectl run shell --rm -it --image=alpine -- /bin/sh
# failed
nslookup jumpbox.local
# only in cluster dns resolver or internet
nslookup kubernetes.default.svc.cluster.local
exit
# check that kubernetes api-server is directly connected!
k get svc -n default
k get endpointslices -n default
Check CoreDNS Configuration:
COREDNS_POD=$(kubectl get pods -l app.kubernetes.io/name=coredns \
  -n kube-system -o jsonpath="{.items[0].metadata.name}")
kubectl get -n kube-system pod $COREDNS_POD -o jsonpath="{.spec.volumes[0]}" | jq
Output should be like:
{
  "configMap": {
    "defaultMode": 420,
    "items": [
      {
        "key": "Corefile",
        "path": "Corefile"
      }
    ],
    "name": "coredns"
  },
  "name": "config-volume"
}
Check configmap content and CoreDNS container:
kubectl -n kube-system get configmap coredns -o yaml

kubectl debug -it -n kube-system $COREDNS_POD \
  --image alpine --target coredns --profile=sysadmin -- /bin/sh
cat /proc/1/root/etc/coredns/Corefile
# no mapping to host
cat /proc/1/root/etc/resolv.conf
# only internet
exit
kubectl debug -it -n kube-system $CONTENT_POD \
  --image alpine --target $TARGET --profile=sysadmin -- /bin/sh
See that resolve.conf only contains the default kubernetes dns server and no host mapping!
kubectl debug -it -n kube-system $CONTENT_POD \
  --image alpine --target $TARGET --profile=sysadmin -- /bin/sh
ls -l /proc/1/root/git/root/repo
cat /proc/1/root/etc/resolv.conf
...
exit
Upps, something are really bad happend...
- POD can't access if inside CrashLoopBackOff!
- POD can't access jumpbox.local
Solve the DNS problem
Add a NodeHosts-Map and reconfigure coredns!
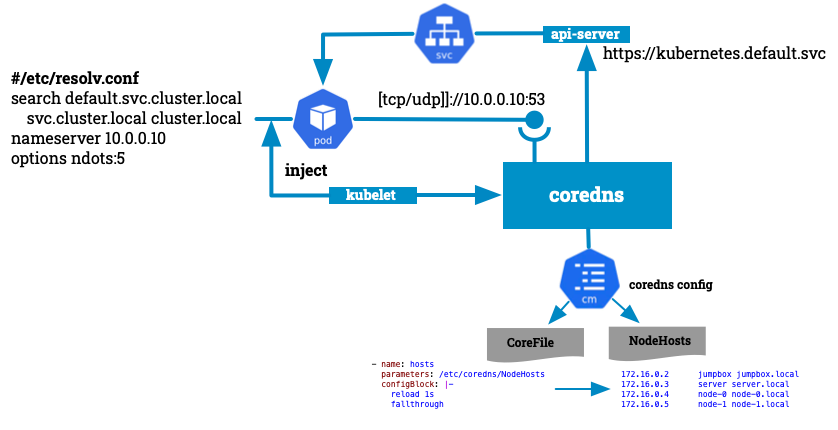
Upgrade CoreDNS with a hosts map to resolve local node names:
cd ~/kubernetes-the-hard-way-simplified/bootstrap/day2-panic
./430-update-coredns.sh
Review script and CoreDNS Helm Chart
- CoreDNS HelmChart
- Review values and templates
- Find trick to add the nodefile without patch the helm chart!
coredns-hosts-values.yaml:
servers:
- zones:
  - zone: .
    use_tcp: true
  port: 53
  plugins:
  - name: errors
  - name: health
    configBlock: |-
      lameduck 10s
  - name: ready
  - name: kubernetes
    parameters: cluster.local in-addr.arpa ip6.arpa
    configBlock: |-
      pods insecure
      fallthrough in-addr.arpa ip6.arpa
      ttl 30
  - name: hosts
    parameters: /etc/coredns/NodeHosts
    configBlock: |-
      reload 1s
      fallthrough
  - name: prometheus
    parameters: 0.0.0.0:9153
  - name: forward
    parameters: . /etc/resolv.conf
  - name: cache
    parameters: 30
  - name: loop
  - name: reload
  - name: loadbalance
zoneFiles:
  - filename: NodeHosts
    contents: |
      172.16.0.2      jumpbox jumpbox.local
      172.16.0.3      server server.local
      172.16.0.4      node-0 node-0.local
      172.16.0.5      node-1 node-1.local
Check the content-site pod restart the gitsync-pull sidecar container and the problem is gone!
# kubectl delete pods content-site-0
kubectl get -n kube-system cm coredns -o yaml
kubectl get pods -l app=content-site
kubectl describe pods content-site-0
kubectl get svc content-site
kubectl get ep content-site

kubectl port-forward service/content-site 8002:80 &
curl 127.0.0.1:8002

# exist port-forward
fg
CTRL-C
Summary
- Understand the roles of gitsync-pull and hugo sidecars:
- Learn how GitSync keeps content synchronized with repositories and how Hugo containers generate and serve static sites, enabling a clean separation of content, build, and delivery.
- DNS can be tricky—register your node names in your local DNS:
- Realize why reliable DNS resolution is essential for cluster stability and troubleshooting, and practice configuring local DNS to avoid hidden networking issues.
- Trust and security with distroless and non-root containers:
- Gain awareness of why minimal, non-root containers are important for reducing the attack surface, and how this impacts debugging and monitoring.
- Master debugging tools like
kubectl debugorkubectl node-shell:- Practice secure troubleshooting without root shells by using Kubernetes-native tools to inspect, diagnose, and recover workloads in production-like environments.
- These tools help maintain security while providing deep insights into container and node states.
Deploy simple app if core service are offline...
In this unit you will complete a series of tasks to ensure you that you understand what you are deploy.
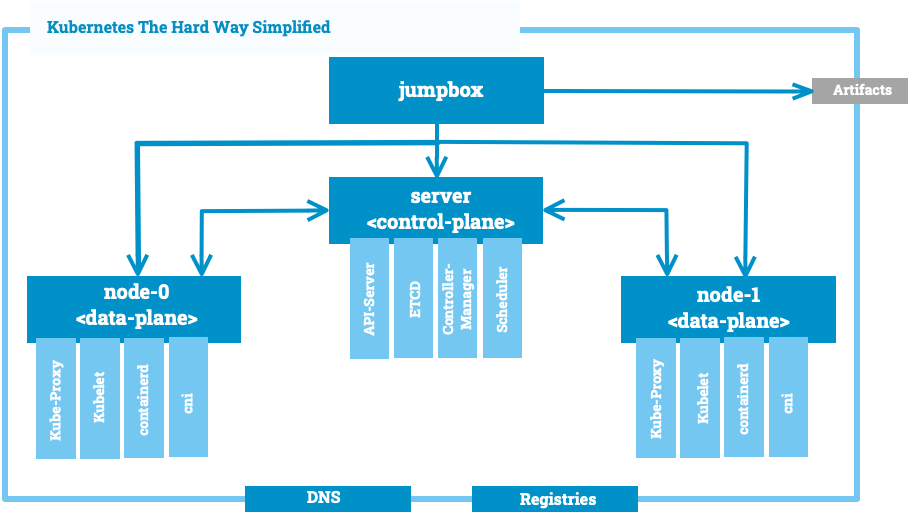
You’ve just tried to deploy a new application on your Kubernetes cluster, but nothing happens. All the core components — controller-manager, scheduler, kubelets, and kube-proxy — are offline. Your deployment sits idle, pods never get created, and the cluster feels frozen.
Step by step, you start the core components:
- Controller-manager: begins observing the desired state, reconciling deployments and replicas.
- Scheduler: starts assigning pods to nodes based on available resources and constraints.
- Kubelets on worker nodes: detect the new pods, pull container images, and start containers.
- Kube-proxy: restores networking rules, so services can communicate internally and externally.
Slowly, the cluster comes back to life. The deployment finally spins up, pods enter Running state, and traffic flows correctly. It’s a vivid reminder: without core components online, Kubernetes is just a collection of idle nodes — only once each piece is restored does orchestration actually happen.
Stop some Kubernetes Core Components
In this exercise, you will stop some core Kubernetes components to simulate a partial outage scenario.
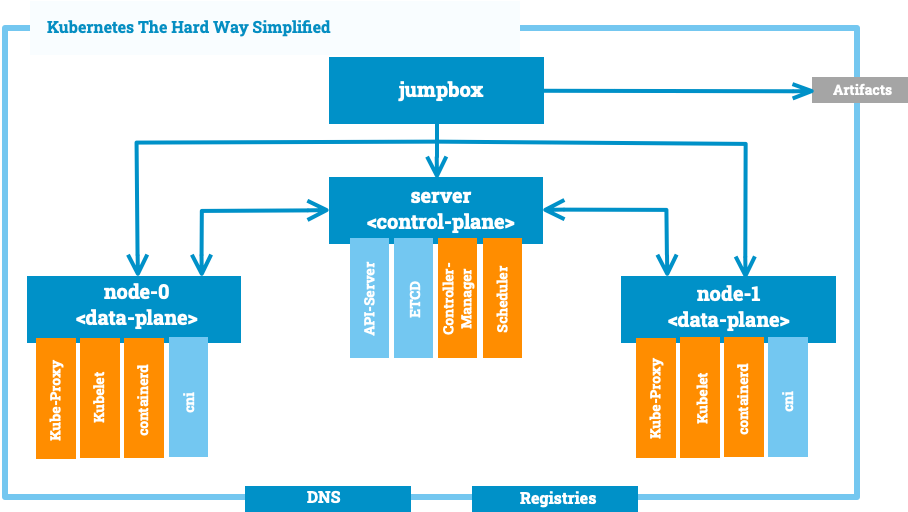
Core Kubernetes Components offlined
Here’s a compact training-style offline description of each:
- Controller Manager (offline)
- Without it, the cluster stops reconciling state: no new Pods for Deployments, no node health checks, no replication fixes.
- Scheduler (offline)
- New Pods remain Pending since no one assigns them to Nodes, but existing Pods keep running.
- Kubelet (offline)
- The Node becomes unmanaged: Pods won’t start, stop, or report status, and the Node eventually gets marked NotReady.
- containerd (offline)
- Containers on that Node can’t be created or restarted, but already-running ones keep going until failure.
- kube-proxy (offline)
- Service networking stops updating: new backends aren’t load balanced, but existing iptables/ipvs rules still route traffic until topology changes.
This way, trainees clearly see what breaks immediately vs. what keeps running for a while.
cd ~/kubernetes-the-hard-way-simplified/bootstrap/day2-panic
./450-system-partial-stop.sh
Even if these components go offline, the cluster’s etcd datastore and the API server remain active and available — ensuring state consistency and continued access to the control plane.
Deploy an application
- You can submit application manifests as long as the API server and etcd are online.
- With the Scheduler and Controller Manager offline, Pods remain Pending and Deployments don’t reconcile.
- If kubelets or containerd are offline, Pods assigned to those Nodes can't start.
- Already-running containers continue, but no new workloads will run until the offline components are restored.
- Services remain accessible as long as kube-proxy is running and the underlying Pods are healthy.
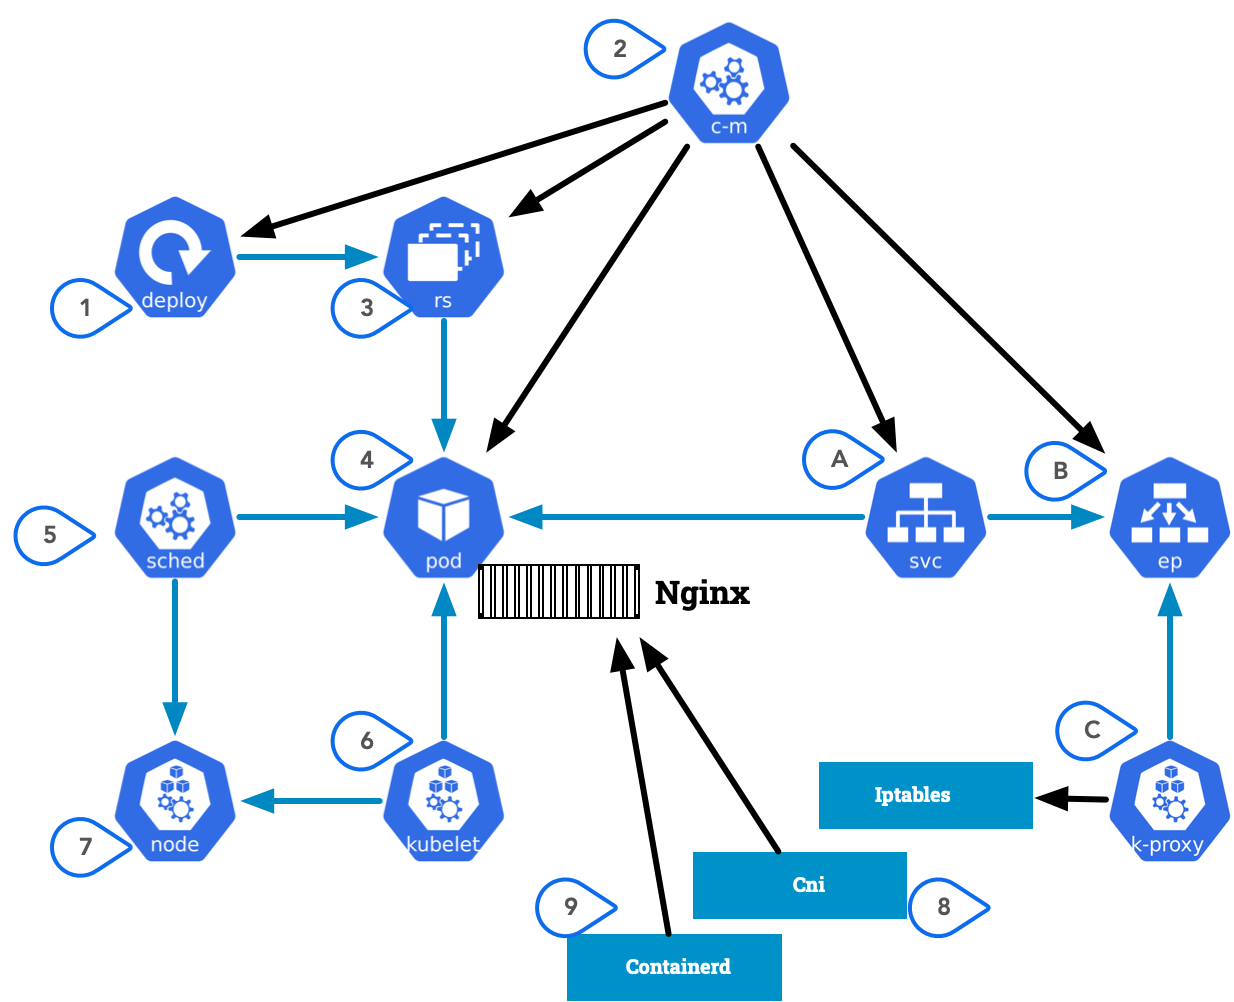
Deploy the nginx app
kubectl create namespace fix-deploy
kubectl ns fix-deploy
# **1** Create a deployment named nginx that uses the nginx image.
kubectl create deployment nginx --image nginx
kubectl get all
NAME                    READY   UP-TO-DATE   AVAILABLE   AGE
deployment.apps/nginx   0/1     0            0           10s
With the Controller Manager offline, the cluster cannot create or reconcile ReplicaSets and Pods.
ssh root@server "systemctl is-active kube-controller-manager"
inactive
Restart the controller manager:
# **2** Start the controller manager and verify that it is running.
# Now Controller create ReplicaSet and Pods
ssh root@server "systemctl start kube-controller-manager"
ssh root@server "systemctl is-active kube-controller-manager"
active
ReplicaSet and POD are spwaned.
# **3** Check ReplicaSet and **4** Pods
kubectl get all
NAME                         READY   STATUS    RESTARTS   AGE
pod/nginx-5869d7778c-wmvw8   0/1     Pending   0          15s

NAME                    READY   UP-TO-DATE   AVAILABLE   AGE
deployment.apps/nginx   0/1     1            0           6m44s

NAME                               DESIRED   CURRENT   READY   AGE
replicaset.apps/nginx-5869d7778c   1         1         0       15s
Pod is pending, ok check and start scheduler
ssh root@server "systemctl is-active kube-scheduler"
inactive

# **5** Start the scheduler and verify that it is running.

ssh root@server "systemctl start kube-scheduler"
ssh root@server "systemctl is-active kube-scheduler"
active
Ok, pod is pending. OK, we also drop the kubelet!
k describe pod -l app=nginx
Events:
  Type     Reason            Age   From               Message
  ----     ------            ----  ----               -------
  Warning  FailedScheduling  68s   default-scheduler  0/2 nodes are available: 2 node(s) had untolerated taint {node.kubernetes.io/unreachable: }. preemption: 0/2 nodes are available: 2 Preemption is not helpful for scheduling.
...
k get nodes
NAME     STATUS     ROLES    AGE   VERSION
node-0   NotReady   <none>   30m   v1.36.1
node-1   NotReady   <none>   30m   v1.36.1
Start the kubelet and see that containerd also start!
# **6** Start the kubelet on node-0 and verify that it is running.
ssh root@node-0 "systemctl start kubelet"
ssh root@node-0 "systemctl is-active kubelet"
active
ssh root@node-0 "systemctl is-active containerd"
active
Now pods is run!
# **7** Check Scheduler, Pods and Nodes
kubectl get nodes
kubectl get pods -o wide
k describe pod -l app=nginx
# **8** Check pod containers and **9** pod IPs from CNI
kubectl get pods \
  -o jsonpath='{range .items[*]}{.metadata.name}{"\t"}{.status.podIP}{"\t"}{range .status.containerStatuses[*]}{.name}={.ready}{" "}{end}{"\n"}{end}'
Start a nginx service
# **A** Expose the deployment as a service
k expose deployment nginx --target-port 80 --port 80
k get svc nginx
NAME    TYPE        CLUSTER-IP   EXTERNAL-IP   PORT(S)   AGE
nginx   ClusterIP   10.0.0.202   <none>        80/TCP    47m
# **B** Check the endpoints as a service
k get endpointslices
NAME          ADDRESSTYPE   PORTS   ENDPOINTS    AGE
nginx-t8jp6   IPv4          80      10.200.0.2   52s
Check service availability from other node:
cat >curl.yaml <<EOF
apiVersion: v1
kind: Pod
metadata:
  name: curl
  labels:
    run: curl
spec:
  affinity:
    podAntiAffinity:
      requiredDuringSchedulingIgnoredDuringExecution:
        - labelSelector:
            matchExpressions:
              - key: app
                operator: In
                values:
                  - nginx
          topologyKey: "kubernetes.io/hostname"
  restartPolicy: Never
  containers:
    - name: curl
      image: curlimages/curl
      command: ["curl", "-s", "--max-time", "5", "http://nginx"]
EOF
kubectl create -f curl.yaml
kubectl logs curl
Error from server: Get "https://node-1:10250/containerLogs/fix-deploy/curl/curl": dial tcp 172.16.0.5:10250: connect: connection refused
kubectl get pods curl -o wide
NAME                     READY   STATUS    RESTARTS   AGE
curl                     0/1     Pending   0          27s
Upps: Forget to start second node kubelet!
Repair the service routing
# **6** Start the kubelet on node-1 and verify that it is running.
ssh root@node-1 "systemctl start kubelet"
ssh root@node-1 "systemctl is-active kubelet"
kubectl get pods curl
NAME                     READY   STATUS       RESTARTS   AGE
curl                     0/1     StartError   0          2m58s
kubectl logs curl
Check pod available:
kubectl port-forward service/nginx 8082:80 &
curl 127.0.0.1:8082
# works!
Check kube-proxies status:
ssh root@node-0 "systemctl is-active kube-proxy"
inactive
ssh root@node-1 "systemctl is-active kube-proxy"
inactive
OK, start kube-proxy:
# **C** Start the kube-proxy on node-0 and node-1 and verify that it is running.
ssh root@node-0 "systemctl start kube-proxy"
ssh root@node-0 "systemctl is-active kube-proxy"

ssh root@node-1 "systemctl start kube-proxy"
ssh root@node-1 "systemctl is-active kube-proxy"
Everything is working now; make sure CoreDNS is also running to ensure proper cluster DNS resolution.
kubectl -n kube-system get pods -l k8s-app=kube-dns
Check again and replace curl pod!
kubectl replace --force -f curl.yaml
kubectl logs curl
# works!
kubectl delete pods curl
Scale and check service access....
kubectl scale deployment nginx --replicas 2

kubectl run --rm -it curl --image=curlimages/curl --restart=Never -- \
  /bin/sh
curl -s --max-time 5 http://nginx
curl -s --max-time 5 http://nginx
curl -s --max-time 5 http://nginx
curl -s --max-time 5 http://nginx
exit
Check nginx pods logs:
kubectl logs -l app=nginx
# or
kubectl stern -l app=nginx
Check Service VIP Routing
Check kube-proxy iptables setup
# **C** Check iptables node setup to made Service VIP accessable
ssh root@node-0 iptables -t nat -L KUBE-SERVICES -n -v --line-numbers | grep 'fix-deploy/nginx'
Output:
5 0 0 KUBE-SVC-2CMXP7HKUVJN7L6M tcp -- * * 0.0.0.0/0 10.0.0.42 /* fix-deploy/nginx cluster IP */ tcp dpt:80
Check Routing at the worker nodes
NGINX_SVC_IP=$(k get svc nginx -o jsonpath="{.spec.clusterIP}")
ssh root@node-0 iptables -t nat -S | grep $NGINX_SVC_IP
Output:
-A KUBE-SERVICES -d 10.0.0.42/32 -p tcp -m comment --comment "fix-deploy/nginx cluster IP" -m tcp --dport 80 -j KUBE-SVC-2CMXP7HKUVJN7L6M
-A KUBE-SVC-2CMXP7HKUVJN7L6M ! -s 10.200.0.0/16 -d 10.0.0.42/32 -p tcp -m comment --comment "fix-deploy/nginx cluster IP" -m tcp --dport 80 -j KUBE-MARK-MASQ
Restoration complete — all Core Kubernetes components are running and healthy.
Explain kube-proxy with iptables mode works
Stopping kube-proxy does not remove existing rules; the network continues to function with the current iptables configuration.
Role of kube-proxy
- Watches the API server for Service and Endpoint objects.
- Programs Linux networking rules (iptables or IPVS, or eBPF in newer distros) so that traffic to a Service ClusterIP/NodePort is redirected to the correct backend Pods.
IPtables setup workflow
- For a service nginx in namespace fix-deploy:
- kube-proxy creates a ClusterIP (e.g.
10.0.0.42).
- kube-proxy creates a ClusterIP (e.g.
- In iptables, it sets up NAT rules:
- Match destination IP
10.0.0.42on port 80. - Jump to a kube-proxy-managed chain like
KUBE-SERVICES. - Pick a backend Pod IP/port from the Endpoints (
10.200.0.2:80, etc.). - Do DNAT → change destination IP/port to Pod IP/port.
- Match destination IP
How to inspect
On a Node where kube-proxy runs, you can check rules:
ssh root@node-1
# All kube-proxy managed chains start with "KUBE-"
iptables -t nat -L -n -v | grep KUBE

# See service rules
iptables -t nat -L KUBE-SERVICES -n -v

# Trace rules for a specific ClusterIP
iptables -t nat -S | grep 10.0.0.42
Key chains created by kube-proxy
KUBE-SERVICES: entry point for Services.KUBE-NODEPORTS: rules for NodePort Services.KUBE-CLUSTER-IP: maps ClusterIP to endpoints.KUBE-SEP-*: Service Endpoints, one per Pod IP.KUBE-MARK-MASQ: mark packets for masquerading when needed (for example, when accessing ClusterIP from Node).
Common pitfalls
- Stale rules
- kube-proxy doesn’t clean up when endpoints are removed (rare but possible).
- iptables flush
- if someone runs iptables -F or resets nat tables, Services stop working until kube-proxy rewrites them.
- Masquerading issues
- incorrect SNAT settings can break Pod-to-Service routing.
- Performance
- iptables rules scale linearly with Services; for large clusters, IPVS or eBPF is recommended.
Kubernetes Day2Operations Panic Summary
Day 2 Kubernetes operations focus on keeping your cluster healthy, secure, and recoverable after initial deployment. Deploy more applications and learn to handle failures across control plane and worker nodes. Learn the deep insights of kubernetes components.
What You Learn as a Trainee?
What You Learn in Day 2 Kubernetes Operations Panic:
Stories like the ones we’ve discussed are more than just entertaining—they are powerful learning tools for trainees. They provide concrete context for abstract concepts, helping learners understand how Kubernetes components such as the API server, scheduler, controller-manager, and kubelets interact in real workflows. By showing cause-and-effect relationships, stories teach trainees to connect symptoms to root causes. For example, seeing Git-sync fail due to DNS issues or deployments stuck because core components are offline demonstrates the importance of tracing problems step by step rather than guessing. Stories also build operational awareness by highlighting real-world challenges, such as logging, network dependencies, retries, and the correct sequence for restoring services. Because humans remember narratives better than abstract diagrams or lists, these stories improve memory retention and engagement.
Furthermore, they teach soft skills and decision-making, such as prioritizing which components to restore first, and simulate consequences without risk. Trainees can experience failures virtually and learn what happens if DNS is broken or core components are offline, all without affecting production systems. In short, stories help trainees understand, remember, and troubleshoot Kubernetes more intuitively, making them an essential part of effective training.
Deploy Application that needs external services
- Hugo website generation with external git server are powerful combinations
- Understand how DNS is critical for pod communication and external access
- Check Filesystem rights and access
- Use env variables and secrets for configuration
- Learn to debug pod issues with logs and describe
- Understand sidecar patterns and init containers
- Deploy Nginx Ingress Controller for external access
- Setup CoreDNS for external service discovery is needed
Component Failure & Restart
- Crash and restart kube-apiserver, scheduler, controller-manager, etcd
- Crash and restart kubelet, containerd and kube-proxy
- Understand what services depend on which components
- Learn to bootstrap a broken control plane and data plane
- Teaches resilience and deep troubleshooting skills
Summary: Explain the role of the core components
Explanation of each component’s role in Kubernetes:
- Api-server
- The front-end for the Kubernetes control plane. It exposes the Kubernetes API, processes REST requests, validates and configures data for the API objects, and serves as the gateway for all cluster interactions.
- 👉 The cluster’s receptionist.
- Etcd
- A distributed key-value store that holds all cluster state and configuration data. It’s the single source of truth for Kubernetes.
- 👉 The brain’s memory.
- Kube-controller-manager
- Runs the control loops (“controllers”) that reconcile cluster state, such as ensuring Deployments have the right number of Pods, replacing failed nodes, and maintaining service accounts.
- 👉 Think of it as the cluster’s automation brain.
- Kube-scheduler
- Watches for new Pods without an assigned Node and decides where they should run based on resource availability, taints/tolerations, and affinity/anti-affinity rules.
- 👉 It’s the matchmaker between Pods and Nodes.
- Kubelet
- An agent running on each Node that receives PodSpecs from the API server, ensures containers are created via the container runtime, monitors their health, and reports back status.
- 👉 The Node’s caretaker.
- Containerd
- The container runtime that pulls images, creates containers, and manages their lifecycle on a Node. Kubernetes talks to it through the CRI (Container Runtime Interface).
- 👉 The engine that actually runs your containers.
- CNI plugins
- Container Network Interface (CNI) plugins provide networking for Pods, enabling them to communicate with each other and the outside world. They handle IP address management, routing, and network policies.
- 👉 The networking fabric of the cluster.
- Kube-proxy
- Maintains network rules on each Node to implement Kubernetes Services, using iptables, IPVS, or eBPF to load balance traffic between Pods.
- 👉 The traffic router for Services.
- CoreDNS
- A DNS server deployed inside the cluster that resolves Service names (e.g.
myservice.default.svc.cluster.local) to virtual IPs and handles Pod/service discovery. - 👉 The phonebook of the cluster.
- A DNS server deployed inside the cluster that resolves Service names (e.g.
- Kubectl
- The command-line tool used by administrators and developers to interact with the Kubernetes API server, manage cluster resources, and deploy applications.
- 👉 The remote control for your cluster
What You Can Do Next?
After completing the basics of day2 operations, you can take your Kubernetes journey further by exploring:
Day 2 Ops isn’t about just surviving — it’s about operating Kubernetes with confidence and automation. Solve the challenges, break things, debug failure and install more kubernetes addons step by step.
Regards,
├─☺︎─┤ The Humble Sign Painter - Peter Rossbach
- Previous lesson
- Day 2 Operations – Why They Matter