Building an eBPF-based Firewall with LPM Trie–Based IP Range Matching

By now, we already know how to capture network traffic using eBPF/XDP, parse it, and even perform some basic IPv6 ICMP rate limiting.
So naturally, you might wonder how different an eBPF-based firewall really is from the rate limiter. After all, instead of rate-limiting packets, we could just block them entirely, right?
Well, not quite.
While our firewall implementation will only focus on filtering packets by client IP (not by ports, protocol, or fingerprinting), one ideally doesn’t want users to specify every single IP rule manually. In many cases, it would be much easier to allow one to whitelist or blacklist entire IP ranges instead.
Nonetheless, a simple IP-based firewall might work fine if you’re only whitelisting a few static addresses. But what if those IPs are dynamic and constantly changing within a certain range or subnet?

But how?
In this tutorial, we’ll learn how to filter network packets using the BPF_MAP_TYPE_LPM_TRIE eBPF map type, which allows one to easily check and enforce whether a certain IP (client machine) belongs to a blacklisted IP range or not.
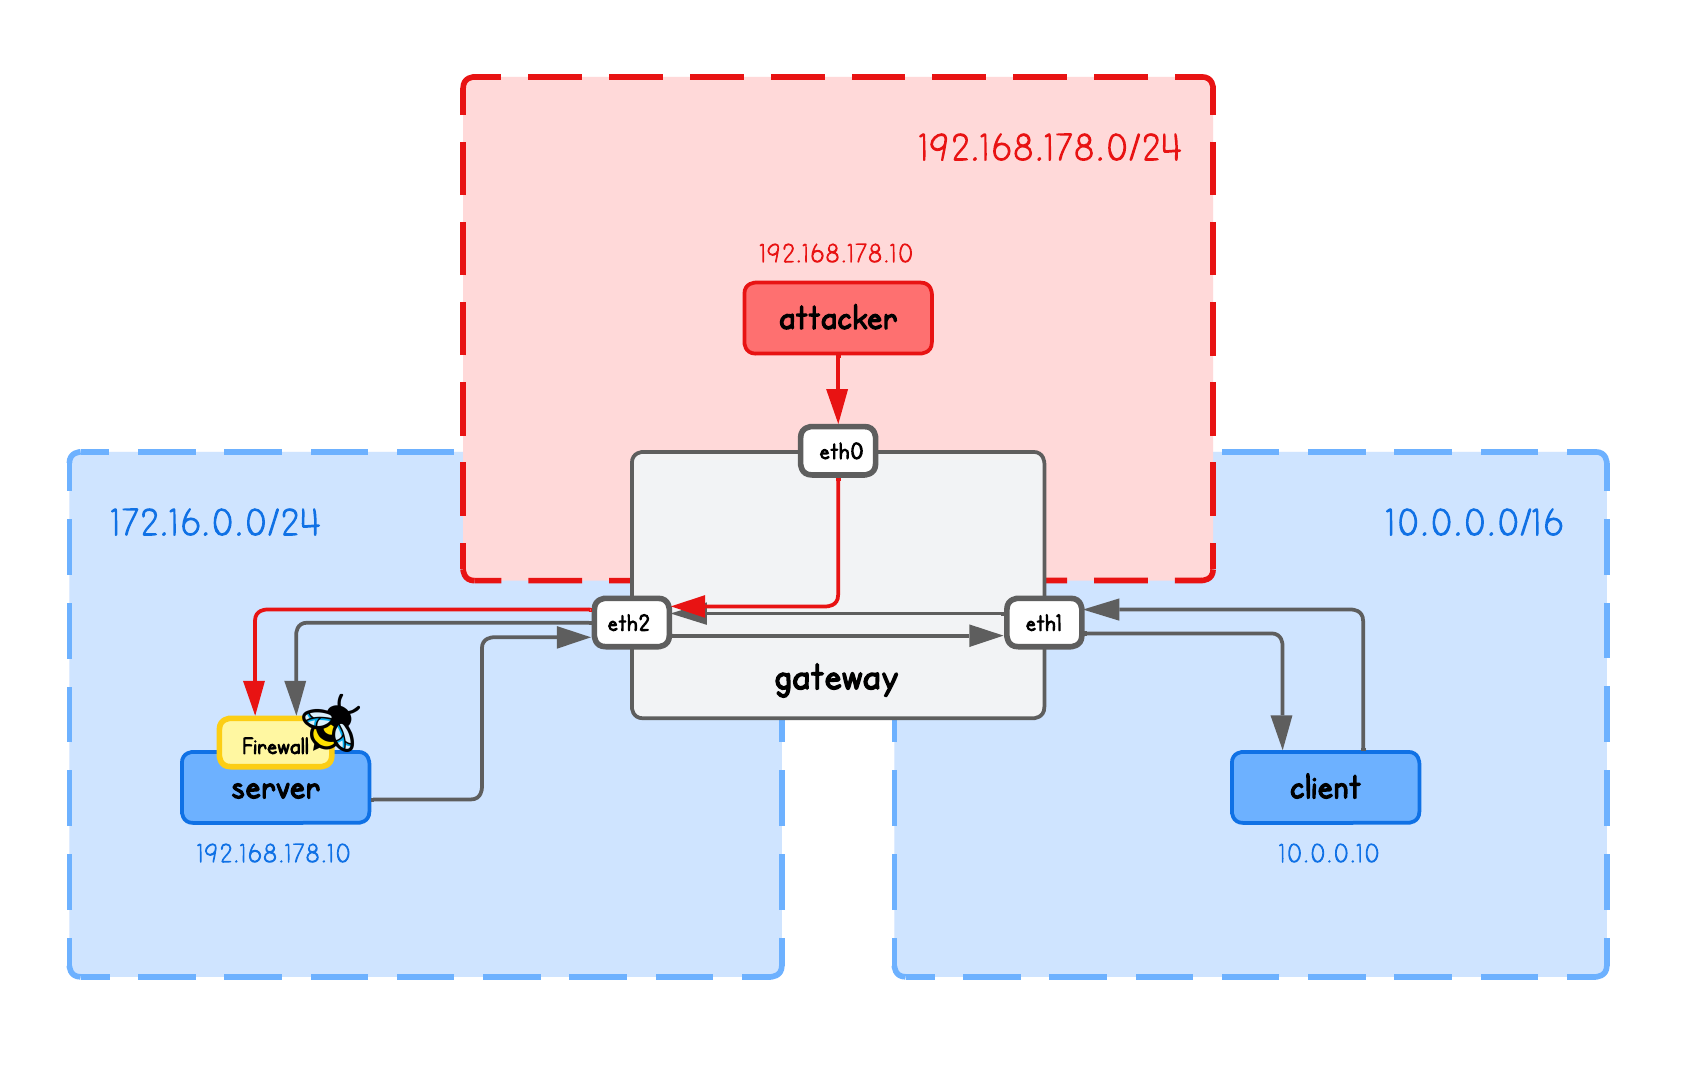
This playground has a network topology with 4 separate machines on three different networks:
serverin network172.16.0.10/24clientin network10.0.0.10/16attackerin network192.168.178.10/24gatewaybetween networks192.168.178.0/24,10.0.0.0/16and172.16.0.10/24
High-Level Overview
Designing an XDP-based firewall is quite straightforward and follows a similar pattern as packet rate-limiting:
- Keep a blacklist (or whitelist) of rules in an eBPF map (IPs, ports, protocols)
- Capture and parse incoming network packets
- Check the packet header fields against the map entries
- Enforce the firewall rules
But obviously things get more complex when adding features such as filtering a combination of IP, port, and protocol, or introducing mechanisms to detect anomalies in network traffic like TCP/TLS fingeprinting.
💡 TCP/TLS fingerprinting examines unique protocol traits—such as TCP options and TLS ClientHello fields—that form consistent, implementation-specific signatures used to identify clients or servers.
But why even XDP? Why not just nftables (or iptables)?
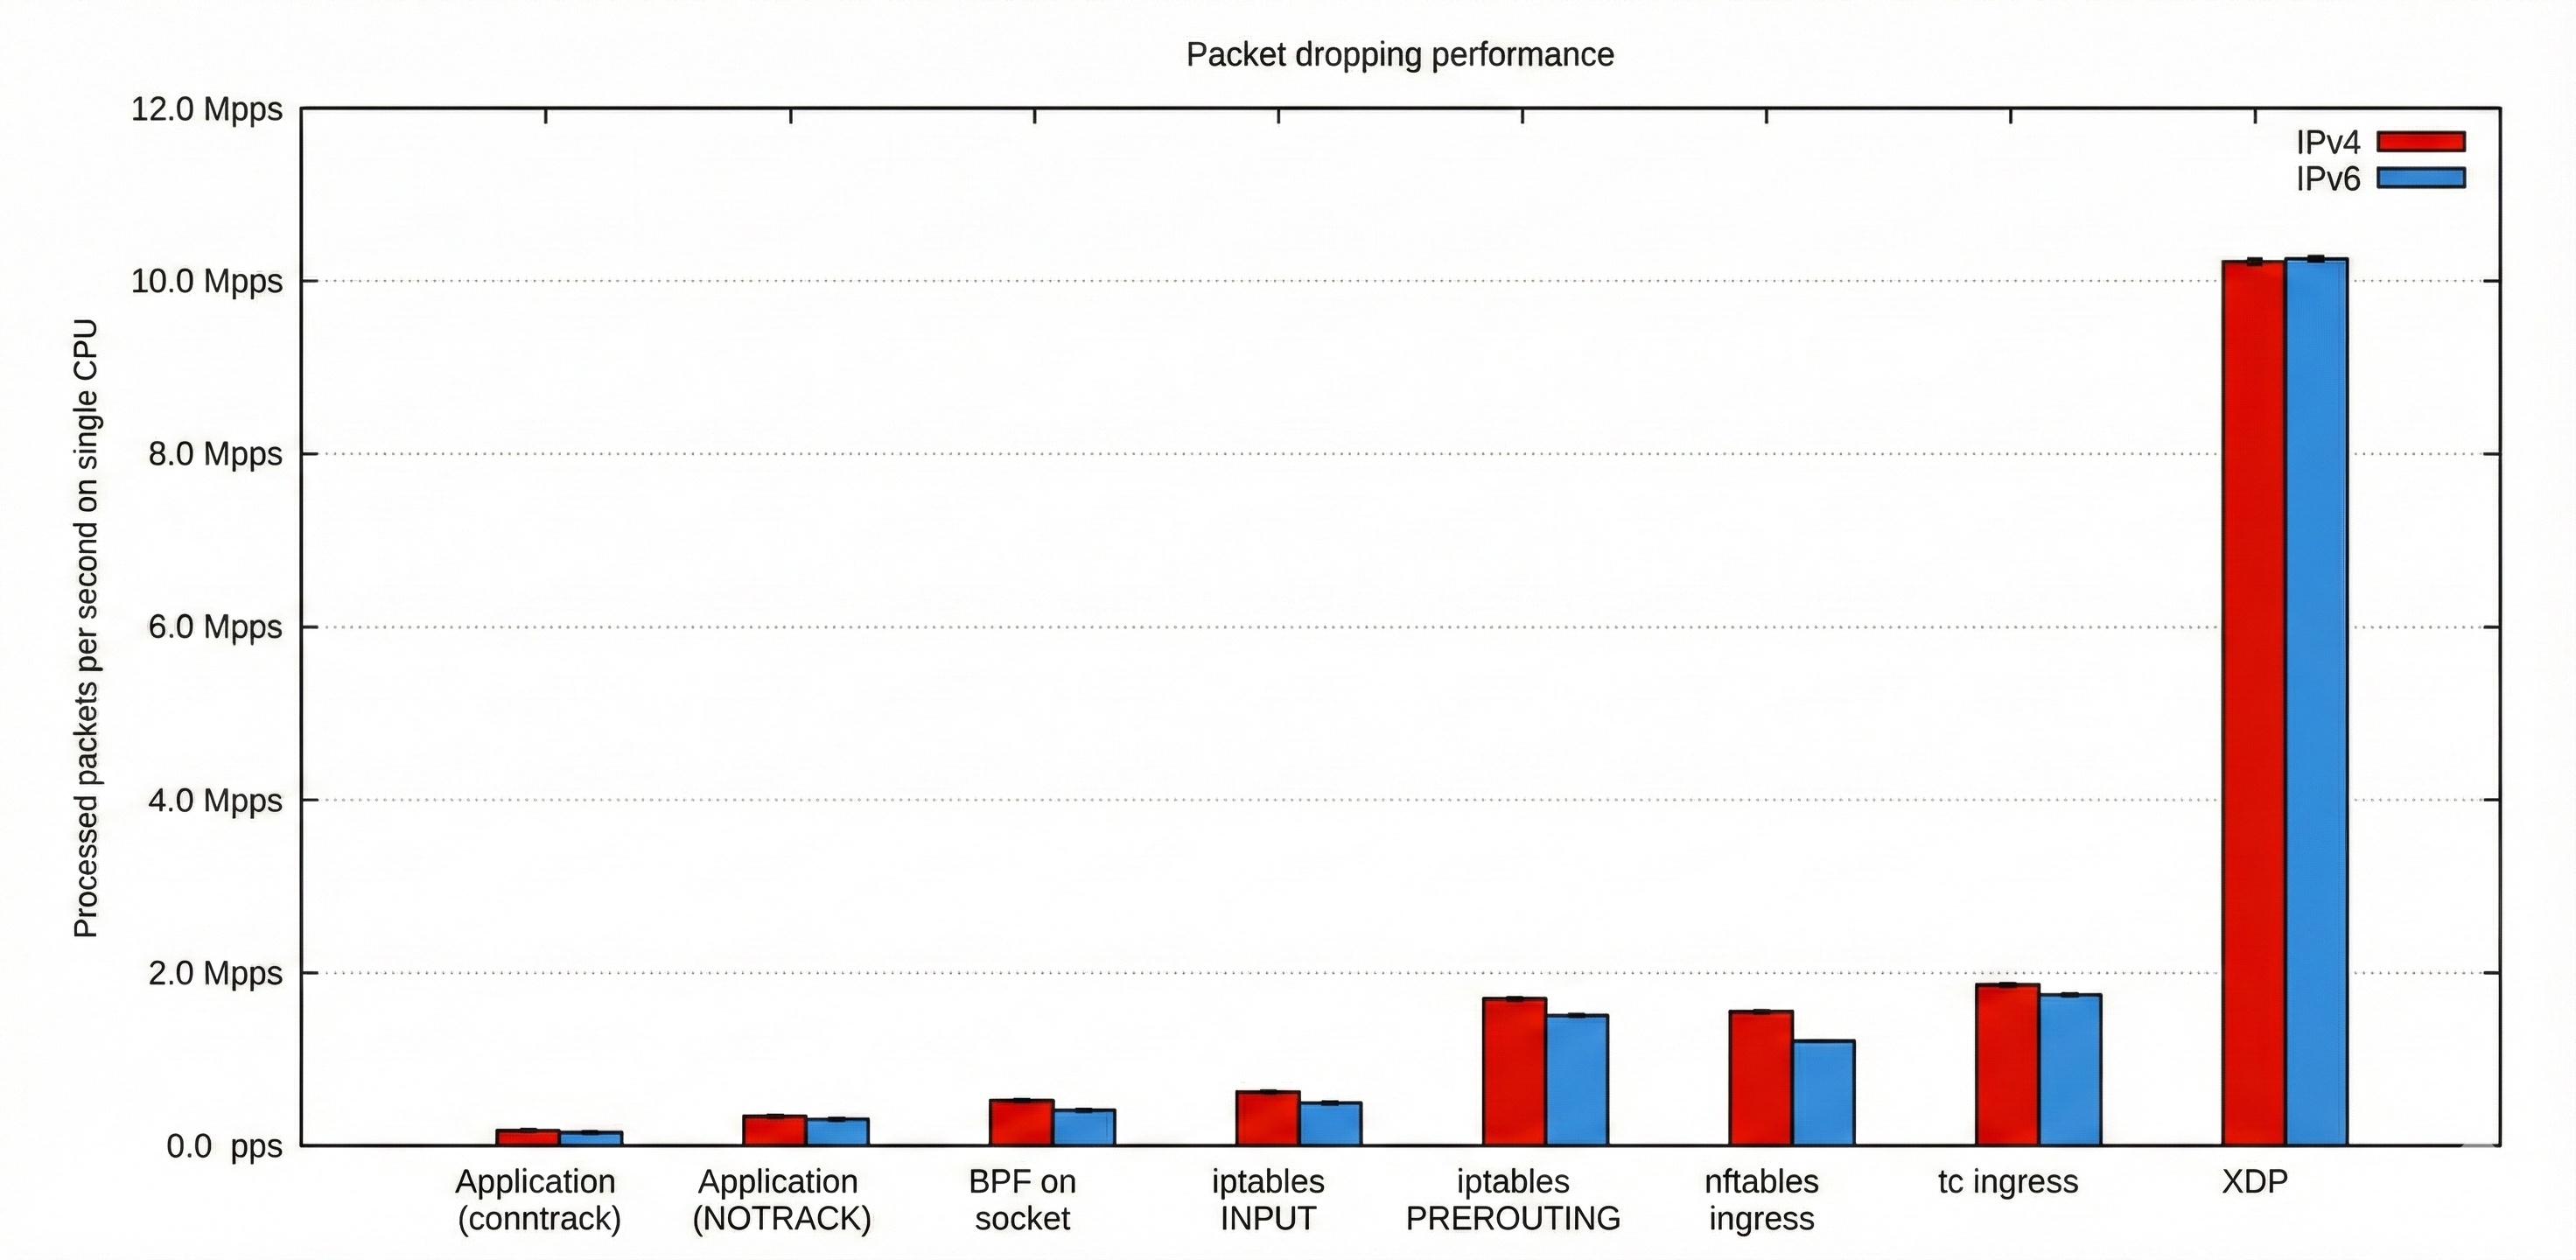
Confused what's on this chart?
This chart compares packet-dropping performance across several networking layers and technologies, showing how many packets per second a single CPU can process.
It highlights that XDP massively outperforms all other methods—reaching over 10 million packets per second—while iptables, nftables, tc, and socket-based filtering handle only a small fraction of that throughput.
While these numbers speak for themselves, one shouldn’t overstate their impact — most companies don’t really operate at a scale where XDP’s extreme performance truly matters, and netfilter-based firewalls are more than sufficient for their needs.
But when that scale does matter, XDP-based firewalls like Cloudflare’s Magic Firewall can block massive attacks—such as 7.3 terabits-per-second (Tbps) DDoS floods—delivering exceptional value to the organizations that rely on them.
Ideally, we’d address all the different firewall features, but instead, I’ll show you one approach in particular that other eBPF tutorials don't put much focus on — the use of BPF_MAP_TYPE_LPM_TRIE for blacklisting (or whitelisting) IP addresses.
BPF_MAP_TYPE_LPM_TRIE eBPF map
In the case of a firewall, this eBPF map type allows one to determine, through a simple map lookup, whether an IP belongs to any of the specified blacklisted (or whitelisted) IP ranges.
Its key is a bpf_lpm_trie_key struct:
struct bpf_lpm_trie_key {
    __u32   prefixlen;
    __u8    data[];
};
Detailed description of the bpf_lpm_trie_key struct
💡 In a bpf_lpm_trie_key struct, the two fields mean:
prefixlen— the CIDR prefix length (the number after/):- IPv4: 0–32
- IPv6: 0–128
data— the network address, whose byte size must match the address family:- IPv4: 4 bytes
- IPv6: 16 bytes
Example (IPv4): 192.168.1.0/24
struct bpf_lpm_trie_key {
    __u32   prefixlen = 24;
    __u8    data[4] = {192, 168, 1, 0};
};
Example (IPv6): 2001:db8::/32
struct bpf_lpm_trie_key {
    __u32 prefixlen = 32;
    __u8  data[16]  = {
        0x20, 0x01, 0x0d, 0xb8,
        0x00, 0x00, 0x00, 0x00,
        0x00, 0x00, 0x00, 0x00,
        0x00, 0x00, 0x00, 0x00
    };
};
But this is just a rather complex key, whereas the value in this key-value pair can be arbitrary and may be used to enforce different logic in your program (e.g., 1 for allowed, 0 for blocked).
So, what’s so special about this eBPF map?
The cool thing is that this eBPF map internally builds a trie, and key lookups work by walking that trie to perform longest prefix matching.
Here’s an image to illustrate this structure.
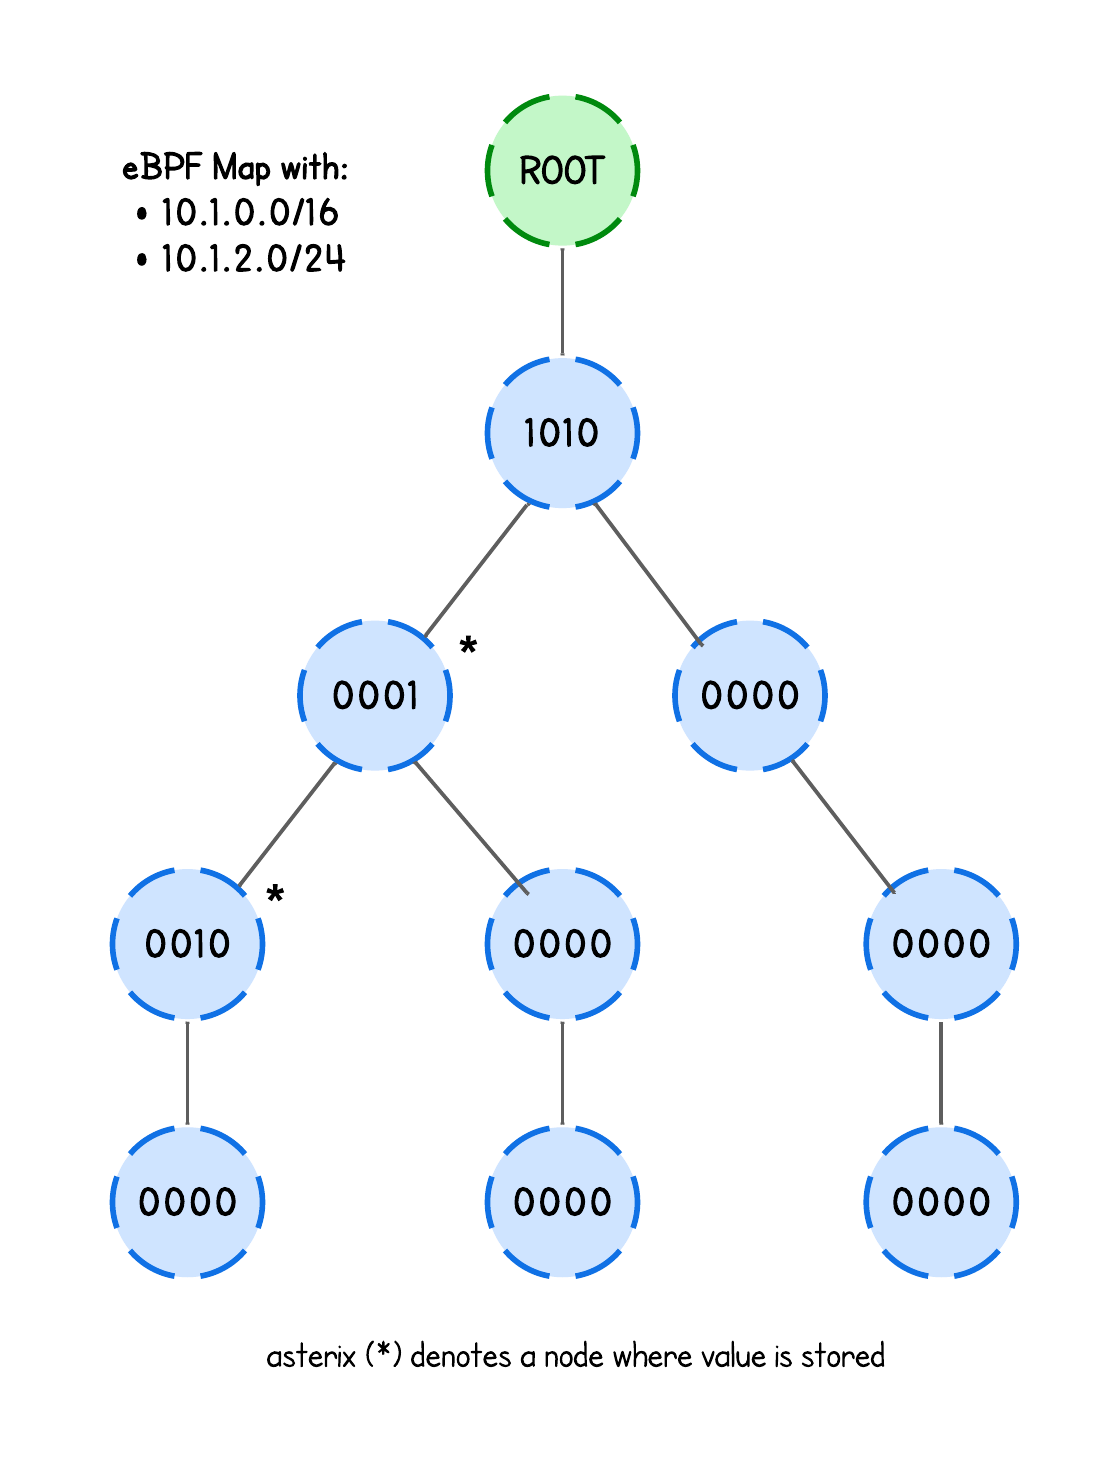
In other words, this structure is perfect for firewall application, as the user can simply blacklist (or whitelist) whole IP ranges and this eBPF map will tell us whether the client IP is within a certain IP range (or not), allowing us to filter packets accordingly.
Whether we then block or allow network packets based on a match is entirely up to the eBPF program’s logic.
More information about eBPF LPM Trie
In fact, the trie structure on the image above is a big oversimplification, neither does it take into an account any optimization techniques like path compression or level compression nor does it explain multibit and singlebit nodes.
The current eBPF LPM trie implementation doesn’t fully support either of these optimizations anyway (though work is underway, as noted in Cloudflare reports).
But this isn’t a math tutorial, so if you are interested in the details, have a look at the implementation in kernel/bpf/lpm_trie.c.
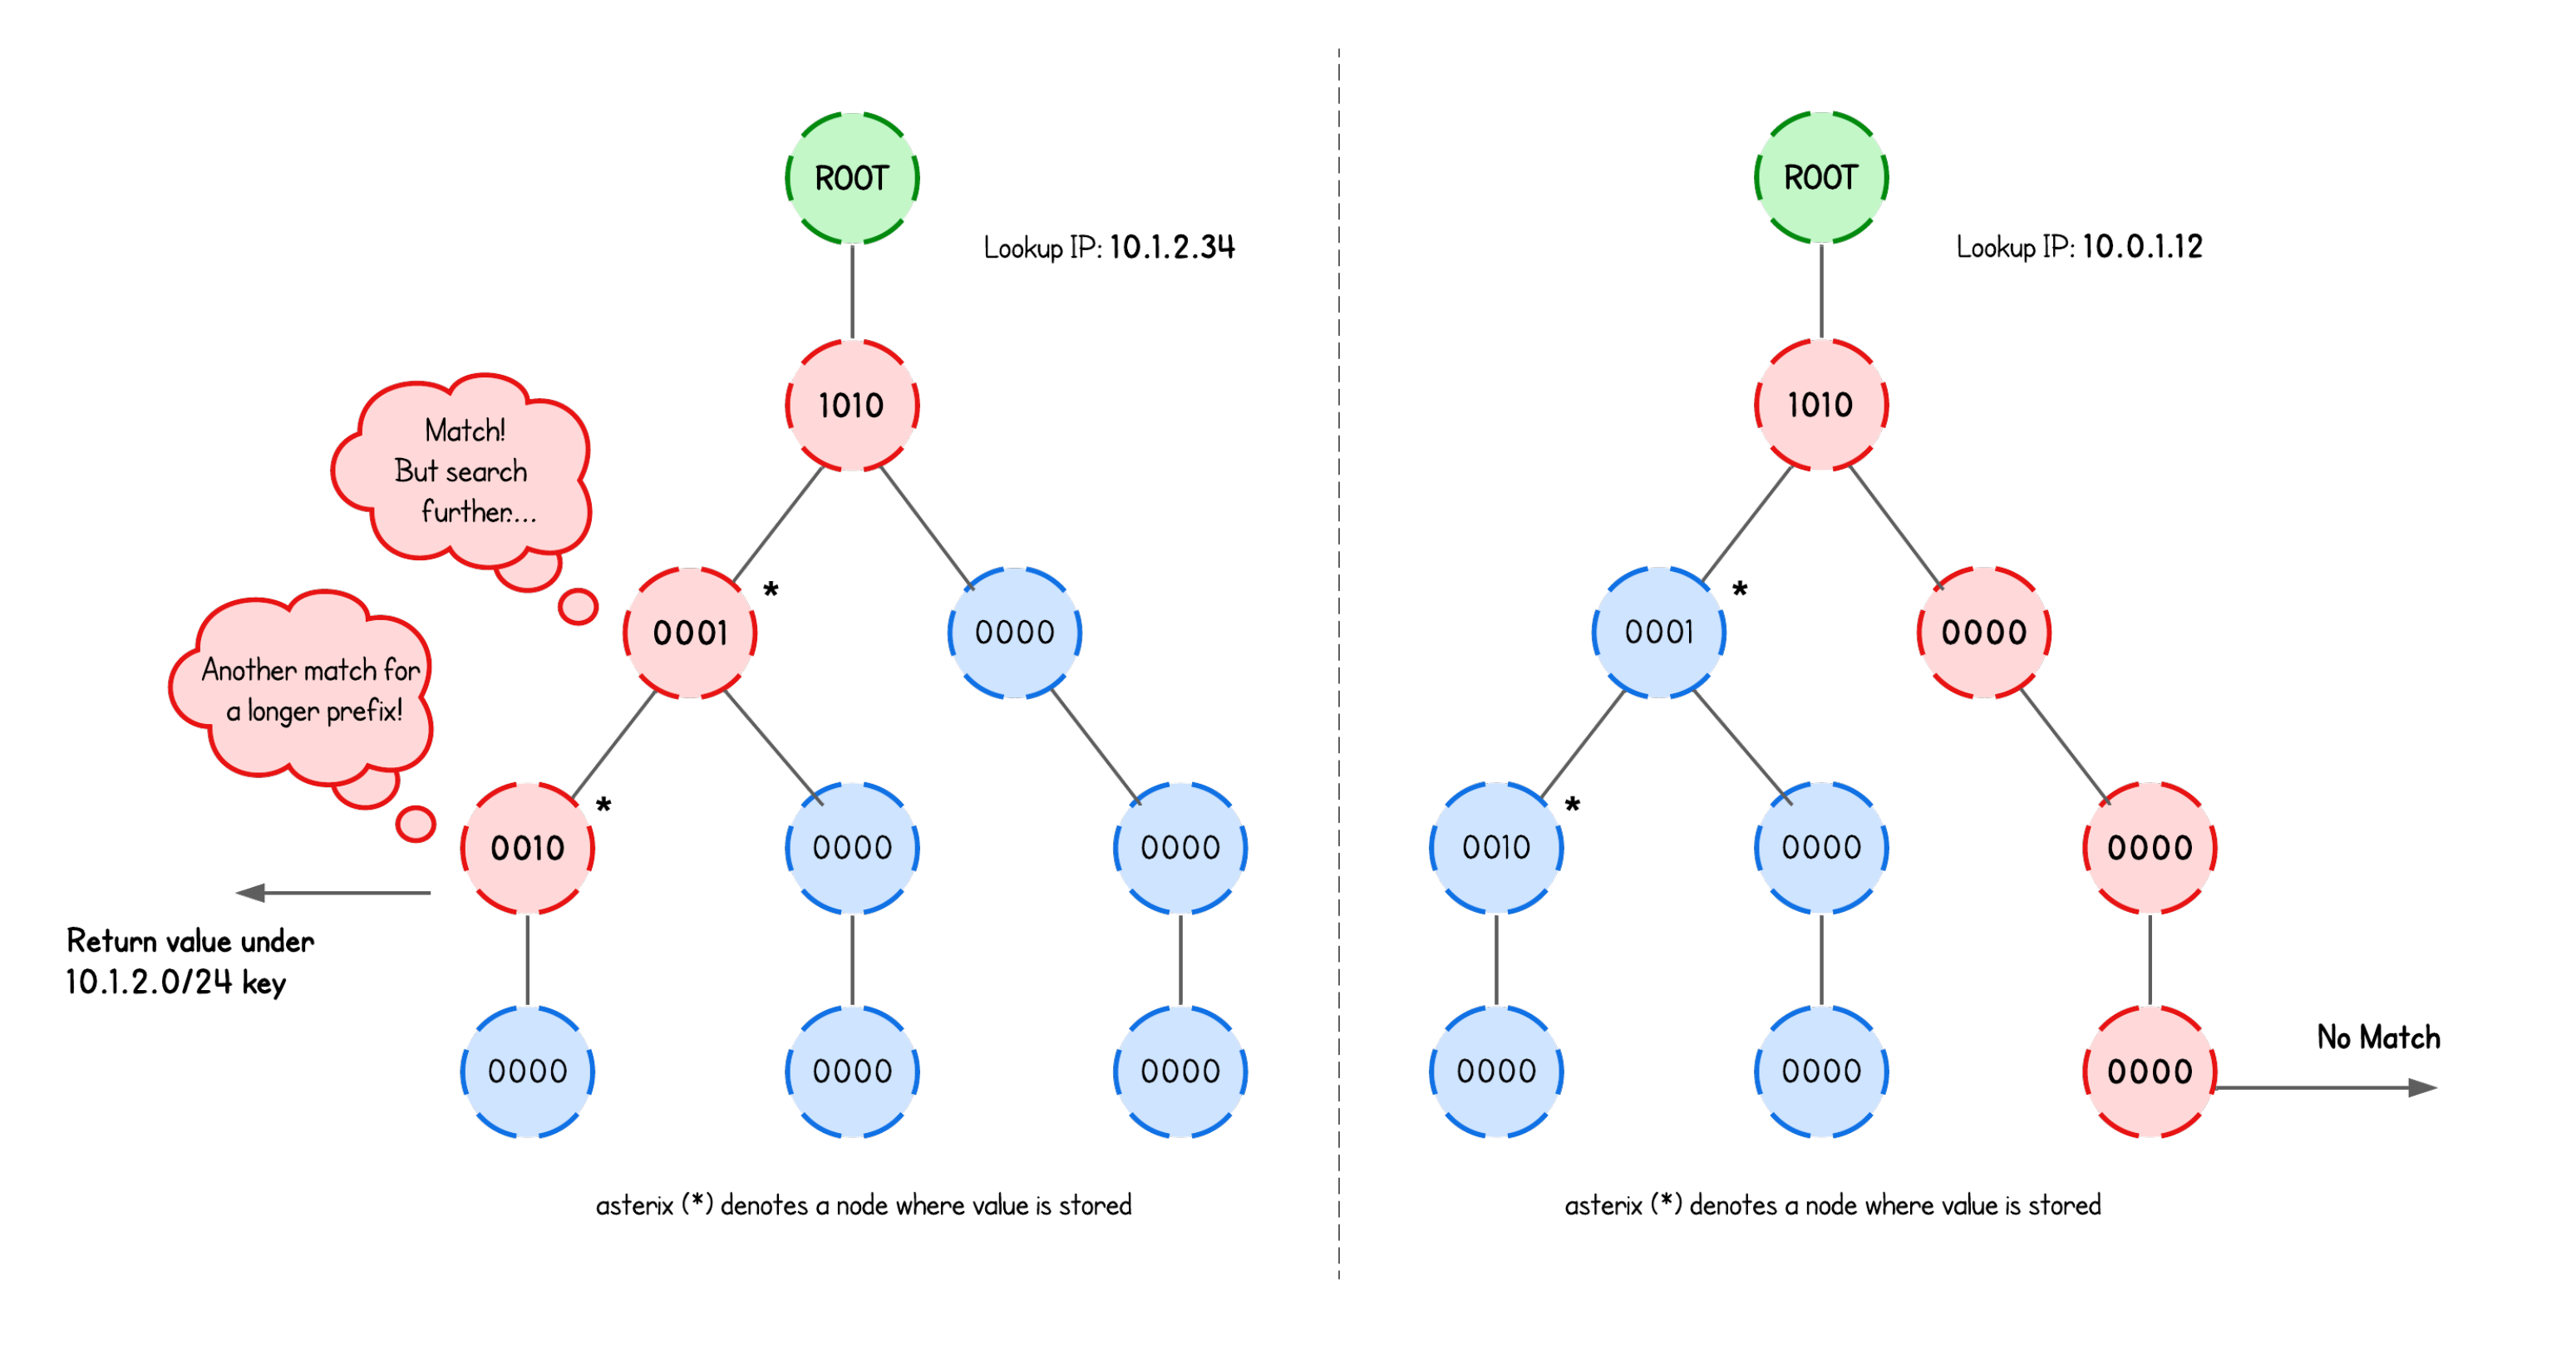
More importantly. if multiple nodes (with values) are hit, the trie remembers the most recent node (with value) it saw and keeps going. If it finds another one deeper down, it overwrites the previous "return value".
What about prefixlen? What role does it play here?
Prefix length determines at what depth are the nodes that store an eBPF map value. If the term "depth" confuses you, imagine the same trie structure as above, just with nodes holding a singlebit.
💡 Interesting fact: routers work the same way—they use longest-prefix matching to figure out the most specific route for a destination IP.
Without further ado, let’s take a look at how this works in practice.
We define our BPF_MAP_TYPE_LPM_TRIE eBPF map type:
struct {
    __uint(type, BPF_MAP_TYPE_LPM_TRIE);
    __type(key, struct ipv4_lpm_key);
    __type(value, __u32);
    __uint(map_flags, BPF_F_NO_PREALLOC);
    __uint(max_entries, 65535);
} blocked_ips SEC(".maps");
What’s the purpose of the BPF_F_NO_PREALLOC flag?
💡 eBPF hash maps are pre-allocated by default, this means that even a completely empty map will use the same amount of kernel memory as a full map.
If BPF_F_NO_PREALLOC flag is set, pre-allocation is disabled.
Users might consider disabling this for large maps since allocating large amounts of memory takes a lot of time during creation and might be undesirable.
But for BPF_MAP_TYPE_LPM_TRIE eBPF map type, the BPF_F_NO_PREALLOC flag must always be set when creating this map type since its implementation cannot pre-allocate it.
This eBPF map is then populated from the user space program (lab/main.go), which basically just means converting the IPs provided in the input to the format that this eBPF map expects (prefixlen and data):
var blockedIPs   string
flag.StringVar(&blockedIPs, "blocked-ips", "", "Comma-separated IP/mask (192.168.23.3/32, 228.13.0.0/16)")
...
// Build the keys for the BPF_MAP_TYPE_LPM_TRIE eBPF Map
// e.g. 127.0.0.1/32 -> { Prefixlen: 32, Data: 16777343}
// Where the:
// - 'Prefixlen' is the prefix length in bits (e.g., /32, /24).
// - 'Data' is the IP converted to the integer
keys, err := buildIPv4LPMKeys(blockedIPs)
if err != nil {
  log.Fatalf("blocked-ips error: %v", err)
}
...
// Add blocked CIDRs/LPM Trie keys into the eBPF map
// Doesn't matter which prefix the captured IP will match (as long as it does match we need to block it)
for _, key := range keys {
  if err := objs.xdpMaps.BlockedIps.Put(&key, uint32(1)); err != nil {
    log.Fatalf("error adding CIDR to allow list: %s", err)
  }
}
💡 Note that when I say CIDR block, I’m simply referring to an IP range defined by a network address and a prefix length.
In this implementation, the map value actually doesn’t matter (we simply set it to 1); all we care about is whether the IP exists in the blacklist. And if the lookup returns NULL, the client isn’t blocked, so the packet is allowed to pass.
With that covered, you should have a pretty good intuition how can we now fit this into our eBPF firewall implementation.
Implementation Breakdown
The only difference that we have compared to packet rate-limiting program is now to perform a lookup against the BPF_MAP_TYPE_LPM_TRIE eBPF map with the prefix.
...
__u32 src = bpf_ntohl(ip->saddr);

struct ipv4_lpm_key key = {
  .prefixlen = 32,
  .data = src,
};

int *blocked = bpf_map_lookup_elem(&blocked_ips, &key);
if (blocked && *blocked) {
  return XDP_DROP;
}
...
Here, prefix (/32) is just hardcoded, because a single IP represent "a range with a single IP".
And with this simple trick of using BPF_MAP_TYPE_LPM_TRIE we already created a pretty powerful layer 4 firewall that filters network packets based on the client IP but allowing one to blacklist whole IP ranges.
What do you mean when you say L4 (or L7)?
When one talks about L4 and L7, we’re referring to different layers of the network stack:
- Layer 4 (L4): The transport layer—TCP/UDP and the layers below (IP, Ethernet).
- Layer 7 (L7): The application layer, where filtering is based on things like HTTP headers, DNS hostnames, and other protocol-level data.
Let's see it in action.
We could demonstrate this with simple ICMP pings—just like in the ICMPv6 rate-limiting example—but let’s take it one step further.
First, start an HTTP server on the server node (server tab):
python3 -m http.server
Then, from either the attacker or client node (attacker or client tabs), try accessing it:
curl http://172.16.0.10:8000
You’ll notice that both nodes can successfully reach the HTTP server, even though ideally the attacker shouldn’t be able to reach it.
Therefore, let’s build and run our eBPF XDP firewall. Open another server tab, navigate to the /lab directory, and run:
go generate
go build
sudo ./xdp -i eth0 --blocked-ips 192.168.178.10/24 # <- this is the attacker subnet
💡 Try running sudo ./xdp --help to see all available parameters and their usage.
Now curl the HTTP server again—you’ll see that the attacker is blocked. Success ✅
💡 Actually, whitelisting clients would actually be easier, since there are usually far fewer trusted clients than potential attackers. However, we use blacklisting here so we don’t unintentionally interfere with other network traffic required for the playground to function.
That said, for pure L4 filtering—IP, ports, protocol, and some advanced matching—eBPF is easily the most performant option. But I believe the transition will still be slow: eBPF expertise is rare, and migration is best done in batches—if you do need it, start by replacing a small subset of features with XDP and then expand as your team’s skills grow.
I will leave it at that - congrats you've came to the end of this tutorial 🎉
In the next tutorial, we take a look at different XDP Load balancing solutions, starting with XDP NAT Load Balancer implementation.
About the Author
Writes about
Frequently covers