How Container Filesystem Works: Building a Docker-like Container From Scratch
One of the superpowers of containers is their isolated filesystem view -
from inside a container it can look like a full Linux distro, often different from the host.
Run docker run nginx, and Nginx lands in its familiar Debian userspace no matter what Linux flavor your host runs.
But how is that illusion built?
In this post, we'll assemble a tiny but realistic, Docker-like container using only stock Linux tools: unshare, mount, and pivot_root.
No runtime magic and (almost) no cut corners.
Along the way, you'll see why the mount namespace is the bedrock of container isolation,
while other namespaces, such as PID, cgroup, UTS, and even network, play rather complementary roles.
By the end - especially if you pair this with the container networking tutorial - you'll be able to spin up fully featured, Docker-style containers using nothing but standard Linux commands. The ultimate goal of every aspiring container guru.
Prerequisites
- Some prior familiarity with Docker (or Podman, or the like) containers
- Basic Linux knowledge (shell scripting, general namespace awareness)
- Filesystem fundamentals (single directory hierarchy, mount table, bind mount, etc.)
Visualizing the end result
The diagram below shows what filesystem isolation looks like when Docker creates a new container. It's all right if the drawing feels overwhelming. With the help of the hands-on exercises in this tutorial, we'll build a comprehensive mental model of how containers work, so when we revisit the diagram in the closing section, it'll look much more digestible.
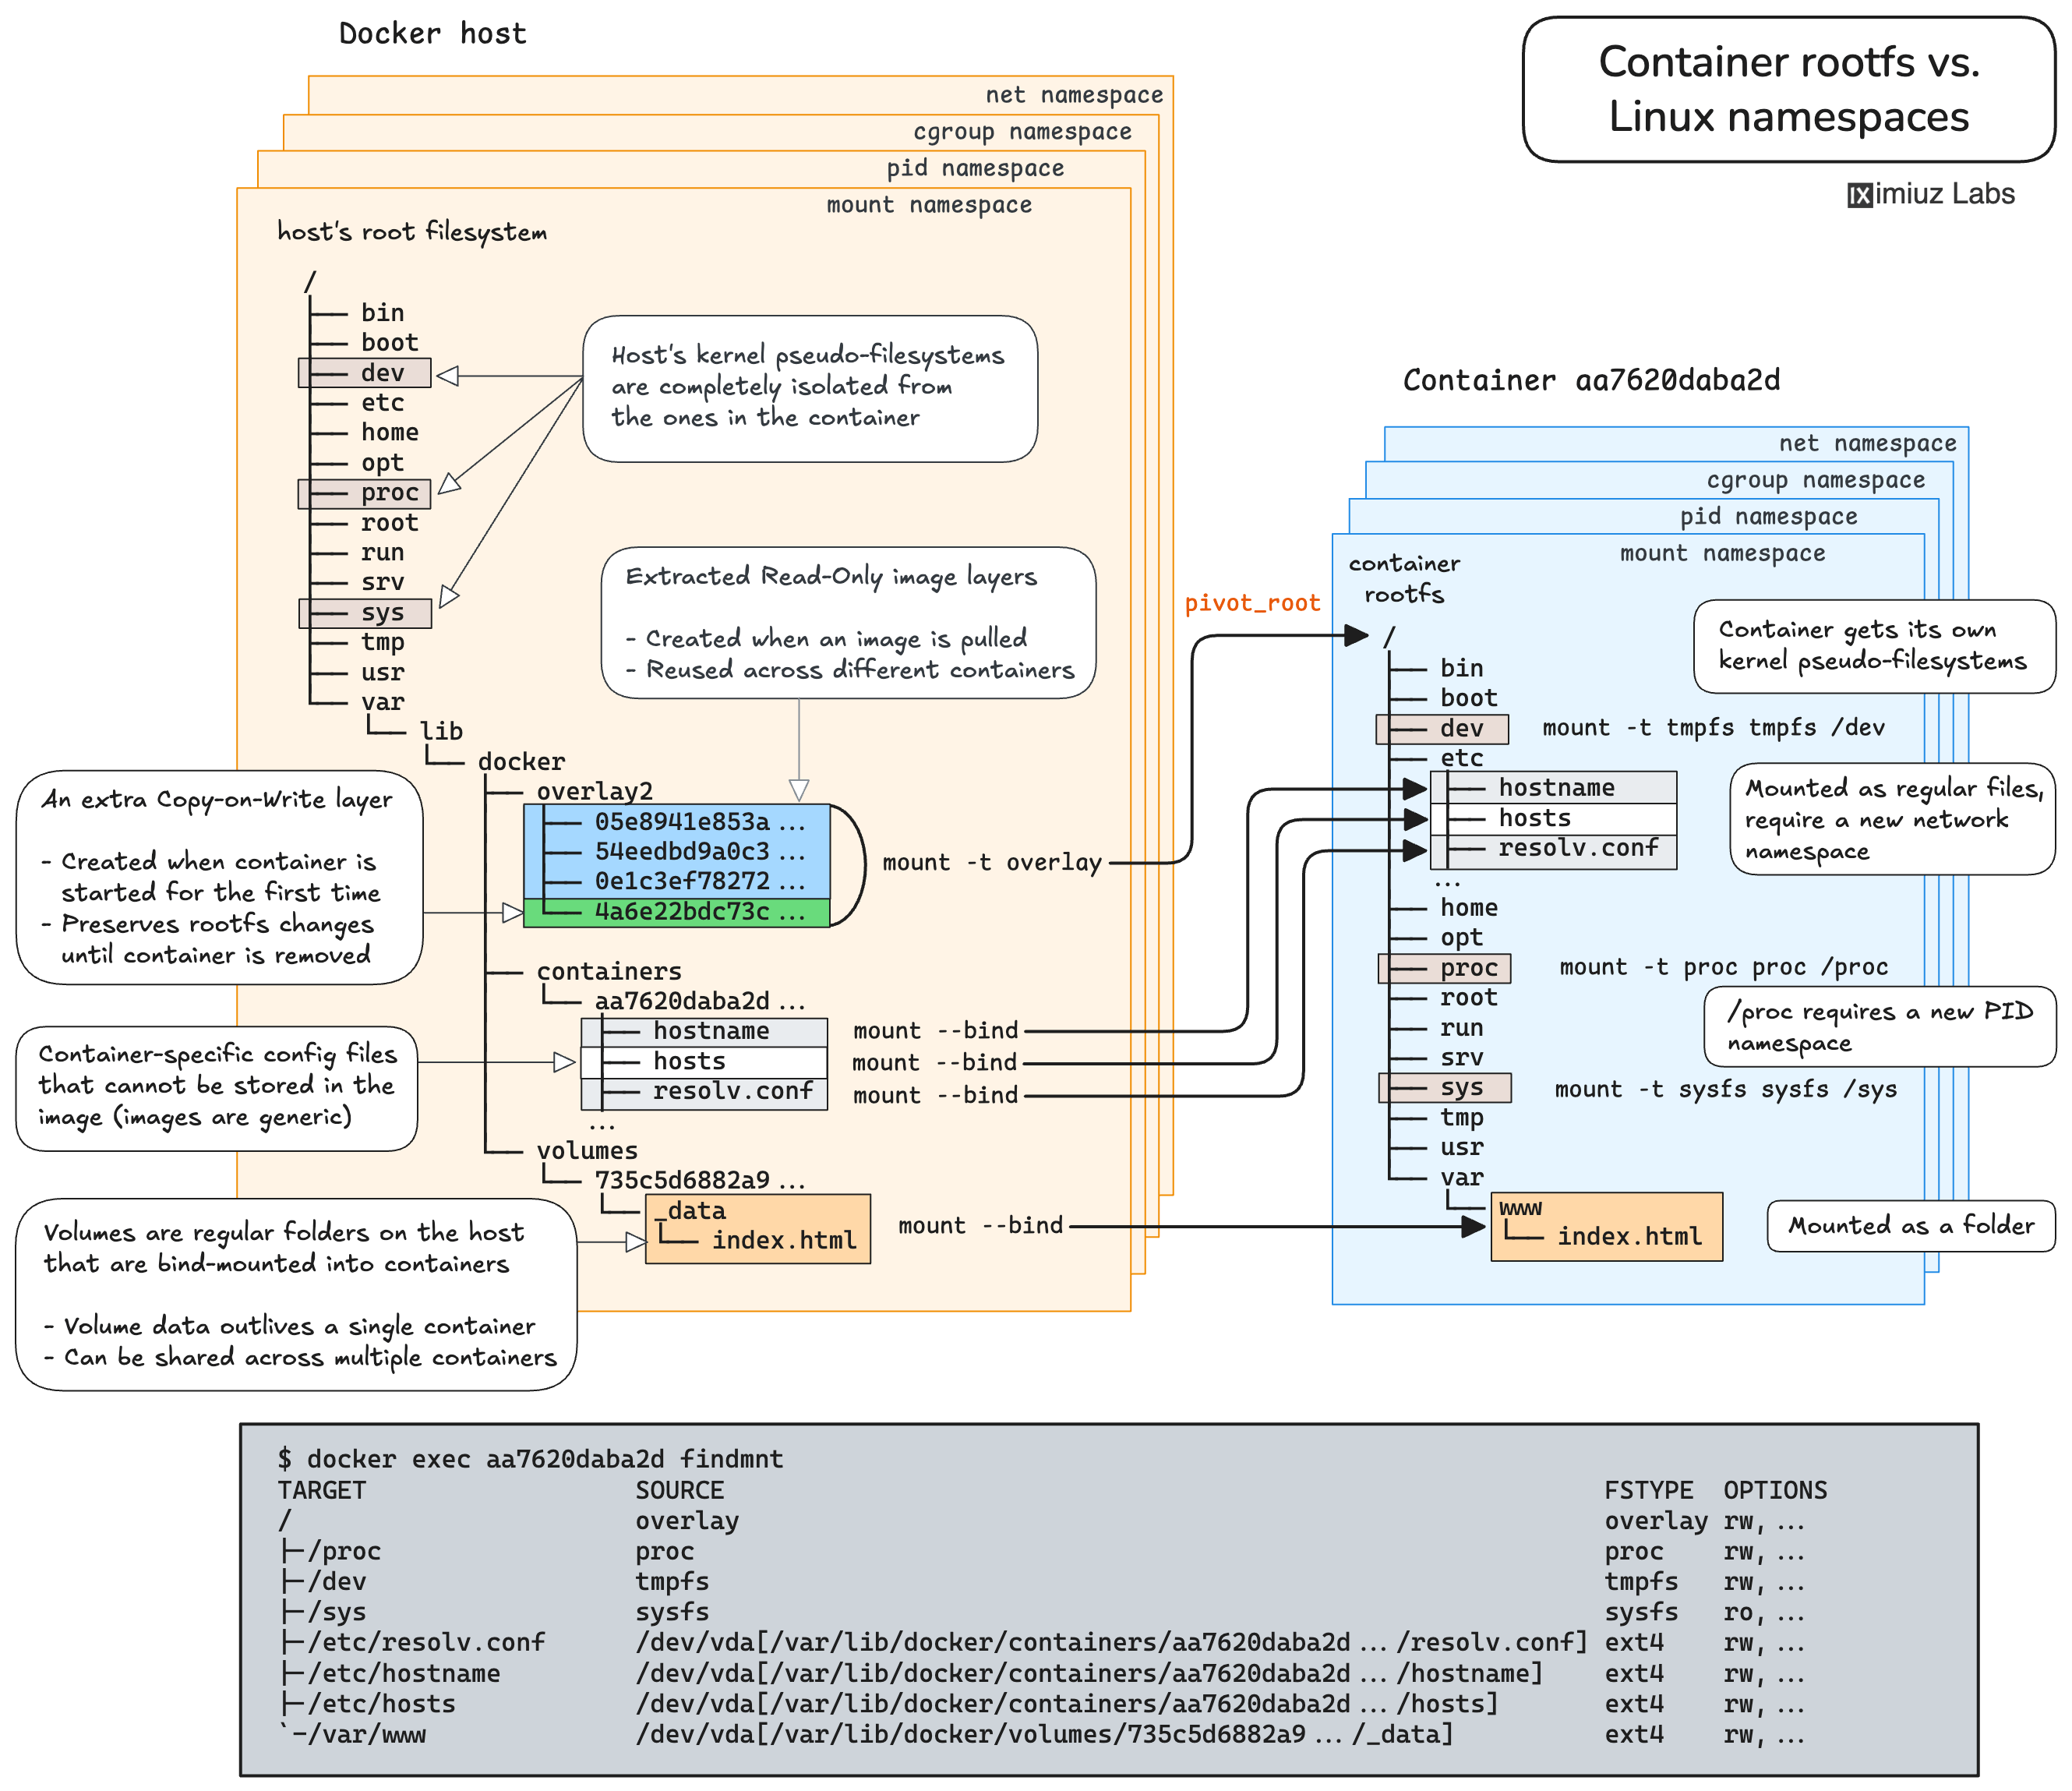
Click to enlarge
What exactly does Mount Namespace isolate?
Let's do a quick experiment. In Terminal 1, start a new shell session in its own mount namespace:
sudo unshare --mount bash
Now in Terminal 2, create a file somewhere on the host's filesystem:
echo "Hello from host's mount namespace" | sudo tee /opt/marker.txt
Surprisingly or not, when you try locating this file in the newly created mount namespace using the Terminal 1 tab, it'll be there:
cat /opt/marker.txt
So what exactly did we just isolate with unshare --mount? 🤔
The answer is - a mount table. Here is how to verify it. From Terminal 1, mount something:
sudo mount --bind /tmp /mnt
💡 The above command uses a bind mount for simplicity, but a regular mount (of a block device) would do, too.
Now if you list the contents of the /mnt folder in Terminal 1,
you should see the files of the /tmp folder:
ls -l /mnt
total 12
drwx------ 3 root root 4096 Sep 11 14:16 file1
drwx------ 3 root root 4096 Sep 11 14:16 file2
...
But at the same time, the /mnt folder remained empty in the host mount namespace.
If you run the same ls command from Terminal 2,
you'll see no files:
ls -lah /mnt
total 0
Finally, the filesystem "views" started diverging between namespaces. However, we could only achieve it by creating a new mount point.
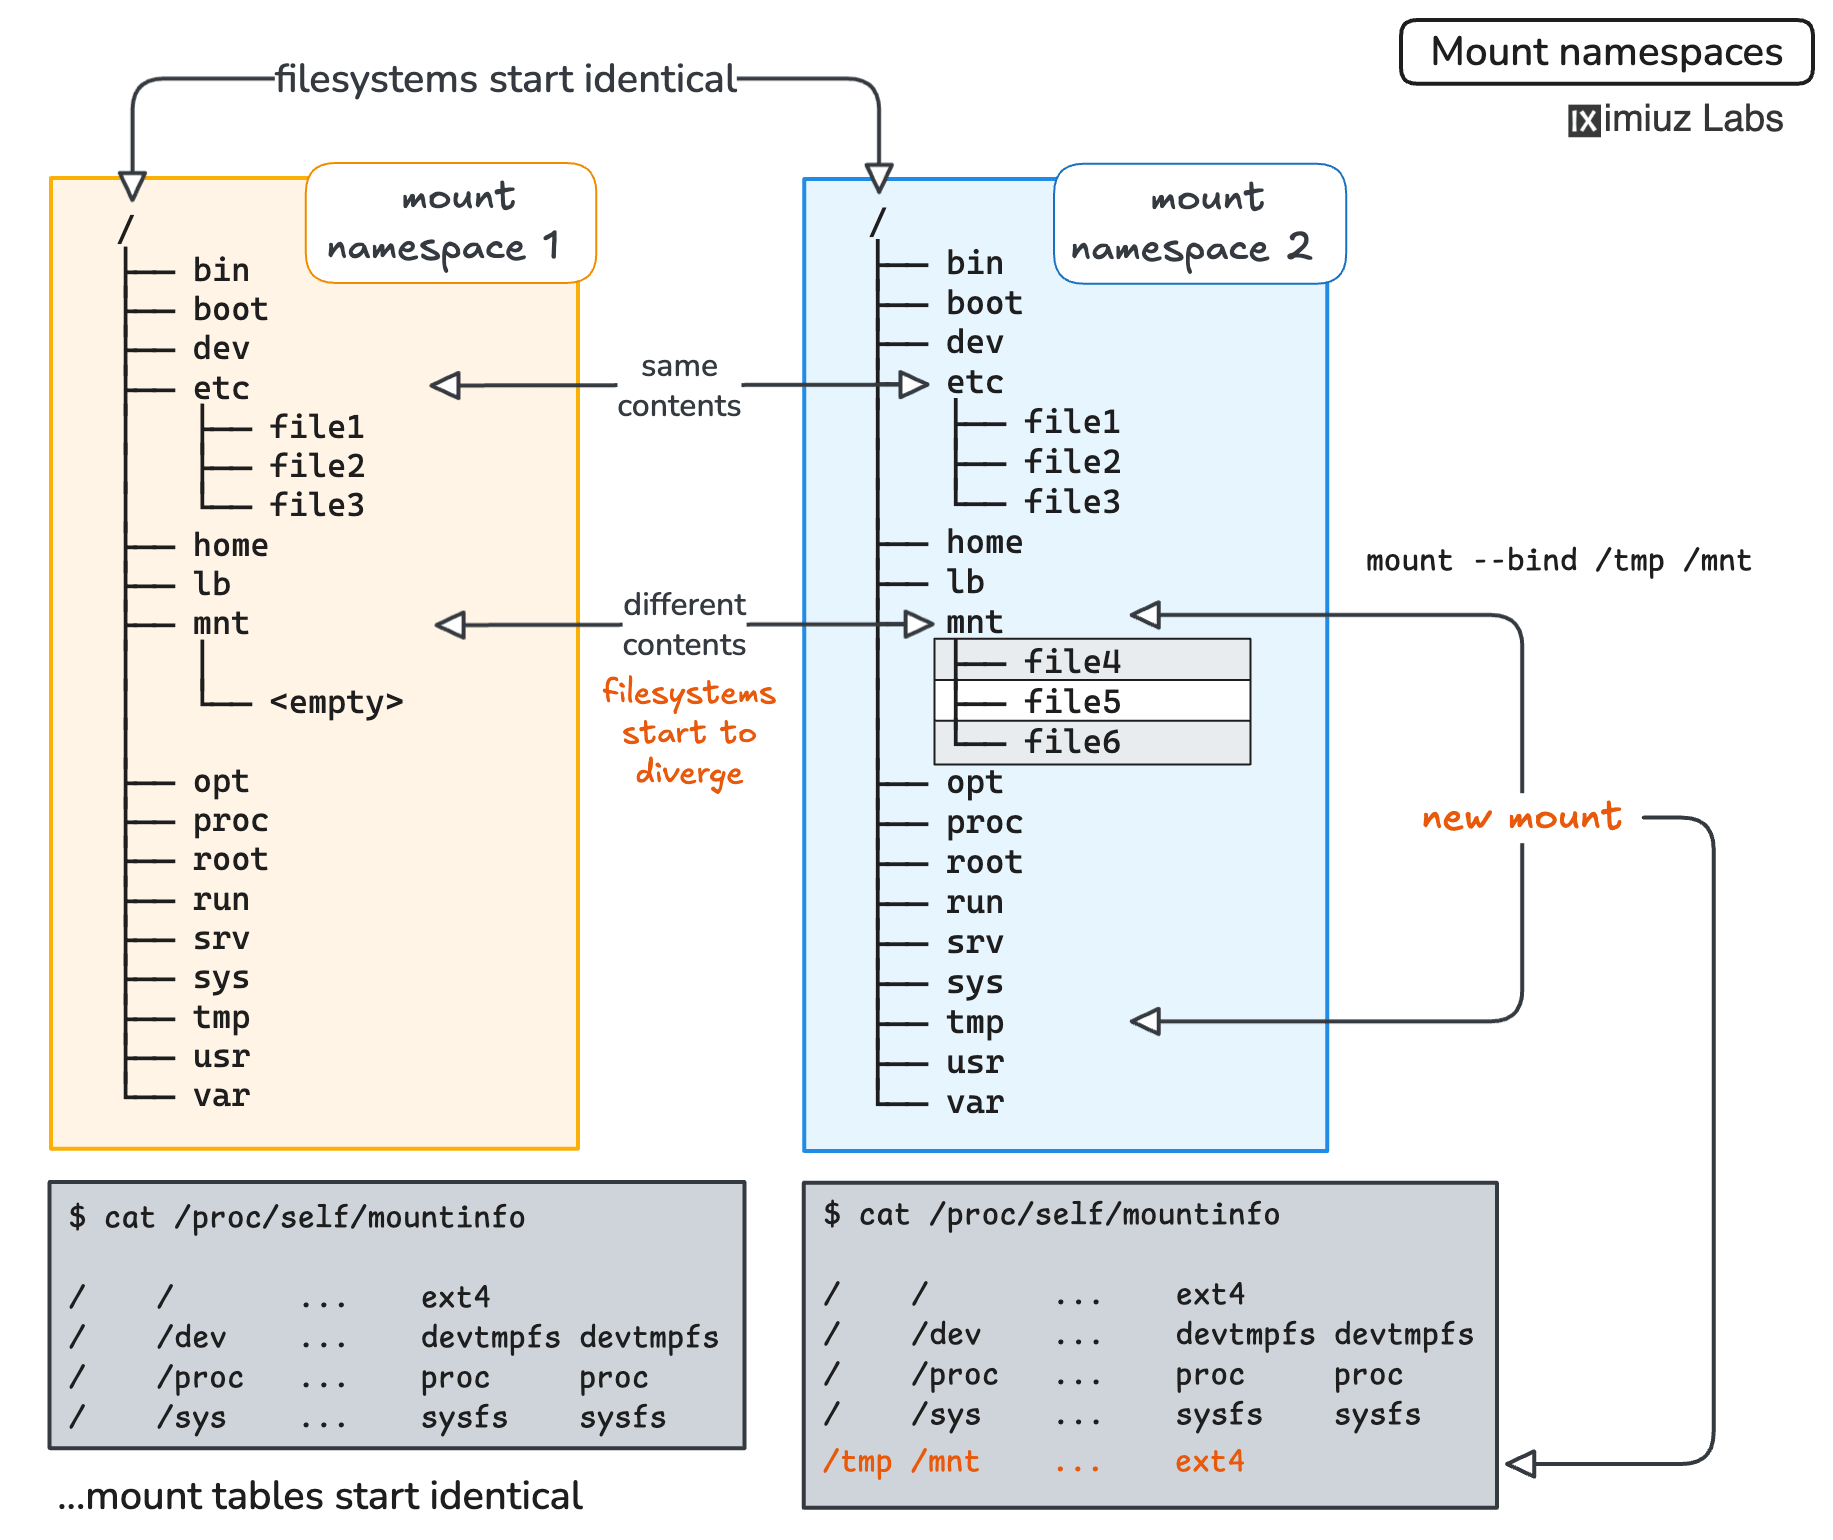
Mount namespaces, visualized
From the mount namespace man page:
Mount namespaces provide isolation of the list of mounts seen by the processes in each namespace instance. Thus, the processes in each of the mount namespace instances will see distinct single directory hierarchies.
Compare the mount tables by running findmnt from Terminal 1 and Terminal 2:
TARGET                         SOURCE         FSTYPE      OPTIONS
/                              /dev/vda       ext4        rw,...
├─/dev                         devtmpfs       devtmpfs    rw,...
│ ├─/dev/shm                   tmpfs          tmpfs       rw,...
│ ├─/dev/pts                   devpts         devpts      rw,...
│ └─/dev/mqueue                mqueue         mqueue      rw,...
├─/proc                        proc           proc        rw,...
├─/sys                         sysfs          sysfs       rw,...
│ ├─/sys/kernel/security       securityfs     securityfs  rw,...
│ ├─/sys/fs/cgroup             cgroup2        cgroup2     rw,...
│ ...
└─/run                         tmpfs          tmpfs       rw,...
  ├─/run/lock                  tmpfs          tmpfs       rw,...
  └─/run/user/1001             tmpfs          tmpfs       rw,...
In hindsight, it should probably make sense - after all, we are playing with a mount namespace (and there is no such thing as filesystem namespaces, for better or worse).
💡 Interesting fact: Mount namespaces were the first namespace type added to Linux, appearing in Linux 2.4, ca. 2002.
💡 Pro Tip: You can quickly check the current mount namespace of a process using the following command:
readlink /proc/$PID/ns/mnt
Different inode numbers in the output will indicate different namespaces.
Try running readlink /proc/self/ns/mnt from Terminal 1 and Terminal 2.
What the heck is Mount Propagation?
Before we jump to how exactly mount namespaces are applied by Docker an OCI runtime
(e.g., runc) to create containers,
we need to learn about one more important (and related) concept - mount propagation.
⚠️ Make sure to exit the namespaced shell in Terminal 1 before proceeding with the commands in this section.
If you tried to re-do the experiment from the previous section using the unshare() system call instead of the unshare CLI command,
the results might look different.
package main
import "os"
import "os/exec"
import "syscall"
func main() {
if err := syscall.Unshare(syscall.CLONE_NEWNS); err != nil {
panic(err)
}
cmd := exec.Command("bash")
cmd.Stdin = os.Stdin
cmd.Stdout = os.Stdout
cmd.Stderr = os.Stderr
cmd.Env = os.Environ()
cmd.Run()
}
Build the above improvised unshare_lite program with:
go build -o unshare_lite unshare_lite.go
And run it from Terminal 1:
sudo ./unshare_lite
Then mount something:
mount --bind /tmp /mnt
This time, the results of the ls -l /mnt will look identical in Terminal 1 and Terminal 2.
Thus, the mount namespace alone may not be enough to provide the mount table isolation.
If you compare the mount tables by running findmnt from Terminal 1 and Terminal 2,
they will look the same:
TARGET                         SOURCE         FSTYPE      OPTIONS
/                              /dev/vda       ext4        rw,...
├─/dev                         devtmpfs       devtmpfs    rw,...
│ ├─/dev/shm                   tmpfs          tmpfs       rw,...
│ ├─/dev/pts                   devpts         devpts      rw,...
│ └─/dev/mqueue                mqueue         mqueue      rw,...
├─/proc                        proc           proc        rw,...
├─/sys                         sysfs          sysfs       rw,...
│ ├─/sys/kernel/security       securityfs     securityfs  rw,...
│ ├─/sys/fs/cgroup             cgroup2        cgroup2     rw,...
│ ...
├─/run                         tmpfs          tmpfs       rw,...
│ ├─/run/lock                  tmpfs          tmpfs       rw,...
│ └─/run/user/1001             tmpfs          tmpfs       rw,...
└─/mnt                         /dev/vda[/tmp] ext4        rw,...
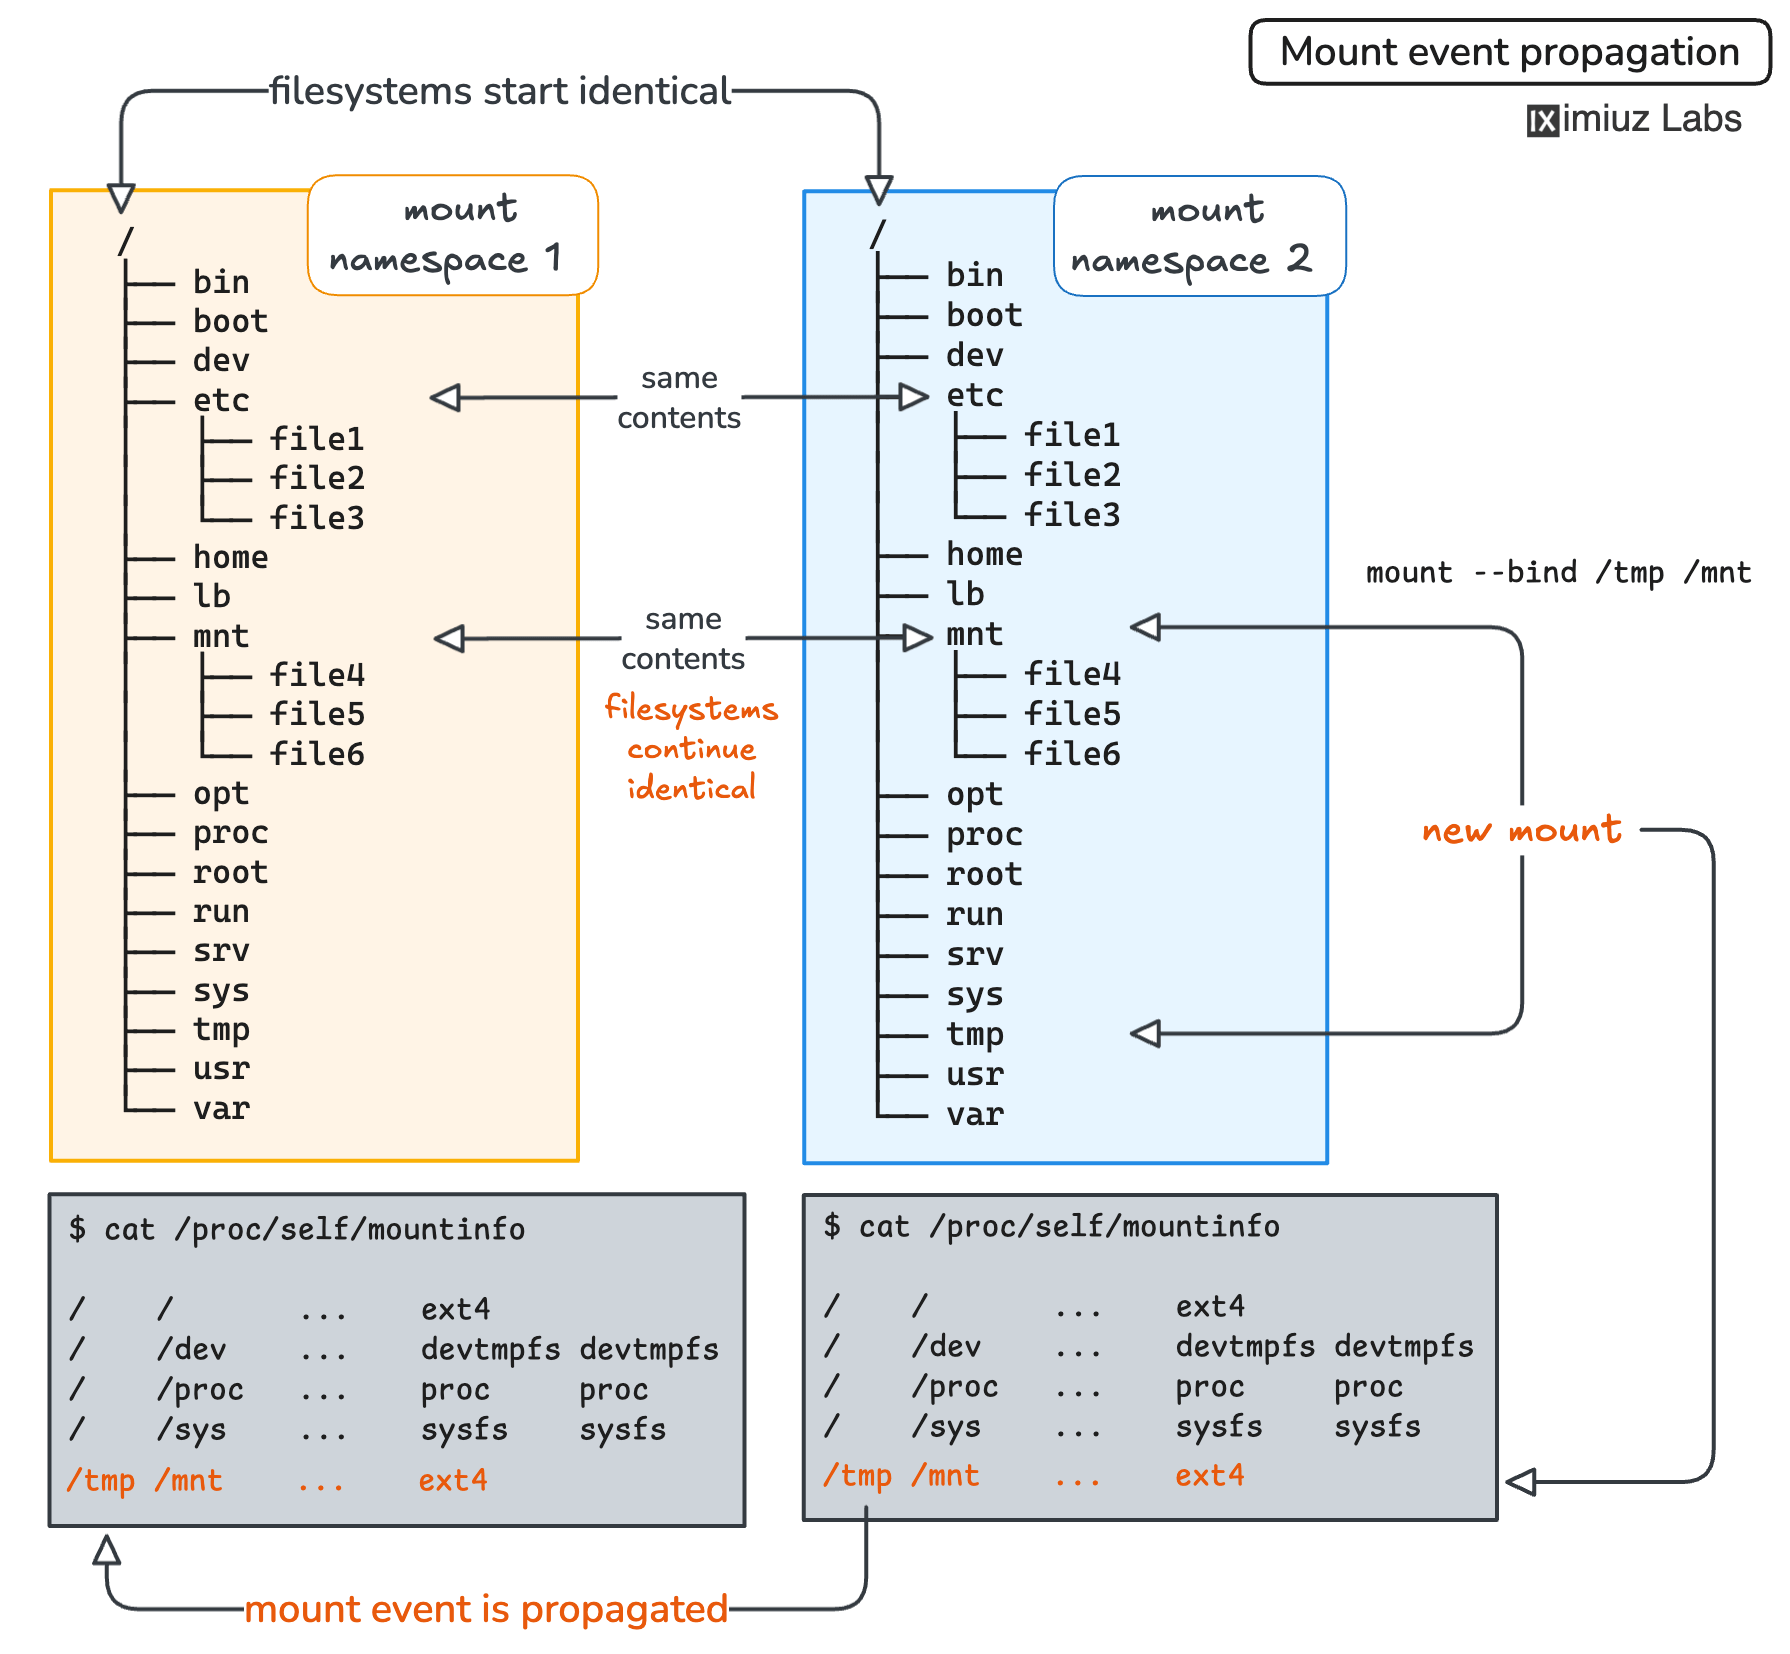
When you unshare a new mount namespace, it gets a full copy of the mount table of the caller process. However, changes to the caller's mount table may be propagated to the new mount table and vice versa.
But why? 🤔
Today, containers can easily be the main "consumer" of mount namespaces. However, the applicability of mount namespaces is not limited to containerization use cases. For example, they can be used to provide per-user views of the filesystem.
The original implementation of mount namespaces came out too strict, and it led to tedious repetitive work for system administrators. To alleviate the problem, the kernel was extended with the mechanism of shared subtrees, which in particular introduced mount event propagation between peer groups (of mount points).
Mount event propagation, visualized
For instance, if multiple users on the system were using separate mount namespaces to isolate their root filesystems,
without mount event propagation, mounting a new shared volume would require N mount operations, where N is equal to the number of users.
While with mount event propagation, system administrators need to mount the volume only once,
and the change will be replicated in all peer groups, even across different mount namespaces.
🤓 Neither kernel documentation nor the mount namespace man page use the term mount propagation - instead, they refer to it as propagation type (of a mount point). However, the term mount propagation seems to be commonly used in the industry, including in the Docker (example) and Kubernetes (example) documentation.
Mount event propagation is exactly what we've just observed when we tried using the unshare system call directly from a Go program:
when the /tmp folder was bind-mounted to the /mnt folder in the new mount namespace,
the original namespace received a mount event and replicated the change creating a similar /tmp:/mnt mount.
Hmm... Why didn't it happen when we used the standard unshare command-line tool? 🤔
The unshare CLI tool does slightly more than just the unshare() system call.
You can sneak a peek under the hood of the unshare CLI with the following strace trick (from a fresh terminal):
sudo strace unshare --mount bash
When you cut through the noise of the trace, you'll spot these three important system calls done in a sequence:
...
unshare(CLONE_NEWNS)                    = 0
mount("none", "/", NULL, MS_REC|MS_PRIVATE, NULL) = 0
execve("/usr/bin/bash", ["bash"], 0x7fff03d0e038 /* 19 vars */) = 0
...
Right after creating a new mount namespace and before executing the bash binary,
the unshare command also changed the mount propagation type of the root mount point.
The above mount() call is equivalent to the following mount command:
mount --make-rprivate /
...which means that in the new mount namespace, the root mount and all its sub-mounts (MS_REC and r in rprivate stand for recursive) become completely isolated from the outside world -
mounting new filesystems inside the mount namespace won't be noticeable in the caller's (i.e., the host's, in our case) mount namespace and vice versa.
💡 Mount propagation type is a property of a mount point.
Since each mount point belongs to the corresponding mount namespace,
the mount propagation type is also a namespace-specific property.
For instance, the root mount / can have a shared mount propagation type in one namespace
and private in another.
No mount event propagation between namespaces:
sudo unshare --mount --propagation private
findmnt -o TARGET,SOURCE,FSTYPE,PROPAGATION
TARGET                         SOURCE      FSTYPE      PROPAGATION
/                              /dev/vda    ext4        private
├─/dev                         devtmpfs    devtmpfs    private
│ ├─/dev/shm                   tmpfs       tmpfs       private
│ ├─/dev/pts                   devpts      devpts      private
│ └─/dev/mqueue                mqueue      mqueue      private
├─/proc                        proc        proc        private
│ └─/proc/sys/fs/binfmt_misc   systemd-1   autofs      private
│   └─/proc/sys/fs/binfmt_misc binfmt_misc binfmt_misc private
├─/sys                         sysfs       sysfs       private
│ ├─/sys/kernel/security       securityfs  securityfs  private
│ ├─/sys/fs/selinux            selinuxfs   selinuxfs   private
│ ...
└─/run                         tmpfs       tmpfs       private
  ├─/run/lock                  tmpfs       tmpfs       private
  └─/run/user/1001             tmpfs       tmpfs       private
Why does mount propagation matter for us? Two reasons:
pivot_root, the modernchrootalternative most container runtimes rely on, comes with its own requirements for the mount propagation type of the involved mount points (we'll see it in the next section).- Some applications may want to mount filesystems on the host while running in a container and some others may need to spot the host (or peer containers) mounting filesystems in runtime (e.g.,
HostToContainerandBidirectionalmount propagations in Kubernetes). More on it later.
A naive attempt to isolate container filesystem
Mount namespaces and propagation are great, but how is all this stuff used in containers? Let's try creating a simple container to see this machinery in action.
⚠️ Make sure to exit the namespaced shell in Terminal 1 before proceeding with the commands in this section.
Preparing container rootfs
First off, we'll need to prepare the future root filesystem. From the host's standpoint, each container's rootfs is just a regular folder with some files inside:
sudo mkdir -p /opt/container-1/rootfs
For this experiment, we can "borrow" the Alpine filesystem by extracting the alpine:3 image into the directory we just created:
crane export alpine:3 | sudo tar -xvC /opt/container-1/rootfs
If you compare the contents of the /opt/container-1/rootfs and the host's / folders, they will look surprisingly similar:
tree -L 1 /opt/container-1/rootfs
/opt/container-1/rootfs/
├── bin
├── dev
├── etc
├── home
├── lib
...
├── tmp
├── usr
└── var

18 directories, 0 files
However, upon closer inspection, you'll see that it's two different Linux distributions:
cat /opt/container-1/rootfs/etc/os-release
NAME="Alpine Linux"
ID=alpine
VERSION_ID=3.22.1
PRETTY_NAME="Alpine Linux v3.22"
HOME_URL="https://alpinelinux.org/"
BUG_REPORT_URL="https://gitlab.alpinelinux.org/alpine/aports/-/issues"
Switching to new rootfs (pivot_root)
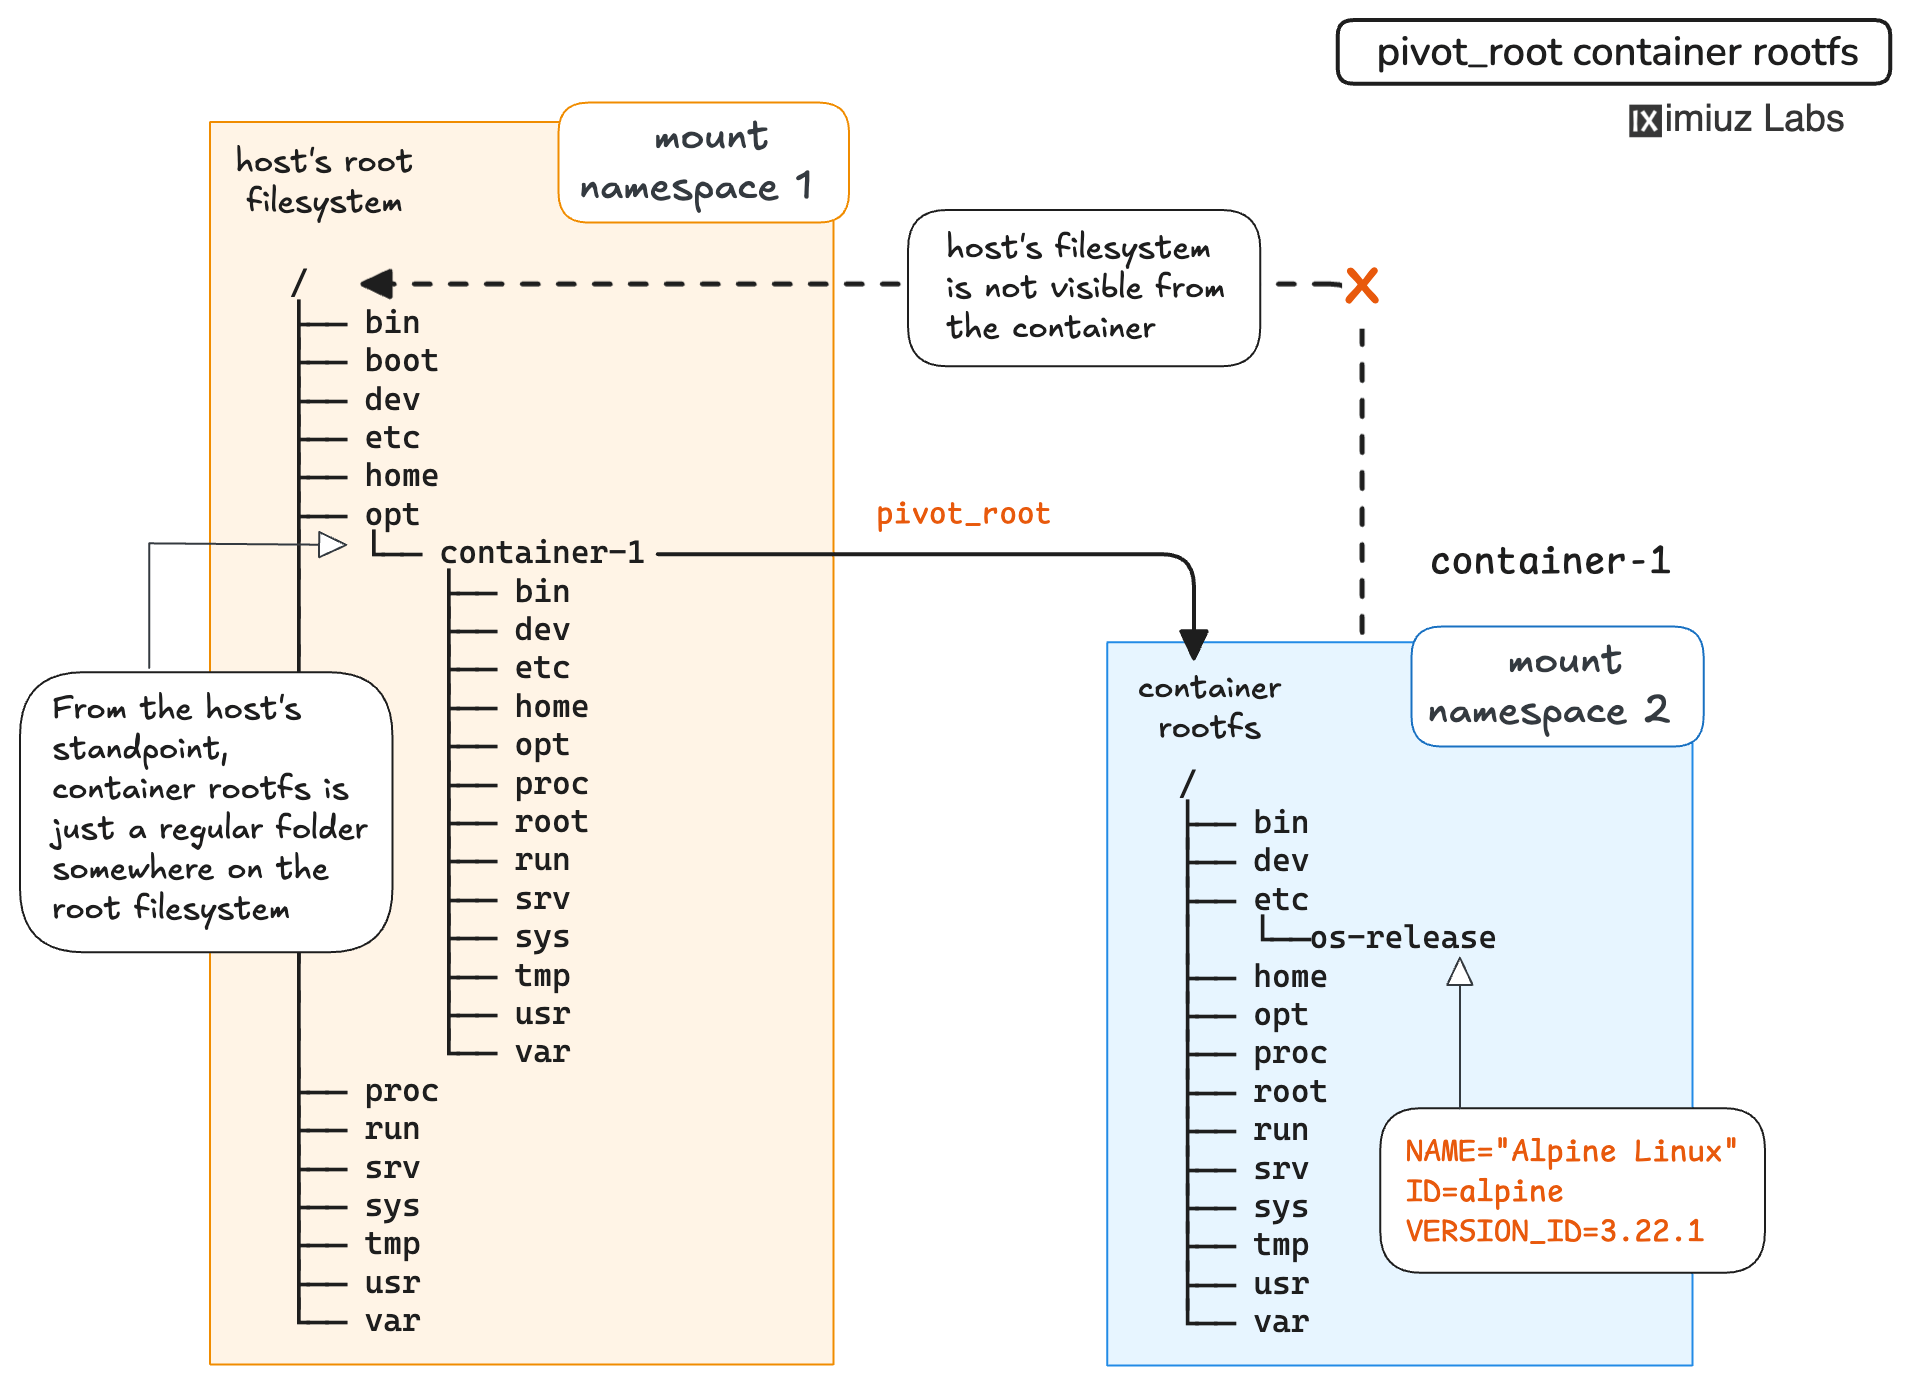
The pivot_root(new_root, put_old) syscall changes the root mount in the mount namespace of the calling process.
More precisely, it moves the current root mount of the caller to the directory put_old and makes new_root the new root mount.
What it practically means is that by calling pivot_root("/opt/container-1/rootfs") in a new mount namespace,
we'll switch to the new root filesystem.
💡 From a layman's standpoint, pivot_root is a safer version of chroot - similar effect but no risk of breakouts via forgotten symlinks to the old root filesystem or the double-chroot trick.
The pivot_root() call comes with a number of restrictions, in particular:
- The
new_rootpath must be a mount point, but can't be/(well, attemptingpivot_root("/")wouldn't make much sense anyway). - The propagation type of the parent mount of
new_rootand the parent mount of the current root directory must not beshared. - If
put_oldis an existing mount point, its propagation type must not beshared.
Expectedly, we only want to perform such a disruptive operation from a separate mount namespace (otherwise, we'd damage the host),
and the last two restrictions ensure that pivot_root never propagates any mount table changes to another mount namespace:
sudo unshare --mount bash
Now let's try satisfying the pivot_root's requirements.
The propagation type of the / mount (the parent mount of the current root directory) should not be shared.
The above unshare command has likely already set it to private but being explicit won't hurt:
mount --make-rprivate /
💡 Interesting fact: runc uses rslave instead of rprivate citing a possibility of a race condition. But both values should be good enough for our demo example.
In our case, the /opt/container-1/rootfs folder is not a mount point (it's a regular folder somewhere in the host's filesystem),
but we can easily make it a mount point by bind mounting the path onto itself (using a recursive bind mount because hypothetically the container rootfs folder itself can contain sub-mounts):
mount --rbind /opt/container-1/rootfs /opt/container-1/rootfs
Lastly, ensuring that the propagation type of the new_root itself isn't shared:
mount --make-rprivate /opt/container-1/rootfs
Now we're ready to chroot pivot the root filesystem:
cd /opt/container-1/rootfs
mkdir .oldroot
pivot_root . .oldroot
...and immediately after that, switch to a shell from the new rootfs because the current bash process may get broken in subtle ways after a pivot_root into a completely different Linux distro (this part is only needed for our demo example -
real-world container runtimes usually don't have this issue because they communicate with the kernel directly, using syscalls instead of shell commands):
exec /bin/sh
Interestingly, after the pivot_root operation,
container runtimes are free to set the propagation type of the new root filesystem to pretty much any value
(shared, slave, private, and even unbindable):
mount --make-rslave /
💡 Propagation type of the container root filesystem should not be confused with the propagation type of bind mounts and volumes in Docker and Kubernetes respectively (see below). This is an advanced setting that is often not even exposed through the user-facing APIs of the higher-level container runtimes, and the most typical use case for it is nested containers (e.g., DinD).
Finally, since you probably don't want the original root filesystem to be accessible in the container,
the .oldroot can (and should) be removed right after the pivot_root call:
umount -l .oldroot  # -l stands for "lazy" because the fs can be busy
rm -rf .oldroot
Yay! We've just pivoted into a new container. Let's look around:
ls -lah /
ls -l /
total 68
drwxr-xr-x    2 root     root          4096 Jul 15 10:42 bin
drwxr-xr-x    2 root     root          4096 Sep  7 12:40 dev
drwxr-xr-x   17 root     root          4096 Jul 15 10:42 etc
drwxr-xr-x    2 root     root          4096 Jul 15 10:42 home
...
drwxr-xr-x   11 root     root          4096 Jul 15 10:42 var
cat /etc/os-release
NAME="Alpine Linux"
ID=alpine
VERSION_ID=3.22.1
PRETTY_NAME="Alpine Linux v3.22"
HOME_URL="https://alpinelinux.org/"
BUG_REPORT_URL="https://gitlab.alpinelinux.org/alpine/aports/-/issues"
So far so good! But if you try listing processes, the output will be empty (which of course can't be true):
ps aux
PID USER TIME COMMAND
And the df command also seems broken:
df -ah
Filesystem                Size      Used Available Use% Mounted on
df: /proc/mounts: No such file or directory
Preparing a complete container filesystem
The df's error message contained a hint - the /proc folder is empty in the new mount namespace:
ls -l /proc
total 0
Hmm... How come?
Well, apparently, not every part of the container root filesystem comes from its image!
Similarly to the host, where /proc is populated by the corresponding kernel pseudo filesystem,
container's /proc needs to be set up separately. And the same goes for /dev and /sys virtual filesystems.
On top of that, some special files like /etc/hosts, /etc/hostname, or /etc/resolv.conf should be crafted for each container individually
because the corresponding files in the image (if present) can only contain generic values (e.g., localhost) while Docker typically sets the hostname of a container to a prefix of its random ID and derives the resolv.conf from the eponymous file on the host.
Populating /proc pseudo filesystem
Populating the /proc pseudo filesystem is as simple as:
mount -t proc proc /proc
💡 In reality, container runtimes usually populate the /proc filesystem before the pivot_root call,
so the command would look like mount -t proc proc $ROOTFS/proc.
However, if you run the above command right away, the /proc filesystem in the container will look exactly the same as the one on the host.
In particular, it means that the ps command will start showing the full list of processes on the server,
which is usually undesirable in a container.
This is where the PID namespace comes into play.
We need to go a few steps back and adjust the unshare command to create not just the mount but also a new PID namespace,
so that the container's topmost process would become PID 1 and the process hierarchy in the container would start from it:
# DO NOT RUN ME
sudo unshare --mount --pid --fork bash
But let's not do it just yet...
💡 The extra --fork flag above doesn't create any new namespaces, but rather makes unshare create a new process instead of exec'ing the bash command directly.
This is a requirement to make the --pid flag actually have the effect on the unshared command
because it's the first child that gets placed into the new PID namespace, not the process that called unshare(CLONE_NEWPID) itself.
Populating /dev pseudo filesystem
Another special folder is /dev. On the host, it's typically provided by the devtmpfs and a number of subordinate virtual filesystems
(from a fresh terminal):
findmnt
TARGET            SOURCE   FSTYPE   OPTIONS
/                 /dev/vda ext4     rw,relatime,stripe=4
├─/dev            devtmpfs devtmpfs rw,relatime,size=4068368k,nr_inodes=1017092,mode=755
│ ├─/dev/shm      tmpfs    tmpfs    rw,nosuid,nodev
│ ├─/dev/pts      devpts   devpts   rw,nosuid,noexec,relatime,gid=5,mode=620,ptmxmode=000
│ ├─/dev/mqueue   mqueue   mqueue   rw,nosuid,nodev,noexec,relatime
...
However, containers usually get a more limited version of the /dev folder, backed by a regular tmpfs.
Here is how it can be populated from inside the new mount namespace (back from Terminal 1):
mkdir -p /dev
mount -t tmpfs -o nosuid,strictatime,mode=0755,size=65536k tmpfs /dev
💡 In reality, container runtimes usually populate the /dev filesystem before the pivot_root call,
so the command would look like mount -t tmpfs ... $ROOTFS/dev.
After mounting the /dev tmpfs,
you'd need to create special character devices such as /dev/null, /dev/zero, /dev/random, etc.
Here is how you can do it using the mknod command:
mknod -m 666 /dev/null    c 1 3
chown root:root /dev/null

mknod -m 666 /dev/zero    c 1 5
chown root:root /dev/zero

# etc.
Then, mount the subordinate filesystems (/dev/shm, /dev/pts, and /dev/mqueue):
mkdir -p /dev/shm
mount -t tmpfs -o nosuid,nodev,noexec,mode=1777,size=67108864 tmpfs /dev/shm
mkdir -p /dev/pts
mount -t devpts -o newinstance,ptmxmode=0666,mode=0620 devpts /dev/pts
mkdir -p /dev/mqueue
mount -t mqueue -o nosuid,nodev,noexec mqueue /dev/mqueue
And lastly, set up some well-known symlinks:
ln -sf /proc/self/fd   /dev/fd
ln -sf /proc/self/fd/0 /dev/stdin
ln -sf /proc/self/fd/1 /dev/stdout
ln -sf /proc/self/fd/2 /dev/stderr
ln -sf /proc/kcore     /dev/core
Populating /sys pseudo filesystem
The most limited of the containers' pseudo filesystems is probably /sys.
It's usually mounted read-only and contains only a few nodes:
mount -t sysfs -o ro,nosuid,nodev,noexec sysfs /sys
💡 In reality, container runtimes usually populate the /sys filesystem before the pivot_root call,
so the command would look like mount -t sysfs ... $ROOTFS/sys.
A prominent part of the /sys filesystem is the virtual cgroup filesystem.
Since a few years ago, Docker and other popular container runtimes started fully isolating the container's cgroup hierarchy by default.
Similarly to the /proc filesystem that works best in combination with a new PID namespace,
a new cgroup namespace can be used to make the cgroup2 mount rooted at the host's cgroupfs node that corresponds to the container's topmost process.
Thus, the unshare command would need one more flag, --cgroup:
# DO NOT RUN ME
sudo unshare --mount --pid --fork --cgroup bash
To mount the cgroup2 filesystem, you can use the following command:
mkdir -p /sys/fs/cgroup
mount -t cgroup2 -o ro,nosuid,nodev,noexec cgroup2 /sys/fs/cgroup
Hardening pseudo filesystems
While it is not strictly necessary for a demo, real-world container root filesystems usually go through an extra round of hardening.
For instance, Docker typically marks a few parts of the /proc filesystem as read-only and masks others, making them completely inaccessible to the containerized app.
Here is how you can get a list of sensitive locations that are made read-only by Docker (from a fresh terminal):
docker container inspect \
    $(docker run --rm -d alpine:3 sleep 5) \
    --format '{{join .HostConfig.ReadonlyPaths "\n"}}'
/proc/bus
/proc/fs
/proc/irq
/proc/sys
/proc/sysrq-trigger
You can make any file or folder read-only by binding it to itself and remounting it using the ro option:
RO_PATH=/proc/bus # or /proc/fs, /proc/irq, etc.

if [ -e "$RO_PATH" ]; then
  mount --bind "$RO_PATH" "$RO_PATH"
  mount -o remount,bind,ro "$RO_PATH"
fi
Similarly, here is how you can get a list of locations that are typically made completely inaccessible (through masking) to the containerized app:
docker container inspect \
    $(docker run --rm -d alpine:3 sleep 5) \
    --format '{{join .HostConfig.MaskedPaths "\n"}}'
/proc/asound
/proc/acpi
/proc/interrupts
/proc/kcore
/proc/keys
/proc/latency_stats
/proc/timer_list
/proc/timer_stats
/proc/sched_debug
/proc/scsi
/sys/firmware
/sys/devices/virtual/powercap
Masking of folders and regular files differs. To mask a folder, a read-only tmpfs filesystem can be mounted over it,
and to mask a regular file, the /dev/null device can be bound to its path.
MASKED_FILE=/proc/asound  # or /proc/interrupts, /proc/kcore, etc.
mount --bind /dev/null $MASKED_FILE

MASKED_DIR=/proc/acpi    # or /proc/scsi, etc.
mount -t tmpfs -o ro tmpfs $MASKED_DIR
💡 The above read-only and masked paths are Docker's defaults for non-privileged containers, while the OCI Runtime Spec defines only the hardening mechanism and not the exact locations (see Masked Paths and Readonly Paths).
Preparing special /etc files
Some of the regular files in the container rootfs also require special treatment:
/etc/hosts/etc/hostname/etc/resolv.conf
Inspecting these files in the /opt/container-1/rootfs folder right after extracting the Alpine rootfs into it would reveal why:
cat /opt/container-1/rootfs/etc/{hosts,hostname,resolv.conf}
# -- /opt/container-1/rootfs/etc/hosts
127.0.0.1       localhost localhost.localdomain
::1             localhost localhost.localdomain

# -- /opt/container-1/rootfs/etc/hostname
localhost

# -- /opt/container-1/rootfs/etc/resolv.conf
cat: /opt/container-1/rootfs/resolv.conf: No such file or directory
The above are some generic values that come directly from the alpine:3 image,
which wouldn't make much sense in any particular container.
At the same time, these files would look very different when inspected from a running alpine:3 container:
docker run --rm alpine:3 cat /etc/{hosts,hostname,resolv.conf}
# -- /etc/hosts
127.0.0.1       localhost
::1             localhost ip6-localhost ip6-loopback
172.17.0.2      2f26e97ae70c

# -- /etc/hostname
2f26e97ae70c

# -- /etc/resolv.conf
# Generated by Docker Engine.
# This file can be edited; Docker Engine will not make further changes once it
# has been modified.

nameserver 168.119.149.157
nameserver 8.8.8.8
nameserver 1.1.1.1

# Based on host file: '/etc/resolv.conf' (legacy)
# Overrides: []
Thus, Docker (or one of its underlying runtimes) replaces the generic /etc/hosts,
/etc/hostname, and /etc/resolv.conf files from the image with container-specific variants.
We can do it, too! Our container has no network interfaces (modulo loopback),
but it can still have a proper hostname set (from the host's terminal):
cat <<EOF | sudo tee /opt/container-1/hosts
127.0.0.1       localhost container-1
::1             localhost ip6-localhost ip6-loopback
EOF
cat | sudo tee /opt/container-1/hostname <<EOF
container-1
EOF
sudo cp /etc/resolv.conf /opt/container-1/resolv.conf
💡 The /etc/resolv.conf file is usually based on the host's /etc/resolv.conf file,
and then potentially adjusted to the container's needs.
The most interesting part is how these files are placed into the container's rootfs. Instead of just overwriting the files from the image, container runtimes usually mount the container-specific variants of these files on top of the original ones, effectively masking them:
sudo mount --bind /opt/container-1/hosts /opt/container-1/rootfs/etc/hosts
sudo mount --bind /opt/container-1/hostname /opt/container-1/rootfs/etc/hostname
sudo mount --bind /opt/container-1/resolv.conf /opt/container-1/rootfs/etc/resolv.conf
Last but not least, for the container to have its own hostname,
the container needs to use a new network and UTS namespaces,
so the unshare command would need to have two more flags (--uts and --net):
# DO NOT RUN ME
sudo unshare --mount --pid --fork --cgroup --uts --net bash
💡 If we forget to use a new UTS namespace, setting the hostname in the new container will overwrite the host's hostname, which is something we definitely don't want. And without a new network namespace, the container simply cannot have its own hostname, because then it technically has the same network stack as the host (which in particular includes the hostname).
Finally, we're ready to prepare a fully isolated container filesystem!
Creating a container from scratch (end-to-end example)
With all the above lessons learned, let's try creating our second container, this time applying all the necessary namespaces and rootfs adjustments.
💡 The below commands are based on the real container preparation steps taken by the runc runtime
obtained with the following strace trick:
# Terminal 1
sudo strace -f -qqq -e \
    trace=/clone,/exec,/unshare,/mount,/mknod,/mkdir,/link,/chdir,/root \
    -p $(pgrep containerd)
# Terminal 2
docker run alpine:3 sleep 9999
Step 1: Prepare rootfs files
⚠️ Make sure to exit the namespaced shell in Terminal 1 before proceeding with the commands in this section.
The second container will be stored in the /opt/container-2 directory:
CONTAINER_DIR=/opt/container-2
ROOTFS_DIR=${CONTAINER_DIR}/rootfs
Similar to the first container, we'll use the alpine:3 image to "borrow" the rootfs files:
sudo mkdir -p $ROOTFS_DIR
crane export alpine:3 | sudo tar -xvC $ROOTFS_DIR
This time, we'll create the /etc/hosts, /etc/hostname, and /etc/resolv.conf files beforehand
(but store them outside of the rootfs dir for now):
cat <<EOF | sudo tee $CONTAINER_DIR/hosts
127.0.0.1       localhost container-2
::1             localhost ip6-localhost ip6-loopback
EOF
cat <<EOF | sudo tee $CONTAINER_DIR/hostname
container-2
EOF
sudo cp /etc/resolv.conf $CONTAINER_DIR/resolv.conf
Step 2: Create namespaces
Create all the required namespaces with the unshare command (mount, PID, cgroup, UTS, and network):
sudo unshare --mount --pid --fork --cgroup --uts --net bash
💡 Other possible namespaces are:
ipc- this namespace has no impact on the rootfs creation, so we're skipping it for brevitytime- (optional) not used by Docker or other mainstream container runtimes yetuser- (optional) rootless containers is an advanced topic that deserves its own tutorial
Step 3: Isolate new mount namespace
From now on, all commands are executed as root and in the new namespaces, so we're skipping the sudo prefix,
and the CONTAINER_DIR and ROOTFS_DIR variables may need to be re-set:
CONTAINER_DIR=/opt/container-2
ROOTFS_DIR=${CONTAINER_DIR}/rootfs
First, we need to make sure that no mount events are propagated back to the host's mount namespace:
mount --make-rslave /
Then, we need to make sure that the root filesystem itself is a mount point:
mount --rbind $ROOTFS_DIR $ROOTFS_DIR
...and that the propagation type of the root filesystem isn't shared:
mount --make-private $ROOTFS_DIR
Step 4: Prepare /proc pseudo filesystem
Mount /proc pseudo filesystem:
mkdir -p $ROOTFS_DIR/proc
mount -t proc proc $ROOTFS_DIR/proc
⚠️ Security Caveat: In untrusted rootfs, $ROOTFS_DIR/<path> can be a symlink pointing outside of $ROOTFS_DIR.
This can make the above and many of the below operations corrupt the host system.
Real-world container runtimes typically use the openat2() syscall with the RESOLVE_NO_SYMLINKS flag to first open the target file or directory ensuring it's not a symlink,
and then use mount (or other filesystem operations) on an open file descriptor instead of a textual filename.
The latter helps to avoid TOCTTOU vulnerabilities
when the $ROOTFS_DIR contents are changed while the container is being created.
However, in a demo context it should be relatively safe to operate with regular filenames. So, we'll do it the simpler way for brevity.
Step 5: Prepare /dev pseudo filesystem
Mount /dev pseudo filesystem as a regular tmpfs:
mount -t tmpfs \
    -o nosuid,strictatime,mode=0755,size=65536k tmpfs \
    $ROOTFS_DIR/dev
Create the standard character devices (/dev/null, /dev/zero, /dev/random, etc.):
mknod -m 666 "$ROOTFS_DIR/dev/null"    c 1 3
mknod -m 666 "$ROOTFS_DIR/dev/zero"    c 1 5
mknod -m 666 "$ROOTFS_DIR/dev/full"    c 1 7
mknod -m 666 "$ROOTFS_DIR/dev/random"  c 1 8
mknod -m 666 "$ROOTFS_DIR/dev/urandom" c 1 9
mknod -m 666 "$ROOTFS_DIR/dev/tty"     c 5 0

chown root:root "$ROOTFS_DIR/dev/"{null,zero,full,random,urandom,tty}
Create typical symlinks:
ln -sf /proc/self/fd   "$ROOTFS_DIR/dev/fd"
ln -sf /proc/self/fd/0 "$ROOTFS_DIR/dev/stdin"
ln -sf /proc/self/fd/1 "$ROOTFS_DIR/dev/stdout"
ln -sf /proc/self/fd/2 "$ROOTFS_DIR/dev/stderr"
ln -sf /proc/kcore     "$ROOTFS_DIR/dev/core"
Create subordinate filesystems (/dev/pts, /dev/shm, /dev/mqueue):
mkdir -p "$ROOTFS_DIR/dev/pts"

mount -t devpts \
    -o newinstance,ptmxmode=0666,mode=0620 devpts \
    $ROOTFS_DIR/dev/pts

ln -sf /dev/pts/ptmx "$ROOTFS_DIR/dev/ptmx"
mkdir -p "$ROOTFS_DIR/dev/mqueue"

mount -t mqueue \
    -o nosuid,nodev,noexec mqueue \
    $ROOTFS_DIR/dev/mqueue
mkdir -p "$ROOTFS_DIR/dev/shm"

mount -t tmpfs \
    -o nosuid,nodev,noexec,mode=1777,size=67108864 tmpfs \
    $ROOTFS_DIR/dev/shm
Step 6: Prepare /sys pseudo filesystem
Mount a read-only /sys pseudo filesystem:
mkdir -p "$ROOTFS_DIR/sys"

mount -t sysfs \
    -o ro,nosuid,nodev,noexec sysfs \
    $ROOTFS_DIR/sys
Mount the subordinate cgroup2 filesystem as /sys/fs/cgroup:
mkdir -p "$ROOTFS_DIR/sys/fs/cgroup"

mount -t cgroup2 \
    -o ro,nosuid,nodev,noexec cgroup2 \
    $ROOTFS_DIR/sys/fs/cgroup
Step 7: Bind hostname, hosts, and resolv.conf files
Bind the container-specific hostname, hosts, and resolv.conf files from /opt/container-2,
masking the original files in the rootfs' /etc directory:
for p in hostname hosts resolv.conf
do
  touch $ROOTFS_DIR/etc/$p
  mount --bind "$CONTAINER_DIR/$p" $ROOTFS_DIR/etc/$p
done
Step 8: Pivot into the new rootfs
Finally, pivot into the fully prepared root filesystem:
cd $ROOTFS_DIR
mkdir -p .oldroot

pivot_root . .oldroot
This is not something a real runtime would do, but since we use a shell,
it's better to exec into the target container's shell
as soon as possible after the pivot_root call:
exec /bin/sh
Configure the propagation type of the container's root filesystem
(setting it arbitrarily to slave, but the OCI Runtime Specification supports private and even shared):
mount --make-rslave /
And lastly, getting rid of the link to the old root filesystem:
umount -l .oldroot
rmdir .oldroot
Set the hostname of the container using the value from the container's /etc/hostname file:
hostname $(cat /etc/hostname)
Step 9: Harden container filesystem
Making a good part of the /proc filesystem read-only:
for d in bus fs irq sys sysrq-trigger
do
  if [ -e "/proc/$d" ]; then
    mount --bind "/proc/$d" "/proc/$d"
    mount -o remount,bind,ro "/proc/$d"
  fi
done
Masking sensitive paths in the /proc and /sys filesystems:
for p in \
  /proc/asound \
  /proc/interrupts \
  /proc/kcore \
  /proc/keys \
  /proc/latency_stats \
  /proc/timer_list \
  /proc/timer_stats \
  /proc/sched_debug \
  /proc/acpi \
  /proc/scsi \
  /sys/firmware
do
  if [ -d "$p" ]; then
    # Masking a folder
    mount -t tmpfs -o ro tmpfs $p
  elif [ -f "$p" ]; then
    # Masking a regular file
    mount --bind /dev/null $p
  fi
done
Step 10: Execute target application
At this point, the containerized environment is ready to be used.
Feel free to look around using the ps, ls, mount, df, hostname,
and any other commands you can think of, and then exec the containerized application:
APP=${APP:-/bin/sh}
exec $APP
Bonus: Sharing host files and folders with containers
One of the very common Docker use cases, especially during local development, is sharing files and folders from the host into the container via bind mounts like this:
# Traditional -v|--volume flag
docker run -v ./data:/data redis

# More modern but equivalent --mount form
docker run --mount type='bind,src=./data,dst=/data' redis
In the previous section(s), we saw that regular files located on the host can be bind mounted into the future container's root filesystem.
This is exactly how Docker runc and similar container runtimes inject the customized /etc/hosts, /etc/hostname, and /etc/resolv.conf files.
But the exact same technique can be used to inject any other files or folders from the host into the container.
The strace -p $(pgrep containerd) command that we used to reverse engineer the rootfs preparation steps
will reveal that the bind mounts of the -v|--volume flag happen right after the pseudo filesystems preparation
and just before the mounts of the /etc/hosts, /etc/hostname, and /etc/resolv.conf files.
And it's a good thing we invested some time in learning about the mount event propagation mechanism - Docker allows configuring the propagation type for bind mounts, so the following command should not look like a magic spell anymore:
docker run -v .:/project:ro,rshared ...
In the above example, if the containerized application would mount a sub-folder under /project,
it would be visible on the host as well (and vice versa).
However, the default propagation type of a Docker bind mount is rprivate,
so don't be surprised if you don't see sub-mounts showing up.
Bonus: Adding support for data volumes
While Docker docs position volumes as a distinct concept, under the hood, they are just bind mounts, but with a few extra features like naming, lifecycle management, and various data source drivers support:
# Traditional -v|--volume flag
docker run --volume redis-data:/data redis

# More modern but equivalent --mount form
docker run --mount type='volume,src=redis-data,dst=/data' redis
Instead of arbitrary folders on the host, volume data is always stored in /var/lib/docker/volumes/CONTAINER_ID/_data,
and you can list all existing volumes with the docker volume ls command, or create new ones with docker volume create,
or even purge them with docker volume rm.
But at the end of the day, you're just listing, creating, or removing _data folders in the /var/lib/docker/volumes directory.
Interesting that Docker always sets mount propagation for volumes to rprivate (for bind mounts you could tweak it),
while Kubernetes, despite relying on the exact same runc (or the like) runtime under the hood,
allows more flexible mount propagation configuration (HostToContainer, Bidirectional, etc.).
So, in Docker, bind mounts vs. volumes is more of a semantic difference (and induced artificial constraints on the data location and propagation type) than an actual technical difference.
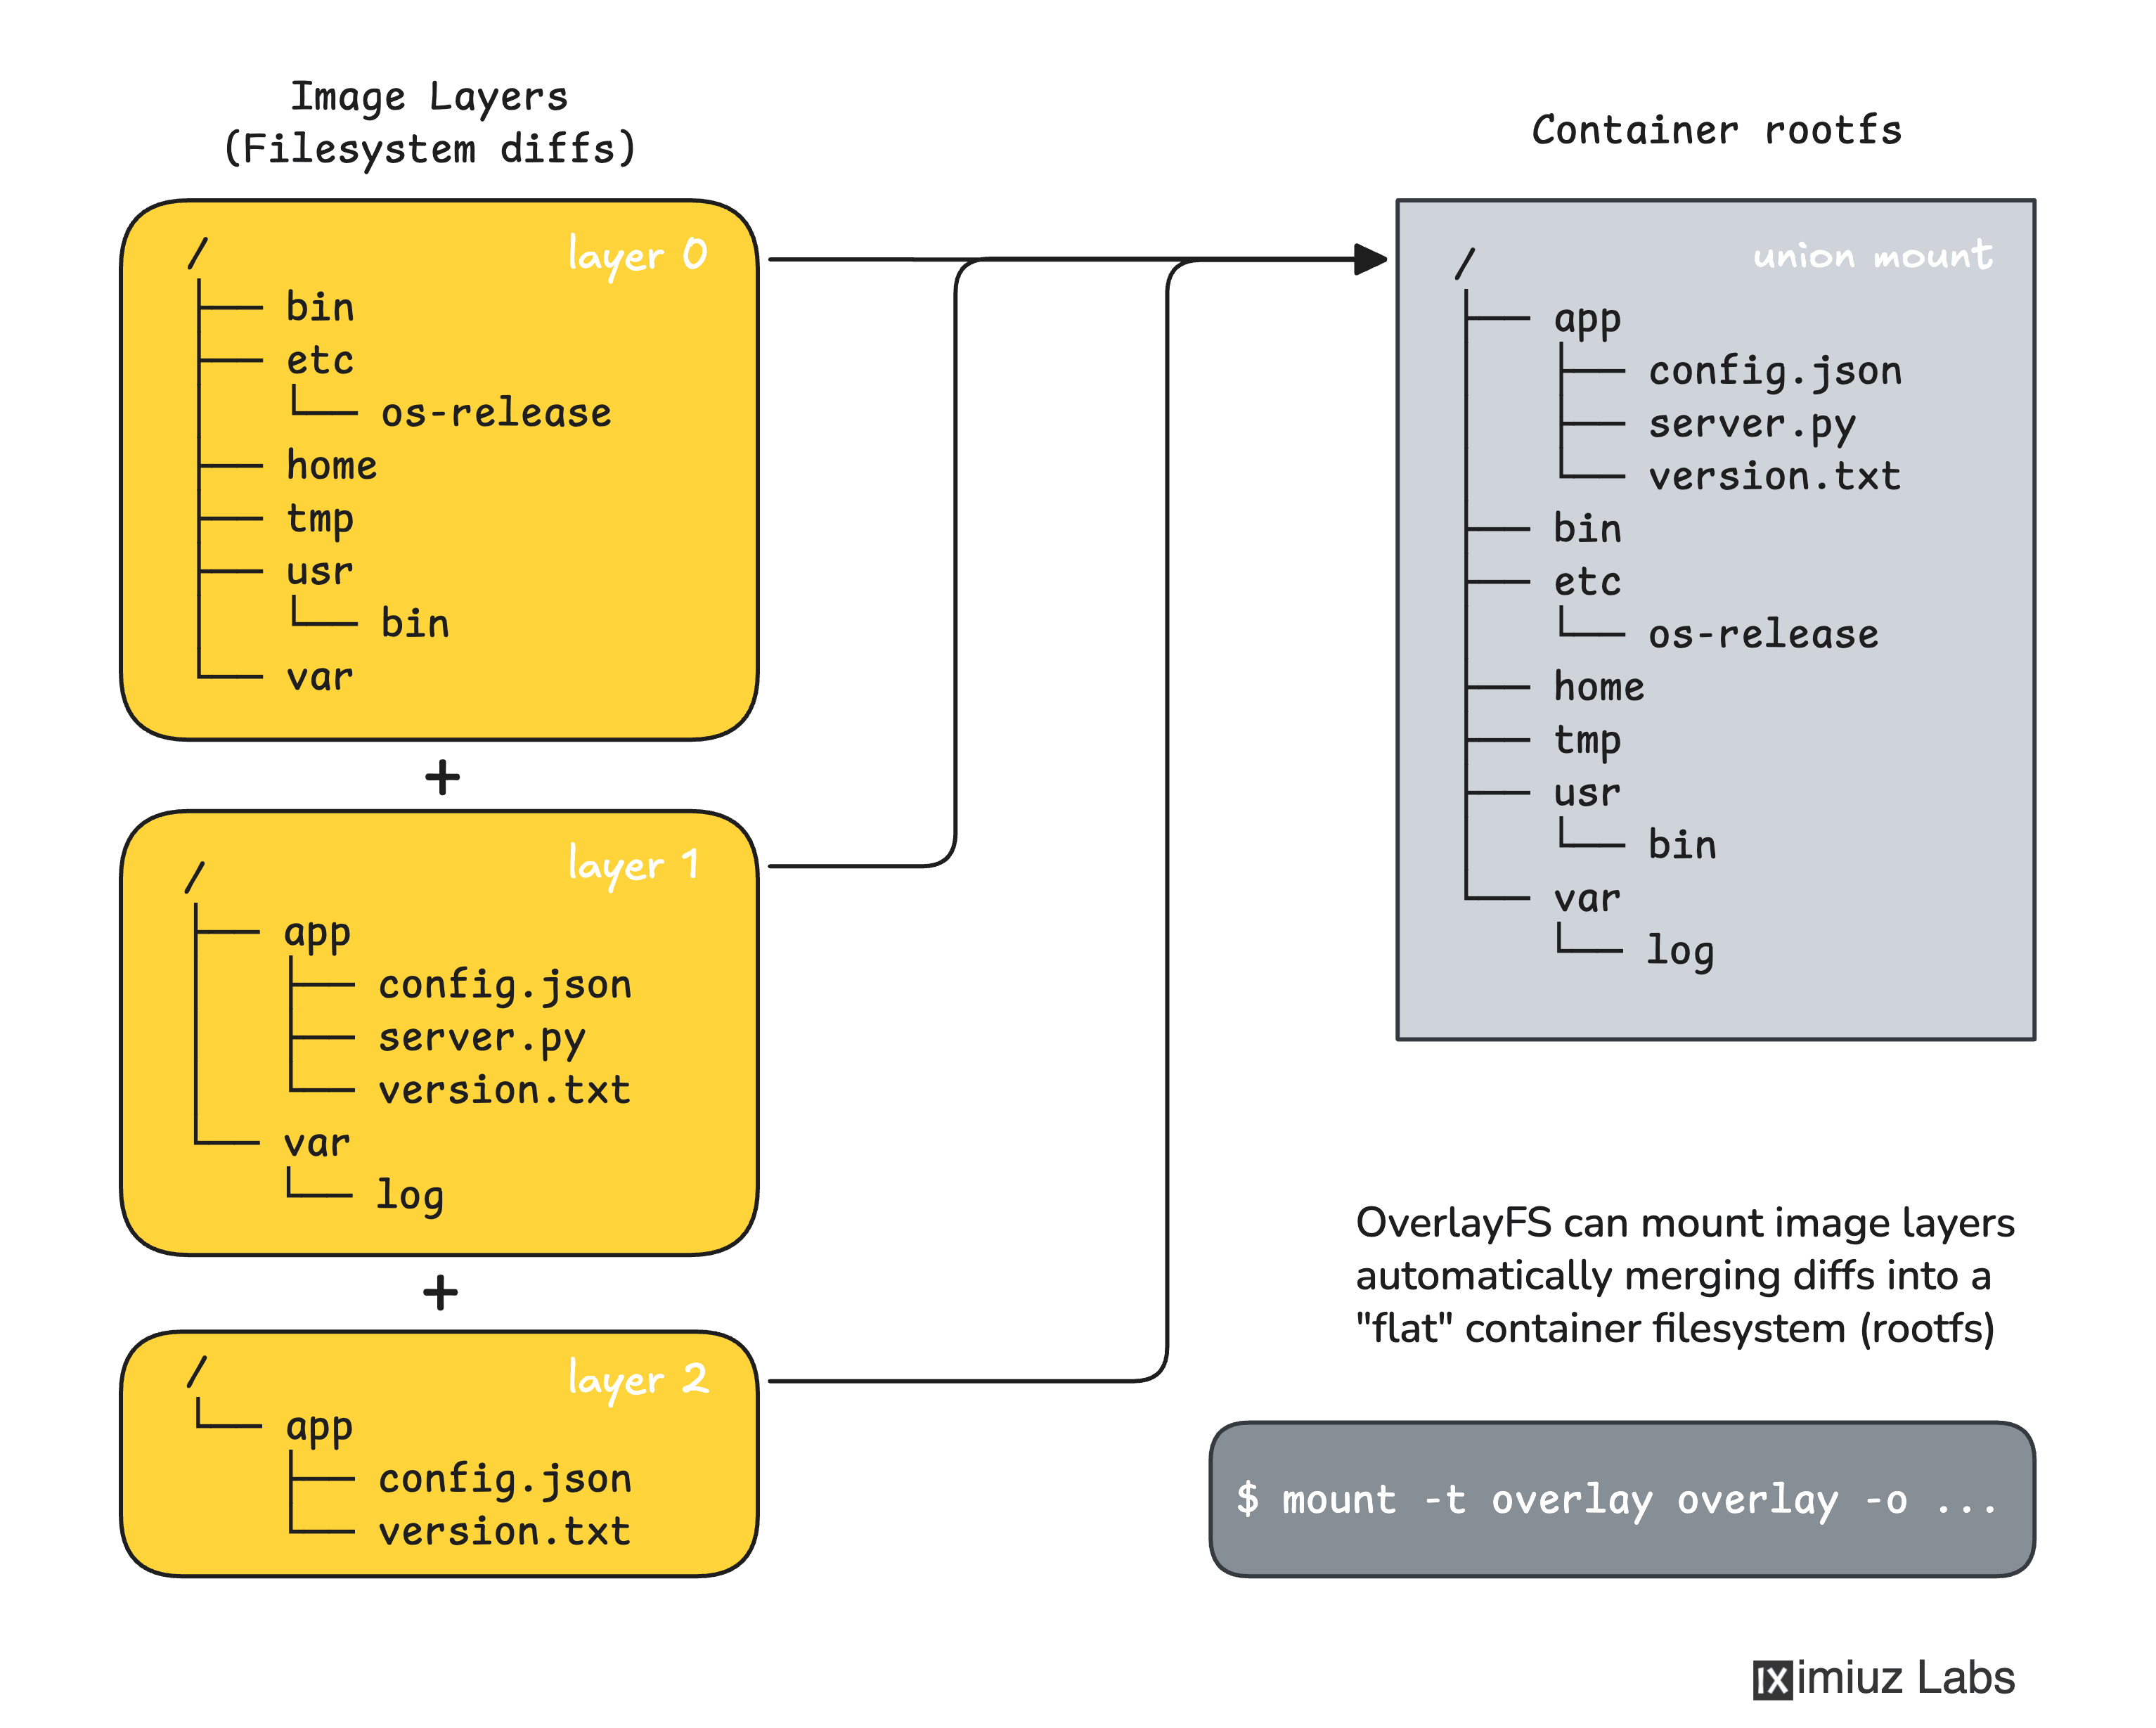
Where do union filesystems come into play?
One of the things we didn't talk about in this article is union filesystems like overlayfs -
simply because despite popular belief, they're not mandatory for containers.
As we just proved with the above demo, it's possible to create a fully-fledged container without relying on a union filesystem at all.
Docker uses overlay2 (or an alternative) storage driver to unpack layered container images into "flat" local folders.
However, this is only an optimization, mainly focused on the disk space efficiency -
as we just saw, it's possible to extract a container image filesystem into a regular folder with crane export (or a similar command),
and the container runtime (e.g., runc) will happily use it as a root filesystem.
Summarizing
At the heart of containers lies the mount namespace. That's not an accident - Linux has long treated the filesystem as the central interface for managing processes, devices, and resources. Once you start assembling a root filesystem for a container, it quickly becomes clear that other namespaces - PID, cgroup, UTS, and network - are interconnected and much needed to complete the task.
This is why walking through the rootfs exercise isn't just an impressive low-level demo you could give at a conference. It's a way to build a comprehensive mental model of how containers work. And with that model in place, higher-level topics like bind mounts, volumes, mount propagation, and persistence in Docker or Kubernetes stop feeling like special cases - they become natural extensions of the same foundation.
Ah, and if you made it this far, take another look at the diagram from the opening part - it should make much more sense now!
Click to enlarge
Resources
- namespaces(7) — Linux manual page
- mount_namespaces(7) — Linux manual page
- mount(2) — Linux manual page
- pivot_root(2) — Linux manual page
- Shared Subtrees - Linux kernel documentation
- Mount namespaces and shared subtrees - LWN.net
- Mount namespaces, mount propagation, and unbindable mounts - LWN.net
- Mounts - OCI Runtime Specification
- rootfs_linux.go - runc source code
- Bind mounts - Docker documentation
- Volumes - Docker documentation
- OverlayFS storage driver - Docker documentation
- Mount propagation - Kubernetes documentation
- Mounting into mount namespaces - Christian Brauner's blog
- Attach a volume to a container while it is running - Jérôme Petazzoni's blog
- Understanding the various mounts setup by a Docker container - Sid Agrawal's blog
Practice
About the Author
Ivan Velichko
Ivan is the creator of iximiuz Labs and a long-time tech blogger and educator with a traditional focus on server-side tech and containers.
Writes about
Frequently covers