How Container Networking Works: Building a Bridge Network From Scratch
Working with containers can feel like magic at times. In a good way for those who understand the internals and in a terrifying - for those who don't. Luckily, we've been looking under the hood of the containerization technology for quite some time already and even managed to uncover that containers are just isolated and restricted Linux processes, that images aren't really needed to run containers, and that, on the contrary, to build an image we may need to run containers.
Now comes a time to tackle the container networking problem. Or, more precisely, a single-host container networking problem. In this article, we are going to answer the following questions:
- How to virtualize network resources to make containers think they have individual network environments?
- How to turn containers into friendly neighbors and teach to communicate with each other?
- How to reach the outside world (e.g. the Internet) from the inside of a container?
- How to reach containers running on a Linux host from the outside world?
- How to implement Docker-like port publishing?
While answering these questions, we'll set up a single-host container network from scratch using standard Linux tools. As a result, it'll become apparent that the magic of container networking emerges from a combination of much more basic Linux facilities:
- Network namespaces (netns)
- Virtual Ethernet devices (veth)
- Virtual network switches (bridge)
- IP routing and network address translation (NAT).
Let's get started! 🚀
Level up your Server Side game — Join 30,000 engineers who receive insightful learning materials straight to their inbox
Prerequisites
Basic bash scripting and Linux command line knowledge are assumed, but no coding skills are required. Examples in this tutorial were tested on Ubuntu 22.04, and they will likely work on other modern Linux distros, too. It's a good idea to use an isolated and disposable sandbox environment to follow the tutorial, like the one provided on the right 👉
⚠️ BEWARE: Running the below commands directly on your computer's host OS may be harmful.
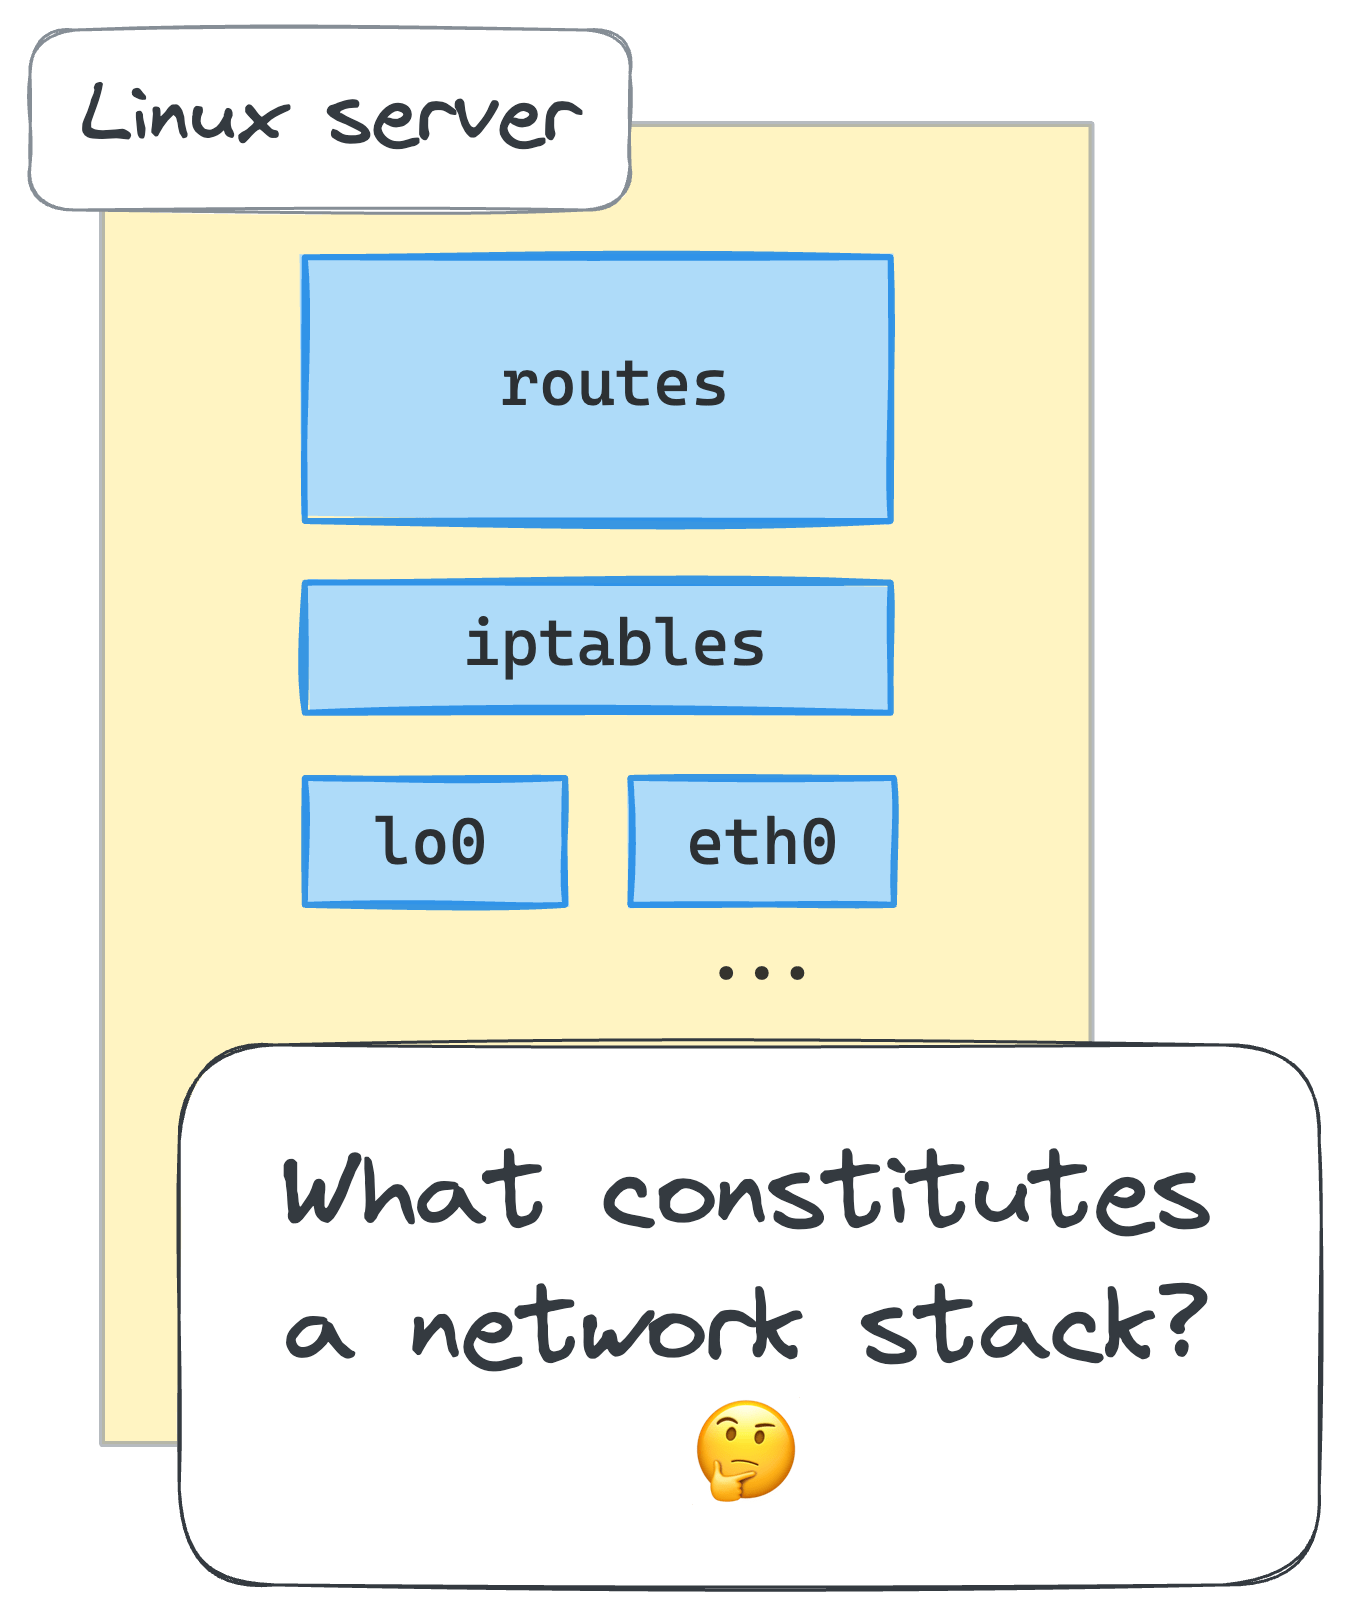
Main network environment components (devices, routing tables, firewall rules)
What constitutes a Linux network environment, a.k.a. a networking context? Well, obviously, a set of network devices. What else? Probably, some routing rules. And, of course not to forget - netfilter hooks, including those that are defined by iptables rules. There are more components, but the above should suffice for our purposes in this tutorial.
We can quickly forge a (no comprehensive) script to inspect the network environment:
#!/usr/bin/env bash

echo "# Network devices"
ip link list

echo -e "\n# Route table"
ip route list

echo -e "\n# iptables rules"
iptables --list-rules
Before running it, though, let's add a new iptables chain to make the set of rules more recognizable:
💡 All commands in this tutorial are supposed to be run as root or prefixed with sudo.
iptables --new-chain MY_CUSTOM_CHAIN
After that, execution of the inspect script on my machine produces the following output: If we run the script on a typical Linux machine, we'll get the output similar to the following:
~/inspect-net-context.sh
# Network devices
1: lo: <LOOPBACK,UP,LOWER_UP> mtu 65536 qdisc noqueue state UNKNOWN mode DEFAULT group default qlen 1000
    link/loopback 00:00:00:00:00:00 brd 00:00:00:00:00:00
...
4: eth0: <BROADCAST,MULTICAST,UP,LOWER_UP> mtu 1500 qdisc pfifo_fast state UP mode DEFAULT group default qlen 1000
    link/ether 92:b2:3d:42:ed:22 brd ff:ff:ff:ff:ff:ff

# Route table
default via 172.16.0.1 dev eth0
172.16.0.0/16 dev eth0 proto kernel scope link src 172.16.0.2

# iptables rules
-P INPUT ACCEPT
-P FORWARD ACCEPT
-P OUTPUT ACCEPT
-N MY_CUSTOM_CHAIN
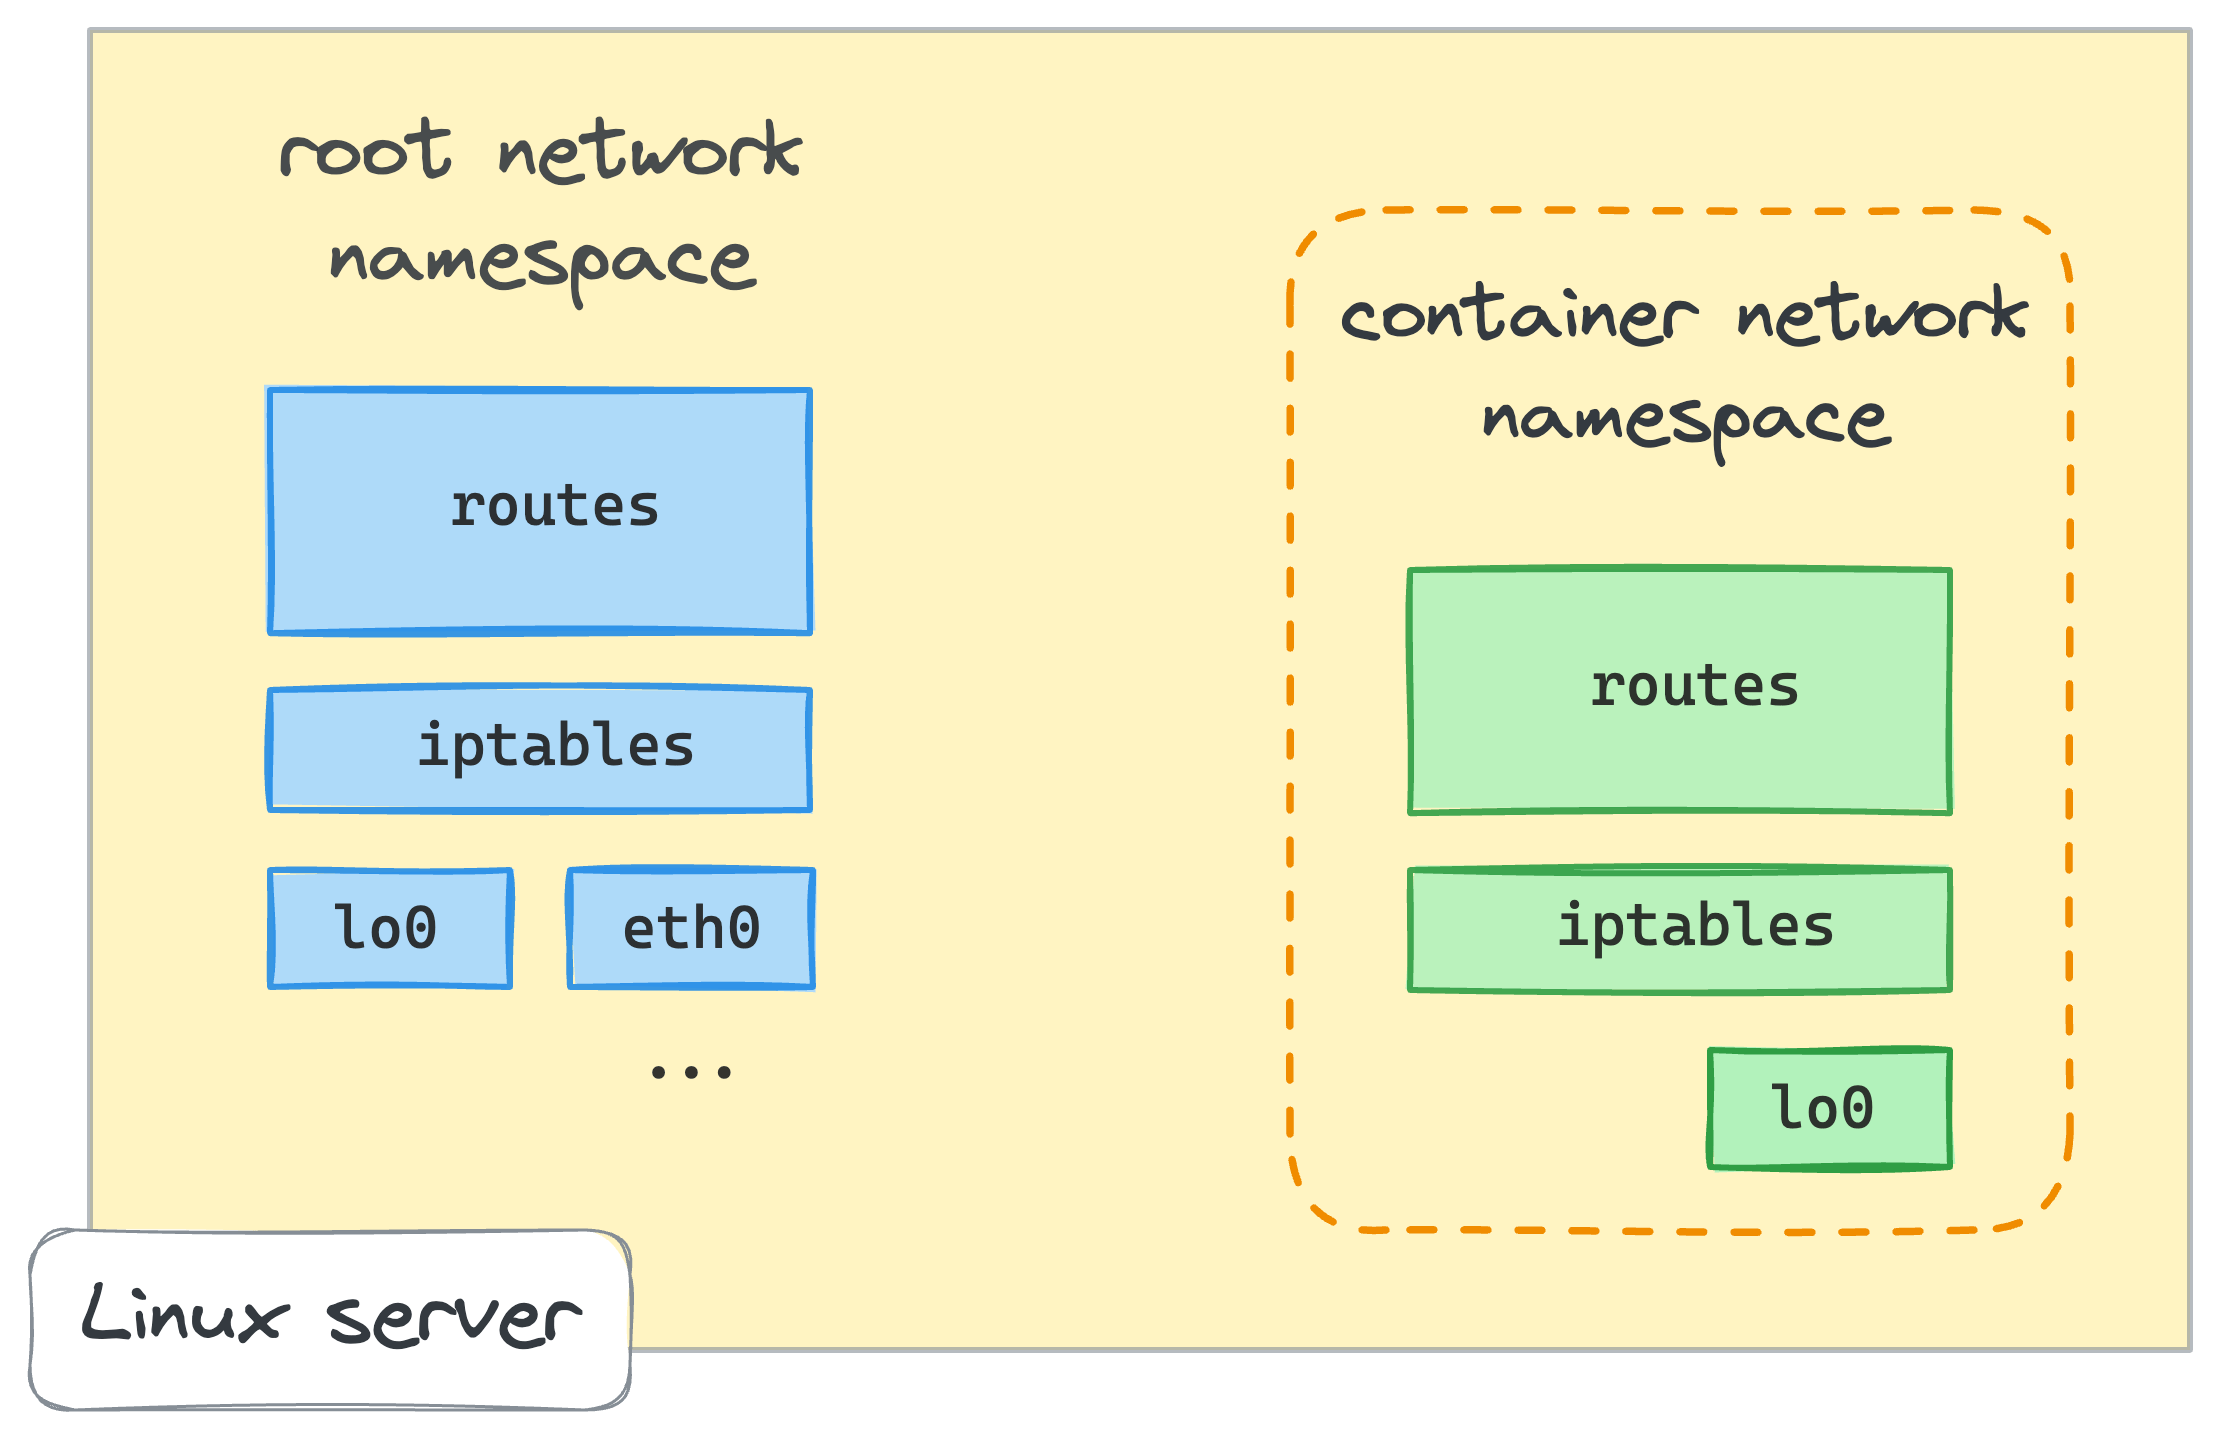
Why do we need to inspect the network environment? Because we're going to start creating containers soon, and we want to make sure that each of them will get its own networking context, fully isolated from the host's and other containers' environments. For that, we'll need to get used to listing the network devices, routing and iptables rules.
👨🎓 For the sake of simplicity, instead of creating full-blown containers that leverage all possible Linux namespaces, in this tutorial we'll restrict the scope of virtualization to networking context only. Thus, a container and a network namespace below will be used interchangeably.
Creating the first container using a network namespace (netns)
You've likely already heard, that one of the Linux namespaces used to create containers is called netns or network namespace.
From man ip-netns,
"network namespace is logically another copy of the network stack, with its own routes, firewall rules, and network devices."
One of the ways to create a network namespace in Linux is to use the ip netns add command
(where the ip utility comes from the de facto standard iproute2 collection):
ip netns add netns0
To check that the new namespace has been added to the system, run the following command:
ip netns list
netns0
How to start using the just created namespace?
There is another handy Linux utility called nsenter.
It enters one or more of the specified namespaces and then executes the given program in it.
For instance, here is how we can start a new shell session inside the netns0 namespace:
nsenter --net=/run/netns/netns0 bash
The newly created bash process now lives in the netns0 namespace.
If we run our inspect script in this new shell, we'll get the following output:
~/inspect-net-context.sh
# Network devices
1: lo: <LOOPBACK> mtu 65536 qdisc noop state DOWN mode DEFAULT group default qlen 1000
    link/loopback 00:00:00:00:00:00 brd 00:00:00:00:00:00

# Route table

# Iptables rules
-P INPUT ACCEPT
-P FORWARD ACCEPT
-P OUTPUT ACCEPT
The above output clearly shows that the bash process that runs in the netns0 namespace has a totally different network environment -
there is no routing rules at all, no MY_CUSTOM_CHAIN iptables chain, and only one network device, the loopback. So far, so good!
To solidify the knowledge obtained in the above section, try solving a challenge:
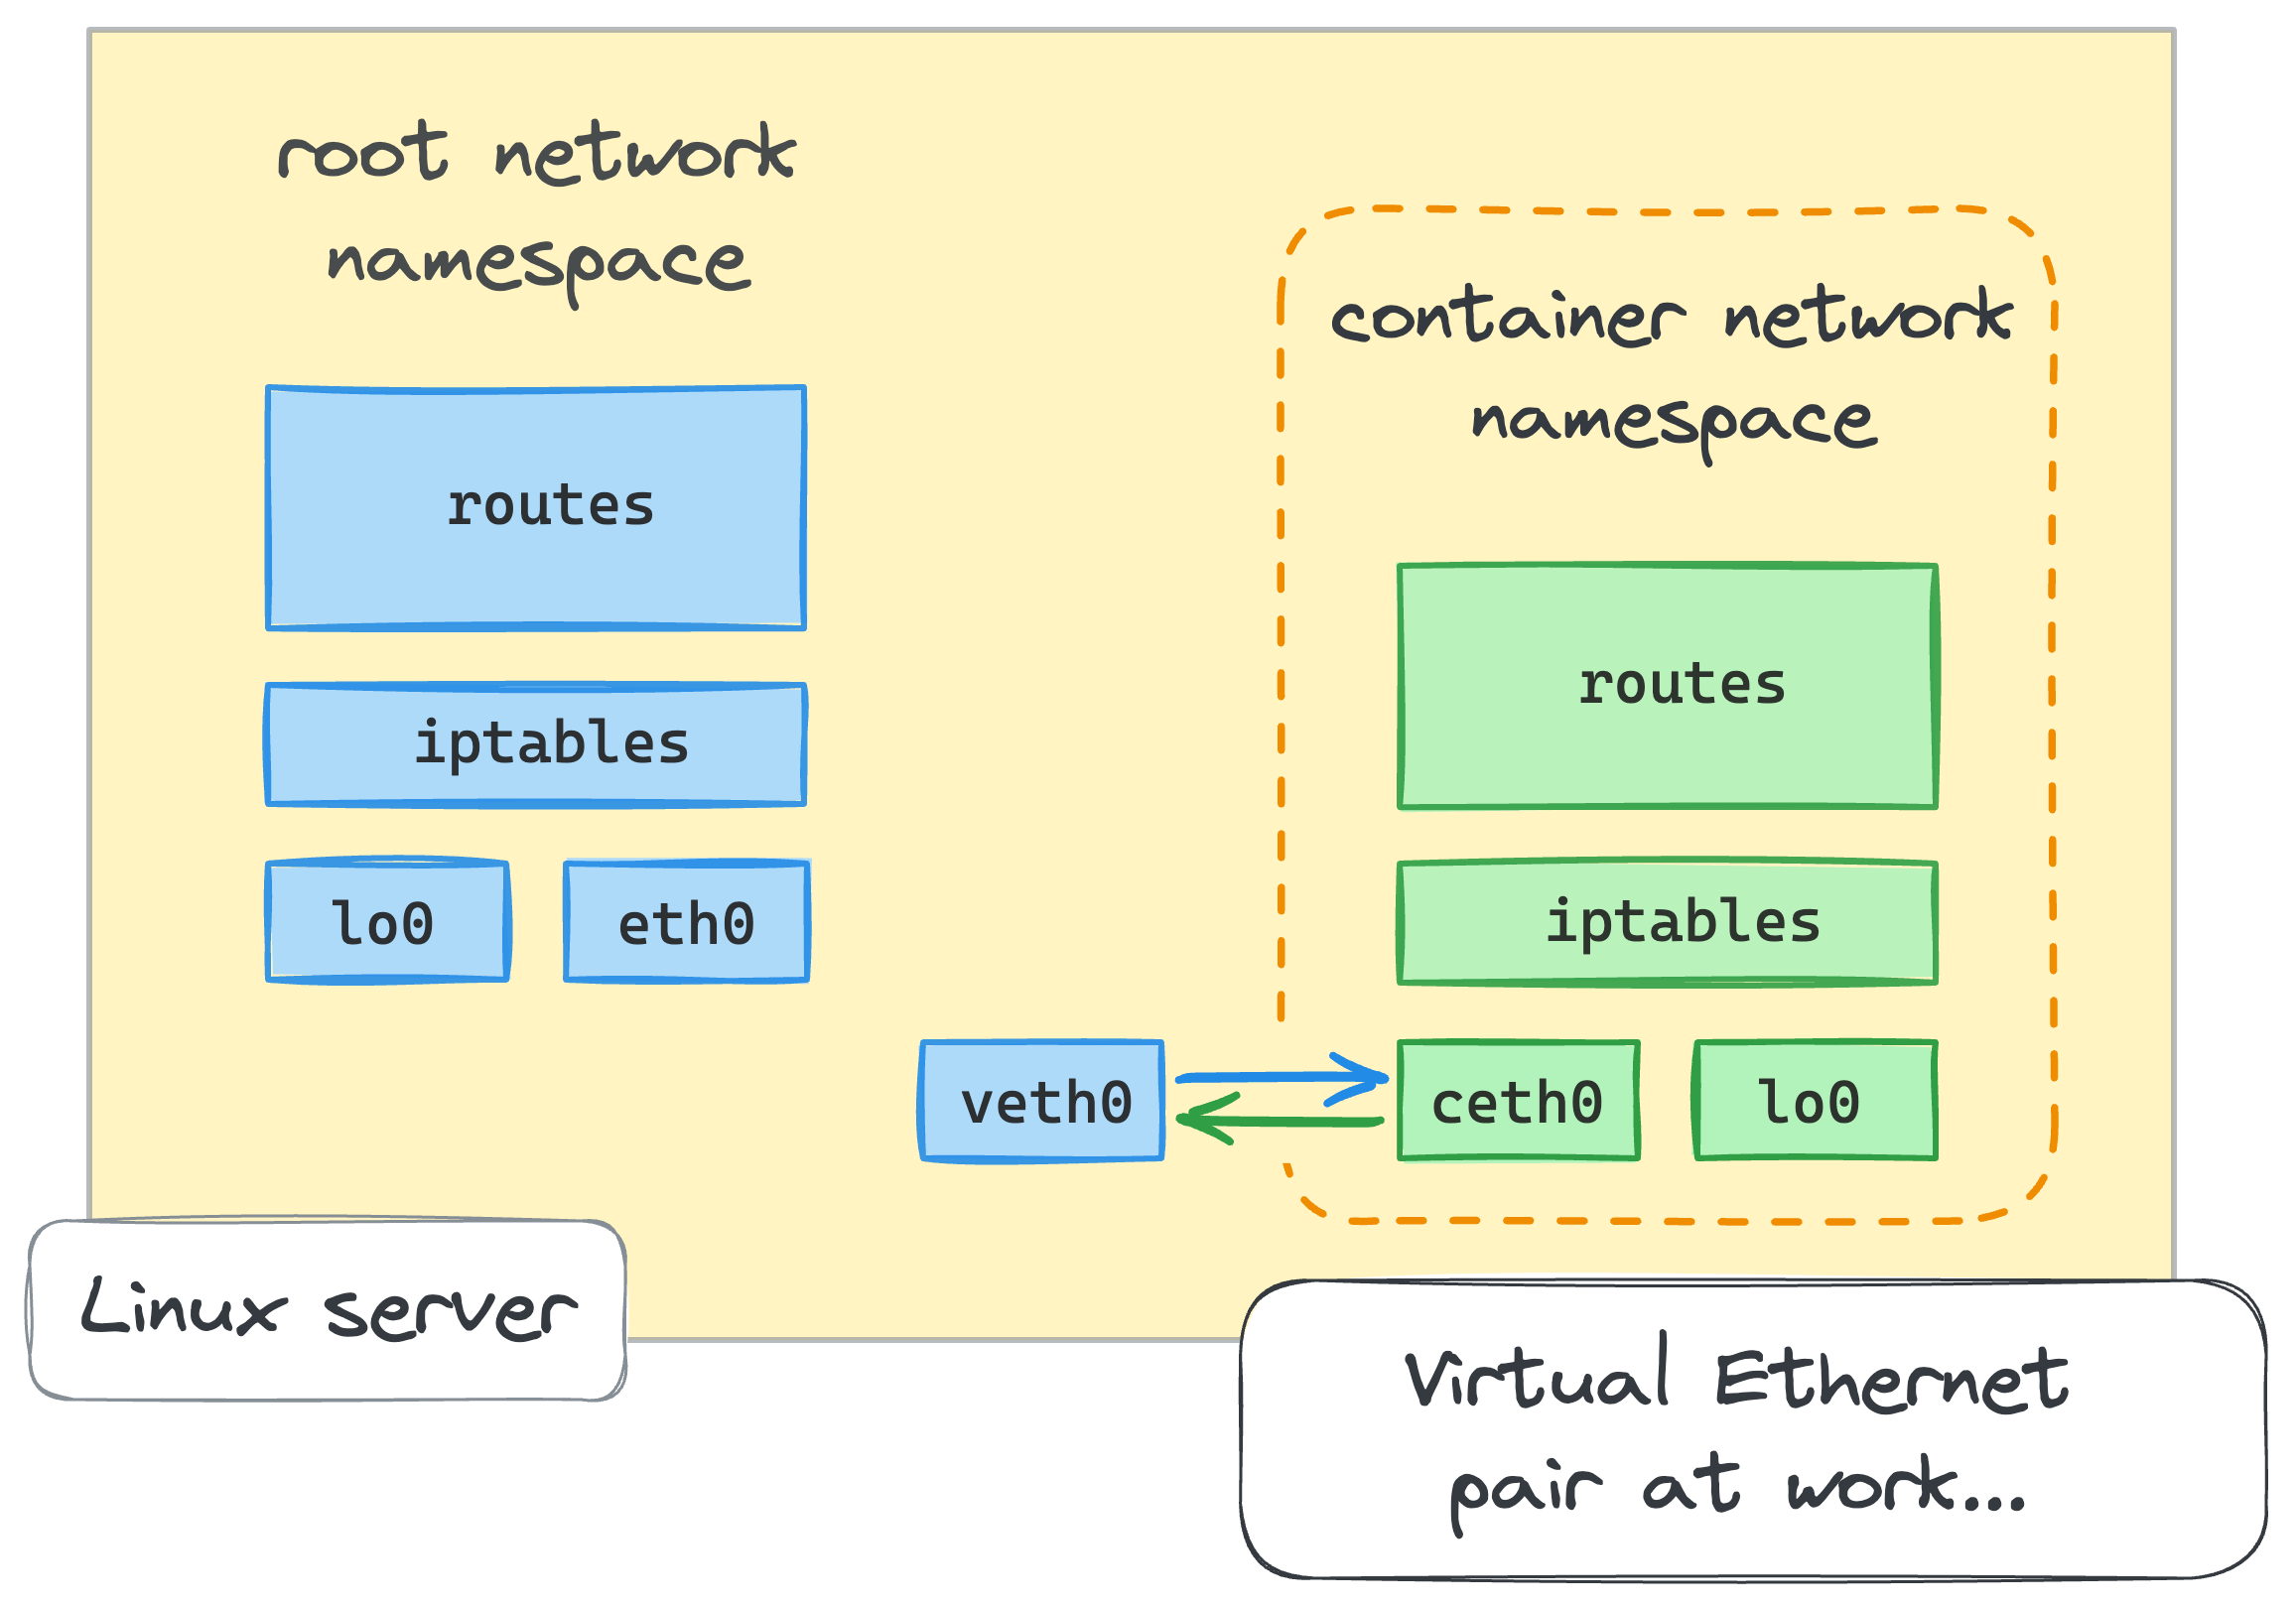
Connecting containers to host using virtual Ethernet devices (veth)
A new isolated network environment would be not so useful if we could not communicate with it.
Luckily, Linux provides a special facility to connect network namespaces - a virtual Ethernet device or veth.
From man veth,
"veth devices are virtual Ethernet devices.
They can act as tunnels between network namespaces to create a bridge to a physical network device in another namespace,
but can also be used as standalone network devices."
Virtual Ethernet devices always go in pairs. No worries if it sounds a bit confusing, it'll be clear when we take a look at the usage example.
⚠️ The nsenter command we used above started a nested shell session in the netns0 network namespace.
Don't forget to exit it or open a fresh terminal tab before proceeding to the next steps.
From the root network namespace, let's create a pair of virtual Ethernet devices:
ip link add veth0 type veth peer name ceth0
With this single command, we just created a pair of interconnected virtual Ethernet devices.
The names veth0 and ceth0 have been chosen arbitrarily:
ip link list
1: lo: <LOOPBACK,UP,LOWER_UP> mtu 65536 qdisc noqueue state UNKNOWN mode DEFAULT group default qlen 1000
    link/loopback 00:00:00:00:00:00 brd 00:00:00:00:00:00
...
4: eth0: <BROADCAST,MULTICAST,UP,LOWER_UP> mtu 1500 qdisc pfifo_fast state UP mode DEFAULT group default qlen 1000
    link/ether 92:b2:3d:42:ed:22 brd ff:ff:ff:ff:ff:ff
5: ceth0@veth0: <BROADCAST,MULTICAST,M-DOWN> mtu 1500 qdisc noop state DOWN mode DEFAULT group default qlen 1000
    link/ether b2:d3:e4:24:c3:f1 brd ff:ff:ff:ff:ff:ff
6: veth0@ceth0: <BROADCAST,MULTICAST,M-DOWN> mtu 1500 qdisc noop state DOWN mode DEFAULT group default qlen 1000
    link/ether 4e:ac:e0:3c:d8:6e brd ff:ff:ff:ff:ff:ff
Both veth0 and ceth0 after creation reside in the host's networking context - i.e., in the root network namespace.
To connect the root namespace with the netns0 namespace that we created earlier,
we need to keep one of the devices in the root namespace and move another one into the netns0:
ip link set ceth0 netns netns0
Let's make sure one of the devices disappeared from the root networking context:
ip link list
1: lo: <LOOPBACK,UP,LOWER_UP> mtu 65536 qdisc noqueue state UNKNOWN mode DEFAULT group default qlen 1000
    link/loopback 00:00:00:00:00:00 brd 00:00:00:00:00:00
...
4: eth0: <BROADCAST,MULTICAST,UP,LOWER_UP> mtu 1500 qdisc pfifo_fast state UP mode DEFAULT group default qlen 1000
    link/ether 92:b2:3d:42:ed:22 brd ff:ff:ff:ff:ff:ff
6: veth0@if5: <BROADCAST,MULTICAST> mtu 1500 qdisc noop state DOWN mode DEFAULT group default qlen 1000
    link/ether 4e:ac:e0:3c:d8:6e brd ff:ff:ff:ff:ff:ff link-netns netns0
Once we turn the veth devices on and assign proper IP addresses, any packet occurring on one of the devices will immediately pop up on its peer device, effectively connecting the two network namespaces.
Let's start from the root namespace:
ip link set veth0 up
ip addr add 172.18.0.11/16 dev veth0
...and continue in the netns0 namespace:
nsenter --net=/run/netns/netns0 bash
In the new shell session that runs in the netns0 namespace:
ip link list
1: lo: <LOOPBACK> mtu 65536 qdisc noop state DOWN mode DEFAULT group default qlen 1000
    link/loopback 00:00:00:00:00:00 brd 00:00:00:00:00:00
5: ceth0@if6: <BROADCAST,MULTICAST> mtu 1500 qdisc noop state DOWN mode DEFAULT group default qlen 1000
    link/ether da:08:47:8b:8f:c7 brd ff:ff:ff:ff:ff:ff link-netnsid 0
Seem like the loopback device is down in new namespaces, so we need to turn it on first:
ip link set lo up
Now, back to the ceth0 device:
ip link set ceth0 up
ip addr add 172.18.0.10/16 dev ceth0
And we are ready for the first connectivity check! 🎉
Let's try to ping the veth0 device from the netns0 namespace:
ping -c 2 172.18.0.11
PING 172.18.0.11 (172.18.0.11) 56(84) bytes of data.
64 bytes from 172.18.0.11: icmp_seq=1 ttl=64 time=0.093 ms
64 bytes from 172.18.0.11: icmp_seq=2 ttl=64 time=0.075 ms

--- 172.18.0.11 ping statistics ---
2 packets transmitted, 2 received, 0% packet loss, time 1028ms
rtt min/avg/max/mdev = 0.075/0.084/0.093/0.009 ms
Now leave netns0 by typing exit (or open a new terminal tab) and try to ping the ceth0 device from the root namespace:
ping -c 2 172.18.0.10
PING 172.18.0.10 (172.18.0.10) 56(84) bytes of data.
64 bytes from 172.18.0.10: icmp_seq=1 ttl=64 time=0.012 ms
64 bytes from 172.18.0.10: icmp_seq=2 ttl=64 time=0.078 ms

--- 172.18.0.10 ping statistics ---
2 packets transmitted, 2 received, 0% packet loss, time 1024ms
rtt min/avg/max/mdev = 0.012/0.045/0.078/0.033 ms
Success! We've just got packets flowing between the root namespace and the netns0 namespace.
But what if we try to reach any other address from the netns0 namespace?
Are we going to succeed too?
Let's find out!
ip addr show dev eth0
4: eth0: <BROADCAST,MULTICAST,UP,LOWER_UP> mtu 1500 qdisc pfifo_fast state UP group default qlen 1000
    link/ether ee:36:69:36:fe:bd brd ff:ff:ff:ff:ff:ff
    inet 172.16.0.2/16 brd 172.16.255.255 scope global eth0
       valid_lft forever preferred_lft forever
    inet6 fe80::b0b9:11ff:fe79:613f/64 scope link
       valid_lft forever preferred_lft forever
Note this 172.16.0.2 address - it's the IP address of another network interface on the host machine,
and we are going to use it to check the connectivity from the netns0 namespace:
nsenter --net=/run/netns/netns0 bash
Accessing the host's network interface from the netns0 namespace:
ping 172.16.0.2
ping: connect: Network is unreachable
What if we try something from the Internet?
ping 8.8.8.8
ping: connect: Network is unreachable
The failure is easy to explain, though.
There is simply no record in the netns0 routing table for such packets.
The only entry there shows how to reach the 172.18.0.0/16 network:
ip route list
172.18.0.0/16 dev ceth0 proto kernel scope link src 172.18.0.10
How did it get there?
Linux has a bunch of ways to populate the routing table.
One of them is to extract routes from the directly attached network interfaces.
Do you remember that the routing table in netns0 was empty right after the namespace creation?
But then we moved the ceth0 device into netns0 and assigned it an IP address 172.18.0.10/16.
Since we were using not a simple IP address, but a combination of the address and the netmask,
the network stack managed to extract the routing information from it.
Because of that derived record, every packet from inside of the netns0 namespace destined to the 172.18.0.0/16 network will be sent through ceth0 device.
But any other packets will be discarded.
Similarly, a new route was added to the root namespace (you may want to type exit to leave netns0 first):
ip route list
... omitted lines ...
172.18.0.0/16 dev veth0 proto kernel scope link src 172.18.0.11
At this point, we are ready to mark our very first question answered. We know now how to virtualize and interconnect Linux network environments.
Time to check the knowledge!
Creating the second container repeating the same steps
The idea of containerization arose because people needed a better way to share computer resources. Instead of using one server for just one application, containers allow running lots of (isolated from each other) processes on the same server. This way, you make the most out of the server's capabilities.
Let's see what happens if we place multiple containers on the same host using the veth trick from above.
From the root namespace, adding another "container":
ip netns add netns1

ip link add veth1 type veth peer name ceth1
ip link set veth1 up
ip addr add 172.18.0.21/16 dev veth1

ip link set ceth1 netns netns1
...and continuing from within the "container":
nsenter --net=/run/netns/netns1 bash
ip link set lo up

ip link set ceth1 up
ip addr add 172.18.0.20/16 dev ceth1
Ok, now comes our favorite part - checking the connectivity (from the netns1 namespace):
ping -c 2 172.18.0.21
PING 172.18.0.21 (172.18.0.21) 56(84) bytes of data.

--- 172.18.0.21 ping statistics ---
2 packets transmitted, 0 received, 100% packet loss, time 1023ms
Hmm... We did everything the same way as before, but the connectivity is broken.
From netns1 we cannot reach the root namespace.
ip route list
172.18.0.0/16 dev ceth1 proto kernel scope link src 172.18.0.20
There is even a route! So why is it not working?
What if we try to ping the ceth1 device from the root namespace?
exit
...and then:
ping -c 2 172.18.0.20
PING 172.18.0.20 (172.18.0.20) 56(84) bytes of data.
From 172.18.0.11 icmp_seq=1 Destination Host Unreachable
From 172.18.0.11 icmp_seq=2 Destination Host Unreachable

--- 172.18.0.20 ping statistics ---
2 packets transmitted, 0 received, +2 errors, 100% packet loss, time 1014ms
pipe 2
At the same time, from our first container (netns0) we CAN reach the host's end of the new container (veth1):
nsenter --net=/run/netns/netns0 bash
ping -c 2 172.18.0.21
PING 172.18.0.21 (172.18.0.21) 56(84) bytes of data.
64 bytes from 172.18.0.21: icmp_seq=1 ttl=64 time=0.037 ms
64 bytes from 172.18.0.21: icmp_seq=2 ttl=64 time=0.046 ms

--- 172.18.0.21 ping statistics ---
2 packets transmitted, 2 received, 0% packet loss, time 33ms
rtt min/avg/max/mdev = 0.037/0.041/0.046/0.007 ms
But we still cannot reach netns1:
ping -c 2 172.18.0.20
PING 172.18.0.20 (172.18.0.20) 56(84) bytes of data.
From 172.18.0.10 icmp_seq=1 Destination Host Unreachable
From 172.18.0.10 icmp_seq=2 Destination Host Unreachable

--- 172.18.0.20 ping statistics ---
2 packets transmitted, 0 received, +2 errors, 100% packet loss, time 63ms
pipe 2
Whoops! Something is wrong... netns1 is stuck in limbo.
For some reason, it cannot talk to the root and from the root namespace we cannot reach it too.
However, since both containers reside in the same IP network 172.18.0.0/16,
we now can talk to the host's veth1 from the netns0 container.
Interesting...
Well, it took me some time to figure it out, but apparently we are facing the clash of routes. Let's inspect the routing table in the root namespace:
ip route list
... omitted lines ...
172.18.0.0/16 dev veth0 proto kernel scope link src 172.18.0.11
172.18.0.0/16 dev veth1 proto kernel scope link src 172.18.0.21
Even though after adding the second veth pair, root's routing table got the new 172.18.0.0/16 dev veth1 proto kernel scope link src 172.18.0.21 route,
there already was an existing route for exactly the same 172.18.0.0/16 network.
When the second container tries to ping veth1 device, the first route is selected, and this breaks the connectivity.
If we were to delete the first route (ip route delete 172.18.0.0/16 dev veth0 proto kernel scope link src 172.18.0.11) and recheck the connectivity,
the situation would reverse - netns0 would be in limbo and netns1 would be able to ping the host's veth0 device.

Well, I believe if we selected another IP network for netns1,
everything would work.
However, multiple containers sitting in one IP network is a legitimate use case.
Thus, we need to adjust the veth approach somehow...
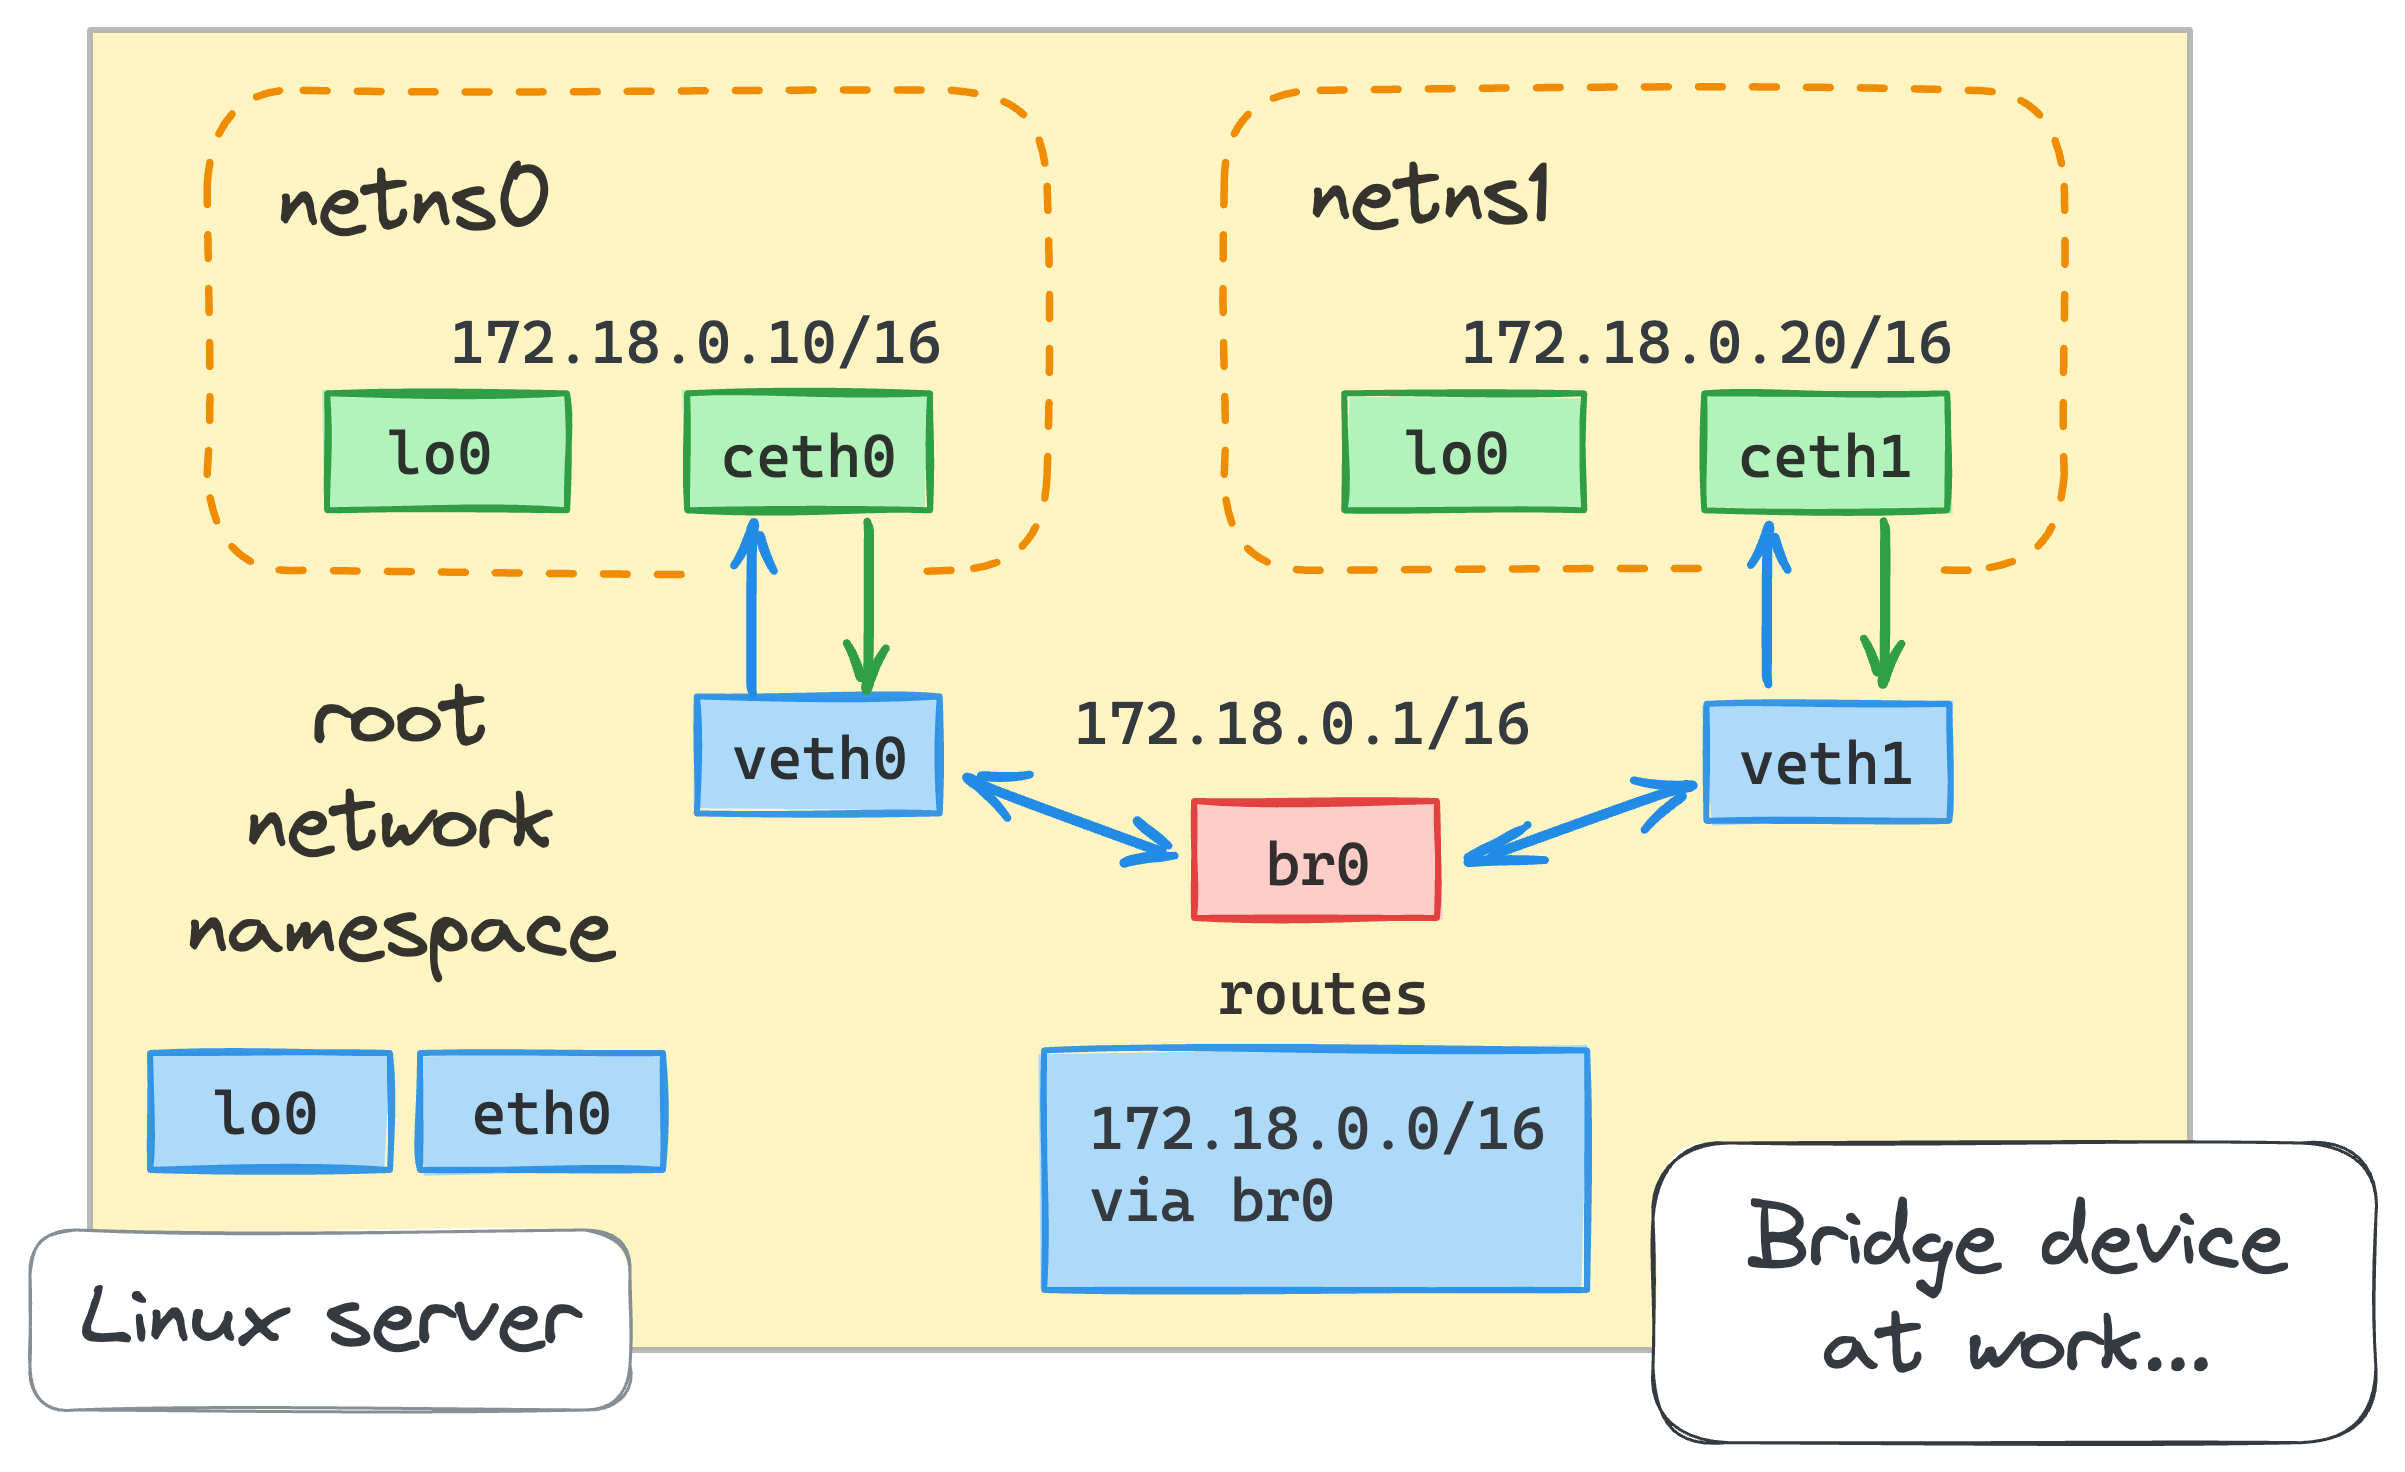
Interconnecting containers using a virtual network switch (bridge)
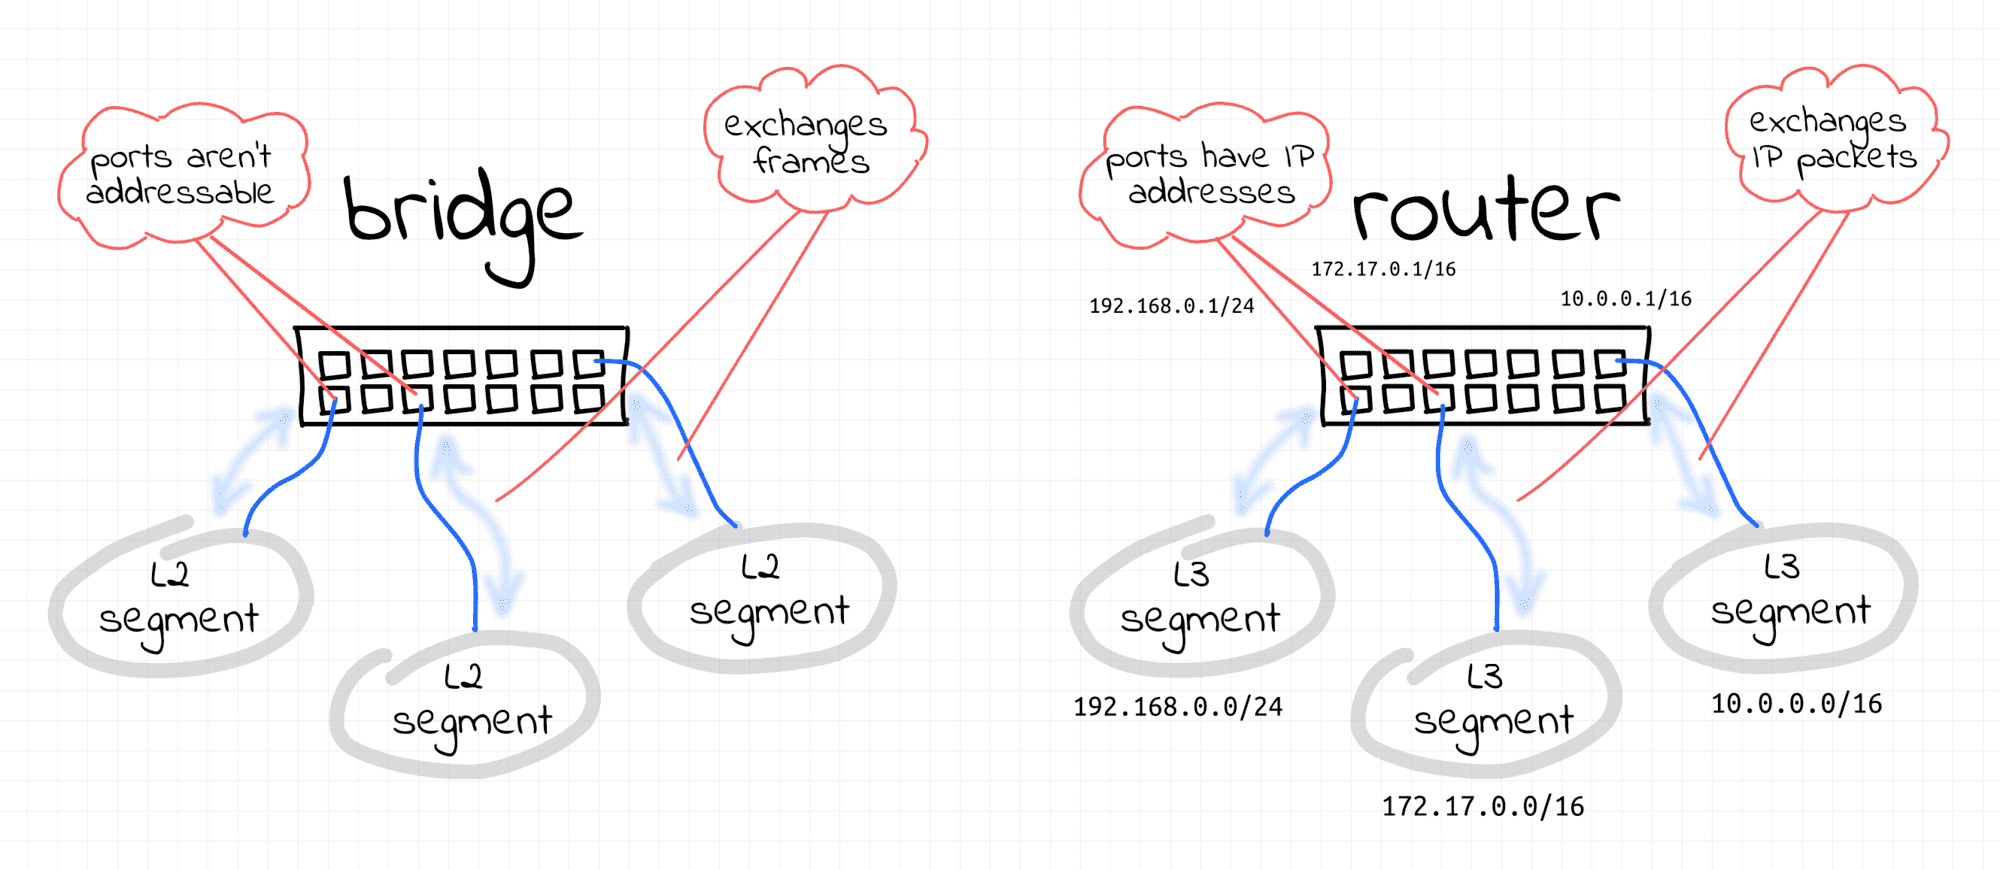
Luckily, Linux has a solution for the above problem, and it's yet another virtualized network facility called bridge.
The Linux bridge device behaves like a network switch.
It forwards packets between interfaces that are connected to it.
And since it's a switch and not a router, it doesn't care about IP addresses of the connected devices because it operates on the L2 (i.e. Ethernet) level.
Let's try to play with our new toy. But first, we need to clean up the existing setup because some of the configurational changes we've made so far aren't really needed anymore. Removing network namespaces should suffice:
ip netns delete netns0
ip netns delete netns1
However, if you still have some leftovers, you can remove them manually:
ip link delete veth0
ip link delete ceth0
ip link delete veth1
ip link delete ceth1
To set the stage for the new experiment, let's quickly re-create two containers.
First container
From the root namespace:
ip netns add netns0

ip link add veth0 type veth peer name ceth0
ip link set veth0 up
ip link set ceth0 netns netns0
Continuing from the netns0 namespace:
nsenter --net=/run/netns/netns0 bash
ip link set lo up
ip link set ceth0 up
ip addr add 172.18.0.10/16 dev ceth0
exit
Second container
From the root namespace:
ip netns add netns1

ip link add veth1 type veth peer name ceth1
ip link set veth1 up
ip link set ceth1 netns netns1
Continuing from the netns1 namespace:
nsenter --net=/run/netns/netns1 bash
ip link set lo up
ip link set ceth1 up
ip addr add 172.18.0.20/16 dev ceth1
exit
👨🎓 Notice we don't assign any IP addresses to the host's ends of the containers (veth0 and veth1) anymore.
Make sure there is no new routes on the host:
ip route list
default via 172.16.0.1 dev eth0
172.16.0.0/16 dev eth0 proto kernel scope link src 172.16.0.2
Now we are ready to create a bridge device:
ip link add br0 type bridge
ip link set br0 up
When the bridge is created, we need to connect the containers to it by attaching the host's ends (veth0 and veth1) of their veth pairs:
ip link set veth0 master br0
ip link set veth1 master br0
It's time to check the connectivity again!
First container to the second:
nsenter --net=/run/netns/netns0 ping -c 2 172.18.0.20
PING 172.18.0.20 (172.18.0.20) 56(84) bytes of data.
64 bytes from 172.18.0.20: icmp_seq=1 ttl=64 time=0.295 ms
64 bytes from 172.18.0.20: icmp_seq=2 ttl=64 time=0.053 ms

--- 172.18.0.20 ping statistics ---
2 packets transmitted, 2 received, 0% packet loss, time 1001ms
rtt min/avg/max/mdev = 0.053/0.174/0.295/0.121 ms
Second container to the first:
nsenter --net=/run/netns/netns1 ping -c 2 172.18.0.10
PING 172.18.0.10 (172.18.0.10) 56(84) bytes of data.
64 bytes from 172.18.0.10: icmp_seq=1 ttl=64 time=0.052 ms
64 bytes from 172.18.0.10: icmp_seq=2 ttl=64 time=0.103 ms

--- 172.18.0.10 ping statistics ---
2 packets transmitted, 2 received, 0% packet loss, time 1019ms
rtt min/avg/max/mdev = 0.052/0.077/0.103/0.025 ms
Lovely! Everything works great.
With this new approach, we haven't configured veth0 and veth1 at all.
The only two IP addresses we explicitly assigned were on the ceth0 and ceth1 ends.
But since both of them are on the same Ethernet segment (remember, we connected them to the virtual switch),
there is connectivity on the L2 level. Here is how we can check it:
nsenter --net=/run/netns/netns0 ip neigh
172.18.0.20 dev ceth0 lladdr 3e:f2:8f:03:c8:1c REACHABLE
nsenter --net=/run/netns/netns1 ip neigh
172.18.0.10 dev ceth1 lladdr 4e:ff:98:90:d5:ea REACHABLE
Congratulations! 🎉 We've just learned how to turn containers into friendly neighbors and teach them to talk to each other.
Challenge time!
Reaching out to the outside world (IP routing and masquerading)
Our containers can talk to each other, but can they talk to the host, i.e. the root namespace?
nsenter --net=/run/netns/netns0 ping -c 2 172.16.0.2 # host's eth0 address
ping: connect: Network is unreachable
That's kind of obvious, there is simply no route for that in netns0:
nsenter --net=/run/netns/netns0 ip route list
172.18.0.0/16 dev ceth0 proto kernel scope link src 172.18.0.10
The root namespace cannot talk to containers either:
ping -c 2 172.18.0.10
PING 172.18.0.10 (172.18.0.10) 56(84) bytes of data.

--- 172.18.0.10 ping statistics ---
2 packets transmitted, 0 received, 100% packet loss, time 1007ms
ping -c 2 172.18.0.20
PING 172.18.0.20 (172.18.0.20) 56(84) bytes of data.

--- 172.18.0.20 ping statistics ---
2 packets transmitted, 0 received, 100% packet loss, time 1016ms
To establish the connectivity between the root and container namespaces, we need to assign the IP address to the bridge network interface:
ip addr add 172.18.0.1/16 dev br0
Once we assigned the IP address to the bridge interface, we got a route on the host routing table:
ip route list
... omitted lines ...
172.18.0.0/16 dev br0 proto kernel scope link src 172.18.0.1
Now, the root namespace should be able to ping the containers.
Root namespace to the first container:
ping -c 2 172.18.0.10
PING 172.18.0.10 (172.18.0.10) 56(84) bytes of data.
64 bytes from 172.18.0.10: icmp_seq=1 ttl=64 time=0.141 ms
64 bytes from 172.18.0.10: icmp_seq=2 ttl=64 time=0.081 ms

--- 172.18.0.10 ping statistics ---
2 packets transmitted, 2 received, 0% packet loss, time 1020ms
rtt min/avg/max/mdev = 0.081/0.111/0.141/0.030 ms
Root namespace to the second container:
ping -c 2 172.18.0.20
PING 172.18.0.20 (172.18.0.20) 56(84) bytes of data.
64 bytes from 172.18.0.20: icmp_seq=1 ttl=64 time=0.048 ms
64 bytes from 172.18.0.20: icmp_seq=2 ttl=64 time=0.083 ms

--- 172.18.0.20 ping statistics ---
2 packets transmitted, 2 received, 0% packet loss, time 1030ms
rtt min/avg/max/mdev = 0.048/0.065/0.083/0.017 ms
The container probably also got the ability to ping the bridge interface,
but they still cannot reach out to host's eth0.
For that, we need to add the default route to the containers' routing tables:
nsenter --net=/run/netns/netns0 \
  ip route add default via 172.18.0.1  # i.e. via the bridge interface
nsenter --net=/run/netns/netns1 \
  ip route add default via 172.18.0.1  # i.e. via the bridge interface
Confirming the containers-to-host connectivity:
nsenter --net=/run/netns/netns0 ping -c 2 172.16.0.2
PING 172.16.0.2 (172.16.0.2) 56(84) bytes of data.
64 bytes from 172.16.0.2: icmp_seq=1 ttl=64 time=0.035 ms
64 bytes from 172.16.0.2: icmp_seq=2 ttl=64 time=0.036 ms

--- 172.16.0.2 ping statistics ---
2 packets transmitted, 2 received, 0% packet loss, time 1009ms
rtt min/avg/max/mdev = 0.035/0.035/0.036/0.000 ms
Perfect! We can go from the containers to the host and back.
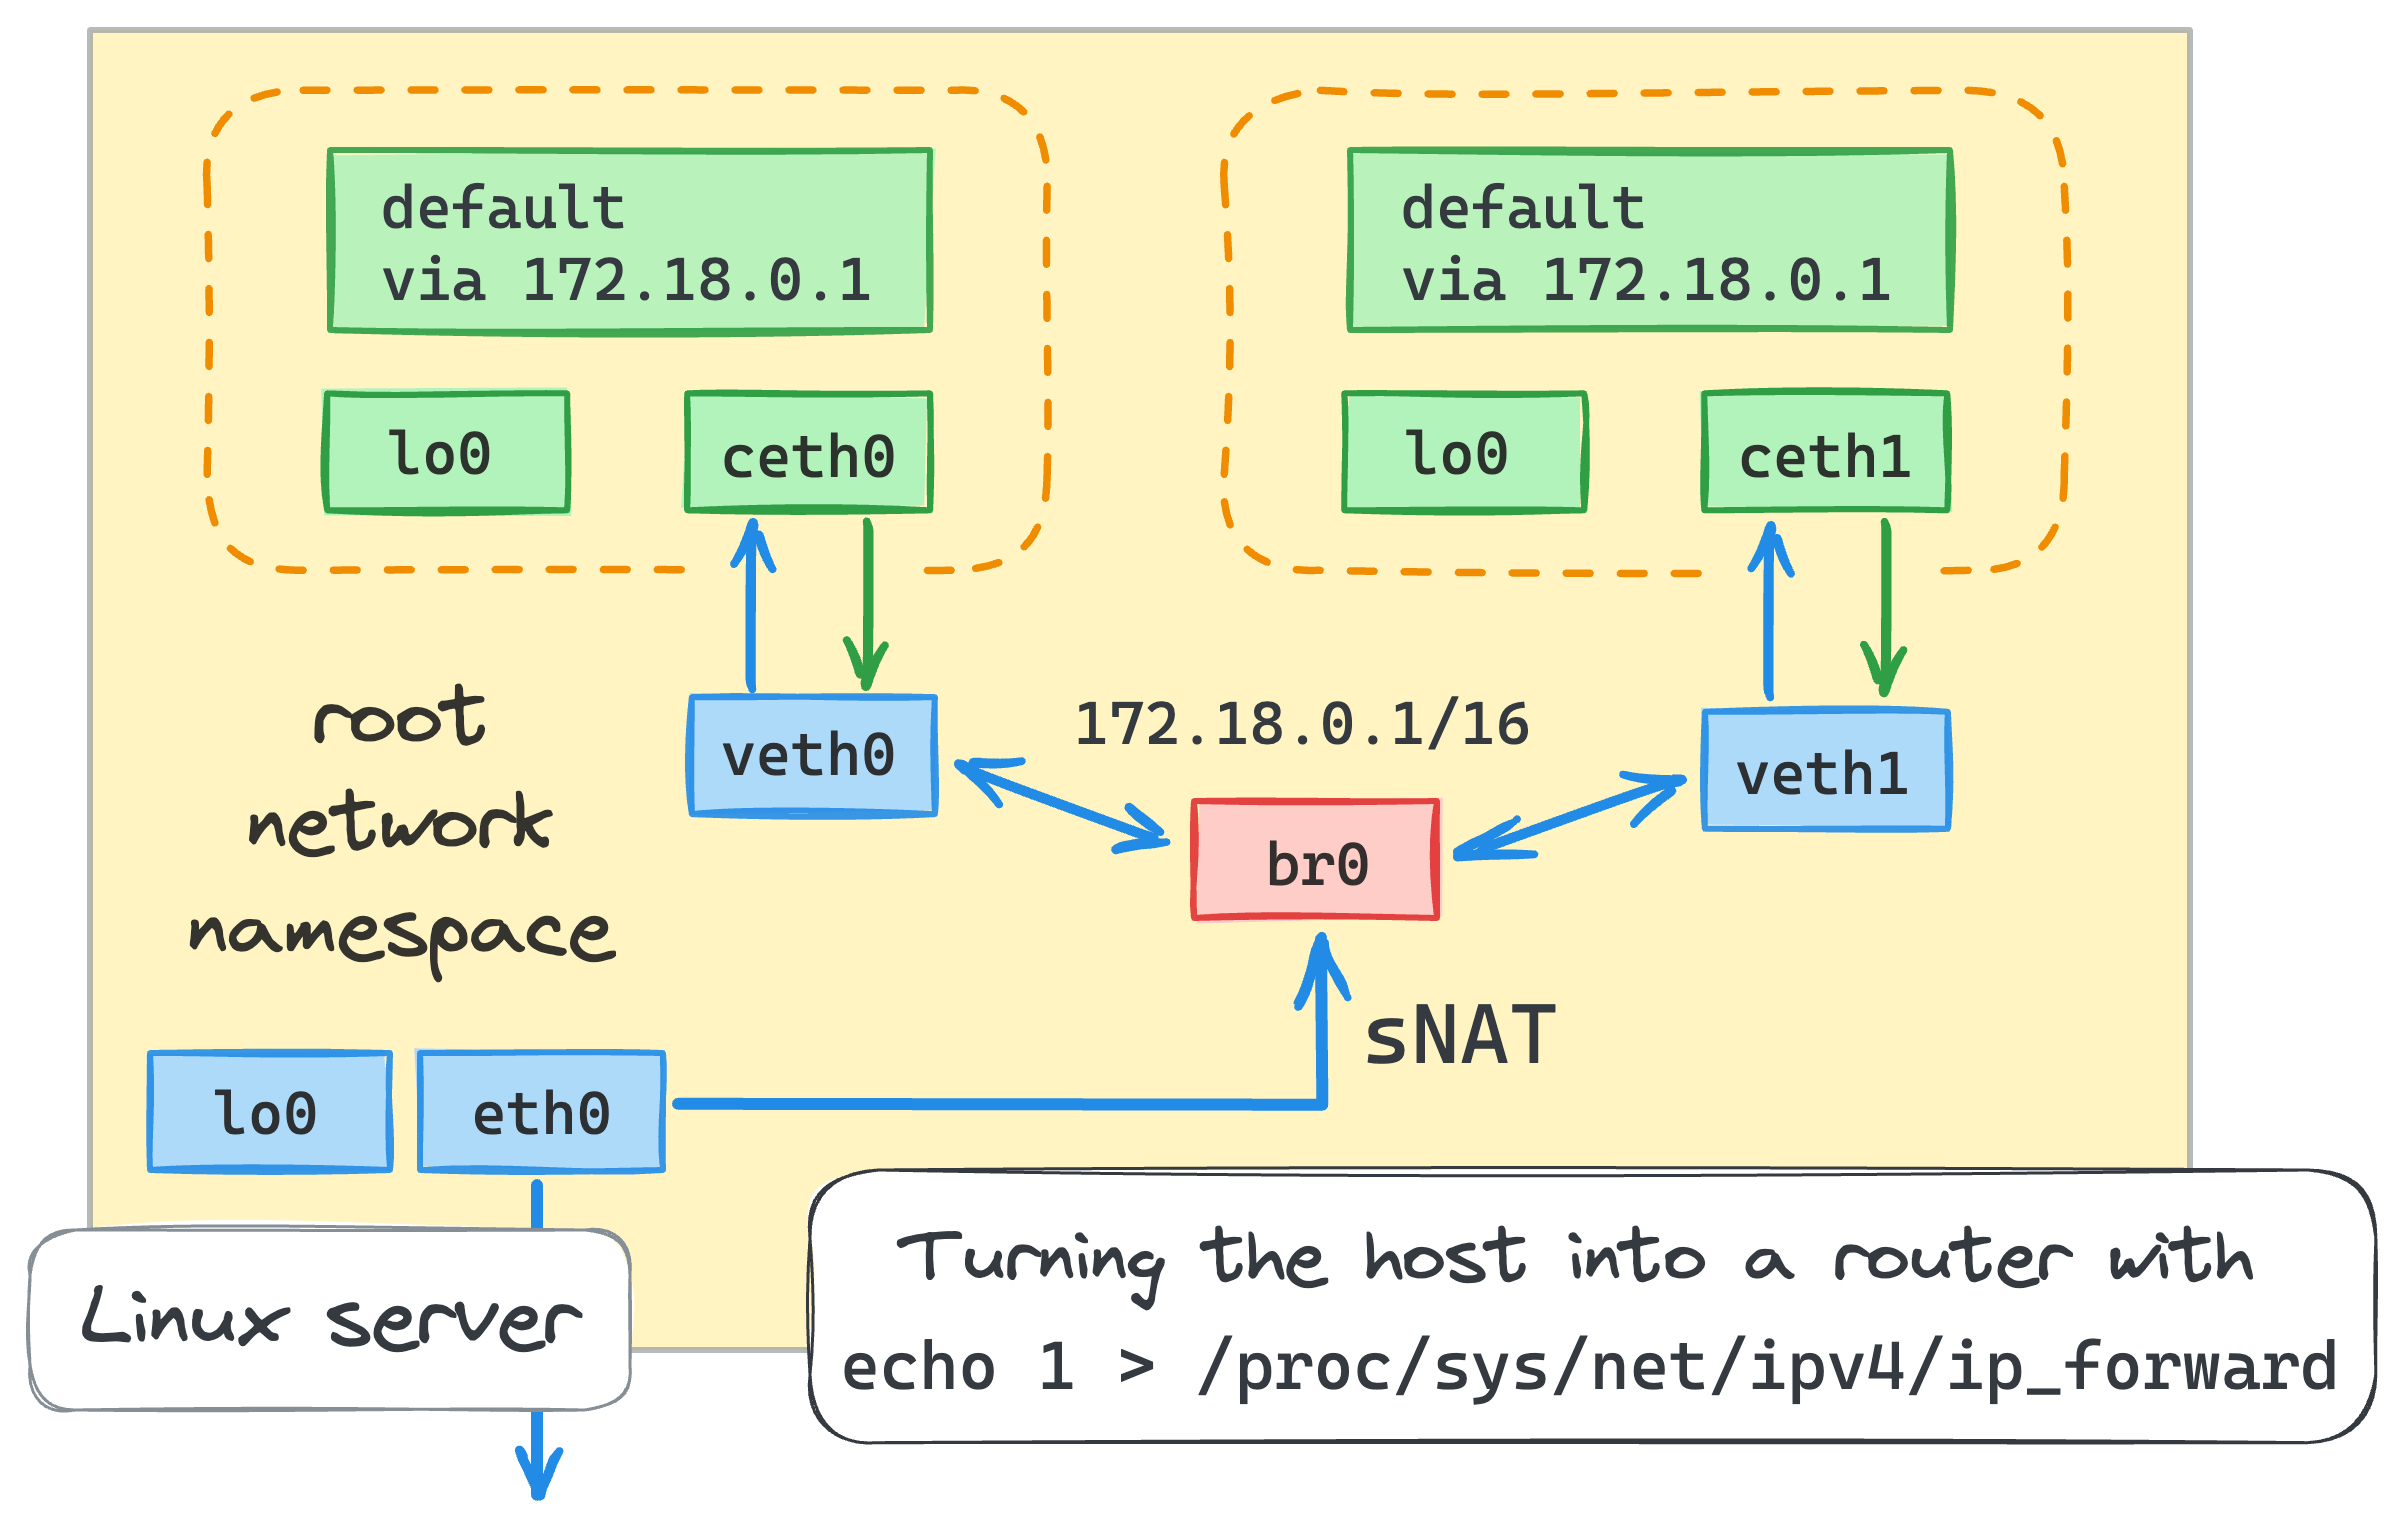
Now, let's try to connect the containers to the outside world. By default, the packet forwarding (i.e. the router functionality) is disabled in Linux. We need to turn it on (from the root namespace):
echo 1 > /proc/sys/net/ipv4/ip_forward
This change basically turned the host machine into a router, and the bridge interface became the default gateway for the containers. Checking the containers-to-internet connectivity:
nsenter --net=/run/netns/netns0 ping -c 2 8.8.8.8
PING 8.8.8.8 (8.8.8.8) 56(84) bytes of data.

--- 8.8.8.8 ping statistics ---
2 packets transmitted, 0 received, 100% packet loss, time 1018ms
Puzzling! Still no luck.
What have we missed?
If the container were to sends packets to the outside world, the destination server would not be able to send packets back to the container because the container's IP address is private.
I.e. the routing rules for that particular IP are known only to the local network.
And lots of the containers in the world share exactly the same private IP address 172.18.0.10.
The solution to this problem is called Network Address Translation (NAT).
Before going to the external network, packets originated by the containers will get their source IP addresses replaced with the host's external interface address.
The host also will track all the existing mappings and on arrival, it'll be restoring the IP addresses before forwarding packets back to the containers.
Sounds complicated to configure manually, but I've got some good news for you!
Thanks to the iptables magic, we need only a single command to make it happen:
iptables -t nat -A POSTROUTING -s 172.18.0.0/16 ! -o br0 -j MASQUERADE
The command is fairly simple when you know how iptables work -
we added a new rule to the nat table of the POSTROUTING chain asking to masquerade all the packets originated in 172.18.0.0/16 network,
except those that are going to the bridge interface.
Checking the connectivity again:
nsenter --net=/run/netns/netns0 ping -c 2 8.8.8.8
PING 8.8.8.8 (8.8.8.8) 56(84) bytes of data.
64 bytes from 8.8.8.8: icmp_seq=1 ttl=115 time=9.29 ms
64 bytes from 8.8.8.8: icmp_seq=2 ttl=115 time=7.72 ms

--- 8.8.8.8 ping statistics ---
2 packets transmitted, 2 received, 0% packet loss, time 1002ms
rtt min/avg/max/mdev = 7.718/8.505/9.293/0.787 ms
⚠️ Beware that we're following the "by default - allow" strategy which might be quite dangerous in a real-world setup.
The host's default iptables policy is ACCEPT for every chain:
iptables -S
-P INPUT ACCEPT
-P FORWARD ACCEPT
-P OUTPUT ACCEPT
As a good practice, Docker, for instance, restricts everything by default and then enables routing for only known paths.
Click here to see Docker iptables rules 🧐
The following are the dumped rules generated by the Docker daemon on an Ubuntu 22.04 machine with single container exposed on port 5005.
You can use docker run -p 5005:80 -d nginx in our online Docker playground to reproduce the results:
iptables -t filter --list-rules
-P INPUT ACCEPT
-P FORWARD DROP
-P OUTPUT ACCEPT
-N DOCKER
-N DOCKER-ISOLATION-STAGE-1
-N DOCKER-ISOLATION-STAGE-2
-N DOCKER-USER
-A FORWARD -j DOCKER-USER
-A FORWARD -j DOCKER-ISOLATION-STAGE-1
-A FORWARD -o docker0 -m conntrack --ctstate RELATED,ESTABLISHED -j ACCEPT
-A FORWARD -o docker0 -j DOCKER
-A FORWARD -i docker0 ! -o docker0 -j ACCEPT
-A FORWARD -i docker0 -o docker0 -j ACCEPT
-A DOCKER -d 172.17.0.2/32 ! -i docker0 -o docker0 -p tcp -m tcp --dport 80 -j ACCEPT
-A DOCKER-ISOLATION-STAGE-1 -i docker0 ! -o docker0 -j DOCKER-ISOLATION-STAGE-2
-A DOCKER-ISOLATION-STAGE-1 -j RETURN
-A DOCKER-ISOLATION-STAGE-2 -o docker0 -j DROP
-A DOCKER-ISOLATION-STAGE-2 -j RETURN
-A DOCKER-USER -j RETURN
iptables -t nat --list-rules
-P PREROUTING ACCEPT
-P INPUT ACCEPT
-P OUTPUT ACCEPT
-P POSTROUTING ACCEPT
-N DOCKER
-A PREROUTING -m addrtype --dst-type LOCAL -j DOCKER
-A OUTPUT ! -d 127.0.0.0/8 -m addrtype --dst-type LOCAL -j DOCKER
-A POSTROUTING -s 172.17.0.0/16 ! -o docker0 -j MASQUERADE
-A POSTROUTING -s 172.17.0.2/32 -d 172.17.0.2/32 -p tcp -m tcp --dport 80 -j MASQUERADE
-A DOCKER -i docker0 -j RETURN
-A DOCKER ! -i docker0 -p tcp -m tcp --dport 5005 -j DNAT --to-destination 172.17.0.2:80
iptables -t mangle --list-rules
-P PREROUTING ACCEPT
-P INPUT ACCEPT
-P FORWARD ACCEPT
-P OUTPUT ACCEPT
-P POSTROUTING ACCEPT
iptables -t raw --list-rules
-P PREROUTING ACCEPT
-P OUTPUT ACCEPT
All right, let's see if you can apply your new knowledge to the following challenge!
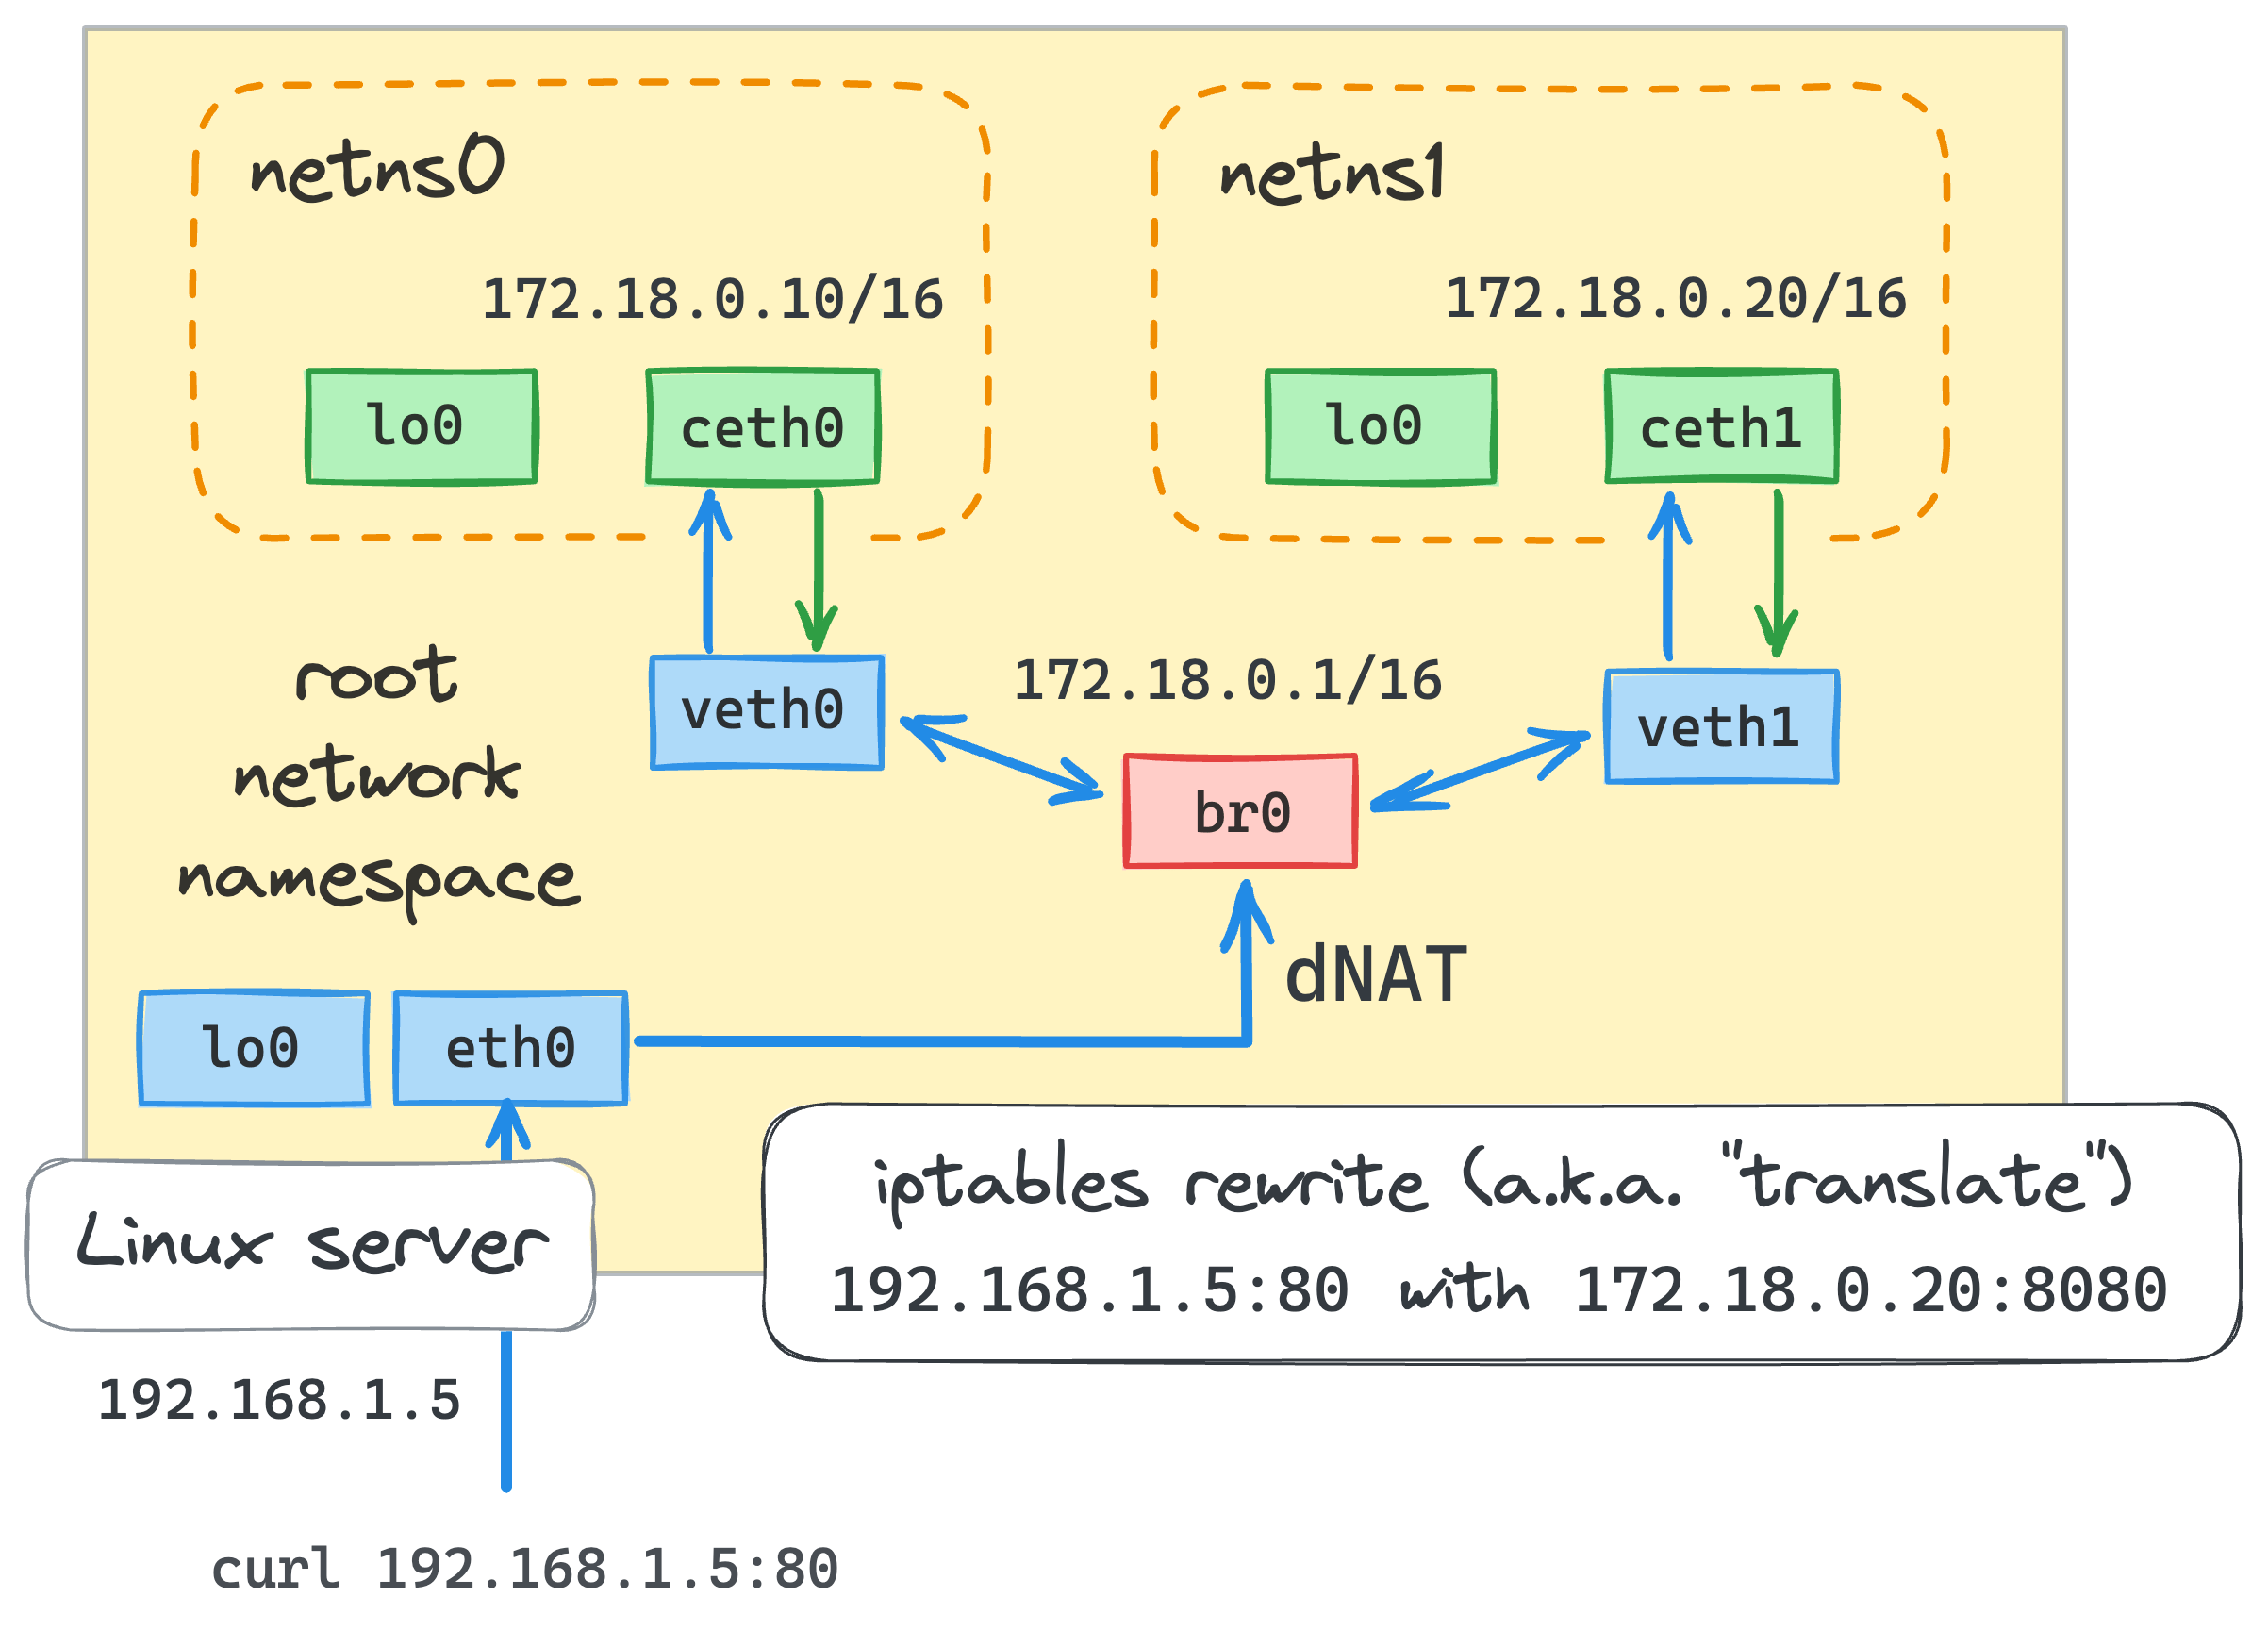
Letting the outside world reach out to containers (port publishing)
It's a well-known practice to publish container ports to some (or all) of the host's interfaces. But what does port publishing actually do?
Imagine we have a server running inside a container:
nsenter --net=/run/netns/netns0 \
  python3 -m http.server --bind 172.18.0.10 5000
If we try to send an HTTP request to this server process from the host, everything will work - well, there is connectivity between root namespace and all the container interfaces, why wouldn't it?
Try it yourself (from the root namespace in a separate terminal tab):
curl 172.18.0.10:5000
<!DOCTYPE HTML PUBLIC "-//W3C//DTD HTML 4.01//EN" "http://www.w3.org/TR/html4/strict.dtd">
... omitted lines ...
However, if we were to access this server from the outside world, what IP address would we use?
The only IP address we might know is the host's external interface address eth0:
curl 172.16.0.2:5000
curl: (7) Failed to connect to 172.16.0.2 port 5000 after 0 ms: Connection refused
Thus, we need to find a way to forward any packets arriving at port 5000 on the host's eth0 interface to the 172.18.0.10:5000 destination.
Or, in other words, we need to publish the container's port 5000 on the host's eth0 interface.
One more time, iptables to the rescue!
Port publishing for the external traffic can be done with the following command (from the root namespace):
iptables -t nat -A PREROUTING \
  -d 172.16.0.2 -p tcp -m tcp --dport 5000 \
  -j DNAT --to-destination 172.18.0.10:5000
Publishing for the local traffic looks slightly different (since it doesn't pass the PREROUTING chain):
iptables -t nat -A OUTPUT \
  -d 172.16.0.2 -p tcp -m tcp --dport 5000 \
  -j DNAT --to-destination 172.18.0.10:5000
Additionally, we need to enable iptables intercepting traffic over bridged networks:
modprobe br_netfilter
Testing time!
curl 172.16.0.2:5000
<!DOCTYPE HTML PUBLIC "-//W3C//DTD HTML 4.01//EN" "http://www.w3.org/TR/html4/strict.dtd">
... omitted lines ...
Perfect! You're well-prepared for the next challenge!
Understanding Docker network types (drivers)
Ok, sir, what can we do with all this useless knowledge?
For instance, we could try to understand some of the Docker network modes!
Let's start with the --network host mode.
Using a Docker playground,
try to compare the output of the following commands:
ip link list # from the Docker host
...versus
docker run -it --rm --network host alpine ip link list
Surprise, surprise, they are exactly the same!
I.e. in the host mode, Docker simply doesn't use the network namespace isolation and containers work in the root network namespace and share the networking context with the host machine.
The next mode to inspect is --network none.
The output of the docker run -it --rm --network none alpine ip link command will show only a single loopback network interface.
It matches the observations we've made right after creating a new network namespace at the beginning of our journey.
Last but not least, the --network bridge (the default) mode.
Well, it's exactly what we've been trying to reproduce in this whole tutorial!
Furthermore, many Kubernetes distros also use bridge network to interconnect Pods running on the same node.
So, understanding how it works is a good starting point to dive into the higher-level Kubernetes CNIs like Flannel or Calico.
It's time for the ultimate challenge of this tutorial!
Conclusion
We've learned today how to virtualize network environments, connect multiple Linux containers using veth pairs and Linux bridge devices,
and even tried to configure IP routing and NAT to enable connectivity between the containers and the outside world.
Most importantly, we've tried connecting the dots between the used techniques and the Docker network modes, hopefully demystifying them a bit.
This knowledge should help you become a power user of Docker and also lay a good foundation for understanding the higher-level networking concepts
used in Kubernetes. Good luck!
Materials used to write this article
- Introduction to Linux interfaces for virtual networking
- ip(8) - Linux manual page
- ⭐ Linux Bridge - Part 1 by Hechao Li (and a more technical Part 2)
- Anatomy of a Linux bridge
- A container networking overview
- Demystifying container networking
- Introducing Linux Network Namespaces
- 🎥 Container Networking From Scratch
- Tracing the path of network traffic in Kubernetes - how Kubernetes builds its networking atop containers.
Our other articles on networking
About the Author
Ivan Velichko
Ivan is the creator of iximiuz Labs and a long-time tech blogger and educator with a traditional focus on server-side tech and containers.
Writes about
Frequently covers