From Zero to Your First eBPF Program

When you start the tutorial, you’ll see a Term 1 terminal and an IDE on the right-hand side. You are logged in as laborant, and the current working directory already contains the ebpf-hello-world folder. Inside, you’ll find the eBPF Hello World labs, implemented with ebpf-go — a Golang eBPF framework developed as part of the Cilium project.
And there are several good reasons for this choice:
- Cloud Native alignment – Most Cloud Native tools are written in Go - Kubernetes, Docker, Prometheus, ArgoCD and so on. Learning eBPF through a Golang framework puts you one step ahead if you plan to integrate eBPF with container runtimes, or cloud tooling.
- Proven and well-supported – ebpf-go is maintained by Cilium and supported by many large enterprises including Cisco, Google, Datadog, Cloudflare. Cilium is a leading project in the eBPF ecosystem, and its backing ensures the framework remains stable, secure, and production-ready.
- Developer experience – The API is idiomatic Go, making it easier for Go developers to quickly become productive without context switching between languages.
- Ecosystem integration – ebpf-go is widely adopted across observability, security, and networking projects. Skills you build here will directly transfer to real-world tools you may already be using.
- Community and documentation – The project has active contributors, solid documentation, and plenty of real-world examples, which makes the learning curve much smoother.
If this still hasn’t convinced you, check out our blog post where we compare different frameworks and break down their pros and cons.
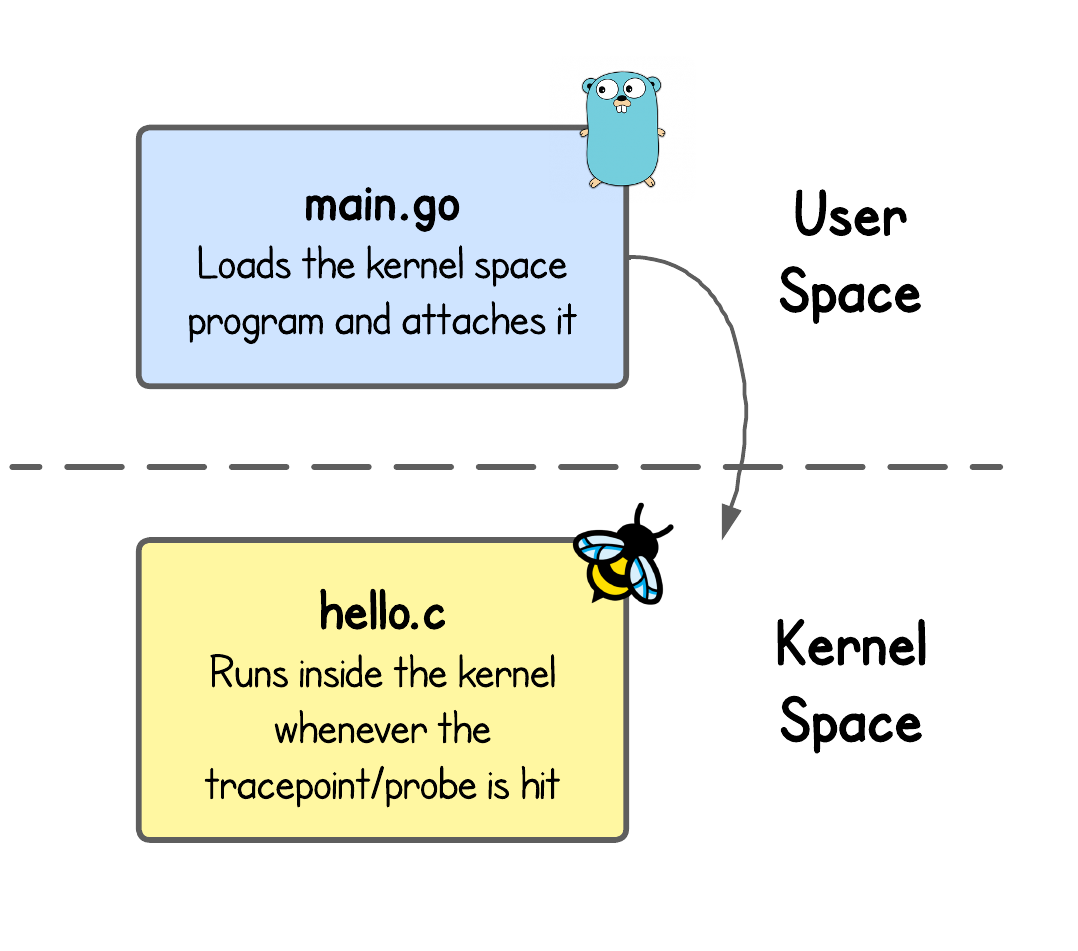
The Two Sides of an eBPF Application
If you open the ebpf-hello-world/lab1 folder—using either the Term 1 terminal or the IDE—you’ll find a minimal (arguably the smallest) eBPF application we could put together.
Every eBPF application typically has two parts:
- User-space program: Loads the kernel-space program and attaches it to the desired tracepoint or probe in the kernel. (Here:
main.go) - Kernel-space program: Runs inside the kernel once the tracepoint/probe is hit. This is where the actual eBPF kernel logic lives. (Here:
hello.c)
We have intentionally added code comments to (almost) every code line, just for the sake of this tutorial. Start by looking into hello.c and follow along with the main.go.
What about vmlinux.h file?
At a high level, your eBPF program needs access to kernel context and data structures to do anything meaningful. For example, we could extend this tutorial's code and read the arguments passed to the execve system call. These arguments are available through the trace_event_raw_sys_enter struct — and that struct is defined in vmlinux.h.
It was generated using bpftool - a super handy eBPF CLI tool that we’ll cover in more detail in an upcoming tutorial:
bpftool btf dump file /sys/kernel/btf/vmlinux format c > vmlinux.h
Generating and Building the eBPF Application
Let's build the eBPF application, using:
cd ebpf-hello-world/lab1 # Go inside the ebpf-hello-world/lab1 folder if you haven't already
go generate
go build
Well, this is interesting — what’s the difference between go build and go generate, or even what are they in the first place?
go build is the standard command that compiles your Go code into a binary (an executable). On the other hand, go generate is a bit less common.
By definition, go generate runs code generation commands that you define in special //go:generate comments within your Go source files. If you look inside the main.go, you’ll find one of these directives right at the top.
package main

//go:generate go run github.com/cilium/ebpf/cmd/bpf2go -target bpf hello hello.c

import (
    "log"
    "os"
...
Namely, the go generate command will invoke a handy tool called bpf2go with some arguments passed to it. But what's really interesting, if you look inside the code of this tool is that it is nothing more that just a wrapper around clang - compiler for C, C++, and related languages, built as part of the LLVM project, which happens to also be used for compiling eBPF kernel code.
What does the `-target bpf` argument do?
By default, eBPF applications follow the endianness of the CPU they’re compiled on.
In other words:
- If you're compiling on a little-endian CPU, the program's byte order will be little-endian.
- On a big-endian CPU, the program's byte order will be big-endian.
But interestingly enough, Clang compiler (used for eBPF programs) supports options like amd64 or arm64 targets for cross-compilation, enabling you to compile on one architecture and run on another.
That said, you have a couple of options for setting the -target flag when compiling the program using clang:
bpf: Uses the endianness of the CPU it compiles onbpfel: Compiles for little-endian systems (x86, ARM, RISC-V, ..)bpfeb: Compiles for big-endian systems (IBM System/360, 370, 390, Z, ..)- *architecture specific: Be it either
amd64,arm64and so on
Though architecture specific compilation might rarely be a concern, it becomes important for cases like eBPF kprobes. Kprobes rely on the kernel's struct pt_regs input context, which stores a copy of the CPU registers' contents.
Since registers are architecture-specific, the pt_regs structure definition depends on the architecture you’re running on, requiring you to specify the appropriate -target <value> flag.
We’ll see such an example in a future tutorial for sure.
In more simple terms, go generate compiles the eBPF kernel program (hello.c) into an object file (hello_bpf.o) and generates a Go source file (hello_bpf.go) that embeds the object and provides helper functions to work with it.
Lastly, go build picks up the main.go and hello_bpf.go and builds the final eBPF application binary lab1.
What about `//go:build ignore` at the top of hello.c file?
Since Go files and C files are in the same folder, the Go toolchain tries to treat everything in that folder as part of the build. But files like hello.c are not Go files, and by default go build will complain if it encounters them.
//go:build ignore
#include "vmlinux.h"
#include <bpf/bpf_helpers.h>

char _license[] SEC("license") = "GPL";

SEC("tracepoint/syscalls/sys_enter_execve")
int handle_execve_tp(struct trace_event_raw_sys_enter *ctx) {
...
Running the eBPF Application
Now, to actually run the compiled lab1 binary and eBPF applications in general, the CAP_BPF Linux capability is required.
That's mandatory because the logic almost always uses privileged BPF operations like loading the eBPF code into the kernel, creating eBPF maps, loading BTF information, iterating over programs and maps, etc.
💡 CAP_BPF is available since Linux kernel 5.8 and was introduced to separate out BPF functionality from the overloaded CAP_SYS_ADMIN capability.
However, since in this demo environment and you can log in as root, this is not a problem - you've got all the permissions.
So we can just run our eBPF application, using:
sudo ./lab1
The lab1 eBPF application should now capture and log Hello world each time a process is executed on the system.
Well, not exactly...
To keep this tutorial as simple as possible, our user and kernel programs aren’t communicating with each other yet — they would need a buffer to exchange data. We’ll cover that in a future tutorial. But if you’re curious, this is typically implemented using different types of BPF maps.
For now, every time a process runs on the system, our eBPF program does capture the event and executes, but just logs the Hello world to the eBPF logs. This done by the following line:
...
SEC("tracepoint/syscalls/sys_enter_execve")
int handle_execve_tp(struct trace_event_raw_sys_enter *ctx) {
    bpf_printk("Hello world");
    return 0;
}
To view these logs, on the right side at the top, open the second Term 2 tab by clicking (+), and run:
sudo cat /sys/kernel/debug/tracing/trace_pipe
It's quite unlikely you won't see any Hello world logs. But this could be the case, since there is little going on in a small VM like ours, so let's execute some process ourself.
Open the third Term 3 tab, and execute:
cat /etc/os-release
# or
uname -a
Switch back to the second Term 2 tab and see the output.
Congrats, you've came to the end of this tutorial. 🥳
In the next tutorial, you’ll learn about eBPF Maps — how they persist and share data between programs and user space.
About the Author
Writes about
Frequently covers