KubeBlocks Tutorial 301 - Backup & Restore

Welcome to the third chapter of our KubeBlocks tutorial series!
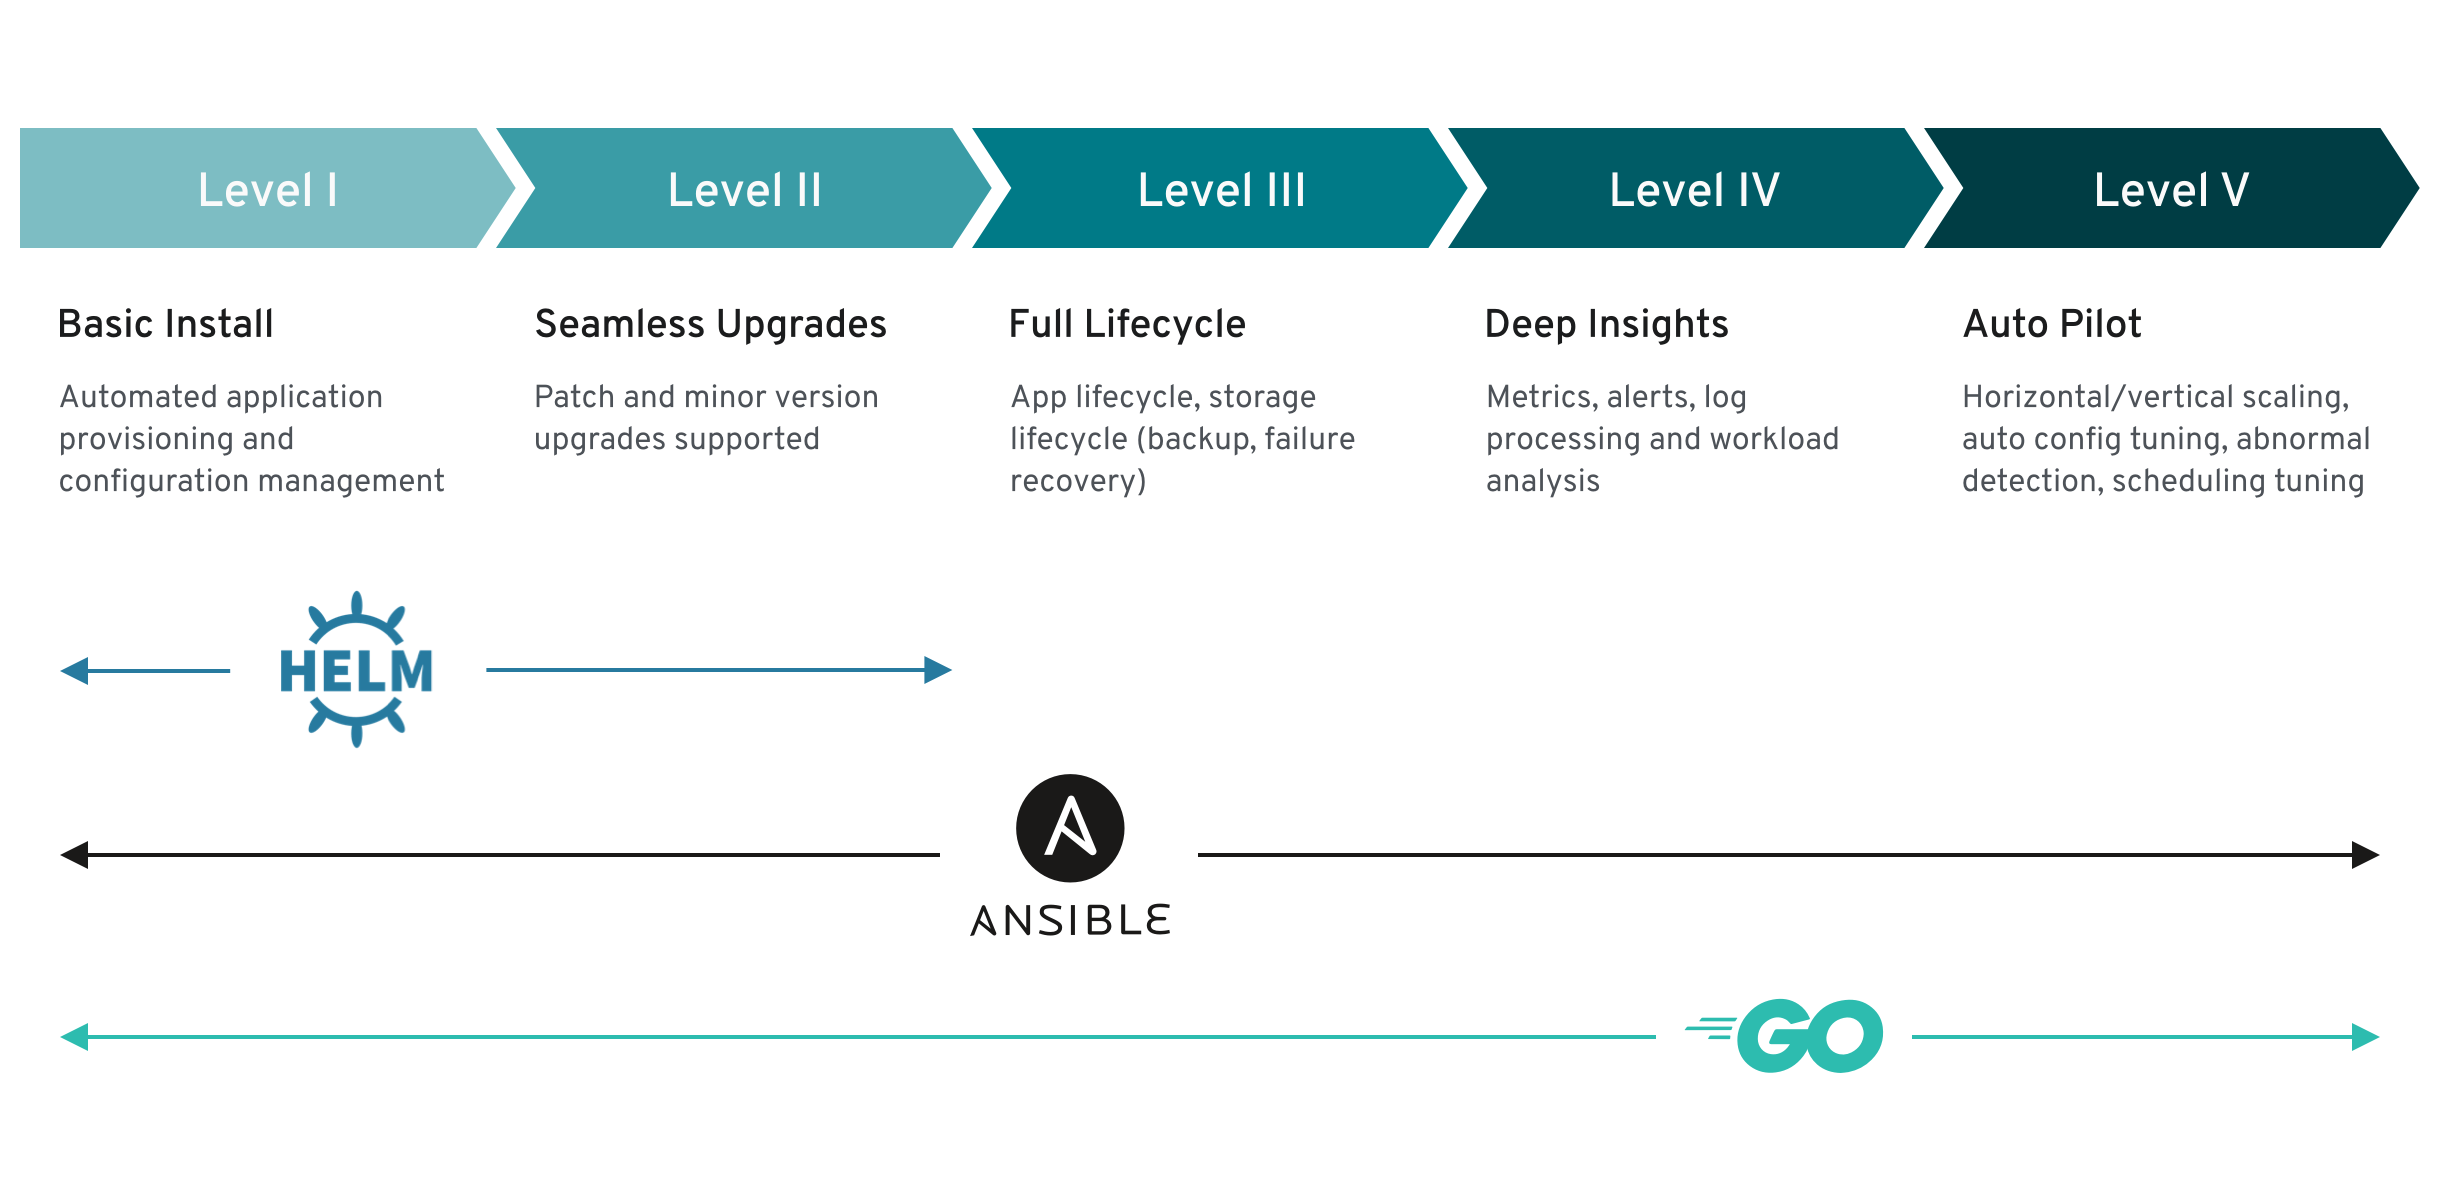
In this tutorial, we’ll focus on backup & restore — a crucial component of Operator Capability Level 3, which emphasizes full lifecycle management of databases on Kubernetes. We’ll now address why backups and restores are vital for production environments, how to create them with minimal downtime, and how to safely and quickly recover data when needed.
👋 If you find KubeBlocks helpful, please consider giving us a star ⭐️ on our GitHub repository. Every star motivates us to make KubeBlocks even better!
Prerequisites
To save you time, we’ve automatically installed KubeBlocks and created a 3-replica MySQL cluster in the background. It may take a few minutes to complete the setup—feel free to proceed, but keep in mind that some commands might need to wait until the installation is fully finished.
If you’re new to KubeBlocks or missed the previous tutorials, see:
1. Introduction
In this lab environment, you should already have:
- KubeBlocks installed.
- A 3-replica MySQL cluster named
myclusterin thedemonamespace.
Verify that the cluster is running:
kubectl get pods -n demo
You should see something like:
NAME                READY   STATUS    RESTARTS   AGE
mycluster-mysql-0   4/4     Running   0          2m
mycluster-mysql-1   4/4     Running   0          2m
mycluster-mysql-2   4/4     Running   0          2m
This same cluster will be used to demonstrate backup & restore features.
Optional: Add Sample Data
Before proceeding, you may want to connect to your MySQL cluster and create some test data. For example:
kbcli cluster connect mycluster -n demo
Once connected, create your own database, tables, and sample records so that you can confirm the backup and restore processes successfully carry over any data you create.
Sample Records
-- Create database
CREATE DATABASE test;

-- Use the database
USE test;

-- Create a simple employees table
CREATE TABLE employees (
    id INT PRIMARY KEY AUTO_INCREMENT,
    name VARCHAR(50) NOT NULL,
    salary DECIMAL(10,2),
    hire_date DATE
);

-- Insert sample records
INSERT INTO employees (name, salary, hire_date) VALUES
('John Smith', 50000.00, '2023-01-15'),
('Mary Johnson', 60000.00, '2023-02-20'),
('Bob Wilson', 55000.00, '2023-03-10');
2. Backup Basics
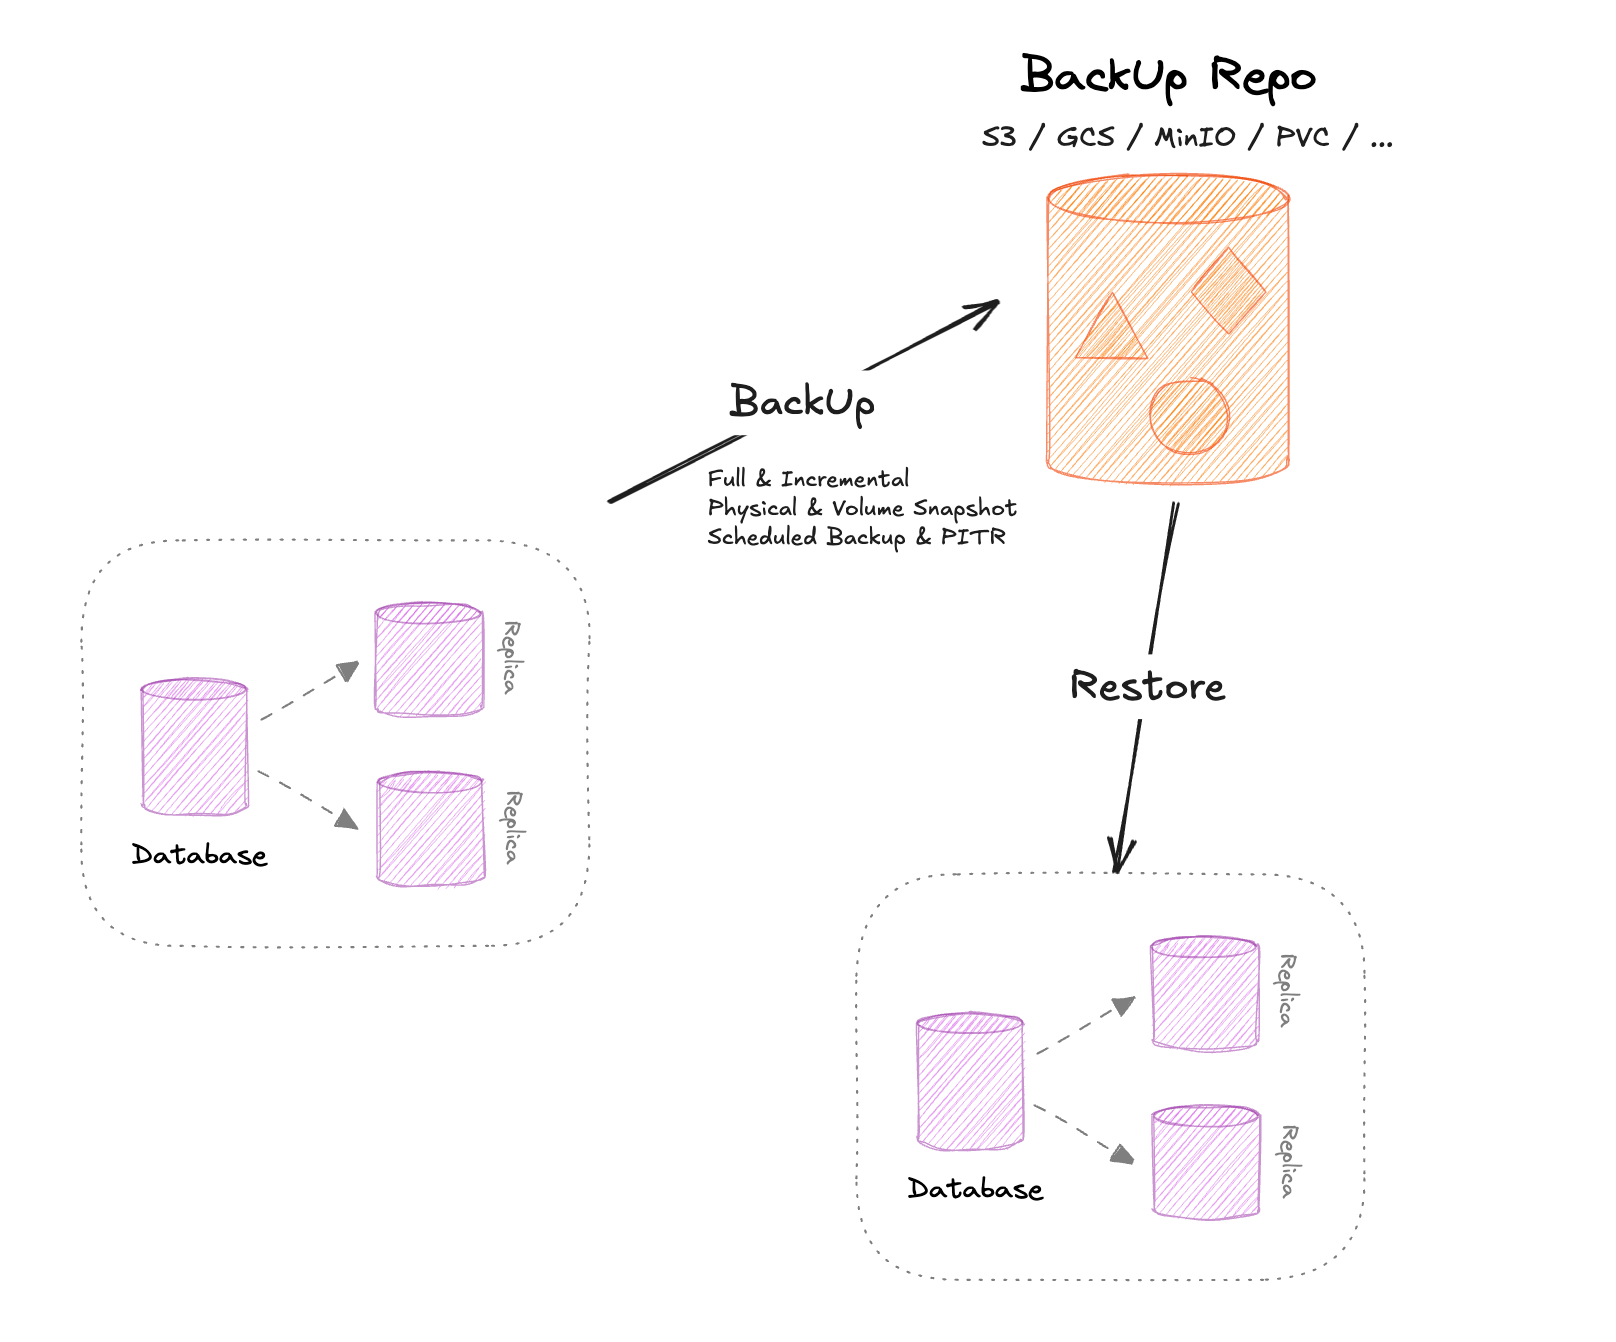
KubeBlocks provides comprehensive backup and restore capabilities to protect your database data. All backups require a BackupRepo, where backup artifacts are stored—this can be object storage or PVC-based volumes.
Under the hood, KubeBlocks supports physical backup tools (like XtraBackup for MySQL) and volume snapshots, giving you the flexibility to choose the method that best fits your workload. You can perform on-demand backups for immediate data protection or set up scheduled backups to automatically capture and manage your data over time.
2.1 Supported Backup Storage
- Object Storage: S3, GCS, OSS, COS, or MinIO (S3-compatible).
- PVC-based Storage: Uses Kubernetes Persistent Volume Claims.
In KubeBlocks, you may have multiple BackupRepos for different environments or regions. For this tutorial, a default repository has already been created. To verify it:
kubectl get backuprepo -n demo
You should be able to see output like this
NAME         STATUS   STORAGEPROVIDER   ACCESSMETHOD   DEFAULT   AGE
backuprepo   Ready    pvc               Mount          true      45m
3. Creating a Backup
3.1 Backup Methods
KubeBlocks supports a variety of backup methods, which may differ based on the database engine and the underlying storage. In general:
- Physical backup (e.g.,
xtrabackup) captures the actual data files on disk. - Volume snapshot leverages cloud-native snapshot capabilities of the storage layer.
The approach you choose can vary depending on your database engine, storage provider, and performance requirements. For MySQL, two common methods are:
- xtrabackup: Uses the Percona XtraBackup tool for online backups.
- volume-snapshot: Uses Kubernetes volume snapshot functionality if supported by your storage.
To see which backup methods are available for mycluster:
kbcli cluster describe-backup-policy mycluster -n demo
You should be able to see output like this
Summary:
Name:               mycluster-mysql-backup-policy
Cluster:            mycluster
Namespace:          demo
Default:            true

Backup Methods:
NAME              ACTIONSET              SNAPSHOT-VOLUMES
xtrabackup        mysql-xtrabackup       false
volume-snapshot   mysql-volumesnapshot   true
3.2 Create a Backup
Below is a minimal example of creating a backup via YAML. We’ll use xtrabackup here:
- Define the Backup Resource:
kubectl apply -f - <<-'EOF'
apiVersion: dataprotection.kubeblocks.io/v1alpha1
kind: Backup
metadata:
  name: mybackup
  namespace: demo
spec:
  backupMethod: xtrabackup
  backupPolicyName: mycluster-mysql-backup-policy
EOF
backupMethod: xtrabackupindicates we’re using the xtrabackup tool.backupPolicyName: mycluster-mysql-backup-policyreferences the default MySQL backup policy.
- Verify the Backup:
After applying the resource, you can:
kubectl get backup -n demo
Wait for the STATUS to become Completed (It may take about a minute).
NAME       POLICY                          METHOD       REPO         STATUS      TOTAL-SIZE   DURATION   CREATION-TIME          COMPLETION-TIME        EXPIRATION-TIME
mybackup   mycluster-mysql-backup-policy   xtrabackup   backuprepo   Completed   1587198      55s        2025-01-21T10:03:35Z   2025-01-21T10:04:30Z
Here, TOTAL-SIZE shows the size of the backup, and DURATION indicates how long the backup process took.
You can also check details:
kubectl describe backup mybackup -n demo
The backup artifact now resides in the configured BackupRepo (e.g., S3, MinIO, or a PVC).
4. Restoring from a Backup
4.1 Restore Workflow Overview
KubeBlocks supports creating a new cluster from an existing backup, allowing you to spin up a cloned environment. Under the hood, the operator retrieves the backup data from the specified BackupRepo and re-seeds the target MySQL cluster.
4.2 Executing the Restore
- Restore the Backup:
kbcli cluster restore myrestore --backup mybackup -n demo
How to Restore data from backup using YAML
The kbcli command above is a convenience wrapper that ultimately applies YAML behind the scenes. For instance:
kubectl apply -f - <<-'EOF'
apiVersion: apps.kubeblocks.io/v1alpha1
kind: Cluster
metadata:
  name: myrestore
  namespace: demo
  annotations:
    kubeblocks.io/restore-from-backup: '{"mysql":{"name":"mybackup","namespace":"demo","connectionPassword":"Bw1cR15mzfldc9hzGuK4m1BZQOzha6aBb1i9nlvoBdoE9to4"}}'
spec:
  clusterDefinitionRef: apecloud-mysql
  clusterVersionRef: ac-mysql-8.0.30
  terminationPolicy: WipeOut
  componentSpecs:
    - name: mysql
      componentDefRef: mysql
      replicas: 3
      volumeClaimTemplates:
        - name: data
          spec:
            accessModes:
              - ReadWriteOnce
            resources:
              requests:
                storage: 20Gi
EOF
Here, the annotation kubeblocks.io/restore-from-backup references the backup to use and the necessary credentials for restoration.
- Monitor the Restore Process:
kubectl get pods -n demo
You’ll see new Pods (e.g., myrestore-mysql-0, etc.) come online and begin synchronization.
- Validate the New/Recovered Cluster:
- Ensure each Pod transitions to
Running. - Confirm that you can connect and that the data is correct:
kbcli cluster connect myrestore -n demo
Check whether any test databases or tables you created earlier are present in this new cluster, confirming that your backup and restore processes worked successfully.
Summary
We have demonstrated how KubeBlocks supports backup & restore — a key feature at Operator Capability Level 3. These capabilities ensure data integrity, disaster recovery, and production-grade operations for your MySQL workloads on Kubernetes.
What’s Next?
Try More Advanced Features
- Scheduled Backups: Automate recurring backups for peace of mind.
- Point-in-time Recovery (PITR): If supported by your storage and backup method.
- Customizing Backup Repos: Store data in different object storage providers or across multiple regions.
- Try the same backup/restore workflow for other databases (PostgreSQL, Redis, MongoDB, etc.) to see how KubeBlocks provides consistent management across multiple engines.
About the Author
Writes about
Frequently covers