KubeBlocks Tutorial 101 - Getting Started
Welcome to this KubeBlocks tutorial!
KubeBlocks is a Kubernetes Operator that allows you to deploy and manage databases and stateful applications seamlessly. With a strong emphasis on “Run Any Database on KubeBlocks,” you can effortlessly spin up popular databases such as MySQL, PostgreSQL, Redis, and more on your Kubernetes cluster.
👋 If you find KubeBlocks helpful, please consider giving us a star ⭐️ on our GitHub repository. Every star motivates us to make KubeBlocks even better!
In this guide, you will:
- Install KubeBlocks and its command-line interface (CLI).
- Create and connect to a MySQL cluster.
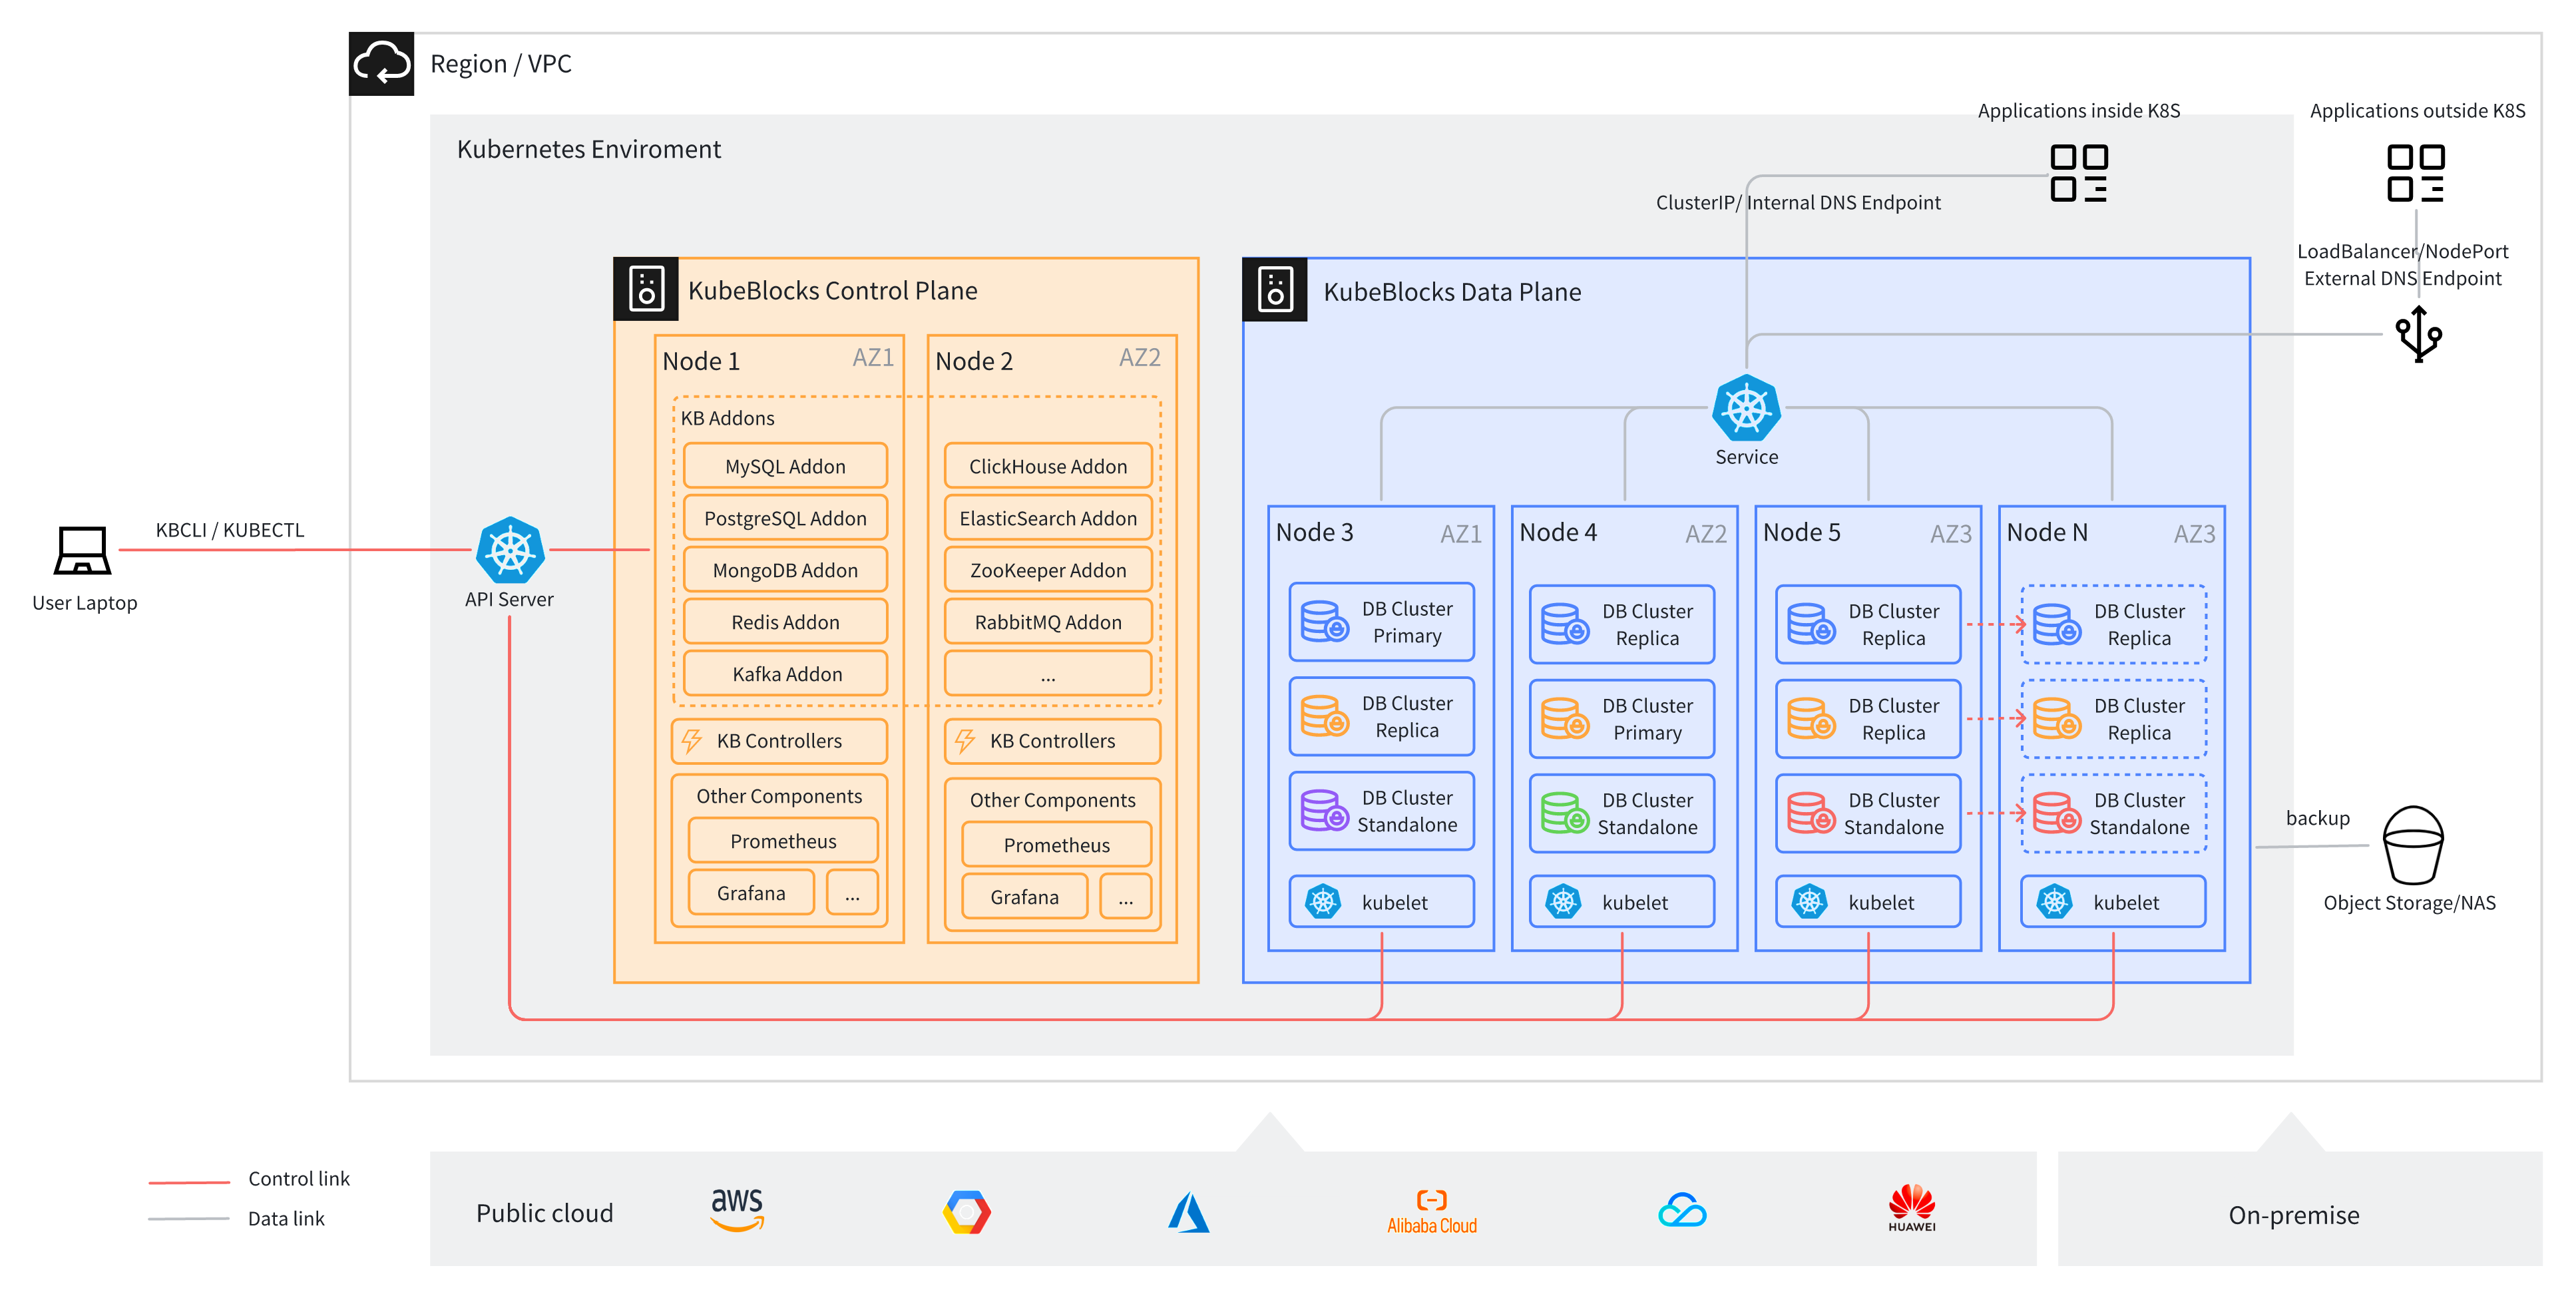
Below is a quick overview of KubeBlocks’s architecture.

Let’s dive in!
1. Install the KubeBlocks CLI
First, install the KubeBlocks CLI tool to interact with KubeBlocks resources easily.
export KB_CLI_VERSION=v0.9.2
curl -fsSL https://kubeblocks.io/installer/install_cli.sh | bash -s $KB_CLI_VERSION
Once the installation completes, verify that the kbcli command is available:
kbcli --help
You should see a help message listing available kbcli commands.
2. Install KubeBlocks
This step merges the installation of CRDs, adding the KubeBlocks Helm repository, and installing KubeBlocks with Helm into a single procedure.
2.1. Install the KubeBlocks CRDs
Install the Custom Resource Definitions (CRDs) required by KubeBlocks. These CRDs define the additional Kubernetes objects that KubeBlocks will manage (e.g., database clusters).
export KB_VERSION=v0.9.2
kubectl create -f https://github.com/apecloud/kubeblocks/releases/download/$KB_VERSION/kubeblocks_crds.yaml
2.2. Add the KubeBlocks Helm Repository
Before installing KubeBlocks itself, add the official Helm repository and update your local Helm cache:
helm repo add kubeblocks https://apecloud.github.io/helm-charts
helm repo update
2.3. Install KubeBlocks with Helm
You’re now ready to install KubeBlocks:
helm -n kb-system install kubeblocks kubeblocks/kubeblocks --version 0.9.2 \
  --set image.registry=docker.io \
  --set dataProtection.image.registry=docker.io \
  --set addonChartsImage.registry=docker.io \
  --create-namespace
This command:
- Creates a new namespace called kb-system (if it doesn’t exist).
- Installs the KubeBlocks operator and required services into your cluster.
Once the installation finishes, check the status of the newly created Pods:
kubectl get pods -n kb-system
Within a few minutes, you should see KubeBlocks-related Pods in a Running status.
3. Deploy a MySQL Cluster
Now that KubeBlocks is installed, let’s see it in action by deploying a MySQL cluster.
3.1. Create the MySQL Cluster
Use the following YAML to create a MySQL cluster named mycluster in the demo namespace, with minimal CPU and memory:
kubectl create namespace demo
cat <<EOF | kubectl apply -f -
apiVersion: apps.kubeblocks.io/v1alpha1
kind: Cluster
metadata:
  name: mycluster
  namespace: demo
spec:
  clusterDefinitionRef: mysql
  clusterVersionRef: mysql-8.0.33
  terminationPolicy: Delete
  affinity:
    podAntiAffinity: Preferred
    topologyKeys:
    - kubernetes.io/hostname
  tolerations:
    - key: kb-data
      operator: Equal
      value: 'true'
      effect: NoSchedule
  componentSpecs:
  - name: mysql
    componentDefRef: mysql
    enabledLogs:
    - error
    - slow
    disableExporter: true
    replicas: 1
    serviceAccountName: kb-mycluster
    resources:
      limits:
        cpu: '0.5'
        memory: 0.5Gi
      requests:
        cpu: '0.5'
        memory: 0.5Gi
    volumeClaimTemplates:
    - name: data
      spec:
        accessModes:
        - ReadWriteOnce
        resources:
          requests:
            storage: 20Gi
EOF
KubeBlocks will then spin up the necessary resources in your Kubernetes cluster.
Check the status of the Pods to see when they become ready:
kubectl get pods -n demo
After a few moments, you should see something like:
NAME                READY   STATUS    RESTARTS   AGE
mycluster-mysql-0   4/4     Running   0          <some time>
3.2. Connect to the MySQL Cluster
To verify the database is available, wait for port 3306 to open on the MySQL Pod:
kubectl -n demo exec mycluster-mysql-0 -- sh -c 'until mysqladmin ping -h127.0.0.1 -uroot -p$MYSQL_ROOT_PASSWORD --silent; do echo "Waiting for MySQL on port 3306..." && sleep 5; done'
Once the above check succeeds, connect to the MySQL server directly:
kubectl -n demo exec -it mycluster-mysql-0 -- bash -c 'mysql -h127.0.0.1 -uroot -p$MYSQL_ROOT_PASSWORD'
You will then be greeted by a MySQL shell prompt. Congratulations, you are now connected to your new MySQL cluster running on KubeBlocks!
Hint
- You can run the command below to get the
usernameandpasswordof the cluster:
kubectl get secrets mycluster-conn-credential -n demo -o jsonpath='{.data.username}' | base64 -d
>
root

kubectl get secrets mycluster-conn-credential -n demo -o jsonpath='{.data.password}' | base64 -d
>
b8wvrwlm
4. Manage Configuration Changes
KubeBlocks uses intelligent configuration management to apply parameter changes safely and efficiently.
- If a parameter supports dynamic reloading, the change is applied immediately with no downtime.
- If the parameter requires a restart, KubeBlocks automatically performs a graceful restart of the necessary components—ensuring minimal disruption to your database cluster.
4.1 View parameters
kbcli provides a series of commands to help you view, configure, and manage parameters.
- View the details of all the current configuration files.
kbcli cluster describe-config mycluster --show-detail -n demo
- View the user guide of a specified parameter.
kbcli cluster explain-config mycluster --param=innodb_buffer_pool_size --config-specs=mysql-replication-config -n demo
Explanation of Output
component: mysql
template meta:
  ConfigSpec: mysql-replication-config  ComponentName: mysql    ClusterName: mycluster
Configure Constraint:
  Parameter Name:     innodb_buffer_pool_size
  Allowed Values:     [5242880-18446744073709552000]
  Scope:              Global
  Dynamic:            true
  Type:               integer
  Description:        The size in bytes of the memory buffer innodb uses to cache data and indexes of its tables
- Allowed Values: It defines the valid value range of this parameter.
- Dynamic: The value of
DynamicinConfigure Constraintdefines how the parameter configuration takes effect. There are two different configuration strategies based on the effectiveness type of modified parameters, i.e. dynamic and static.- When
Dynamicistrue, it means the effectiveness type of parameters is dynamic and can be configured online. - When
Dynamicisfalse, it means the effectiveness type of parameters is static and a pod restarting is required to make the configuration effective.
- When
- Description: It describes the parameter definition.
4.2 Configure parameters
The example below takes configuring max_connections and innodb_buffer_pool_size as an example.
- View the current values of
max_connectionsandinnodb_buffer_pool_size.
kbcli cluster connect mycluster -n demo
mysql> show variables like '%max_connections%';
>
+-----------------+-------+
| Variable_name   | Value |
+-----------------+-------+
| max_connections | 83    |
+-----------------+-------+
1 row in set (0.04 sec)
mysql> show variables like '%innodb_buffer_pool_size%';
>
+-------------------------+-----------+
| Variable_name           | Value     |
+-------------------------+-----------+
| innodb_buffer_pool_size | 134217728 |
+-------------------------+-----------+
1 row in set (0.00 sec)
- Adjust the values of
max_connectionsandinnodb_buffer_pool_size.
kbcli cluster configure mycluster --set=max_connections=600,innodb_buffer_pool_size=512M -n demo
- Search the status of the parameter configuration.
kbcli cluster describe-ops $<Replace_With_OpsRequestName> -n demo
Status.Progress shows the overall status of the parameter configuration and Conditions show the details.
Explanation of Output
Spec:
Name: mycluster-reconfiguring-pxs46 NameSpace: demo Cluster: mycluster  Type: Reconfiguring

Command:
  kbcli cluster configure mycluster --components=mysql --config-specs=mysql-replication-config --config-file=my.cnf --set innodb_buffer_pool_size=512M --set max_connections=600 --namespace=demo

Status:
  Start Time:         Jul 05,2024 19:00 UTC+0800
  Completion Time:    Jul 05,2024 19:00 UTC+0800
  Duration:           2s
  Status:             Succeed
  Progress:           2/2
                      OBJECT-KEY   STATUS   DURATION   MESSAGE

Conditions:
LAST-TRANSITION-TIME         TYPE                 REASON                            STATUS   MESSAGE
Jul 05,2024 19:00 UTC+0800   WaitForProgressing   WaitForProgressing                True     wait for the controller to process the OpsRequest: mycluster-reconfiguring-pxs46 in Cluster: mycluster
Jul 05,2024 19:00 UTC+0800   Validated            ValidateOpsRequestPassed          True     OpsRequest: mycluster-reconfiguring-pxs46 is validated
Jul 05,2024 19:00 UTC+0800   Reconfigure          ReconfigureStarted                True     Start to reconfigure in Cluster: mycluster, Component: mysql
Jul 05,2024 19:00 UTC+0800   Succeed              OpsRequestProcessedSuccessfully   True     Successfully processed the OpsRequest: mycluster-reconfiguring-pxs46 in Cluster: mycluster

Warning Events: <none>
- Connect to the database to verify whether the parameters are configured as expected.
It takes about 30 seconds for the configuration to take effect because the kubelet requires some time to sync changes in the ConfigMap to the Pod's volume.
kbcli cluster connect mycluster -n demo
mysql> show variables like '%max_connections%';
>
+-----------------+-------+
| Variable_name   | Value |
+-----------------+-------+
| max_connections | 600   |
+-----------------+-------+
1 row in set (0.04 sec)
mysql> show variables like '%innodb_buffer_pool_size%';
>
+-------------------------+-----------+
| Variable_name           | Value     |
+-------------------------+-----------+
| innodb_buffer_pool_size | 536870912 |
+-------------------------+-----------+
1 row in set (0.00 sec)
Batch Configuration
For your convenience, KubeBlocks offers a tool edit-config to help you configure parameters in a bach.
kbcli cluster edit-config mycluster --config-spec=mysql-replication-config -n demo
- Since MySQL currently supports multiple templates, it is required to use
--config-specto specify a configuration template. You can runkbcli cluster describe-config mycluster -n demoto view all template names. - If there are multiple components in a cluster, use
--componentsto specify a component.
4.3 View history and compare differences
After the configuration is completed, you can search the configuration history and compare the parameter differences.
View the parameter configuration history.
kbcli cluster describe-config mycluster -n demo
>
component: mysql

ConfigSpecs Meta:
CONFIG-SPEC-NAME           FILE                              ENABLED   TEMPLATE                          CONSTRAINT                           RENDERED                                   COMPONENT   CLUSTER
mysql-replication-config   my.cnf                            true      oracle-mysql8.0-config-template   oracle-mysql8.0-config-constraints   mycluster-mysql-mysql-replication-config   mysql       mycluster
agamotto-configuration     agamotto-config.yaml              false     mysql-agamotto-configuration                                           mycluster-mysql-agamotto-configuration     mysql       mycluster
agamotto-configuration     agamotto-config-with-proxy.yaml   false     mysql-agamotto-configuration                                           mycluster-mysql-agamotto-configuration     mysql       mycluster

History modifications:
OPS-NAME                        CLUSTER     COMPONENT   CONFIG-SPEC-NAME           FILE     STATUS    POLICY              PROGRESS   CREATED-TIME                 VALID-UPDATED
mycluster-reconfiguring-pxs46   mycluster   mysql       mysql-replication-config   my.cnf   Succeed   syncDynamicReload   2/2        Jul 05,2024 19:00 UTC+0800   {"my.cnf":"{\"mysqld\":{\"innodb_buffer_pool_size\":\"512M\",\"max_connections\":\"600\"}}"}
mycluster-reconfiguring-x52fb   mycluster   mysql       mysql-replication-config   my.cnf   Succeed   syncDynamicReload   2/2        Jul 05,2024 19:04 UTC+0800   {"my.cnf":"{\"mysqld\":{\"max_connections\":\"1000\"}}"}
From the above results, there are two parameter modifications.
Compare these modifications to view the configured parameters and their different values for different versions.
kbcli cluster diff-config mycluster-reconfiguring-pxs46 mycluster-reconfiguring-x9zsf -n demo
>
DIFF-CONFIGURE RESULT:
  ConfigFile: my.cnf    TemplateName: mysql-replication-config ComponentName: mysql    ClusterName: mycluster       UpdateType: update

PARAMETERNAME             mycluster-reconfiguring-pxs46   mycluster-reconfiguring-x9zsf
max_connections           600                             2000
innodb_buffer_pool_size   512M                            1G
Conclusion
You have successfully:
- Installed KubeBlocks on your Kubernetes cluster (CRDs, Helm repo, and Operator).
- Deployed a MySQL cluster.
- Connected to MySQL within the same cluster.
- Managed configuration changes for the MySQL cluster.
KubeBlocks provides a convenient way to run any database on Kubernetes with minimal friction, empowering you to standardize database operations in a cloud-native manner.
For more detailed usage and advanced configuration, check out the official KubeBlocks documentation. Enjoy your new, streamlined database management capabilities on Kubernetes!
What’s Next?
- Explore Other Databases: Try PostgreSQL, Redis, MongoDB, ElasticSearch, Qdrant, and more — all using the same KubeBlocks workflow you just learned.
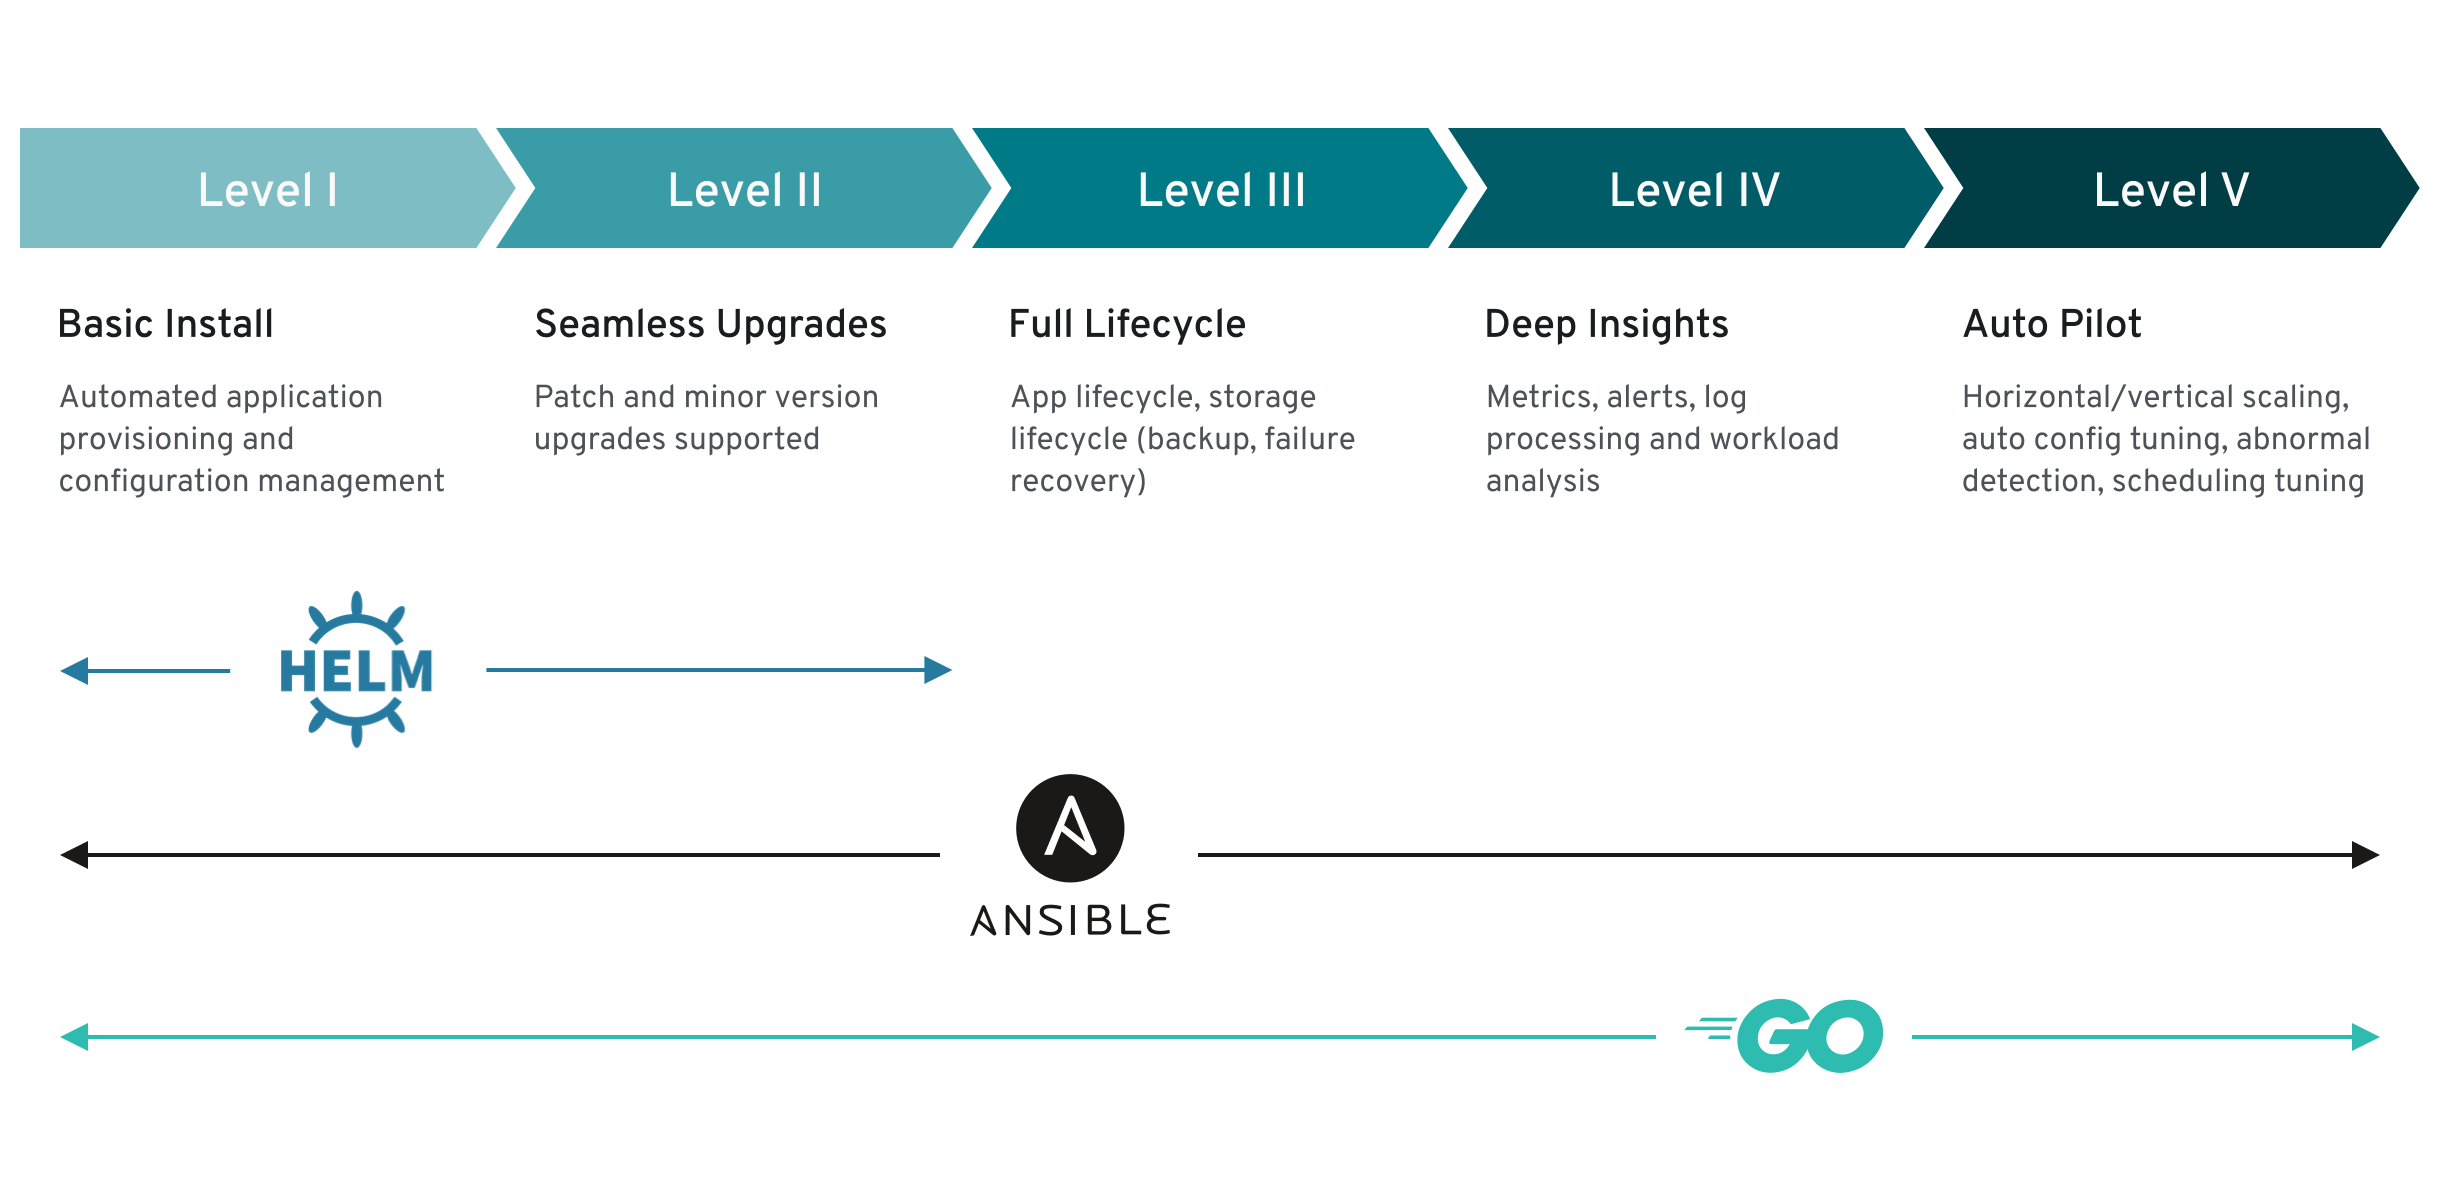
- Dive into Advanced Capabilities: Move beyond basic deployments to explore higher Operator Capability Levels, including automated upgrades, backup and restore, self-healing, and more.
- Stay Tuned for the Next Tutorial: In our upcoming guide, we’ll tackle more complex scenarios and showcase how to leverage KubeBlocks’ features for production-grade operations.
