KubeBlocks Tutorial 201 - Seamless Upgrades
Welcome to the second chapter of our KubeBlocks tutorial series!
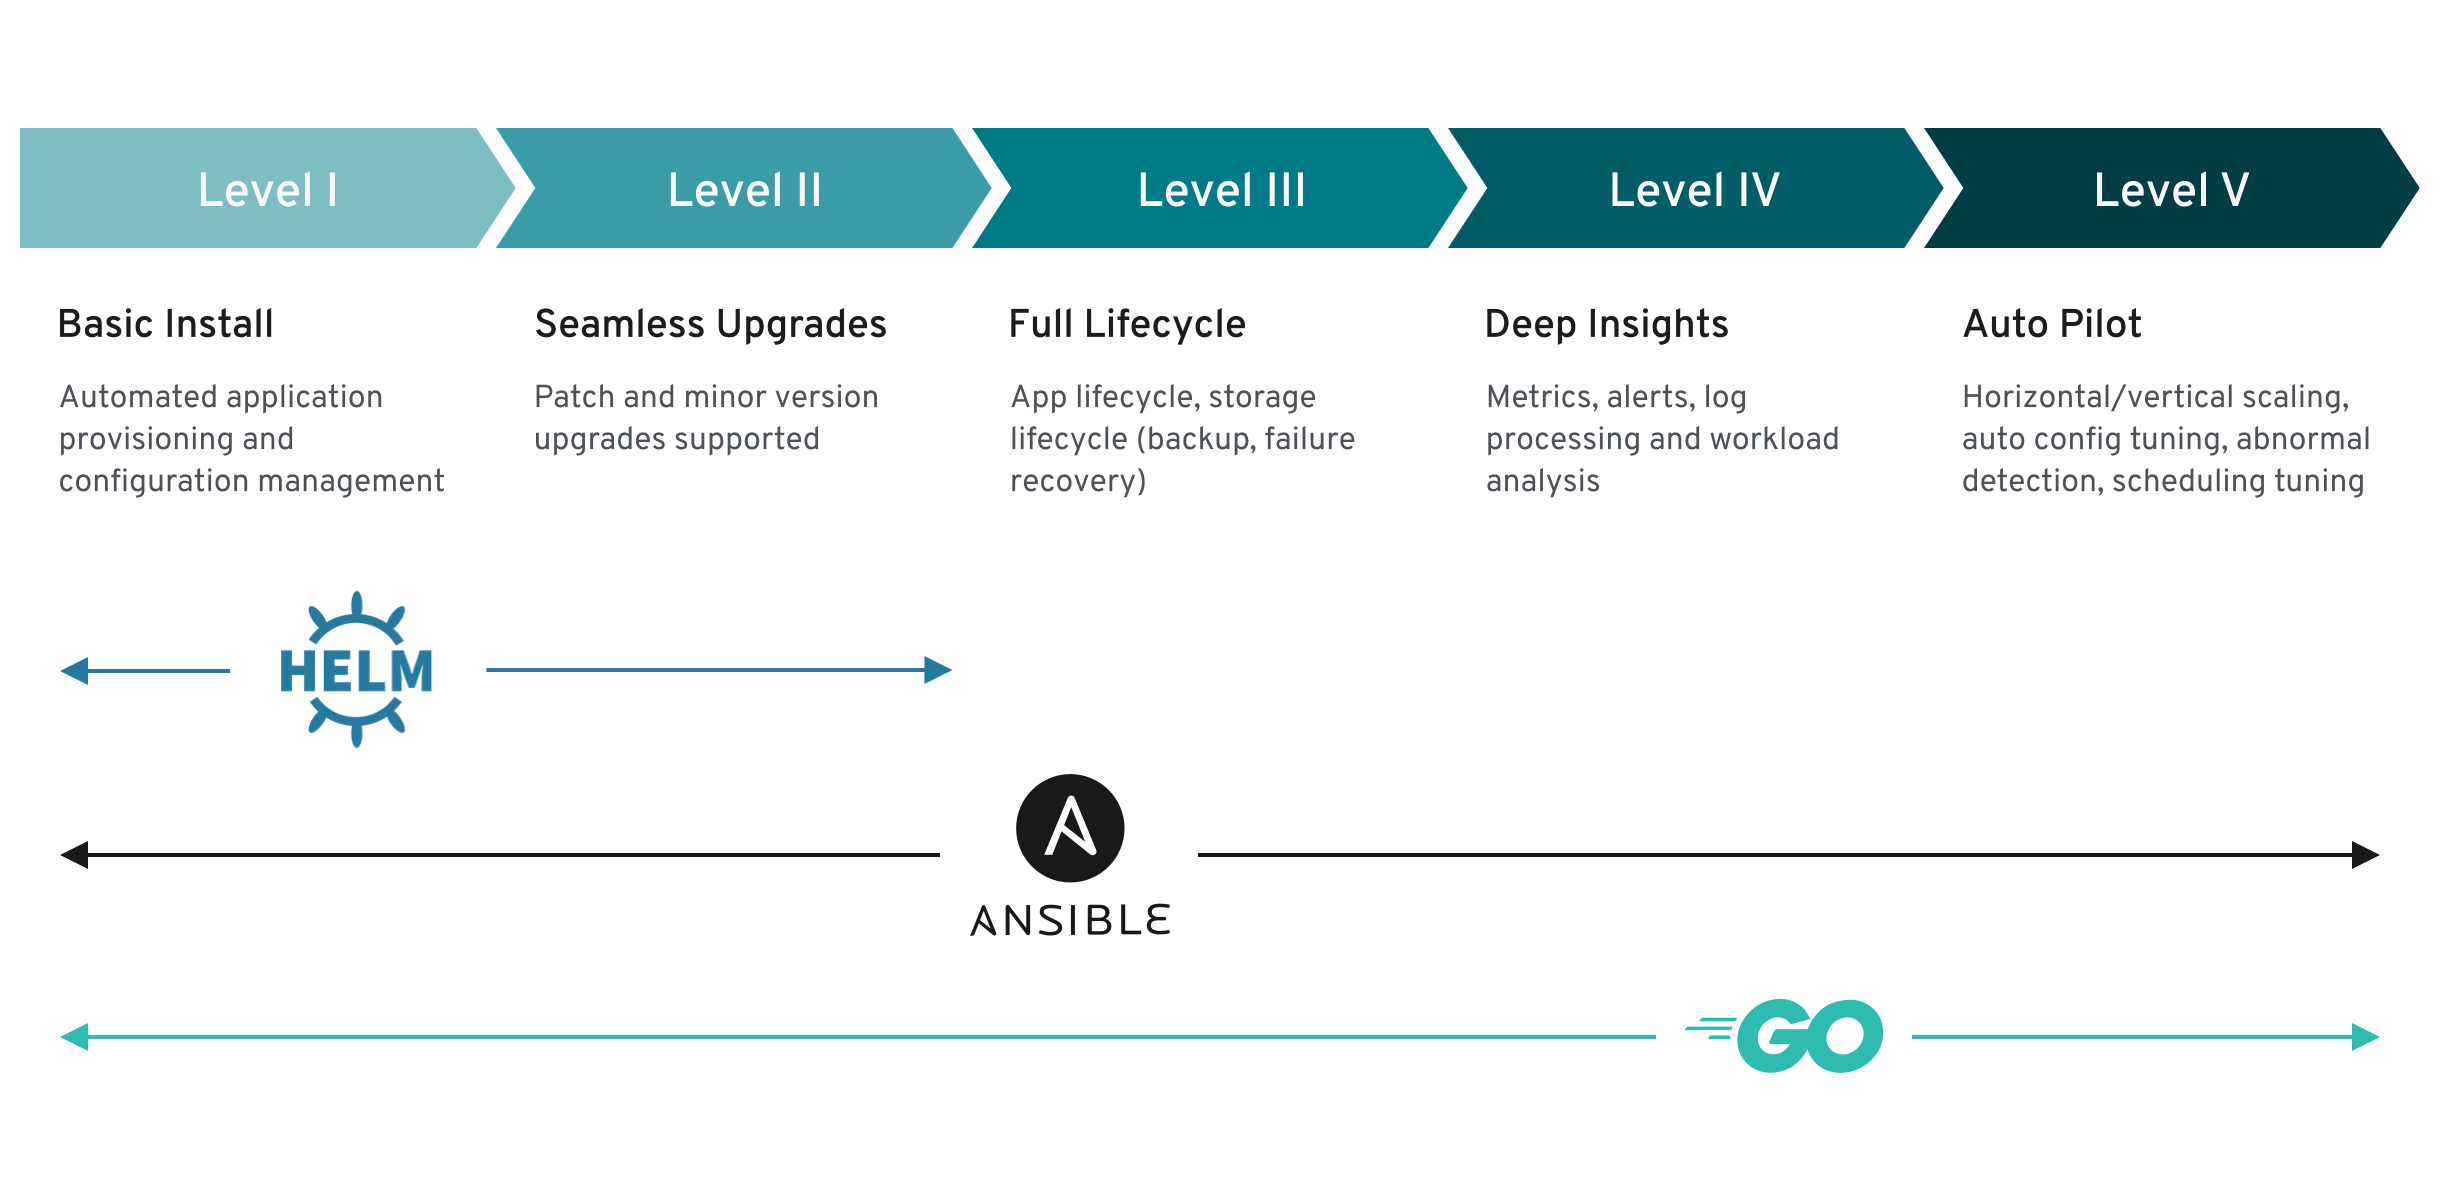
In this guide, we focus on seamless upgrades—a key feature that aligns with Operator Capability Level 2. You’ll see how KubeBlocks keeps your databases updated with minimal downtime, even in a production-grade environment. Whether you’re managing a small dev cluster or a large-scale enterprise deployment, KubeBlocks streamlines the entire database lifecycle on Kubernetes, and can scale up to even more advanced capabilities.
👋 If you find KubeBlocks helpful, please consider giving us a star ⭐️ on our GitHub repository. Every star motivates us to make KubeBlocks even better!

Prerequisites
To save you time, we’ve automatically installed KubeBlocks and created a 3-replica MySQL cluster in the background. It may take a few minutes to complete the setup—feel free to proceed, but keep in mind that some commands might need to wait until the installation is fully finished.
If you’re new to KubeBlocks or missed the first tutorial, see: KubeBlocks Tutorial 101 – Getting Started
1. Introduction & Review
1.1. Checking Your MySQL Cluster
By default, a 3-replica MySQL cluster named mycluster has been created in the demo namespace:
kubectl get pods -n demo
Example output:
NAME                READY   STATUS    RESTARTS   AGE
mycluster-mysql-0   4/4     Running   0          16s
mycluster-mysql-1   4/4     Running   0          16s
mycluster-mysql-2   4/4     Running   0          16s
1.2. High Availability Demonstration
KubeBlocks automatically configures one of these Pods as the primary database instance, while the rest act as secondaries. To see which is which, run:
kubectl get pods -n demo -o yaml | grep kubeblocks.io/role
You may see something like:
kubeblocks.io/role: secondary
kubeblocks.io/role: primary
kubeblocks.io/role: secondary
In this example, mycluster-mysql-1 is the primary, but keep in mind the actual Pod name assigned as primary in your environment could be different (e.g., mycluster-mysql-0 or mycluster-mysql-2).
To illustrate KubeBlocks’ built-in High Availability (HA), try removing the primary Pod:
kubectl delete pod mycluster-mysql-1 -n demo
Shortly after deletion, KubeBlocks will:
- Promote one of the secondaries to become the new primary.
- Restart the removed Pod (e.g.,
mycluster-mysql-1). - Maintain data consistency across replicas throughout the process.
When you run kubectl get pods -n demo again, you’ll see that the removed Pod is recreated and that a new primary has been automatically elected. No manual intervention is needed, and no data is lost. This seamless recovery demonstrates why KubeBlocks is ideal for production-grade environments where minimal downtime is crucial.
2. Upgrade a Cluster
Upgrading your database version is a key maintenance task. KubeBlocks orchestrates a rolling upgrade—updating pods one at a time to keep your database highly available throughout the process.
2.1 View Available MySQL Versions
Before starting an upgrade, check which MySQL versions KubeBlocks can deploy:
kubectl get clusterversion | grep mysql
Example output (your environment may differ):
Warning: The ClusterVersion CRD has been deprecated since 0.9.0
ac-mysql-8.0.30      apecloud-mysql       Available   2m55s
ac-mysql-8.0.30-1    apecloud-mysql       Available   2m55s
mysql-5.7.44         mysql                Available   2m56s
mysql-8.0.33         mysql                Available   2m56s
mysql-8.4.2          mysql                Available   2m56s
2.2 Performing a Rolling Upgrade
Let’s say you want to upgrade from mysql-8.0.33 to mysql-8.4.2. KubeBlocks will:
- Create a OpsRequest to instruct
KubeBlocks Operatorto upgrade the cluster. - Sequentially take each secondary offline, upgrade it, bring it back up, and then move on.
- Upgrade the primary last, typically with a secondary promoted temporarily if necessary to avoid downtime.
1. Patch the cluster:
kubectl apply -f - <<EOF
apiVersion: apps.kubeblocks.io/v1alpha1
kind: OpsRequest
metadata:
  name: mysql-upgrade
  namespace: demo
spec:
  clusterRef: mycluster
  type: Upgrade
  upgrade:
    clusterVersionRef: mysql-8.4.2
EOF
This instructs KubeBlocks to begin upgrading the mycluster to mysql-8.4.2.
2. Monitor the rolling update:
kubectl get pods -n demo --watch
You should see the Pods being updated one by one.
3. Validate that the cluster remains operational:
- Check Pod Status: Ensure each Pod transitions through
RunningandReadystates in a sequence. - Confirm New Version: Once all Pods have been upgraded, you can connect to MySQL and run:
kubectl -n demo exec -it mycluster-mysql-0 -- bash -c 'mysql -h127.0.0.1 -uroot -p$MYSQL_ROOT_PASSWORD -e "SELECT @@version;"'
to ensure that the reported version matches 8.4.2.
If everything goes smoothly, you’ve completed a seamless rolling upgrade with minimal or zero downtime. Your applications should remain connected throughout.
2.3 Understanding the Rolling Upgrade Process
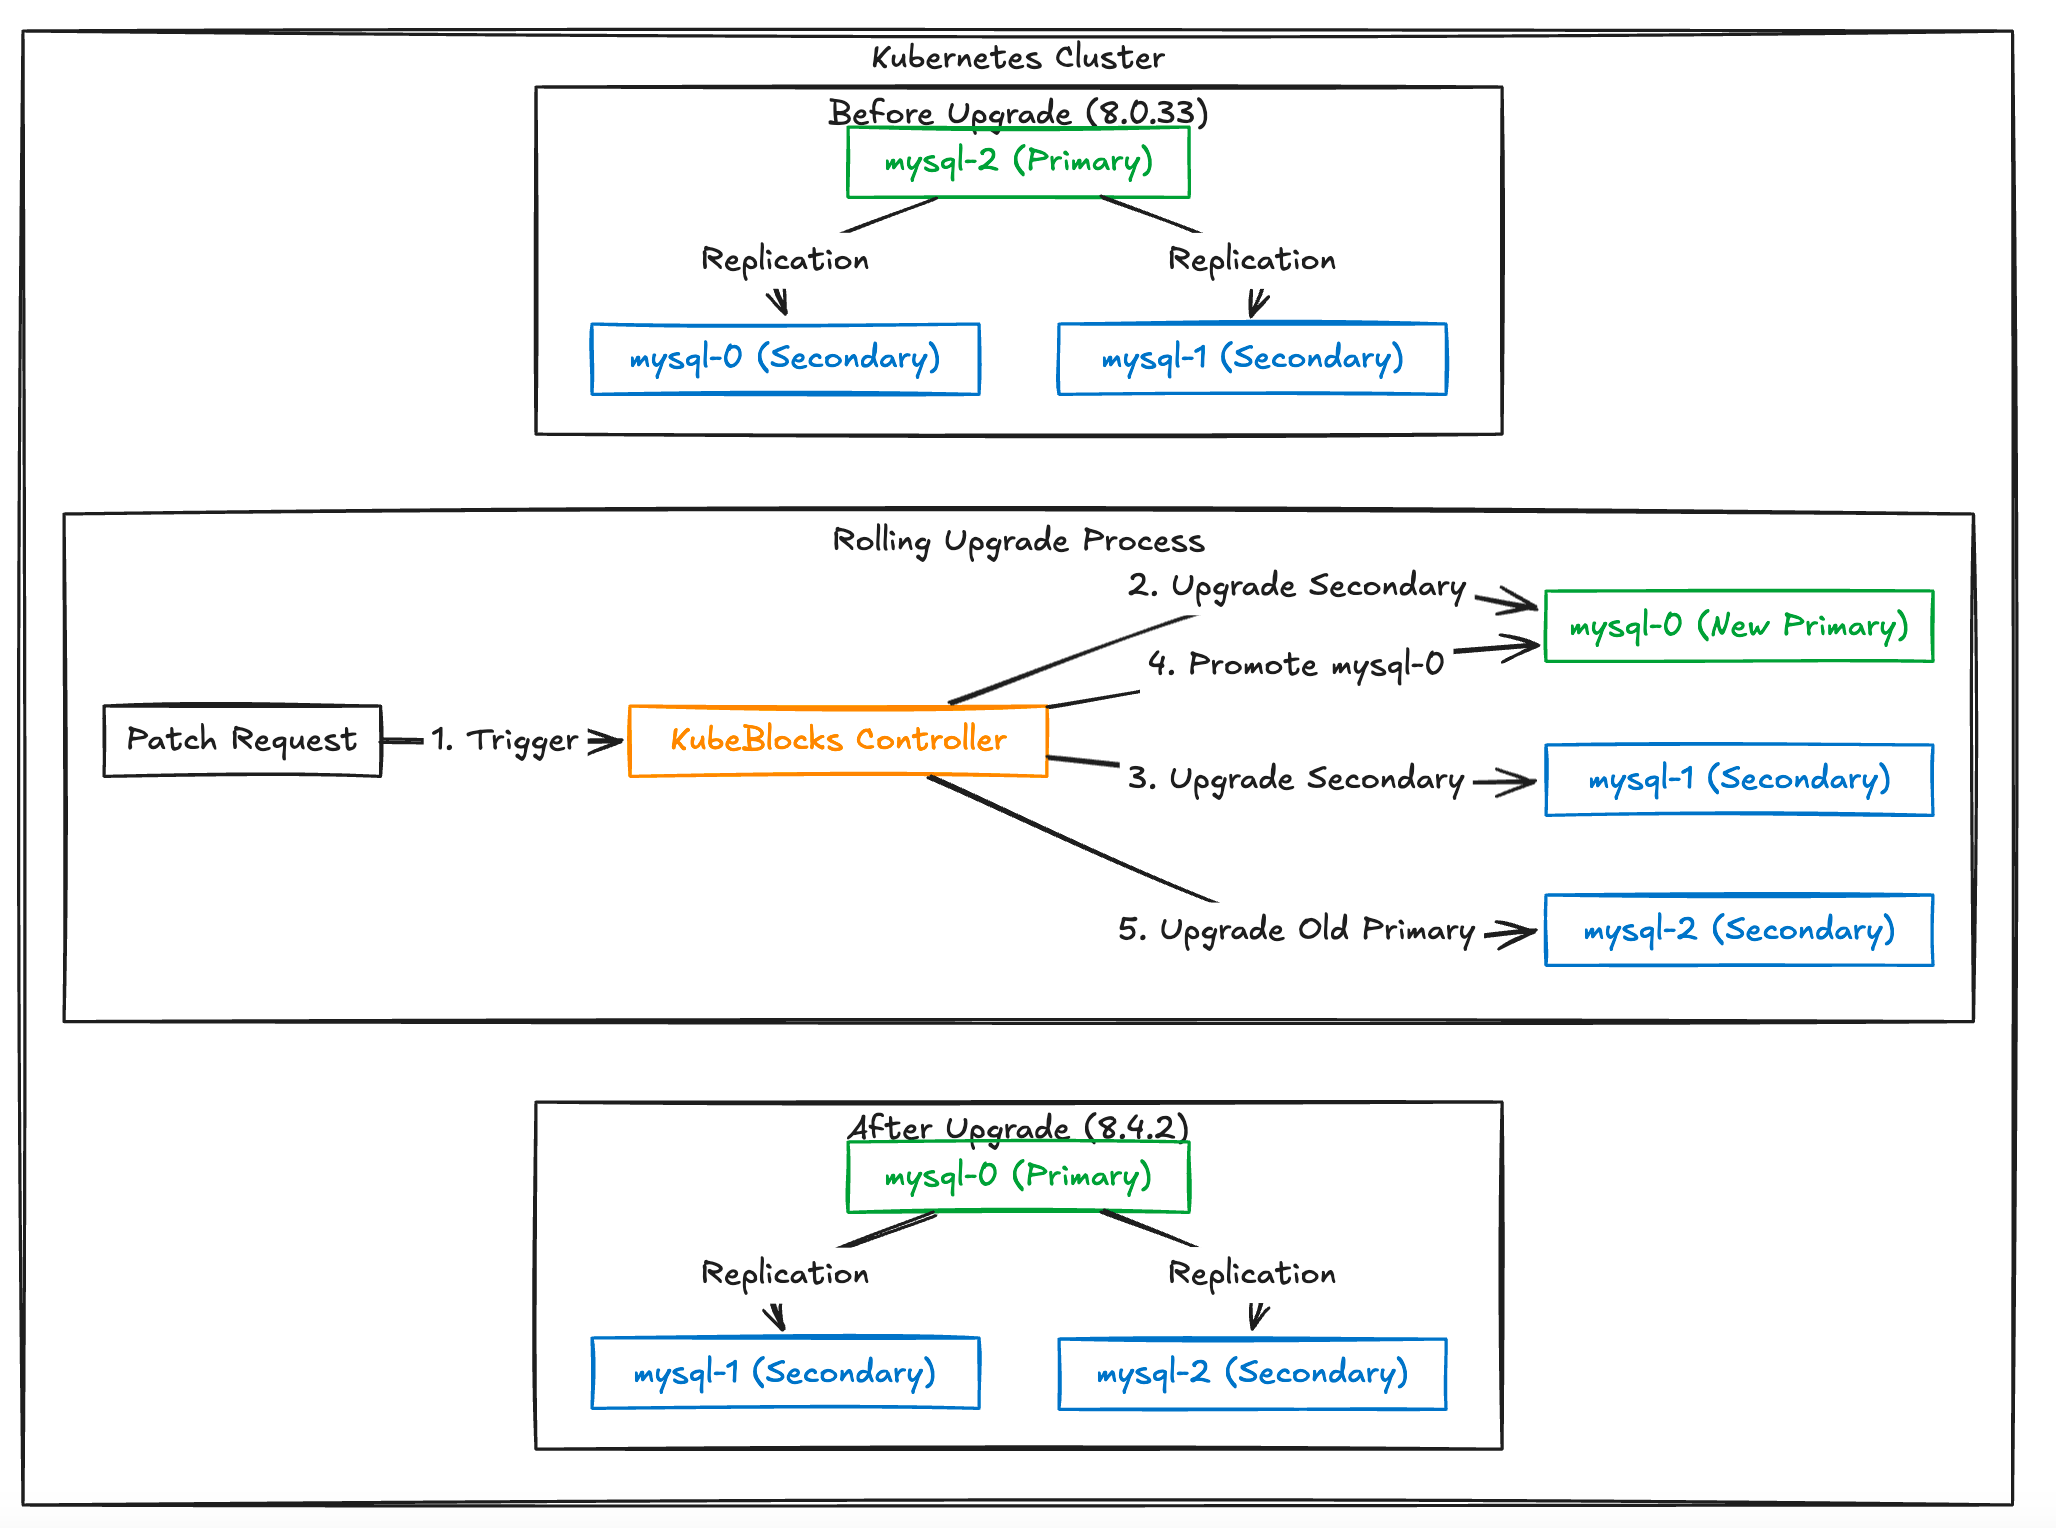
During the rolling upgrade, KubeBlocks follows a carefully orchestrated sequence:

- Initial State: mysql-2 serves as Primary, with mysql-0 and mysql-1 as Secondaries.
- Secondary Upgrades:
- First upgrades mysql-0 (Secondary)
- Then upgrades mysql-1 (Secondary)
- Primary Switch:
- Promotes mysql-0 to become the new Primary
- Final Upgrade:
- Upgrades the original Primary (mysql-2)
- mysql-2 becomes a Secondary in the new configuration
This careful sequencing ensures:
- Minimal downtime during the upgrade
- Data consistency throughout the process
- Automatic handling of Primary/Secondary roles
- Safe rollback capability if issues occur
What’s Next?
- Explore Other Databases: Apply the same upgrade principles to PostgreSQL, Redis, MongoDB, Elasticsearch, Qdrant, and more.
- Advance to the Next Tutorial: Discover full lifecycle management—including backups, restores, and failover—showing how KubeBlocks delivers robust database operations that approach higher Operator Capability Levels.
By leveraging KubeBlocks’ built-in intelligence for upgrade orchestration and HA failover, you can keep your database versions current and reliable with ease.