An Introduction to Docker Security

In this tutorial we'll be exploring a bit about the architecture and security model of Docker.
Docker's Architecture
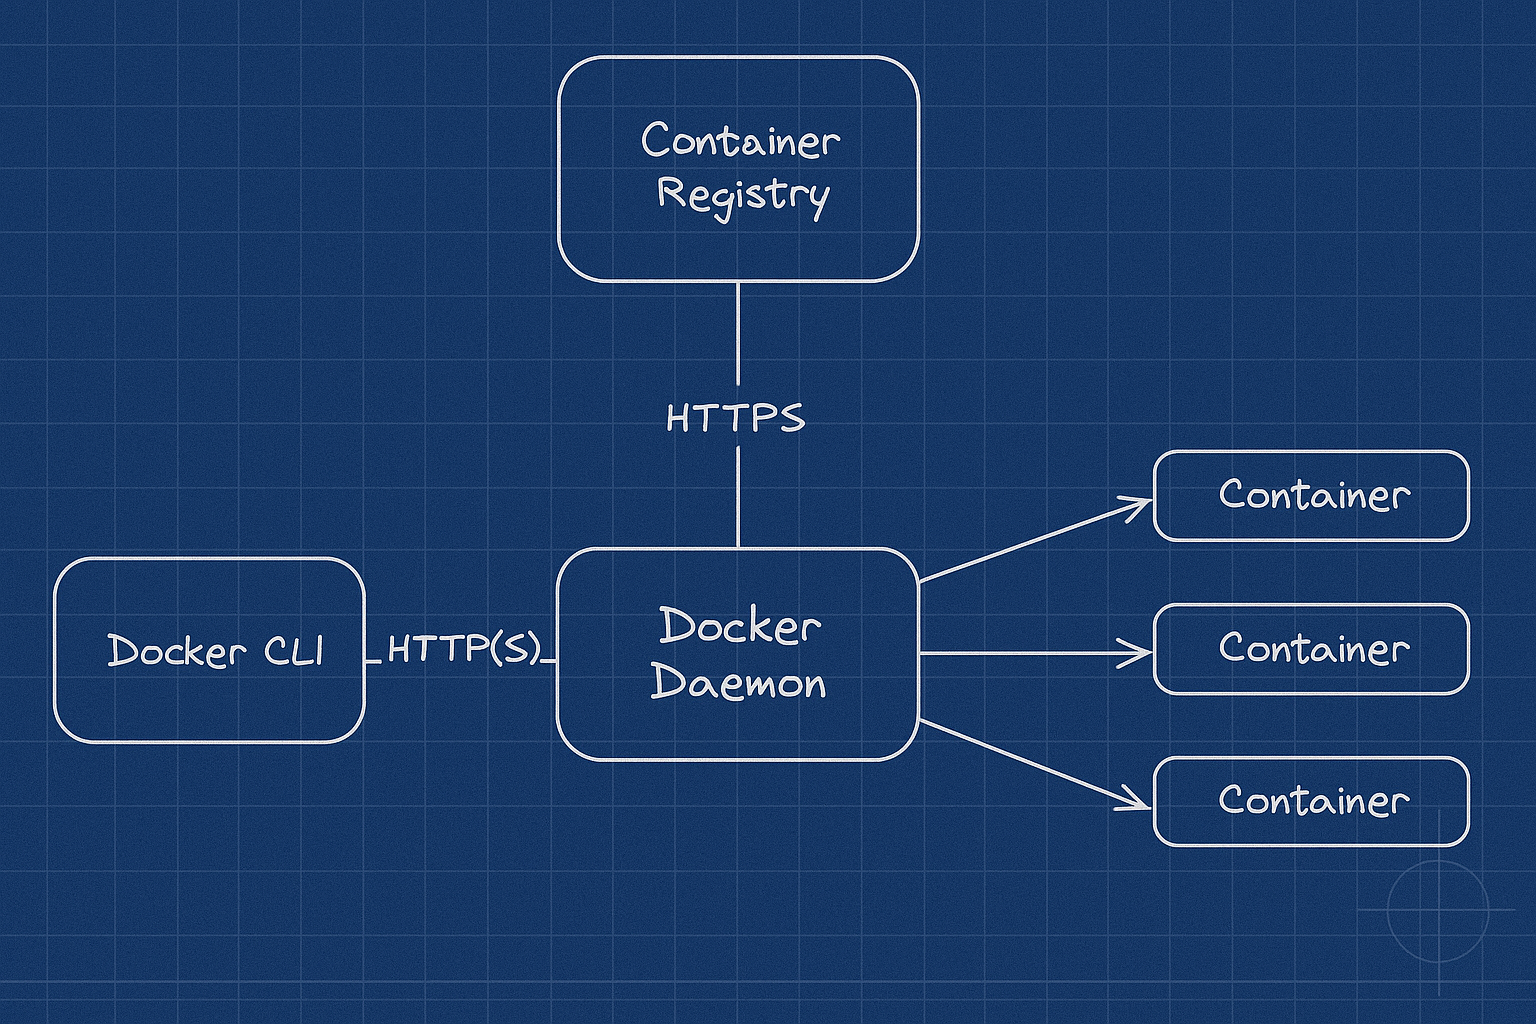
Before we get into details on security, it's worth talking briefly about Docker's architecture. Fundamentally, it is a client/server application where the client talks to a REST HTTP API. Communications between the client and server either happen locally over a UNIX socket, or remotely via a network connection via HTTP, or SSH.
By default Docker will use a UNIX socket located at /var/run/docker.sock for all communications.
The Docker server itself will also talk to container registries over HTTP to get images and handle tasks like container and network creation and management.
Viewing Docker Daemon Traffic
We can view traffic traveling between the Docker client and server using socat and two terminals.
First, click the "start playground" button on the right to create an ephemeral VM with Docker installed that we can use to execute all our commands.
In the first terminal run this command, which will set-up the socat utility to create a new socket file and pass on any requests to the Docker socket :
socat -v UNIX-LISTEN:/tmp/tempdock.sock,fork UNIX-CONNECT:/var/run/docker.sock
Then in the second terminal run the following docker command which will contact our temporary socket and ask for a list of images.
docker -H unix:///tmp/tempdock.sock images
Back in the first terminal, if you scroll up a bit, you should be able to see the HTTP requests and responses between the client and server, showing a bit about how the Docker API works. If you're familiar with HTTP requests you can see that this looks like a fairly typical REST API.
Once you're finished looking at the traffic, in the first terminal (where you ran socat) press CTRL-C to return to the prompt.
Docker system components
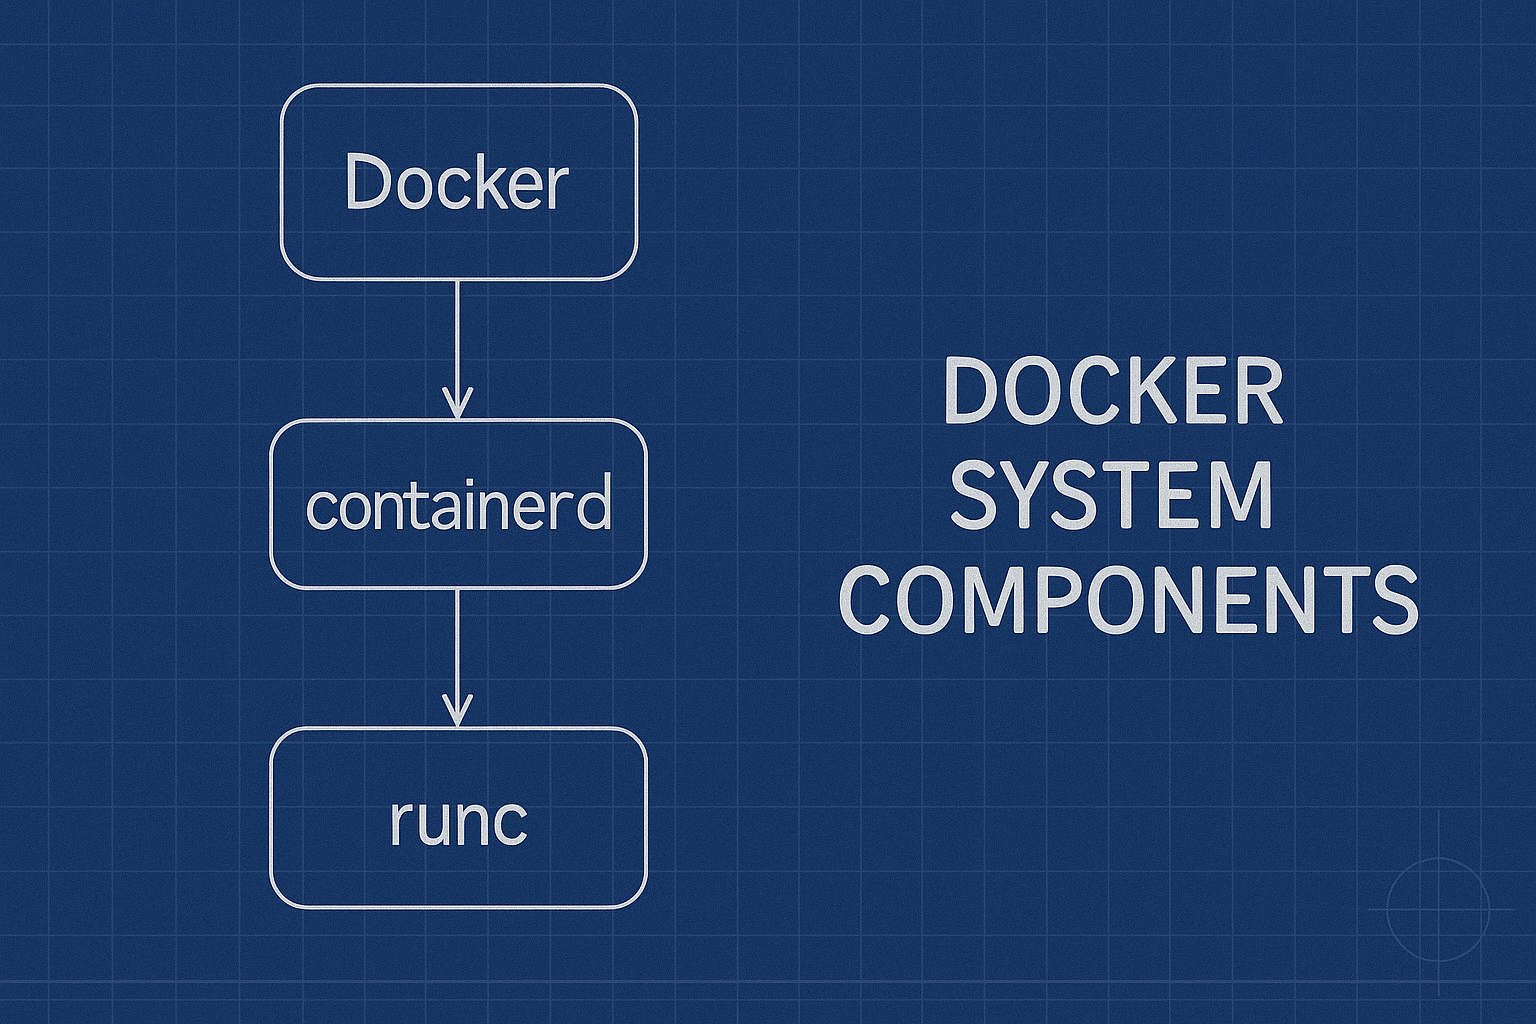
Docker runs alongside some other components which are used to run container on the host. In addition to the main Docker daemon there is containerd daemon and runc which actually starts the containers.
Docker's Attack Surface
Typically, the attack surface of a Docker installation will be the local socket files. In addition to the Docker socket (at /run/docker.sock), there's also the containerd socket which is usually at /run/containerd/containerd.sock (N.B. you'll also see these files under /var/run which is symlinked back to /run)
If the Docker daemon has been configured to listen on the network, it will be listening on either port 2375/TCP or 2376/TCP by default. Port 2375 is used for the insecure configuration where anyone who can reach the port can run Docker commands and probably gain root access to the underlying host. Port 2376 is used where TLS authentication has been configured.
Docker Daemon Authentication - Local
Where a local user is trying to access the Docker daemon, access is controlled by file permissions to the socket file. The default is to have the socket file owned by the root user and docker group and have file permissions of 660 meaning that any user within the docker group will have access to the Docker socket.
Running the command below can confirm the permissions on the socket
ls -al /run/docker.sock
Docker Daemon Remote Authentication - TLS
Where authentication has been setup for the Docker daemon, it will likely be TLS client certificates. The client certs will be stored in ~/.docker by default, so managing access to that directory is important when securing them. Docker's documentation has details on setting this up.
Docker Daemon Remote Authentication - SSH
It's also possible to access a Docker daemon via SSH. This effectively uses a combination of SSH permissions (user must be able to SSH to the host running the Docker daemon) and the file permissions we discussed earlier. Docker's documentation has details on how to set this up. If remote access to a Docker daemon is needed, this is likely to be an easier to manage and more secure option than exposing via TLS
Docker Daemon Authorization
By default, there is no concept of authorization for requests to the Docker daemon. Any user with access to the Docker socket has full access to all commands. Docker does have the concept of authorization plugins but they're not widely adopted.
Container Process Security
One of the key features of Docker containers is that they are just processes (there's a tutorial with more details on this here) using a shared Linux kernel. As a result it's important to consider what user is being used inside containers. From a security standpoint, it's unfortunate that the default is that all containers run as the root user inside the container unless there's an explicit USER statement in the Dockerfile, or a shellscript is used to change user as part of the container entrypoint.
We can see this in effect by starting a new container using a very basic webserver image called ctrsec/swc which runs a process called simple-webserver
docker run -d --name=rootwebserver ctrsec/swc
Then if we look at the processes on the host, we can see the simple-webserver process running as the root user
ps -fC simple-webserver
the output will show a simple-webserver process which is running as root.
UID          PID    PPID  C STIME TTY          TIME CMD
root       19290   19265  0 14:59 ?        00:00:00 /simple-webserver
Once you've completed these steps stop the container
docker stop rootwebserver
It is also possible to have a container image that doesn't run as the root user. This is done using the USER directive in the Dockerfile, and containers based on this image, will run as a non-root UID based on what the image has setup.
To show an example of this we'll use a non-root version of the swc image which is called swcnr and runs as UID 3456
docker run -d --name=nonrootwebserver ctrsec/swcnr
Now running our ps command from earlier
ps -fC simple-webserver
we can see the UID is different
UID          PID    PPID  C STIME TTY          TIME CMD
3456       20138   20114  0 15:04 ?        00:00:00 /simple-webserver
Once we've seen this stop this webserver too
docker stop nonrootwebserver
Docker Privilege Escalation
Once you have access to the Docker socket on a given system, getting root privileges on the host should be trivial. There are a number of ways to do this but the easiest is The Most Pointless Docker Command Ever
If you run the command
whoami
You'll see that you're currently the laborant user on the host. Now run the most pointless Docker command.
docker run -ti --privileged --net=host --pid=host --ipc=host --volume /:/host busybox chroot /host
And then run whoami again. Now you're the root user!
The reason that this works is that, while Docker provides layers of isolation by default, it allows anyone who can run Docker commands to remove any or all of those layers.
Once you've completed this command, don't forget to type exit so you're back running as the laborant user.
The Perils of 'Privileged'
One of the most important elements of the pointless Docker command is the --privileged switch that we passed to it. This essentially removes most of the main protections provided by Docker.
Container Breakout
In addition to directly having access to the Docker socket from the host, you might also see the Docker socket inside a container. When the Docker socket is mounted into a container, it's relatively simple to get root access to the underlying host. To demonstrate this first run a new container with the Docker socket mounted inside it
docker run -it -v /var/run/docker.sock:/var/run/docker.sock raesene/alpine-containertools /bin/bash
As this container image has the docker client installed you can run docker commands from inside the container. For example docker ps will show the list of running containers on the host.
Then just run our pointless Docker command
docker run -ti --privileged --net=host --pid=host --ipc=host --volume /:/host busybox chroot /host
At this point it will appear that you're back outside the container as the root user, but this is actually another container running on the host!
To get back to your original shell use the exit command twice. The first time will take you to the first container and the second time back to the host.
Rootless Docker
One of the security challenges with Docker is that the daemon runs as root, so that any attacker that gets access to the Docker socket will be able to escalate their privileges on the host to root. However it is possible to run the Docker daemon as an ordinary user, using rootless Docker.
In this setup, Docker runs as an ordinary user, limiting the impact of an attacker getting access to the socket and also reducing the impact of a container breakout
We can setup rootless Docker on a host which has an existing standard "rootful" install.
First install the uidmap package that's used by rootless Docker
sudo apt update && sudo apt install -y uidmap
Then run the Docker supplied shell-script to install Rootless Docker
dockerd-rootless-setuptool.sh install --force
With that install complete you can use docker context to show the original configuration and the new rootless one
docker context ls
Once we've established the new rootless installation we can repeat the exercise that we completed earlier on container process security, to show the effects of using rootless docker.
First start a new simple webserver container. This image is the one which ran as root last time we used it.
docker run --name=rootlesswebserver -d ctrsec/swc
Then if we look at the processes on the host, we can see what how the output has changed.
ps -fC simple-webserver
the output will show the simple-webserver process running as the laborant user, instead of running as root as it did last time.
UID          PID    PPID  C STIME TTY          TIME CMD
laborant    2143    2116  0 18:25 ?        00:00:00 /simple-webserver
Now let's confirm how this looks inside the container. We can do that by running the id command.
docker exec rootlesswebserver id
which should return something like the below, showing that the contained process thinks that it's running as root!
uid=0(root) gid=0(root) groups=0(root),10(wheel)
Rootless Docker works by using user namespaces and re-mapping UIDs inside the container to a different one on the host. In this case, it remaps UID 0 inside the container to UID 1001 on the host, which is the UID of the laborant user.
Conclusion
In this tutorial, we've explored Docker's security model and some basic attacks against it. As you can see Docker has a relatively simple security model, but there are some key things to be aware of.
Further Reading
About the Author
Writes about
Frequently covers