How to Build Smaller Container Images: Docker Multi-Stage Builds
If you're building container images with Docker and your Dockerfiles aren't multi-stage, you're likely shipping unnecessary bloat to production. This not only increases the size of your images but also broadens their potential attack surface.
What exactly causes this bloat, and how can you avoid it?
In this article, we'll explore the most common sources of unnecessary packages in production container images. Once the problem is clear, we'll see how using Multi-Stage Builds can help produce slimmer and more secure images. Finally, we'll practice restructuring Dockerfiles for some popular software stacks - both to better internalize the new knowledge and to show that often, just a little extra effort can yield a significantly better image.
Let's get started!
Why is my image so huge?
Almost any application, regardless of its type (web service, database, CLI, etc.) or language stack (Python, Node.js, Go, etc.), has two types of dependencies: build-time and run-time.
Typically, the build-time dependencies are much more numerous and noisy (read - have more CVEs in them) than the run-time ones. Therefore, in most cases, you'll only want the production dependencies in your final images.
However, build-time dependencies end up in production containers more often than not, and one of the main reasons for that is:
⛔ Using exactly the same image to build and run the application.
Building code in containers is a common (and good) practice - it guarantees the build process uses the same set of tools when performed on a developer's machine, a CI server, or any other environment.
Running applications in containers is the de facto standard practice today. Even if you aren't using Docker, your code is likely still running in a container or a container-like VM.
However, building and running apps are two completely separate problems with different sets of requirements and constraints. So, the build and runtime images should also be completely separate! Nevertheless, the need for such a separation is often overlooked, and production images end up having linters, compilers, and other dev tools in them.
Here are a couple of examples that demonstrate how it usually happens.
How NOT to organize a Go application's Dockerfile
Starting with a more obvious one:
# DO NOT DO THIS IN YOUR DOCKERFILE
FROM golang:1.23
WORKDIR /app
COPY . .
RUN go build -o binary
CMD ["/app/binary"]
The issue with the above Dockerfile is that golang
was never intended as a base image for production applications.
However, this image is the default choice if you want to build your Go code in a container.
But once you've written a piece of Dockerfile that compiles the source code into an executable,
it can be tempting to simply add a CMD
instruction to invoke this binary and call it done.
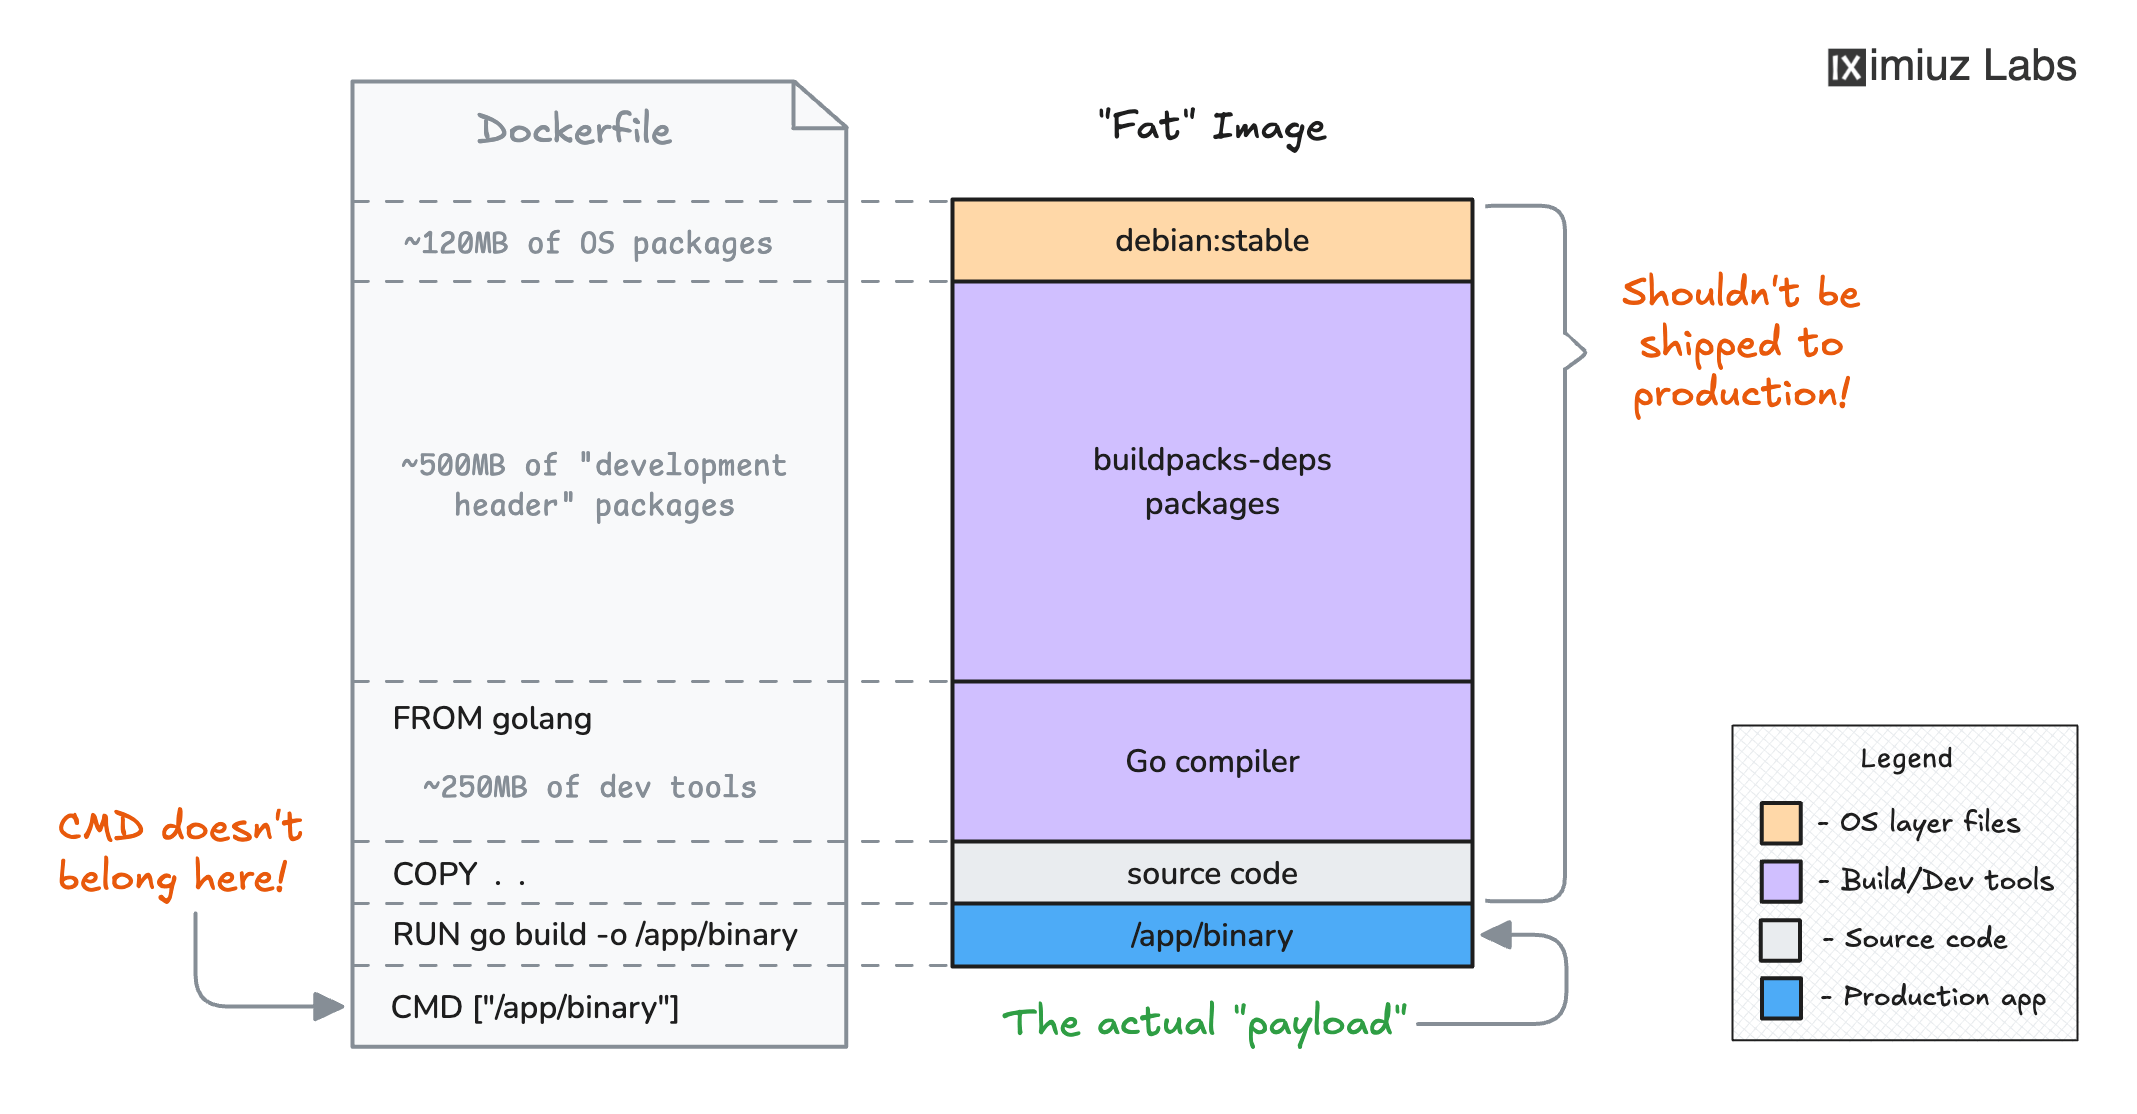
How NOT to structure a Dockerfile for a Go application.
The gotcha is that such an image would include not only the application itself (the part you want in production) but also the entire Go compiler toolchain and all its dependencies (the part you most certainly don't want in production):
trivy image -q golang:1.23
golang:1.23 (debian 12.7)
Total: 799 (UNKNOWN: 0, LOW: 240, MEDIUM: 459, HIGH: 98, CRITICAL: 2)
The golang:1.23
brings more than 800MB
of packages and about the same number of CVEs 🤯
How NOT to organize a Node.js application's Dockerfile
A similar but slightly more subtle example:
# DO NOT DO THIS IN YOUR DOCKERFILE
FROM node:22-slim
WORKDIR /app
COPY . .
RUN npm ci
RUN npm run build
ENV NODE_ENV=production
EXPOSE 3000
CMD ["node", "/app/.output/index.mjs"]
Unlike the golang
image, the
node:22-slim
is a valid choice for a production workload base image.
However, there is still a potential problem with this Dockerfile.
If you build an image using it,
you may end up with the following composition:
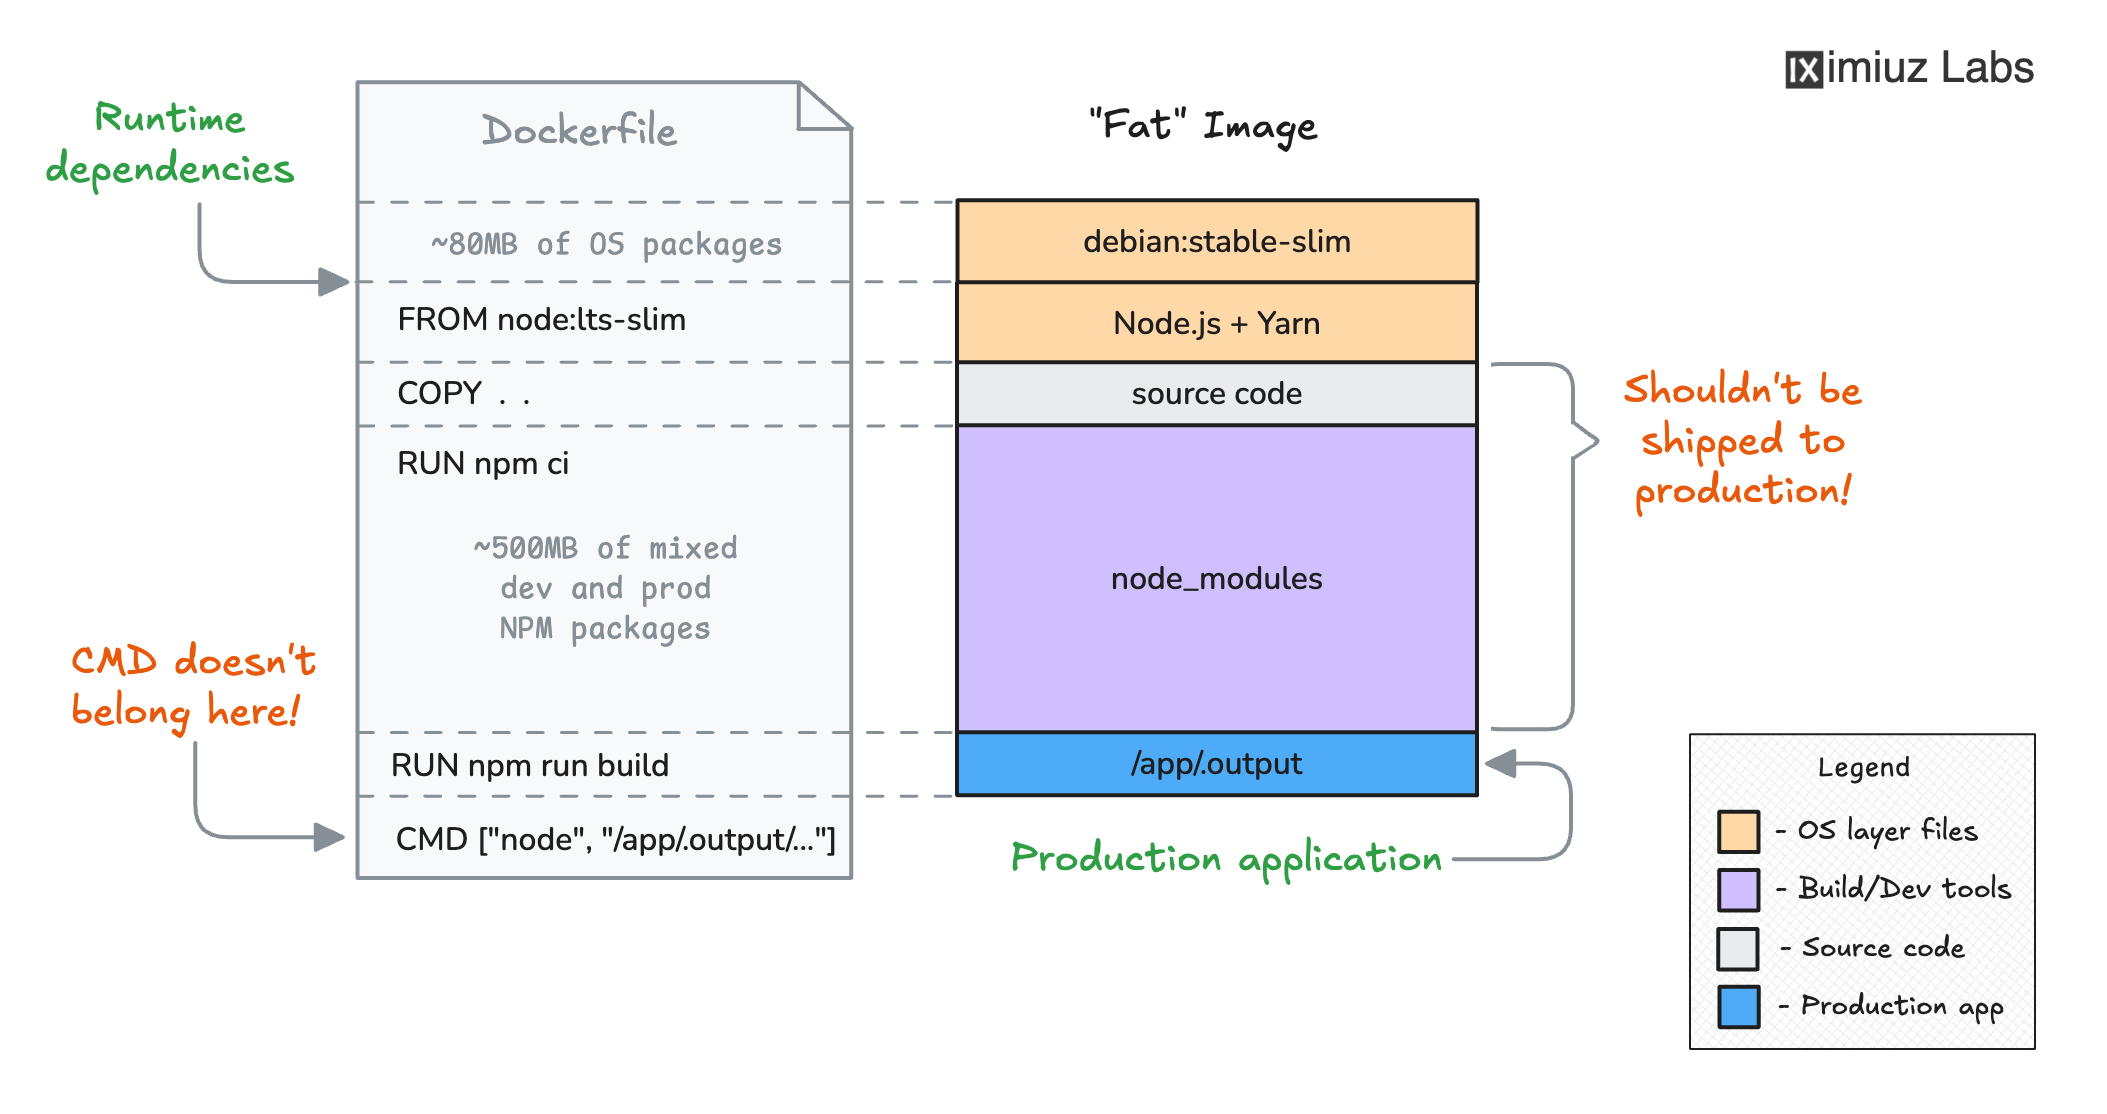
How NOT to structure a Dockerfile for a Node.js application.
The diagram shows the actual numbers for the iximiuz Labs frontend app, which is written in Nuxt 3.
If it used a single-stage Dockerfile like the above, the resulting image would have almost 500MB
of node_modules
,
while only about 50MB
of the "bundled" JavaScript (and static assets) in the .output
folder would constitute the (self-sufficient) production app.
This time, the "bloat" is caused by the npm ci
step, which installs both production and development dependencies.
But the problem cannot be fixed by simply using npm ci --omit=dev
because it'd break the consequent npm run build
command
that needs both the production and the development dependencies to produce the final application bundle.
So, a more subtle solution is required.
How lean images were produced before Multi-Stage Builds
In both the Go and Node.js examples from the previous section, the solution could involve splitting the original Dockerfile into two files.
The first Dockerfile would start with a FROM <sdk-image>
and contain the application building instructions:
FROM node:22-slim
WORKDIR /app
COPY . .
RUN npm ci
RUN npm run build
Running the docker build
command using Dockerfile.build
would produce an auxiliary image:
docker build -t build:v1 -f Dockerfile.build .
...which then could be used to extract the built app (our artifact) to the builder host:
docker cp $(docker create build:v1):/app/.output .
The second Dockerfile would start with a FROM <runtime-image>
and simply COPY
the built application from the host into its future runtime environment:
FROM node:22-slim
WORKDIR /app
COPY .output .
ENV NODE_ENV=production
EXPOSE 3000
CMD ["node", "/app/.output/index.mjs"]
Running the docker build
command for the second time with Dockerfile.run
would produce the final slim production image:
docker build -t app:v1 -f Dockerfile.run .
This technique, known as the Builder Pattern, was widely used before Docker added Multi-Stage Build support.
However, while fully functional, the Builder Pattern had a relatively rough UX. It required:
- Writing multiple interdependent Dockerfiles.
- Copying build artifacts to and from the builder host.
- Devising extra scripts to execute
docker build
commands.
Additionally, one would need to remember to always run the docker build -f Dockerfile.build
command before
the docker build -f Dockerfile.run
command
(otherwise, the final image could be baked with a stale artifact from the previous build),
and the experience of sending the build artifacts through the host was also far from perfect.
At the same time, a "native" Builder Pattern implementation could:
- Optimize the artifact copying.
- Simplify the build order organization.
- Standardize the technique across different teams.
And luckily, the one followed!
An easy way to understand Multi-Stage Builds
In essence, Multi-Stage Builds are the Builder Pattern on steroids implemented right inside Docker. To understand how Multi-Stage Builds work, it's important to be familiar with two simpler and seemingly independent Dockerfile features.
You can COPY
files --from=<another-image>
One of the most frequently used Dockerfile instructions is COPY
.
Most of the time, we COPY
files from the host to the container image:
COPY host/path/to/file image/path/to/file
However, you can also COPY
files straight from other images 🤯
Here is an example that copies the nginx.conf
file from the Docker Hub's nginx:latest
image to the image that is being currently built:
COPY --from=nginx:latest /etc/nginx/nginx.conf /nginx.conf
The feature can also come in handy while implementing the Builder Pattern.
Now, we can COPY
the built artifacts directly --from
the auxiliary build image:
FROM node:22-slim
WORKDIR /app
COPY --from=build:v1 /app/.output .
ENV NODE_ENV=production
EXPOSE 3000
CMD ["node", "/app/.output/index.mjs"]
Thus, the COPY --from=<image>
trick enables bypassing the builder host when copying artifacts from the build to runtime images.
However, the need to write multiple Dockerfiles and the build order dependency problems remain...
You can define several images in one Dockerfile
Historically, a Dockerfile would start with a FROM <base-image>
instruction:
FROM node:22-slim
COPY ...
RUN ["node", "/path/to/app"]
...and then the docker build
command would use it to produce just one image:
docker build -f Dockerfile.simple -t app:latest .
However, since ~2018, Docker supports complex "multi-tenant" Dockerfiles.
You can put as many named FROM
instructions into a Dockerfile as you like:
FROM busybox:stable AS from1
CMD ["echo", "busybox"]
FROM alpine:3 AS from2
CMD ["echo", "alpine"]
FROM debian:stable-slim AS from3
CMD ["echo", "debian"]
...and every FROM
will become a separate target for the docker build
command:
docker build -f Dockerfile.complex --target from1 -t my-busybox
docker run my-busybox
Same Dockerfile, but a totally different image:
docker build -f Dockerfile.complex --target from2 -t my-alpine
docker run my-alpine
...and one more image from exactly the same Dockerfile:
docker build -f Dockerfile.complex --target from3 -t my-debian
docker run my-debian
Returning to our Builder Pattern problem,
it means that we can put back together the build and runtime Dockerfiles
using two different FROM
instructions in one compound Dockerfile!
The power of Multi-Stage Dockerfiles
Here is what a "compound" Node.js application Dockerfile could look like:
# The "build" stage
FROM node:22-slim AS build
WORKDIR /app
COPY . .
RUN npm ci
RUN npm run build
# The "runtime" stage
FROM node:22-slim AS runtime
WORKDIR /app
COPY --from=build /app/.output .
ENV NODE_ENV=production
EXPOSE 3000
CMD ["node", "/app/.output/index.mjs"]
Using the official terminology,
every FROM
instruction defines not an image but a stage,
and technically the COPY
happens --from
a stage.
However, as we saw above, thinking of stages as independent images is helpful for connecting the dots.
Last but not least, when all stages and COPY --from=<stage>
instructions are defined in one Dockerfile,
the Docker build engine (BuildKit) can compute the right build order, skip unused,
and execute independent stages concurrently 🧙
A few important facts to remember before writing your first multi-stage Dockerfile:
- The order of stages in the Dockerfile matters - it's impossible to
COPY --from
a stage defined below the current stage. - The
AS
aliases are optional - if you don't name your stages, they still can be referred to by their sequence number. - When the
--target
flag is not used, thedocker build
command will build the last stage (and all stages it copies from).
Multi-Stage Builds in practice
Below are examples of how to use Multi-Stage Builds to produce smaller and more secure container images for different languages and frameworks.
Node.js
There are different shapes and forms of Node.js applications - some of them require a Node.js runtime only during the development and build phases, while others need Node.js in the production container image, too.
Here are some examples of how to structure multi-stage Dockerfiles for Node.js applications:
Multi-Stage Build example: React application
Pure React applications don't depend on Node.js when built,
so they can be served by any static file server.
However, the build process requires Node.js, npm
, and all dependencies from package.json
to be installed.
Thus, it's important to carefully "cherry-pick" the static build artifacts from the potentially massive build image.
# Lifehack: Define the Node.js image only once for all stages.
# Generally, it's a good idea to stick with the active LTS version.
FROM node:22-slim AS base
# Optimization: Re-install dependencies only when
# package.json or package-lock.json files change.
FROM base AS deps
WORKDIR /app
COPY package*.json ./
RUN npm ci
# Run tests right in the container reusing the installed dependencies.
FROM deps AS test
WORKDIR /app
RUN npm run test
# Build stage
FROM base AS build
WORKDIR /app
# IMPORTANT: Add node_modules to your .dockerignore file
# to avoid overwriting the node_modules from the deps stage.
COPY --from=deps /app/node_modules ./node_modules
COPY . .
RUN npm run build
# Runtime stage
FROM nginx:alpine
WORKDIR /usr/share/nginx/html
RUN rm -rf ./*
COPY --from=build /app/build .
ENTRYPOINT ["nginx", "-g", "daemon off;"]
Multi-Stage Build example: Next.js application
Next.js applications can be:
- Fully static: the build process and the multi-stage Dockerfile then are almost identical to the React example above.
- With server-side features: the build process is similar to React, but the runtime image requires Node.js, too.
For a Node.js server-enabled Docker image,
the next.config.mjs
file should have the output: "standalone"
option.
Below is an example of a multi-stage Dockerfile for a Next.js application that uses server-side features:
# Lifehack: Define the Node.js image only once for all stages.
# Generally, it's a good idea to stick with the active LTS version.
FROM node:22-slim AS base
# Optimization: Re-install dependencies only when
# package.json or package-lock.json files change.
FROM base AS deps
WORKDIR /app
COPY package*.json ./
RUN npm ci
# Run tests right in the container reusing the installed dependencies.
FROM deps AS test
WORKDIR /app
RUN npm run test
# Build stage
FROM base AS build
WORKDIR /app
# IMPORTANT: Add node_modules to your .dockerignore file
# to avoid overwriting the node_modules from the deps stage.
COPY --from=deps /app/node_modules ./node_modules
COPY . .
RUN npm run build
# Runtime stage
FROM base AS runtime
WORKDIR /app
COPY --from=build /app/public ./public
COPY --from=build --chown=node:node /app/.next/standalone ./
COPY --from=build --chown=node:node /app/.next/static ./.next/static
ENV NODE_ENV=production
ENV HOSTNAME="0.0.0.0"
ENV PORT=3000
EXPOSE 3000
USER node
CMD ["node", "server.js"]
Multi-Stage Build example: Vue application
From the build process perspective, Vue applications are pretty similar to React applications.
The build process requires Node.js, npm
, and all dependencies from package.json
to be installed,
but produced build artifacts are static files that can be served by any static file server.
# Lifehack: Define the Node.js image only once for all stages.
# Generally, it's a good idea to stick with the active LTS version.
FROM node:22-slim AS base
# Optimization: Re-install dependencies only when
# package.json or package-lock.json files change.
FROM base AS deps
WORKDIR /app
COPY package*.json ./
RUN npm ci
# Run tests right in the container reusing the installed dependencies.
FROM deps AS test
WORKDIR /app
RUN npm run test
# Build stage
FROM base AS build
WORKDIR /app
# IMPORTANT: Add node_modules to your .dockerignore file
# to avoid overwriting the node_modules from the deps stage.
COPY --from=deps /app/node_modules ./node_modules
COPY . .
RUN npm run build
# Runtime stage
FROM nginx:alpine
WORKDIR /usr/share/nginx/html
RUN rm -rf ./*
COPY --from=build /app/dist .
Multi-Stage Build example: Nuxt application
Similarly to Next.js, Nuxt applications can be either fully static or with server-side support. Below is an example of a multi-stage Dockerfile for a Nuxt application that uses a Node.js server:
# Lifehack: Define the Node.js image only once for all stages.
# Generally, it's a good idea to stick with the active LTS version.
FROM node:22-slim AS base
# Optimization: Re-install dependencies only when
# package.json or package-lock.json files change.
FROM base AS deps
WORKDIR /app
COPY package*.json ./
RUN npm ci
# Run tests right in the container reusing the installed dependencies.
FROM deps AS test
WORKDIR /app
RUN npm run test
# Build stage
FROM base AS build
WORKDIR /app
# IMPORTANT: Add node_modules to your .dockerignore file
# to avoid overwriting the node_modules from the deps stage.
COPY --from=deps /app/node_modules ./node_modules
COPY . .
RUN npm run build
# Runtime stage
FROM base AS runtime
WORKDIR /app
COPY --from=build --chown=node:node /app/.output .
ENV NODE_ENV=production
ENV NUXT_ENVIRONMENT=production
ENV NITRO_HOST=0.0.0.0
ENV NITRO_PORT=8080
EXPOSE 8080
USER node:node
CMD ["node", "server/index.mjs"]
Multi-Stage Build example: Svelte application
Similar to pure React and Vue applications, Svelte applications can be either fully static or server-enabled. Below is an example of a multi-stage Dockerfile that builds a static Svelte application and uses an Nginx container to serve it:
# Lifehack: Define the Node.js image only once for all stages.
# Generally, it's a good idea to stick with the active LTS version.
FROM node:22-slim AS base
# Optimization: Re-install dependencies only when
# package.json or package-lock.json files change.
FROM base AS deps
WORKDIR /app
COPY package*.json ./
RUN npm ci
# Run tests right in the container reusing the installed dependencies.
FROM deps AS test
WORKDIR /app
RUN npm run test
# Build stage
FROM base AS build
WORKDIR /app
# IMPORTANT: Add node_modules to your .dockerignore file
# to avoid overwriting the node_modules from the deps stage.
COPY --from=deps /app/node_modules ./node_modules
COPY . .
RUN npm run build
# Runtime stage
FROM nginx:alpine
WORKDIR /usr/share/nginx/html
RUN rm -rf ./*
COPY --from=build /app/build .
ENTRYPOINT ["nginx", "-g", "daemon off;"]
Multi-Stage Build example: SvelteKit application
SvelteKit is to Svelte what Next.js is to React or Nuxt is to Vue.
SvelteKit applications support multiple build targets (via adapters).
To build a Docker image, the @sveltejs/adapter-node
should be used.
Beware that unlike Next.js or Nuxt, SvelteKit doesn't always produce a standalone build
(e.g., when the dependencies
field in package.json
is not empty),
so the node_modules
folder with production-only dependencies might be required at runtime.
Below is an example of a multi-stage Dockerfile for a SvelteKit application that uses a Node.js server:
# Lifehack: Define the Node.js image only once for all stages.
# Generally, it's a good idea to stick with the active LTS version.
FROM node:22-slim AS base
# Optimization: Re-install dependencies only when
# package.json or package-lock.json files change.
FROM base AS deps
WORKDIR /app
COPY package*.json ./
RUN npm ci
# Run tests right in the container reusing the installed dependencies.
FROM deps AS test
WORKDIR /app
RUN npm run test
# Build stage
FROM base AS build
WORKDIR /app
# IMPORTANT: Add node_modules to your .dockerignore file
# to avoid overwriting the node_modules from the deps stage.
COPY --from=deps /app/node_modules ./node_modules
COPY . .
RUN npm run build
# Production dependencies
FROM base AS production-deps
WORKDIR /app
COPY --from=deps /app/node_modules ./node_modules
COPY package.json .
RUN npm prune --production
# Runtime stage
FROM base AS runtime
WORKDIR /app
COPY --from=build --chown=node:node /app/build build/
COPY --from=production-deps --chown=node:node /app/node_modules node_modules/
ENV NODE_ENV=production
ENV PORT=3000
EXPOSE 3000
USER node:node
CMD ["node", "build"]
Go
Go applications are always compiled during the build phase.
However, the resulting binary can be either statically (CGO_ENABLED=0
) or dynamically linked (CGO_ENABLED=1
).
The choice of the base image for the runtime stage will depend on the type of the produced binary:
- For statically linked binaries, you may pick the minimalistic
gcr.io/distroless/static
or even ascratch
base (the latter with extreme caution). - For dynamically linked binaries, a base image with standard shared C libraries is required (e.g.,
gcr.io/distroless/cc
,alpine
, or evendebian
).
In most cases, the choice of the runtime base image will not impact the structure of the multi-stage Dockerfile.
Multi-Stage Build example: Go application
# Build stage
FROM golang:1.23 AS build
WORKDIR /app
# Optimization: Re-download dependencies only when
# go.mod or go.sum files change.
COPY go.* ./
RUN go mod download
COPY . .
RUN CGO_ENABLED=0 go build -o binary .
# Run the tests in the container reusing the compiled dependencies.
FROM build AS test
WORKDIR /app
RUN go test -v ./...
# Runtime stage
FROM gcr.io/distroless/static-debian12:nonroot
COPY --from=build /app/binary /app/binary
CMD ["/app/binary"]
Rust
Rust applications are typically compiled from source code using cargo
.
The Docker Official rust
image includes cargo
, rustc
, and many other development and build tools,
that make the total size of the image nearly 2GB.
The multi-stage build is a must-have for Rust applications to keep the runtime image small.
Note that the final choice of the runtime base image will depend on the Rust application's library requirements.
Multi-Stage Build example: Rust application
# Build stage
FROM rust:1.67 AS build
WORKDIR /usr/src/app
COPY . .
RUN cargo install --path .
# Runtime stage
FROM debian:bullseye-slim
RUN apt-get update && \
apt-get install -y extra-runtime-dependencies && \
rm -rf /var/lib/apt/lists/*
COPY --from=build /usr/local/cargo/bin/app /usr/local/bin/app
CMD ["myapp"]
Java
Java applications are compiled from source code using build tools such as Maven or Gradle and require a Java Runtime Environment (JRE) to execute.
For containerized Java applications, it’s typical to use different base images for the build and runtime stages. The build stage requires a Java Development Kit (JDK), which includes tools for compiling and packaging the code, whereas the runtime stage generally only needs the smaller, more lightweight Java Runtime Environment (JRE) for execution.
Multi-Stage Build example: Java application
This example is adapted from the official Docker documentation. The Dockerfile is more complex than previous examples because it includes an additional test stage, and the Java build process involves more steps compared to the simpler processes for Node.js and Go applications.
# Base stage (reused by test and dev stages)
FROM eclipse-temurin:21-jdk-jammy AS base
WORKDIR /build
COPY --chmod=0755 mvnw mvnw
COPY .mvn/ .mvn/
# Test stage
FROM base AS test
WORKDIR /build
COPY ./src src/
RUN --mount=type=bind,source=pom.xml,target=pom.xml \
--mount=type=cache,target=/root/.m2 \
./mvnw test
# Intermediate stage
FROM base AS deps
WORKDIR /build
RUN --mount=type=bind,source=pom.xml,target=pom.xml \
--mount=type=cache,target=/root/.m2 \
./mvnw dependency:go-offline -DskipTests
# Intermediate stage
FROM deps AS package
WORKDIR /build
COPY ./src src/
RUN --mount=type=bind,source=pom.xml,target=pom.xml \
--mount=type=cache,target=/root/.m2 \
./mvnw package -DskipTests && \
mv target/$(./mvnw help:evaluate -Dexpression=project.artifactId -q -DforceStdout)-$(./mvnw help:evaluate -Dexpression=project.version -q -DforceStdout).jar target/app.jar
# Build stage
FROM package AS extract
WORKDIR /build
RUN java -Djarmode=layertools -jar target/app.jar extract --destination target/extracted
# Development stage
FROM extract AS development
WORKDIR /build
RUN cp -r /build/target/extracted/dependencies/. ./
RUN cp -r /build/target/extracted/spring-boot-loader/. ./
RUN cp -r /build/target/extracted/snapshot-dependencies/. ./
RUN cp -r /build/target/extracted/application/. ./
ENV JAVA_TOOL_OPTIONS="-agentlib:jdwp=transport=dt_socket,server=y,suspend=n,address=*:8000"
CMD [ "java", "-Dspring.profiles.active=postgres", "org.springframework.boot.loader.launch.JarLauncher" ]
# Runtime stage
FROM eclipse-temurin:21-jre-jammy AS runtime
ARG UID=10001
RUN adduser \
--disabled-password \
--gecos "" \
--home "/nonexistent" \
--shell "/sbin/nologin" \
--no-create-home \
--uid "${UID}" \
appuser
USER appuser
COPY --from=extract build/target/extracted/dependencies/ ./
COPY --from=extract build/target/extracted/spring-boot-loader/ ./
COPY --from=extract build/target/extracted/snapshot-dependencies/ ./
COPY --from=extract build/target/extracted/application/ ./
EXPOSE 8080
ENTRYPOINT [ "java", "-Dspring.profiles.active=postgres", "org.springframework.boot.loader.launch.JarLauncher" ]
PHP
PHP applications are interpreted from source code, so they don't require compilation. However, the dependencies needed for development and production are often different, so it's often a good idea to use a multi-stage build to install only production dependencies, and copy them to the runtime image.
Multi-Stage Build example: PHP application
# Install dependencies stage
FROM composer:lts AS deps
WORKDIR /app
COPY composer.json composer.lock ./
RUN --mount=type=cache,target=/tmp/cache \
composer install --no-dev --no-interaction
# Runtime stage
FROM php:8-apache AS runtime
RUN docker-php-ext-install pdo pdo_mysql
RUN mv "$PHP_INI_DIR/php.ini-production" "$PHP_INI_DIR/php.ini"
COPY ./src /var/www/html
COPY --from=deps /app/vendor/ /var/www/html/vendor
USER www-data
Conclusion
Production images often suffer from "forgotten" development packages, adding unnecessary bloat and security risks. Multi-Stage Builds solve this by letting us separate build and runtime environments while keeping them described in a single Dockerfile, allowing more efficient builds. As we've seen, a few straightforward adjustments can reduce image size, improve security, and make build scripts cleaner and easier to maintain.
Multi-Stage Builds also enable a number of advanced use cases,
such as conditional RUN
instructions (branching),
unit testing during the docker build
step, and more.
Start using Multi-Stage Builds to keep your containers lean and production-ready 🚀
Level up your Server Side game — Join 9,000 engineers who receive insightful learning materials straight to their inbox