Tutorial Β onΒ  Containers

How Container Registries Work: Pushing and Pulling Images By Hand

Container registries look simple until you need to debug what was actually pushed, why a pull picked the wrong image, or why deleting a tag didn't remove anything. Learn how registries work by pushing, pulling, inspecting, and deleting image data directly through the Registry API.

Most of the time, we interact with container registries via the docker pull and docker push commands or by setting an image name in a Kubernetes manifest. However, sooner or later you'll run into cases where you need to talk to the registry directly: a tag points to the wrong image manifest, a pull fails because the client requested the wrong platform, a layer is missing, or an accidentally pushed image needs to be removed for real (not just untagged). This is where understanding how registries actually work comes in handy.

In this tutorial, you'll practice working with the Registry API directly. You'll upload and download raw blobs, assemble and push an image by hand, list tags, pull image contents without using Docker, see why deleting images is trickier than it sounds, and finally inspect how multi-platform images are represented in a registry.

Sounds a bit too low-level? Fear not, the Registry API is actually quite simple and easy to use with plain curl.

Registry API Demystified

Most if not all modern container registries implement the OCI Distribution Specification, which "defines an API protocol to facilitate and standardize the distribution of content". Despite the fancy sound of the previous sentence, the Registry API is actually concise and easy to understand, especially if you approach it from the right angle. Below is an overview of the key container registry operations - traditionally augmented with hands-on examples.

Container Registry: Connecting the dots between the key API endpoints and the underlying data flow.

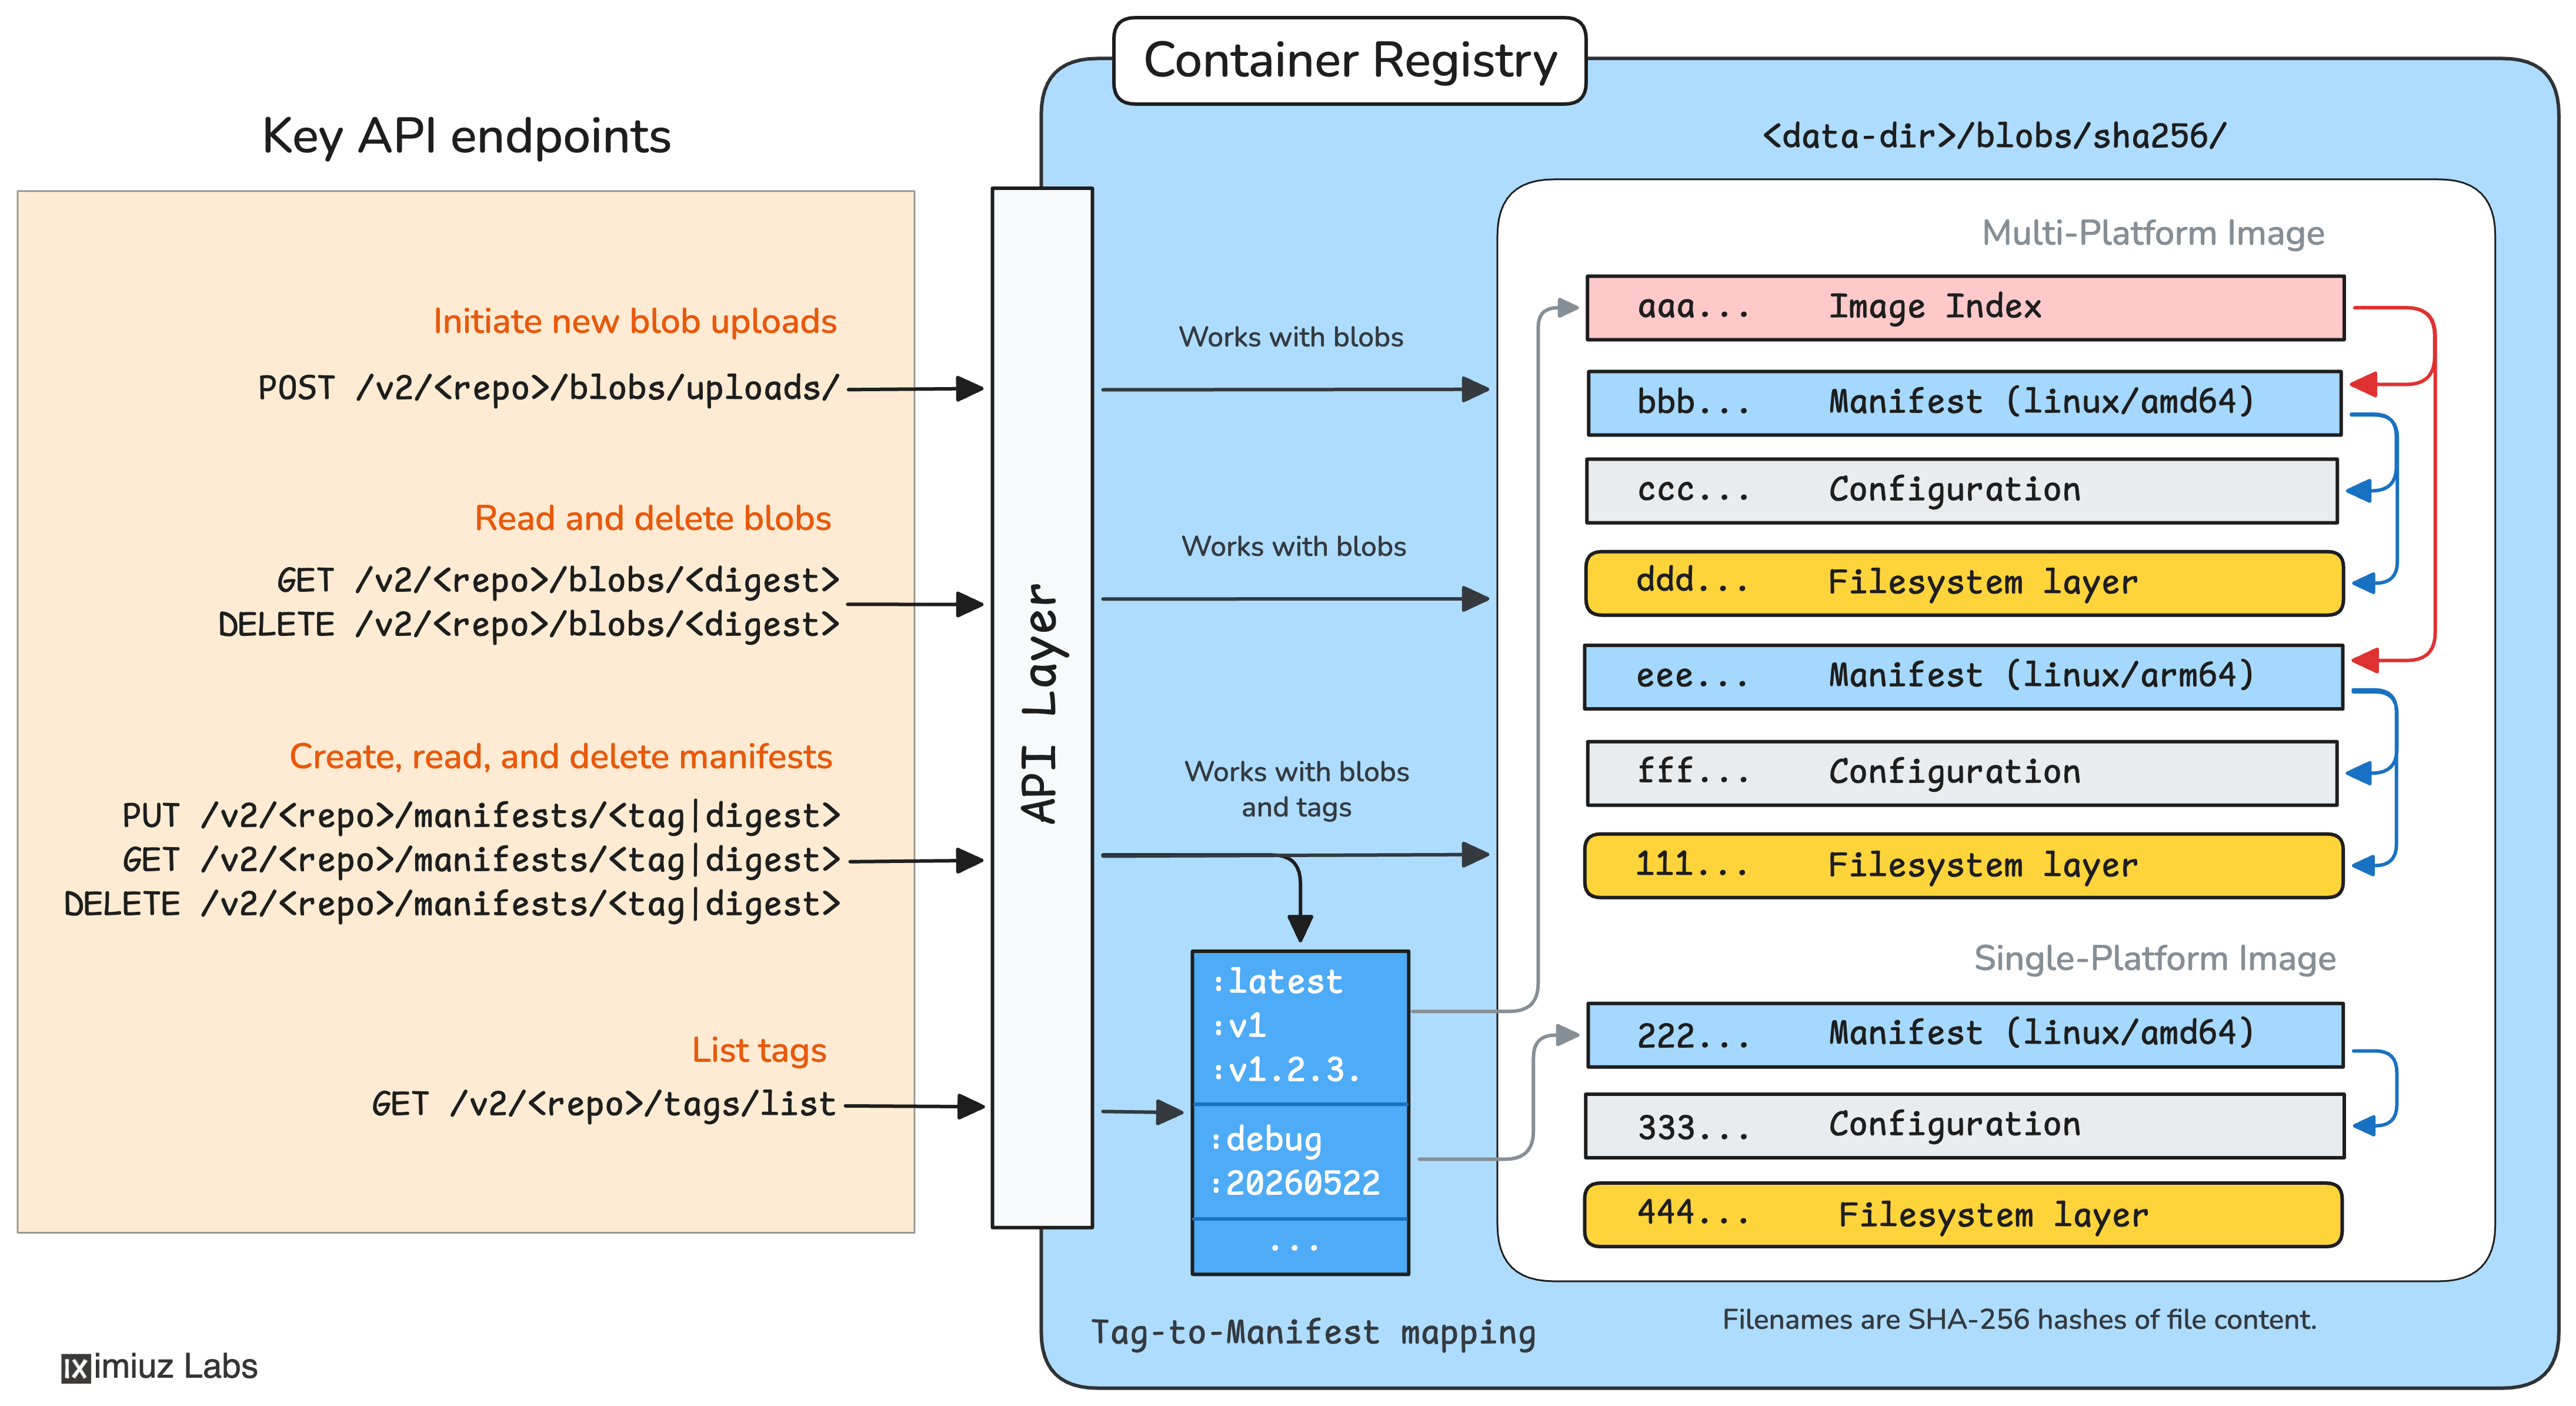
Uploading and Downloading Blobs

At its core, a registry is a content-addressable blob store. This means you can upload any blob (i.e., an arbitrary file) into a registry by hashing the file locally and using its digest as the future address:

POST /v2/<repo>/blobs/uploads/ -> Location: <url> (response header)
PUT <url>?digest=<digest>

The above monolithic PUT request is the simplest way to upload a blob but it's definitely not the most efficient one. For larger blobs, the OCI Distribution Spec offers a lengthier yet more efficient alternative POST + PATCH + PUT approach to upload files in chunks. But since all blobs in this tutorial are intentionally small, we'll stick with the "monolithic PUT" approach for the sake of brevity.

Hands-On: Upload a blob to a registry using curl

A sample blob.tar.gz is already waiting for you in the home directory ~ on host-1. Compute its digest and push it to a fresh hello-world repository in the playground's registry.iximiuz.com registry:

host-1
BLOB=~/blob.tar.gz
DIGEST=$(sha256sum ${BLOB} | awk '{print $1}')
  1. Initialize an upload session and capture the location URL from the response header:
host-1
LOCATION=$(curl -s -o /dev/null -X POST \
    -w '%header{location}' \
    "https://registry.iximiuz.com/v2/hello-world/blobs/uploads/")
  1. Send the blob bytes together with the digest to the returned location URL:
host-1
curl -s -i -X PUT \
    -H "Content-Type: application/octet-stream" \
    --data-binary @"${BLOB}" \
    "${LOCATION}&digest=sha256:${DIGEST}"

A successful upload responds with HTTP/2 201 Created and a Location header pointing to the new blob.

Downloading a blob from a registry is even simpler. Assuming you know the blob's digest, you can simply GET it from the registry:

GET /v2/<repo>/blobs/<digest>
Hands-On: Download a blob from a registry using curl

First, note the digest of the blob you just uploaded from host-1:

host-1
echo ${DIGEST}

Then switch to the host-2 terminal, and using the digest from above, download the blob back from the registry:

host-2
DIGEST=<paste the digest from host-1>

curl -s -L -o /tmp/blob.tar.gz \
    "https://registry.iximiuz.com/v2/hello-world/blobs/sha256:${DIGEST}"

Verify the blob "round-tripped" intact: the locally computed digest must match the one we uploaded with from host-1:

host-2
sha256sum /tmp/blob.tar.gz

Pushing Images

Pushing an image by hand is only marginally more complex than uploading blobs.

To push a container image, you need to compute a digest of its (usually compressed) first layer, upload it to the registry as an opaque blob, then move to the next layer, the next after next, and eventually to the configuration file, which is also hashed and uploaded as yet another opaque blob. Of course, all these uploads usually happen in parallel.

At its core, a container image is two-fold: it bears a filesystem and a runtime configuration.

Once all image layers and the configuration blob are uploaded, you need to prepare a manifest file, which "stitches" all the just pushed blobs together by listing their digests in one JSON document, and push it to the registry under the desired tag using the following endpoint:

PUT /v2/<repo>/manifests/<tag>
An OCI Image Manifest pointing to an OCI Image Configuration and one or more filesystem layers.
Hands-On: Push an image to a registry using curl

On host-1, the ~/image/ directory already contains an image ready to be pushed: two gzipped rootfs layers, a JSON config blob, and the corresponding manifest:

host-1
ls ~/image/
config.json  layer-1.tar.gz  layer-2.tar.gz  manifest.json

First, define a simple push_blob helper that combines the POST and PUT upload requests from the previous section into a single command:

host-1
push_blob() {
  local repo=$1
  local file=$2

  local digest="sha256:$(sha256sum "${file}" | awk '{print $1}')"

  local location=$(curl -s -o /dev/null -X POST \
      -w '%header{location}' \
      "https://registry.iximiuz.com/v2/${repo}/blobs/uploads/")

  curl -s -o /dev/null -X PUT \
      -w "${file} -> HTTP %{http_code}\n" \
      -H "Content-Type: application/octet-stream" \
      --data-binary @"${file}" \
      "${location}&digest=${digest}"
}

Then use it to upload both layers and the config blob to registry.iximiuz.com/my/app. Real-world clients (e.g., docker push) fan blob uploads in parallel - we'll keep it sequential for clarity:

host-1
push_blob my/app ~/image/layer-1.tar.gz
push_blob my/app ~/image/layer-2.tar.gz
push_blob my/app ~/image/config.json

Each call should print HTTP 201. The three blobs are now in the registry, addressable by their digests:

Finally, tie the blobs together by pushing the manifest under the v1 tag:

host-1
curl -s -i -X PUT \
    -H "Content-Type: application/vnd.oci.image.manifest.v1+json" \
    --data-binary @$HOME/image/manifest.json \
    "https://registry.iximiuz.com/v2/my/app/manifests/v1"

You should see HTTP/2 201 Created for each blob upload and the manifest push.

Listing Tags

By pushing an image using the PUT /v2/<repo>/manifests/<tag> endpoint, you create a new tag in the registry pointing to the manifest.

You can list the tags of all previous uploaded manifests in one repository using another simple endpoint:

GET /v2/<repo>/tags/list

Surprisingly, this operation is not exposed in the docker CLI - but it's just one curl away (tools like crane and regctl simply wrap this same endpoint behind a handy ls command).

Container image name format visualized: registry domain, repository path, tag, and digest.
Hands-On: List a repository's tags using curl

The registry.iximiuz.com/acme repository was pre-populated with a few tags during the playground bootstrap. List them with curl and tee the result to disk (using the host-2 terminal):

host-2
curl -s "https://registry.iximiuz.com/v2/acme/tags/list" \
  | tee /tmp/acme-tags.json

Pulling Images

The image pulling process is inverse to pushing. First, you need to fetch the manifest for the given repository and tag.

GET /v2/<repo>/manifests/<tag>

Then download all the blobs mentioned in the manifest by their digests:

pseudocode
for digest in $MANIFEST_DIGESTS; do
    GET /v2/<repo>/blobs/<digest>
done

Originally, image manifests referenced only rootfs layers and image configuration blobs, but container registries turned out to be a very convenient general-purpose store, so modern manifests often reference arbitrary artifacts stored as blobs: Helm charts, SBOMs, provenance attestations, LLM weights, etc.

A manifest can reference rootfs layers, an image config blob, or arbitrary artifact blobs - any content-addressable payload.
Hands-On: Pull an image from a registry using curl

Let's try pulling the my/app:v1 image we pushed earlier to host-2 using curl:

host-2
DEST=/tmp/pulled
mkdir -p "${DEST}"
  1. Fetch the manifest. Everything else the image is made of is referenced from it:
curl -s -L \
    -H "Accept: application/vnd.oci.image.manifest.v1+json" \
    -o "${DEST}/manifest.json" \
    "https://registry.iximiuz.com/v2/my/app/manifests/v1"
  1. Download the image configuration blob reading its digest from the manifest:
CONFIG_DIGEST=$(jq -r '.config.digest' "${DEST}/manifest.json")

curl -s -L \
    -o "${DEST}/config.json" \
    "https://registry.iximiuz.com/v2/my/app/blobs/${CONFIG_DIGEST}"
  1. Download every rootfs layer blob reading their digests from the manifest:
LAYER_DIGESTS=$(jq -r '.layers[].digest' "${DEST}/manifest.json")

for DIGEST in ${LAYER_DIGESTS}; do
    curl -s -L \
        -o "${DEST}/${DIGEST#sha256:}.tar.gz" \
        "https://registry.iximiuz.com/v2/my/app/blobs/${DIGEST}"
done

With the manifest, config, and all layers saved to disk, you've reassembled the entire image by hand:

host-2
ls -la "${DEST}"

Deleting Images

The tricky part is deletion. It is rather hard to purge an image that was once pushed to a registry. You can "untag" a manifest but a single manifest can have more than one tag. And even if you delete all tags of a manifest, the registry will still keep the manifest itself around.

Delete the manifest's tag(s):

DELETE /v2/<repo>/manifests/<tag>

Fetch the manifest back by its digest:

GET /v2/<repo>/manifests/<manifest-digest>

Fetch the manifest back as a blob (works, too):

GET /v2/<repo>/blobs/<manifest-digest>

The digest of the image's manifest, as stored in the registry, is the (in)famous Image Digest every tutorial recommends to pin.

Of course, you can delete the manifest as a blob - by its digest. However, before deleting the manifest as an opaque blob, you should read it and delete all the rootfs layers and the image configuration blobs it mentions. But only if they are not referenced from other manifests. Otherwise, you're risking to damage other images that reuse one or more underlying layers.

DELETE /v2/<repo>/blobs/<manifest-digest>

Remember, registries use content addressable storage, so the same (bit-by-bit) rootfs layer pushed into the registry from two different images will end up having the same digest, hence the same address. And deleting it will delete it for all images.

An alternative way is to delete all the manifest's tags and hope that the registry is configured with garbage collection enabled and that it includes deletion of untagged manifests. But it's not always the case with public registries.

Hands-On: Purge an image from a registry

On host-2, fetch the manifest of my/app:v1 and compute its digest locally with sha256sum - since the manifest is just another content-addressable blob, hashing the exact bytes the registry returns gives you the very same digest it's stored under:

host-2
MANIFEST_DIGEST="sha256:$(
    curl -s -L \
      -H "Accept: application/vnd.oci.image.manifest.v1+json" \
      "https://registry.iximiuz.com/v2/my/app/manifests/v1" \
      | sha256sum | awk '{print $1}'
)"

Print the digest and save it to a file for later use:

host-2
echo "${MANIFEST_DIGEST}" | tee /tmp/manifest_digest.txt

Now let's untag the manifest. The v1 tag will disappear, but the manifest itself stays addressable by its digest.

host-2
curl -s -i -X DELETE \
    "https://registry.iximiuz.com/v2/my/app/manifests/v1"

The tags/list endpoint should no longer report the v1 tag:

host-2
curl -s "https://registry.iximiuz.com/v2/my/app/tags/list" | jq .

However, the manifest is still there, just untagged. We can fetch it back by its digest and save the JSON for the next step:

host-2
curl -s -L \
    -H "Accept: application/vnd.oci.image.manifest.v1+json" \
    "https://registry.iximiuz.com/v2/my/app/manifests/${MANIFEST_DIGEST}" \
    | tee /tmp/manifest-by-digest.json

To finalize the image deletion, we need to delete every rootfs layer plus the config blob the manifest points at:

host-2
BLOB_DIGESTS=$(jq -r '.config.digest, .layers[].digest' /tmp/manifest-by-digest.json)

for DIGEST in ${BLOB_DIGESTS}; do
    curl -s -o /dev/null -X DELETE \
        -w "${DIGEST} -> HTTP %{http_code}\n" \
        "https://registry.iximiuz.com/v2/my/app/blobs/${DIGEST}"
done

At this point, fetching any of the image's layers or the config blob will start to return 404, which means the image was completely purged from the registry.

Storing Multi-Platform Images

For a relatively long time all images were single-platform. The support for multi-platform images was added only later and for many tools somewhat "bolt-on". However, multi-platform images did not change the design of registries. Even the set of API endpoints stayed unchanged - no extra endpoints were added and no existing endpoints were modified (modulo supported Accept headers, probably).

To push a multi-platform image into a registry, all its single-platform variants need to be pushed first, each with its own manifest, but pushed by digest instead of tag:

PUT /v2/<repo>/manifests/<amd64-manifest-digest>
PUT /v2/<repo>/manifests/<arm64-manifest-digest>
...

Once all single-platform manifests become addressable as blobs, an extra "higher-level manifest", called image index (a.k.a., manifest list) is pushed to the registry using the regular manifest upload endpoint:

PUT /v2/<repo>/manifests/<tag>

This makes the GET /v2/<repo>/manifests/<tag> endpoint return either a (good old) single-platform manifest or a new(er) image index - and callers are expected to differentiate by the content type of the returned document (and/or the response header).

Thus, pushing and pulling of multi-platform images just added one extra layer of indirection and one extra step - uploading/downloading the index document.

An OCI Image Index pointing to one or more OCI Image Manifests, each of which points to an OCI Image Configuration and one or more filesystem layers.
Hands-On: Inspect single- and multi-platform manifests using curl

On host-2, query the manifest of a single-platform image single:latest and observe its top-level mediaType:

host-2
curl -s -L \
    -H "Accept: application/vnd.oci.image.manifest.v1+json, application/vnd.oci.image.index.v1+json" \
    "https://registry.iximiuz.com/v2/single/manifests/latest" \
    | tee /tmp/single-manifest.json \
    | jq '{mediaType, config: .config.digest, layers: [.layers[].digest]}'

Now do the same for a multi-platform image multi:latest - the mediaType flips to application/vnd.oci.image.index.v1+json and the document carries a manifests[] array instead of config/layers.

host-2
curl -s -L \
    -H "Accept: application/vnd.oci.image.manifest.v1+json, application/vnd.oci.image.index.v1+json" \
    "https://registry.iximiuz.com/v2/multi/manifests/latest" \
    | tee /tmp/multi-manifest.json \
    | jq '{mediaType, manifests: [.manifests[] | {digest, platform}]}'

Protecting the Registry API

The OCI Distribution Spec does not strictly define how authentication should be done, but most real-world registries use the good old HTTP Basic authentication. Which means that running a registry is only safe over HTTPS - otherwise the credentials will be sent over the wire unencrypted.

Summary

Container registries are simpler than they may look. At the core, a registry is a content-addressable blob store with a small HTTP API on top.

Rootfs layers, image config files, and even "non-container" artifacts are all stored as blobs and addressed by their digests. Manifests stitch blobs together into single-platform images. Tags are just human-friendly references to manifests. And multi-platform images simply add one extra level of indirection via manifest-like indexes reusing the existing API endpoints.

Pulling an image means fetching a manifest and then downloading the blobs it mentions. Pushing an image means uploading the blobs first and then publishing a manifest that ties them together.

Once you understand these few building blocks, container registries become much easier to debug, automate, and use beyond the usual docker pull / docker push workflow. Except for maybe the image deletion part πŸ™ˆ

Practice

Here are a few hands-on challenges to practice what you've learned:

About the Author

Ivan Velichko

Ivan Velichko

Ivan is the creator of iximiuz Labs and a long-time tech blogger and educator with a traditional focus on server-side tech and containers.

Find this author online

Writes about

containerslinuxnetworking

Frequently covers

dockercontainer-imagecontainers-101container-runtimecontainer-registry