Writing Your First Dagger Function and Digging Into Its Runtime
Introduction
Dagger allows writing automation scripts in regular programming languages.
However, at their core, such scripts are just sequences of system commands.
Does this mean that with Dagger,
our pipelines will become full of exec.Command("go", "build", ".").Run() or os.system("pip install -r ...") constructions?
Dagger also advertises running its pipelines in containers. But what does this actually mean? Does every task (aka Dagger Function) get its own container? Or is it a container per shell-out attempt? Or both? And if tasks are run in containers, how are project files and build artifacts shared between the host machine and these containers?
To answer the above questions, we will write our own Dagger Function, invoke it from the command line, and explore what happens from the user's perspective and under the hood.
But first, let's take a little detour that should help us understand the key technique that Dagger heavily relies on to run its pipelines.
Emulating Dagger with Docker
Docker has made our applications more portable by packaging the runtime dependencies with the app itself. But it also has made the way we build our applications more portable. Today, if a project has a Dockerfile, anyone with just Docker on their machine can build it - there is no need to have the app's build-time dependencies such as the compiler toolchain or the language runtime installed on the host.
Perhaps less appreciated, but running unit tests or linting the code without installing development tools on the host has become possible, too. Almost every language-specific guide (Go, Node.js, Java, C#, PHP, etc.) of the official Docker documentation has now a section called "Run tests when building", that shows how to organize the project's Dockerfile to make it also suitable for running unit tests.
For instance, here is how we can add the test stage to the Todolist's Dockerfile:
💡 iximiuz/todolist is a toy web service that is used in this course to illustrate various development challenges and the corresponding solutions.
# Base stage
FROM golang:1 AS base
WORKDIR /app
COPY go.mod go.sum ./
RUN go mod download -x

# Test stage
FROM base AS test
COPY . .
RUN go test -v ./...

# Build stage
FROM base AS build
COPY . .
RUN CGO_ENABLED=0 go build -o server ./cmd/server

# Final "production" image
FROM alpine:3 AS runtime
...
Running the docker build command with the --target flag set to test will not produce the final image,
but instead will run the unit tests in an temporary container that has the Go toolchain and the project's source code in it:
docker build --target test --progress plain --no-cache .
Furthermore, if some intermediate artifacts (e.g. test coverage reports or the compiled project's binary) need to be extracted from such an ephemeral container to the host, they first can be copied to a scratch stage:
# Base stage
FROM golang:1 AS base
WORKDIR /app
COPY go.mod go.sum ./
RUN go mod download -x

# Build stage
FROM base AS build
COPY . .
RUN CGO_ENABLED=0 go build -o server ./cmd/server

# Artifact stage
FROM scratch AS artifact
COPY --from=build /app/server .

# Final "production" image
FROM alpine:3 AS runtime
...
...and then saved locally using the --output flag with the type option set to local:
docker build --target artifact --output type=local,dest=./bin .
Quite a powerful trick, isn't it?
Using containerized environments for running development workflow tasks has always been possible, but the introduction of multi-stage builds has made it more convenient and cache-friendly.
In Docker, multi-stage builds are powered by BuildKit, its [not so] new builder engine. And this is exactly the technology that Dagger relies on! It's just that, in Dagger, you write your "stages" in languages like Go and call them "Dagger Functions" instead:
...

func (m *Todolist) Build(src *dagger.Directory) *dagger.File {
  return dag.Container().
      From("golang:1").
      WithDirectory("/app", src).
      WithWorkdir("/app").
      WithEnvVariable("CGO_ENABLED", "0").
      WithExec([]string{"go", "build", "-o", "server", "./cmd/server"}).
      File("/app/server")
}
The above snippet is an example of a "build stage", similar to the one we've seen in the Todolist's Dockerfile. The three key takeaways from it that will help you get started with writing your own Dagger modules are:
- To start a new stage
FROMa given image, writedag.Container().From(...). - To
RUNa system command in the stage's container, write<container>.WithExec(...). - To extract files from the stage's container, return a
dagger.Fileordagger.Directoryobject.
Now, on to the next section where we will prepare the environment to write our very first Dagger Function.
Initializing a Dagger Module
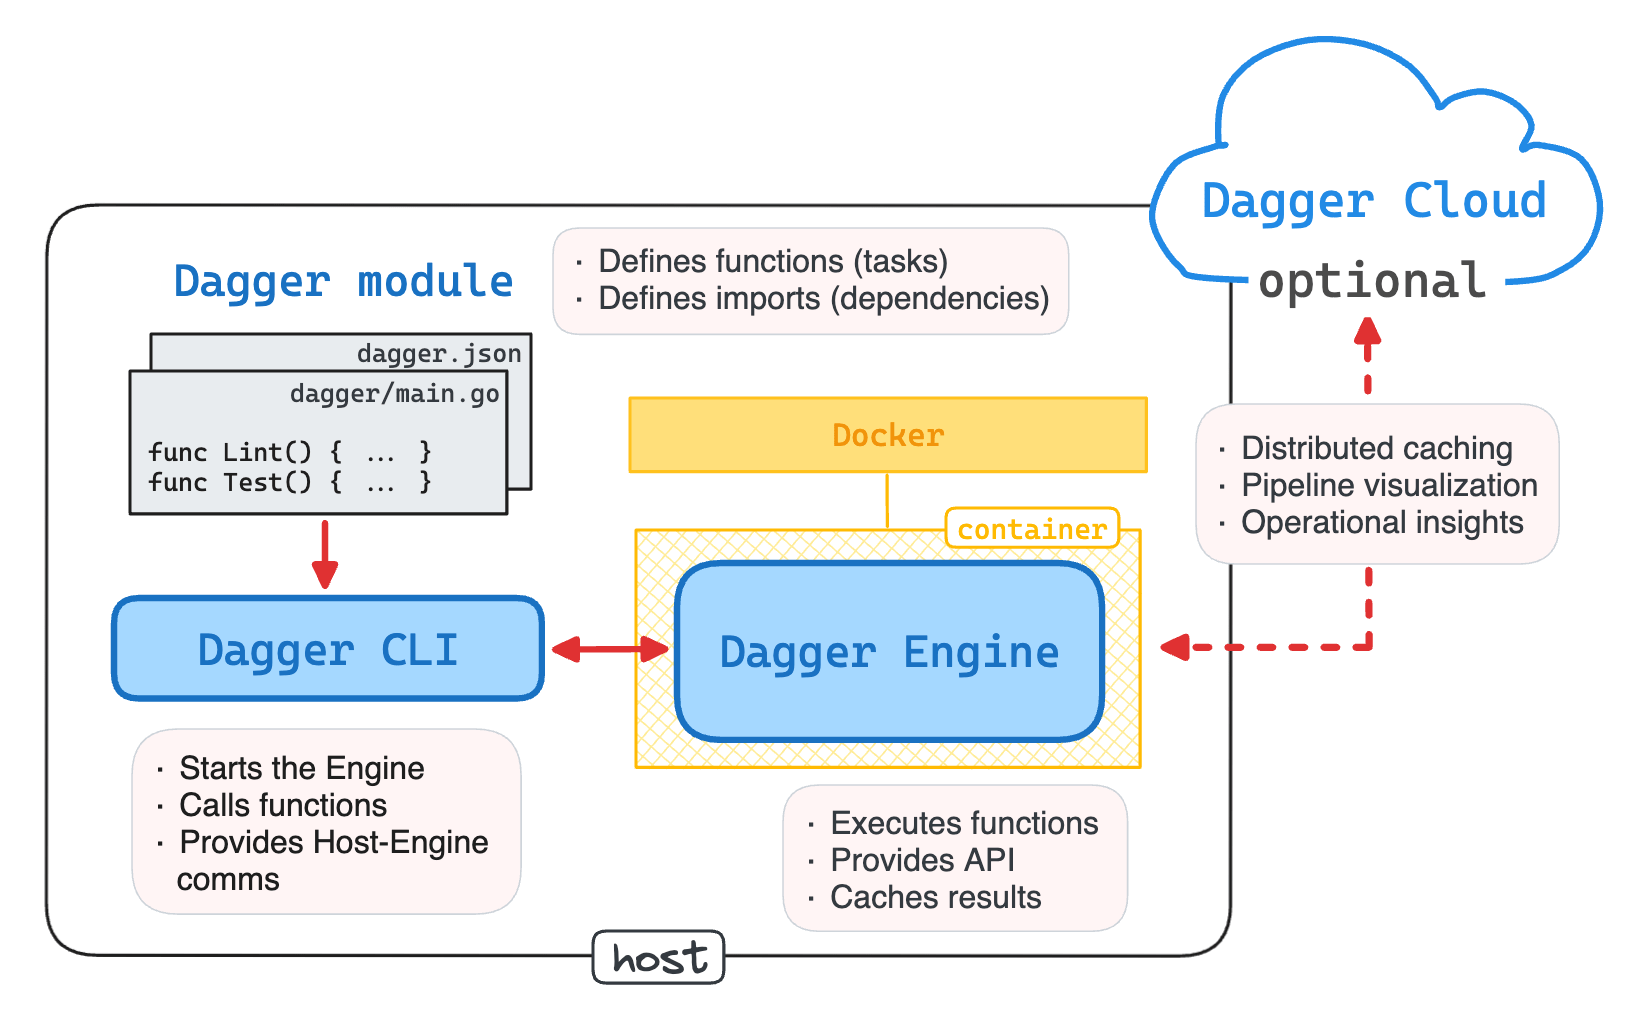
Before you can start writing Dagger Functions, you need to initialize a Dagger Module.
In Dagger, a pipeline is a fully-featured program,
with its own go.mod (or package.json, or pyproject.toml) file and an arbitrary complex internal structure.
When you initialize a Dagger module, a dagger.json file is created, which in particular points to the module's root directory.
Like a Makefile or Dockerfile, a Dagger module can reside anywhere within the project's file tree.
The most common location is at the root of the project in a dedicated subfolder such as ./dagger or ./ci
(or whatever name you might prefer for it).
⚠️ Don't confuse the module's root with the project's root. Even when the project and its Dagger module are written in the same language, they are two independent programs with two separate sets of configuration files.

Run the following command from ~/todolist to initialize a Dagger module for our guinea pig project:
dagger init --sdk=go --source=./dagger # --name=todolist
Once the module is initialized, you may want to explore what files have been generated in the project's directory.
The git status command can help you with that, but don't spend to much time on it -
we'll talk about the structure of Dagger modules in more detail in one of the future lessons.
💡 In this lesson, we deal only the current module of the project and with just one function in it, so the above overview of Dagger modules is intentionally over-simplified. In general, Dagger modules is a more powerful concept - for instance, you can import modules from other projects, making their functions available in your current pipeline.
Now, when we have the module created, it's finally time to add our first Dagger Function to it.
Writing the first Dagger Function
Despite being called "functions", Dagger Functions are usually defined as methods on a so-called main object of the module. From a programming standpoint, a Dagger module is no different from a module of any typical object-oriented language. The implementation may vary between SDKs, but all three officially supported languages expect the module to define a class (or struct) named after the module itself (the main object) with a set of public and/or annotated methods in it (Dagger Functions).
Here is what it looks like in Go:
type MyProject struct{}

func (m *MyProject) Hello() string {
  return "Hello, world"
}

// ...or
// func (m *MyProject) Hello(ctx context) string {}
// func (m *MyProject) Hello(ctx context) (string, error) {}
...in Python:
import dagger
from dagger import function, object_type

@object_type
class MyProject:
  @function
  async def hello(self) -> str:
    return "Hello, world"
...and in TypeScript:
import { object, func } from "@dagger.io/dagger"

@object()
class MyProject{
  @func()
  async hello(): Promise<string> {
    return "Hello, world"
  }
}
This convention is probably the only special thing you need to remember about Dagger Functions. For the rest, Dagger Functions are just regular code. They can:
- Accept arguments
- Return values
- Throw (or return if it's Go) errors
- Call other functions
- Use the language's stdlib
- Use third-party libraries
- Access network and filesystem
- Etc.
💡 Refer to the official documentation on Dagger Functions for the full list of supported features.
Let's write a very simple Dagger Function that does nothing but sleeps for some time.
Replace the generated content of ~/todolist/dagger/main.go with the following code:
// The Todolist's module description goes here.
package main

import "time"

// This struct is the "main object" of the module.
type Todolist struct{}

// Sleep is a Dagger Function that... sleeps for some time.
func (m *Todolist) Sleep(
  // +optional
  // +default="10s"
  duration string,
) (string, error) {
  d, err := time.ParseDuration(duration)
  if err != nil {
    return "", err
  }

  time.Sleep(d)
  return "done", nil
}
If you run the dagger functions command from the root of the project (where the dagger.json file is located),
you should see approximately the following output:
Name    Description
sleep   Sleep is a Dagger Function that... sleeps for some time.
💡 When used from the CLI or the API,
Dagger automatically converts function and argument names to "kebab-case".
Thus, the Dagger Function called Sleep becomes sleep,
and a function called HelloWorld would become hello-world.
It's time to call our Dagger Function and explore its runtime!
Calling Dagger Functions from the CLI
To invoke a Dagger Function from the command line, you can use the dagger call command:
dagger call [options] [arguments] <function>
Try it out with the just written sleep function:
dagger call sleep --duration 5s
Apparently, it works! But how could Dagger run a piece of Go code if there is (intentionally) no Go toolchain in the playground?
🤯 Go is a somewhat special case because it can be compiled to a statically linked binary.
But if the sleep function was written in TypeScript or Python,
Dagger would have been able to run it without having the Python or Node.js runtimes installed on the host, too.
Don't believe me?
You can easily verify it by re-initializing the Dagger module with dagger init --sdk=typescript or dagger init --sdk=python.
Yes, much like RUN instructions in Dockerfiles, system commands in Dagger Functions are executed in containers,
where you can install any dependencies you need, including the Go toolchain.
However, as we saw earlier, it'd require an explicit expression like:
dag.Container().From(<image>).WithExec(<cmd>)
...and it'd also introduce a chicken and egg problem. Puzzling!
Let's call the sleep function again,
but this time, we'll use a second terminal to take a closer look at the process tree on the host while the function is running:
dagger call sleep --duration 60s
...and from another terminal tab:
ps axfo pid,ppid,command
 PID    PPID   COMMAND
8851    1017    \_ sshd: root@pts/0
8855    8851    |   \_ -bash
9195    8855    |       \_ dagger call sleep --duration 60s
9217    9195    |           \_ docker exec -i dagger-engine buildctl dial-stdio
9243    9195    |           \_ docker exec -i dagger-engine buildctl dial-stdio

 ...

1412       1   /usr/bin/containerd-shim-runc-v2 -namespace moby -id 10d66dab...
1435    1412    \_ /usr/local/bin/dagger-engine
9287    1435    |   \_ /usr/local/bin/runc
9299    9287    |       \_ /.init /runtime
9305    9299    |           \_ /runtime
9233    1412    \_ buildctl dial-stdio
9258    1412    \_ buildctl dial-stdio
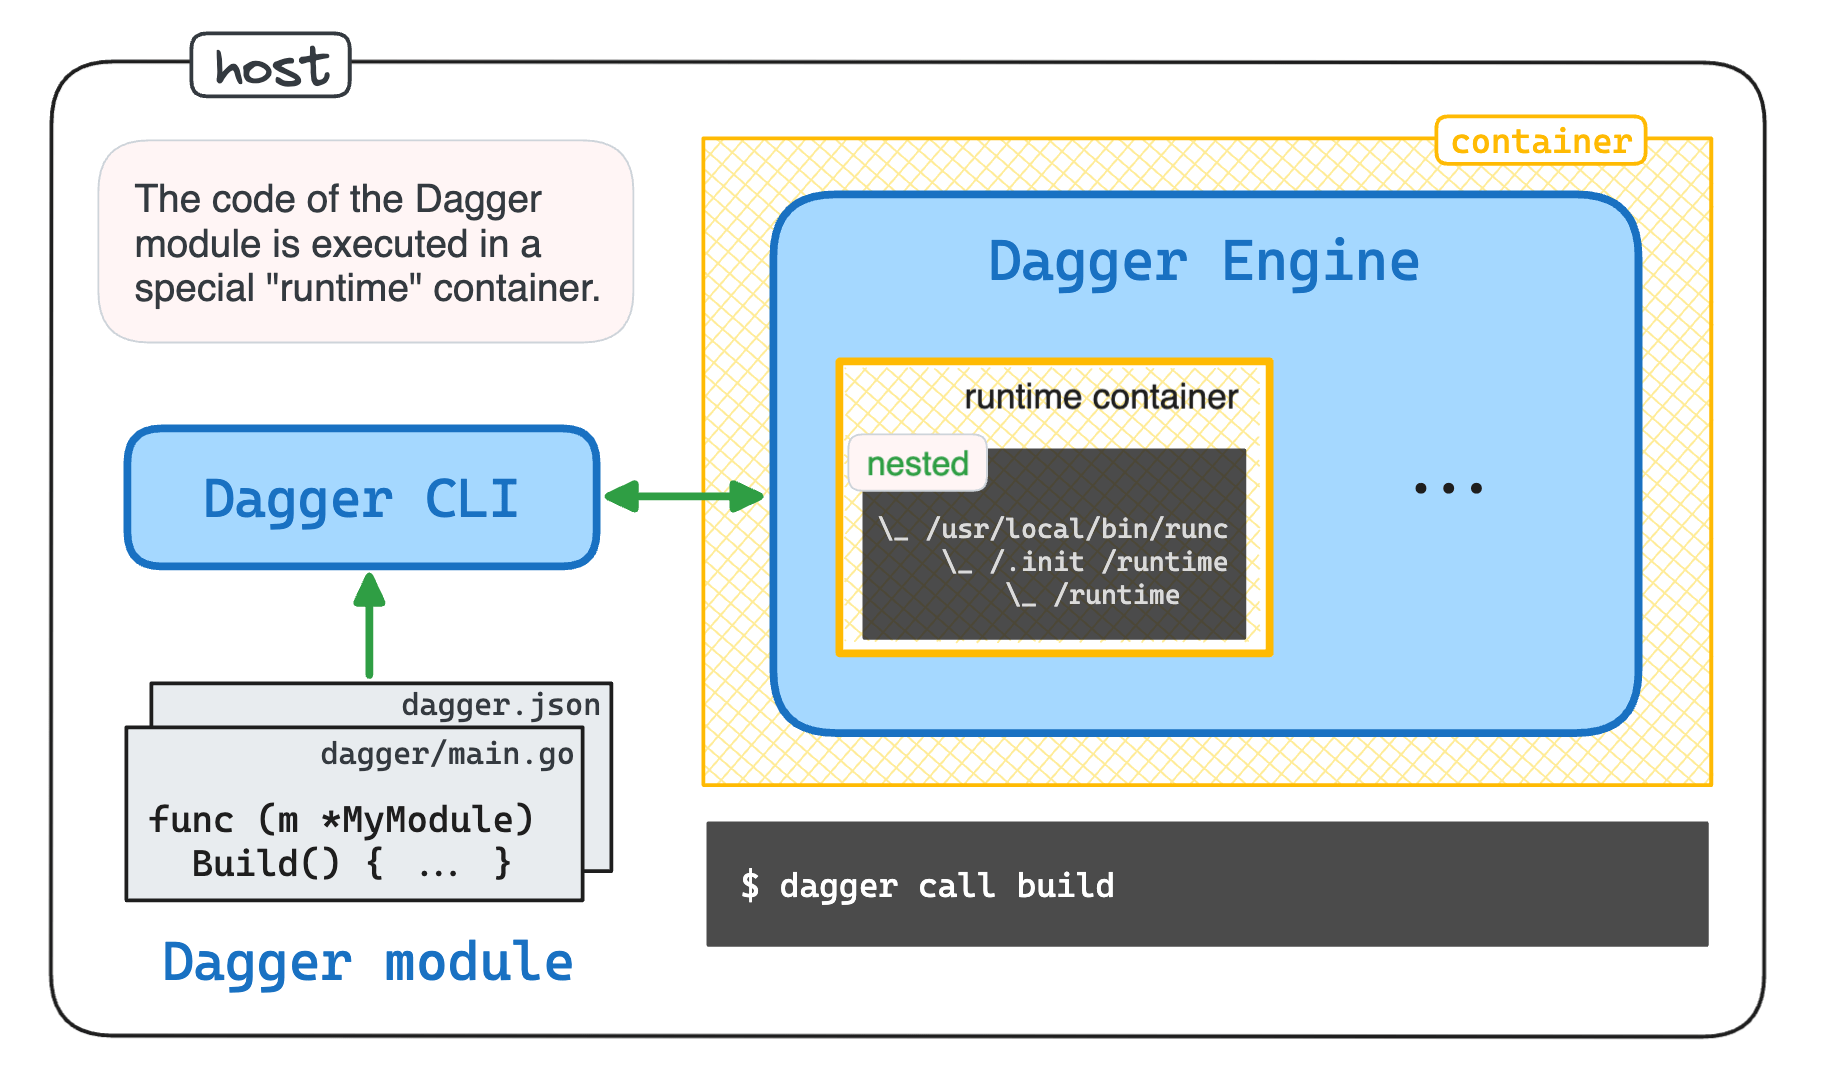
Can you tell from the above process tree what's actually going on?
The first group of processes is our original shell session running the dagger call command.
The second group of processes is the Dagger Engine, started as a Docker container (judging by its parent shim process).
However, the Dagger Engine process itself has an interesting runc child that in turn runs something called runtime.
Again, Go is somewhat special, but here is what the same process tree would look like if the sleep function was written in a Python:
    PID    PPID   COMMAND
   9572    1017  \_ sshd: root@pts/0
   9576    9572  |   \_ -bash
  11434    9576  |       \_ dagger call sleep --duration 60
  11457   11434  |           \_ docker exec -i dagger-engine buildctl dial-stdio
  11484   11434  |           \_ docker exec -i dagger-engine buildctl dial-stdio

    ...

   1412       1 /usr/bin/containerd-shim-runc-v2 -namespace moby -id 10d66dab...
   1435    1412  \_ /usr/local/bin/dagger-engine
  11899    1435  |   \_ /usr/local/bin/runc
  11911   11899  |       \_ /.init /runtime
  11918   11911  |           \_ python /runtime
  11474    1412  \_ buildctl dial-stdio
  11499    1412  \_ buildctl dial-stdio
...and the TypeScript version of the process tree For the sake of completeness 🙈
    PID    PPID   COMMAND
   9572    1017  \_ sshd: root@pts/0
   9576    9572  |   \_ -bash
  14311    9576  |       \_ dagger call sleep --duration 60000
  14335   14311  |           \_ docker exec -i dagger-engine buildctl dial-stdio
  14360   14311  |           \_ docker exec -i dagger-engine buildctl dial-stdio

    ...

   1412       1 /usr/bin/containerd-shim-runc-v2 -namespace moby -id 10d66dab...
   1435    1412  \_ /usr/local/bin/dagger-engine
  14682    1435  |   \_ /usr/local/bin/runc
  14694   14682  |       \_ /.init tsx --no-deprecation --tsconfig /src/dagger/tsconfig.json /src/dagger/src/__dagger.entrypoint.ts
  14700   14694  |           \_ node /usr/local/bin/tsx --no-deprecation --tsconfig /src/dagger/tsconfig.json /src/dagger/src/__dagger.entrypoint.ts
  14711   14700  |               \_ /usr/local/bin/node --require /usr/local/lib/node_modules/tsx/dist/preflight.cjs --import file:///usr/local/lib/node_modules
  14724   14711  |                   \_ /usr/local/lib/node_modules/tsx/node_modules/@esbuild/linux-x64/bin/esbuild --service=0.20.2 --ping
  14350    1412  \_ buildctl dial-stdio
  14376    1412  \_ buildctl dial-stdio
Notice how in the latter case, the runtime thingy is likely a Python program that contains the sleep function.
Apparently, Dagger Engine uses runc to start a special runtime container that executes the code of the Dagger module.
So, it's nested containers all the way down!

Thus, it's not only the system commands that are executed in containers, but also the Dagger Functions themselves.
This is the reason why we could call the sleep function on the host without the Go toolchain installed.
But as we will see later, this is also an integral part of the mechanism that makes it possible to call Go functions from Python modules (and vice versa),
making Dagger Function extremely reusable.
Executing commands in Dagger Functions
Runtime containers is a great invention for running Dagger Functions,
but they are not suitable for executing system commands like go build or pip install -
you cannot/should not install extra tools or packages in runtime containers.
But don't Dagger Functions exist mainly to execute such system commands?
That's where the dag.Container() construct finally comes into play.
💡 The dag thingy is a global variable that points to the default Dagger Engine API client.
Almost everything in Dagger happens in containers and via the API.
Let's replace the dummy sleep function with a much more useful build command:
package main

import (
  "dagger/todolist/internal/dagger"
)

type Todolist struct{}

// Build compiles the Todolist server binary in a golang:1 container.
func (m *Todolist) Build(src *dagger.Directory) *dagger.File {
  return dag.Container().
      From("golang:1").
      WithDirectory("/app", src).
      WithWorkdir("/app").
      WithEnvVariable("CGO_ENABLED", "0").
      WithExec([]string{"go", "build", "-o", "server", "./cmd/server"}).
      File("/app/server")
}
Relatively short and sweet, isn't it?
And still looks familiar if you've ever written a Dockerfile.
Here is how you can build the Todolist server binary using our new Dagger Function:
dagger call build --src . export --path ./bin/server
💡 The above command is an example of Function Chaining -
a technique often used in programming but rarely seen in the CLI.
The word export is actually a method of the dagger.File object returned from the Build function,
so in code it'd look like Build(src).Export(path).
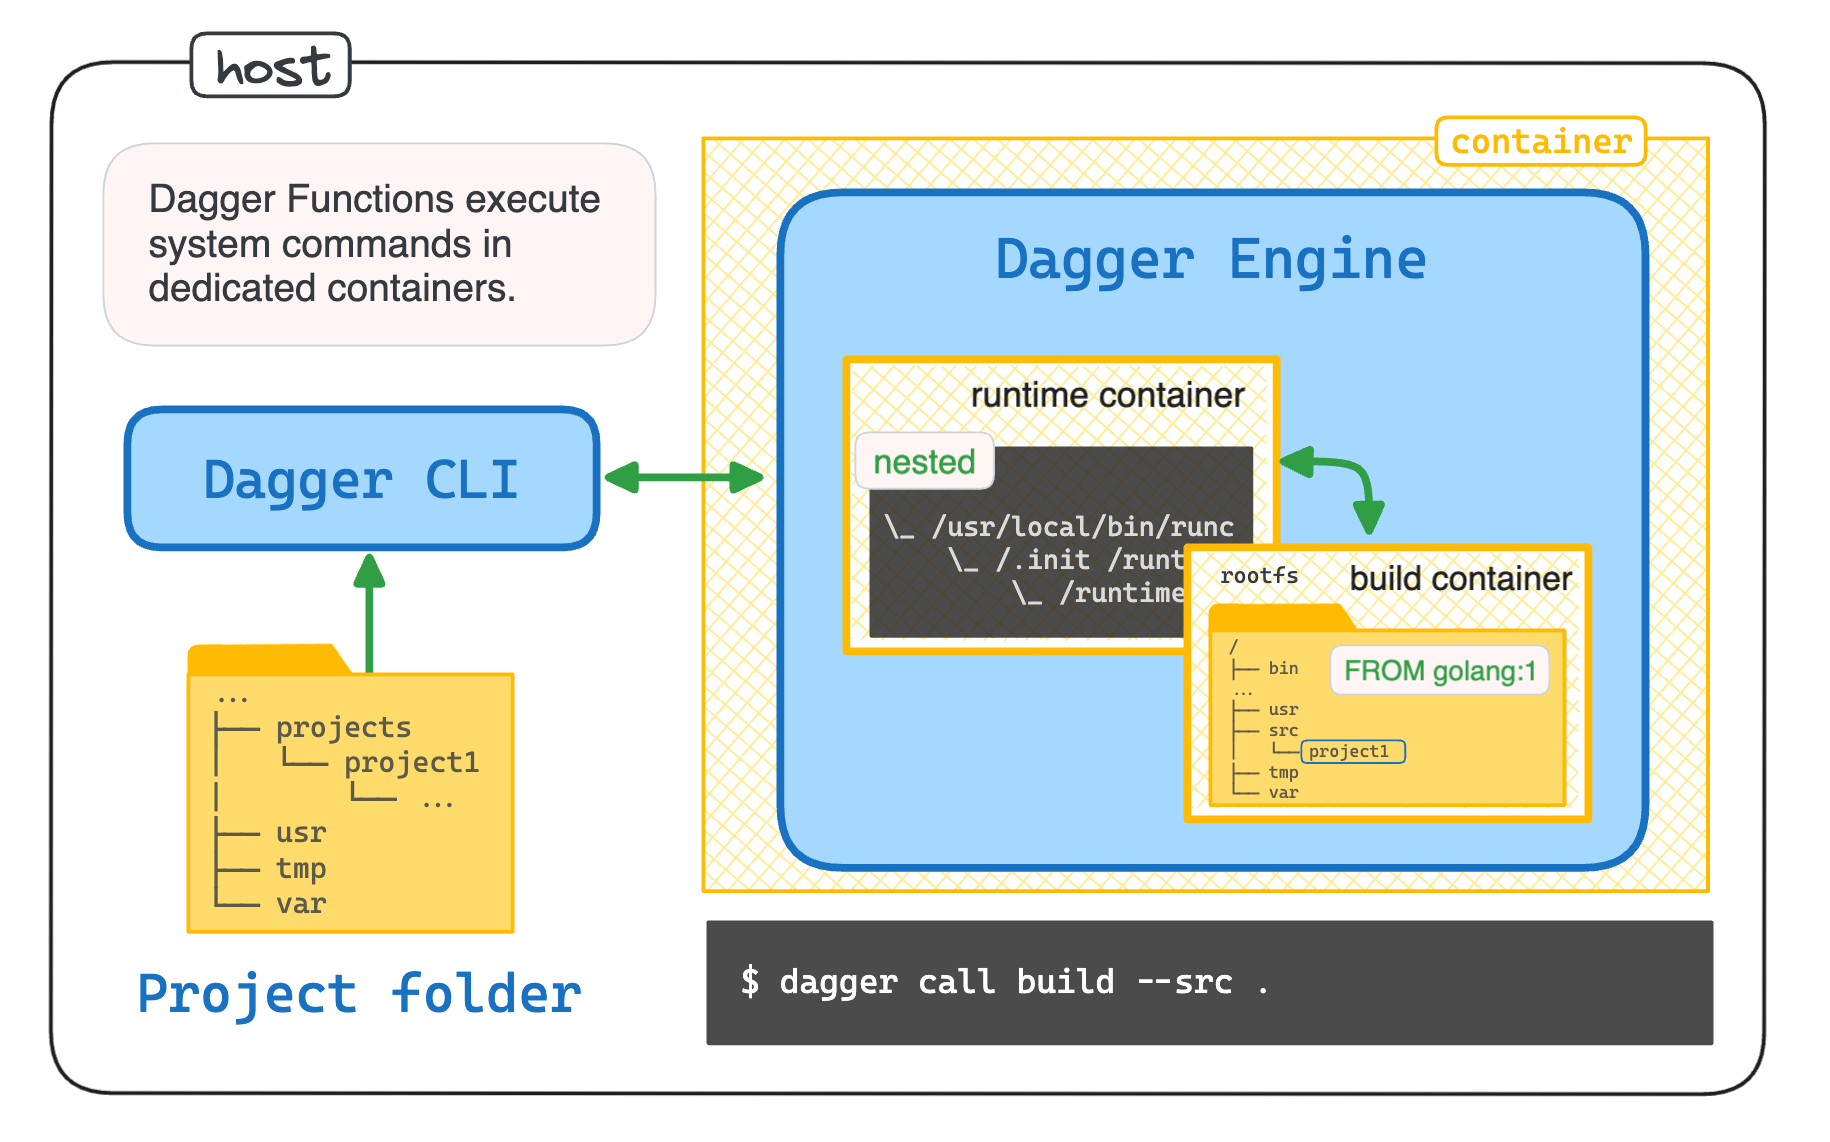
Since the go build command is executed in a container,
it doesn't have access to the host machine's filesystem.
That's why we need to use the --src flag to specify the directory containing the source code.
What happens next is no different from running docker build -t <name> . -
the local "context" folder is archived and sent first to the Dagger Function's runtime container,
and from there it's mounted to the golang:1 container via the explicit <container>.WithDirectory() call.

Sending files (or directories) in the opposite direction is also possible -
via explicitly returned dagger.File (or dagger.Directory) objects that can be Export'ed to the host machine.
But this is very similar to the way we were extracting the artifacts from the Docker build stage with the docker build -o type=local,dest=. command earlier in this lesson.
Other types of objects that can be passed to Dagger Functions 🧐
The following types of objects can be passed to Dagger Functions:
- Environment variables (via
dagger call foo --string-arg=$MY_ENV) - Secrets from files, env vars, or commands (via
dagger call foo --secret-arg=<kind>:<name>) - Services (via
dagger call foo --service-arg=tcp://<host>:<port>) - Container images (via
dagger call foo --container-arg=<registry>/<repo>:<tag>) - Git repositories (via
dagger call foo --directory-arg=<url>)
Thus, fundamentally, Dagger is not very different from multi-stage Docker builds. However, Dagger tries to bring the user experience of writing "stages" to a totally different level and makes glueing stages together much easier.
Summarizing
Dagger Functions are written in regular programming languages and packaged as self-sufficient programs called Dagger Modules. Functions are executed by Dagger in special runtime containers. This makes them independent from the host system and allows running functions written in arbitrary languages without having the corresponding runtimes installed locally.
However, runtime containers often remain unnoticed,
while the main attention is given to another type of Dagger containers.
Every time a Dagger Function needs to run a system command like pip install or go build,
it asks the Dagger Engine to spin up a separate container - either FROM a certain image, or by branching from one of the previously created containers.
This is the type of containers that forms the famous DAG (Directed Acyclic Graph) and benefits from the BuildKit caching mechanism.
If you are familiar with multi-stage builds in Docker, understanding the way Dagger Functions are structured will be very easy for you. Like Docker, Dagger leverages BuildKit's ability to run anonymous containers to execute arbitrary commands in controlled environments, aggressively caching intermediate results via taking snapshots of container filesystems.
In the next lesson, we will write two more Dagger Functions to test and lint the Todolist application, learn a few neat Dagger programming tricks, and explore the caching behavior.
But first, let's practice what we've learned so far!
- Previous lesson
- What Is Dagger and Why You Might Want to Use It
- Next lesson
- Function-Driven Programming Model and DAG