Union Mount Container Image Layers into a Flat Filesystem Using OverlayFS
In this challenge, you will take a container image stored in a remote registry,
save it as an OCI layout on disk, extract its individual filesystem layers,
and then mount them together using Linux OverlayFS to produce a flat, container-like root filesystem.
This is essentially what container runtimes such as Docker, Podman, and containerd do under the hood to
prepare an OCI runtime bundle for the lower-level tool like runc to start a container.
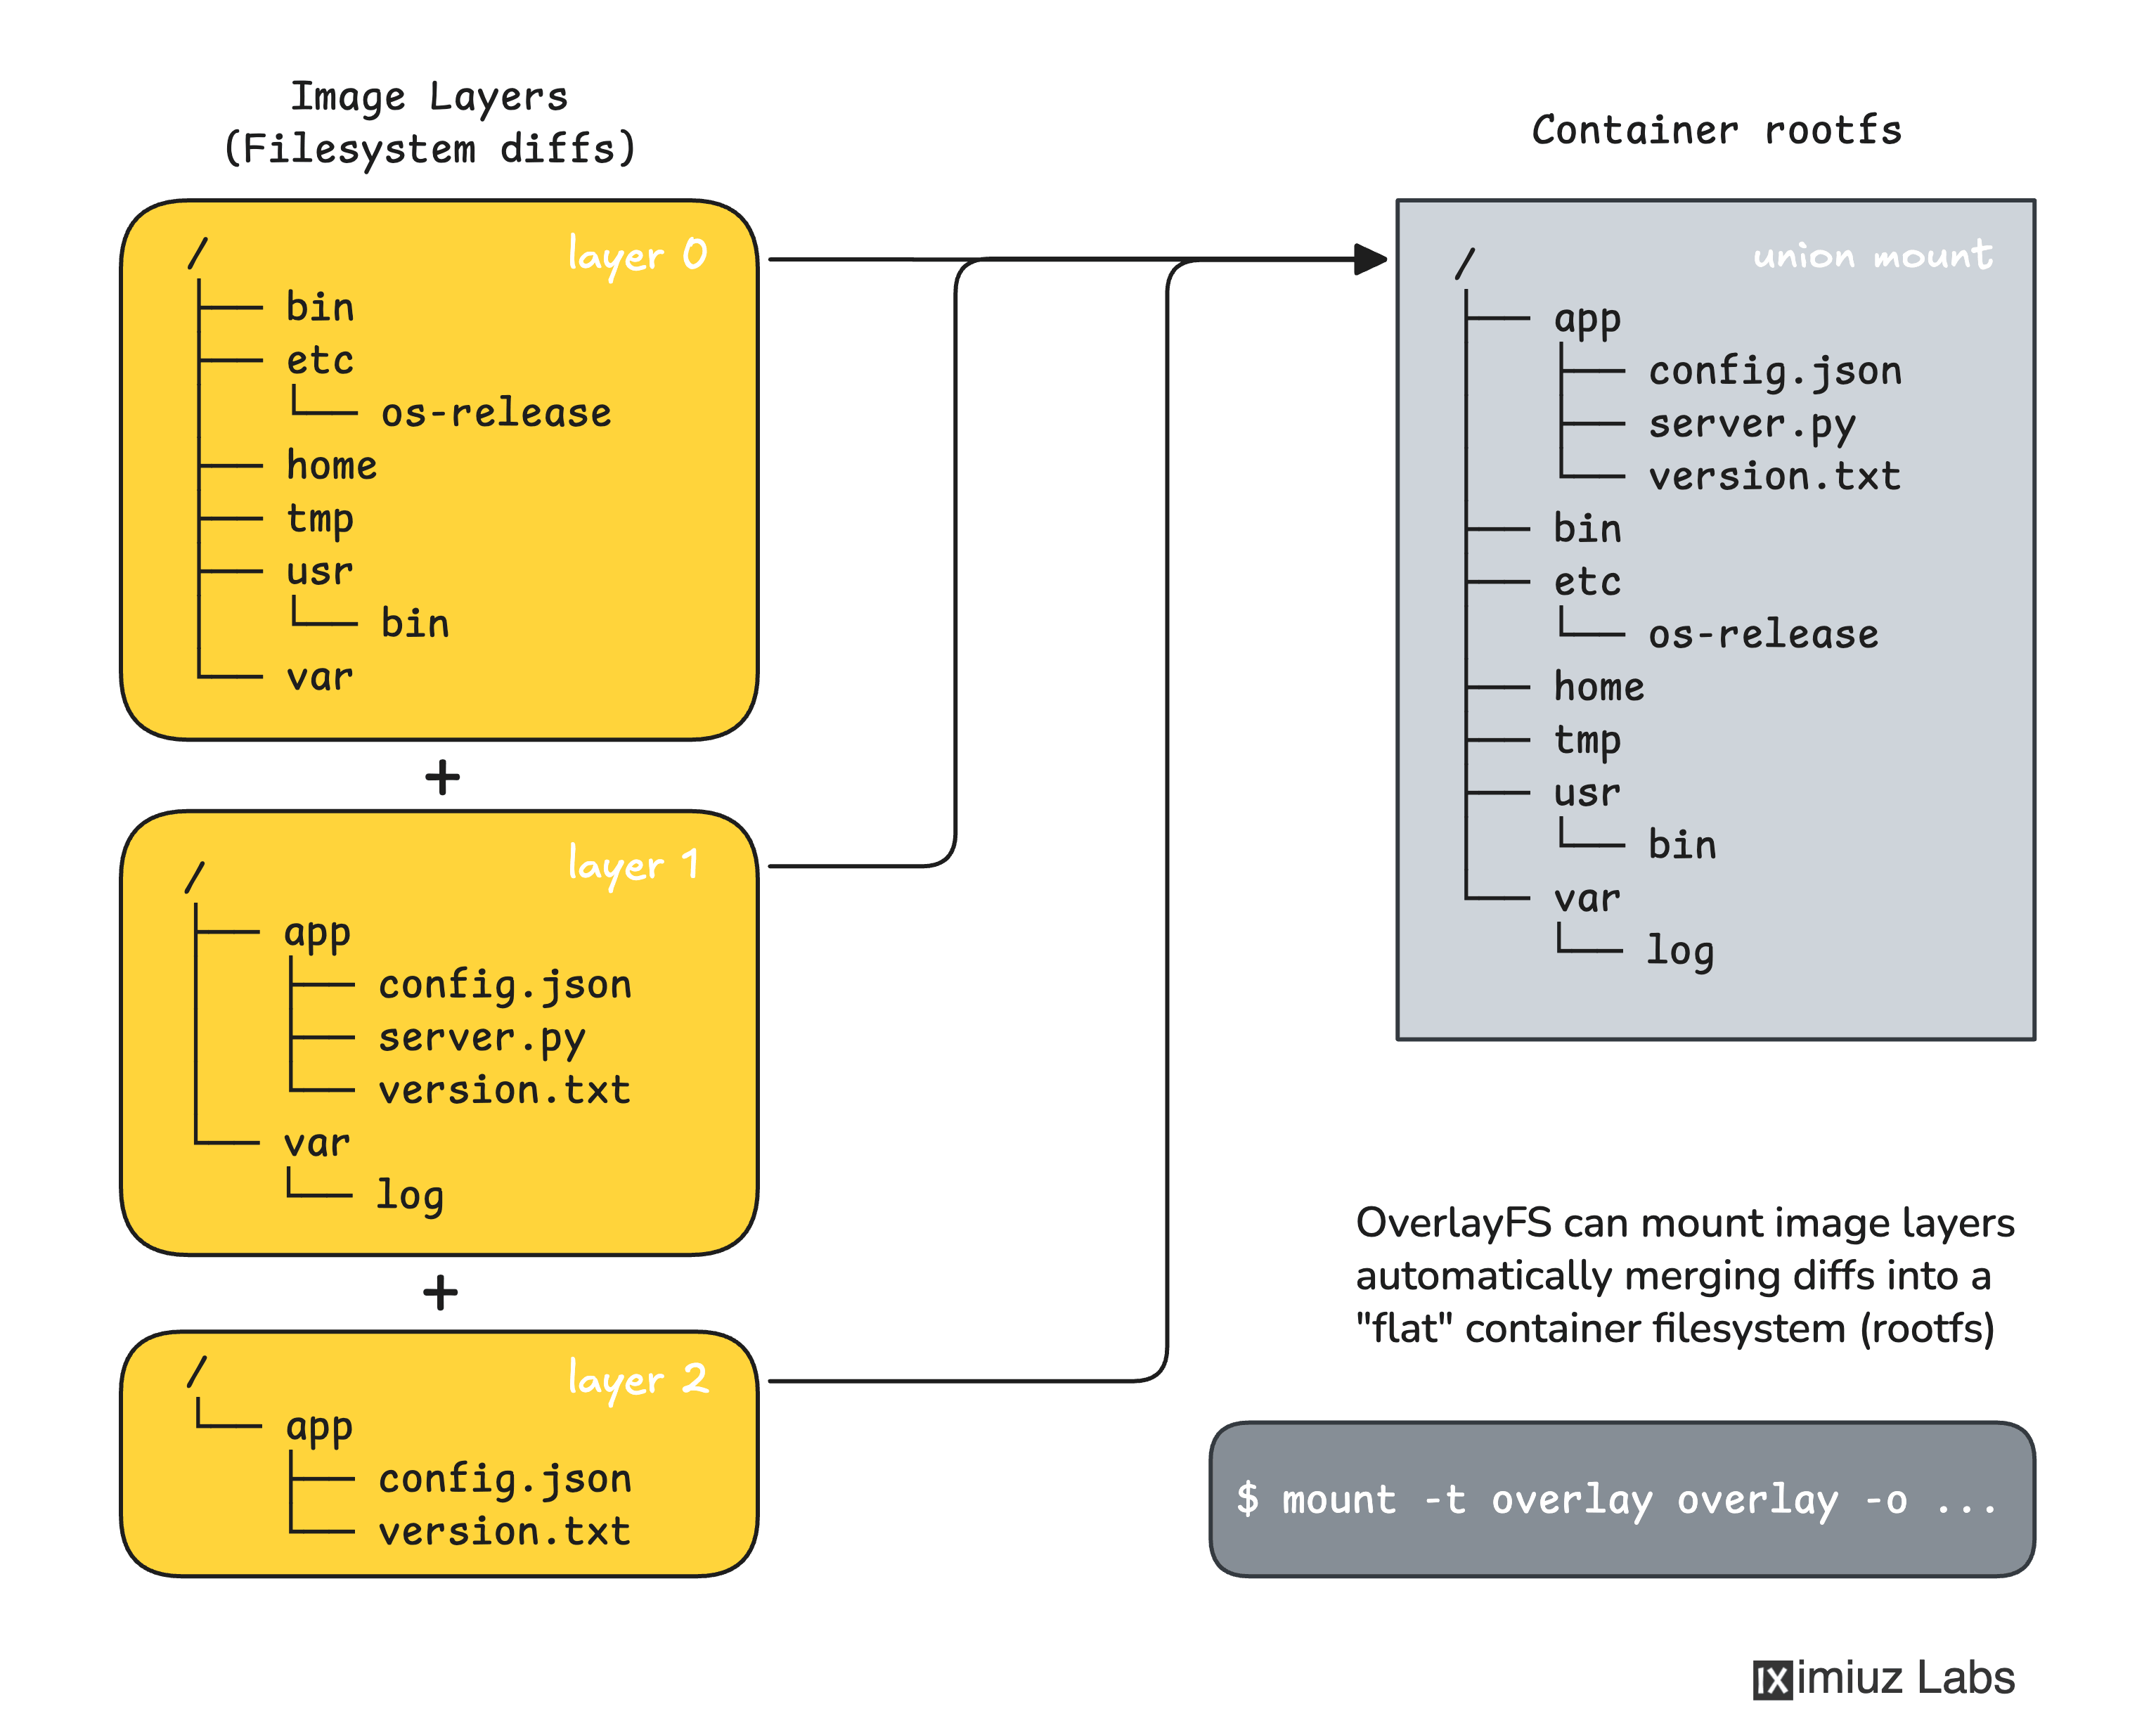
The image you'll be working with (registry.iximiuz.com/mini-web:v1) has exactly 3 layers:
- Layer 0 - Minimal Linux-ish filesystem layout (
etc/os-release, plus emptybin/,home/, etc. folders) - Layer 1 - Application files (
app/server.py,app/config.json,app/version.txtwith1.0.0value) - Layer 2 - App config tweaks (overwrites
app/config.jsonand bumps the version inapp/version.txt)
This challenge is intentionally simplified. It handles only additions and modifications of files across consecutive layers. Real container images can also delete files using special whiteout markers, but we skip that complexity here to focus on the core OverlayFS mechanics.
Step 1: Save the image as an OCI layout
The crane CLI tool is pre-installed on this machine. Use it to pull
the registry.iximiuz.com/mini-web:v1 image and save it as an OCI layout
into /tmp/mini-web/:
Hint: How to save an image as an OCI layout
The crane pull command can save images in different formats.
Run crane pull --help to find the flag that selects the OCI output format.
Take a look at the layout:
ls /tmp/mini-web/
cat /tmp/mini-web/index.json | jq .
Step 2: Extract the layers
Each layer in the manifest is a compressed tar archive stored as a blob.
Create a directory structure under /opt/cont-1/layers/ and extract each layer
into its own numbered subdirectory (/opt/cont-1/layers/0, /opt/cont-1/layers/1,
/opt/cont-1/layers/2), preserving the order from the manifest.
Layer 0 (base) - the foundation of the filesystem:
Layer 1 (additions) - new application files:
Layer 2 (modifications) - configuration overwrites:
Hint: How to navigate the OCI layout and extract layers
Navigating an OCI layout directory requires some prior familiarity with the OCI Image Specification. If you are not familiar with the OCI layout structure, try solving this challenge first:
Inspect OCI Image Layout of Single- and Multi-Platform Images
Once you identified the image's manifest blob,
you can find the filesystem layer blobs by reading its .layers[].digest field -
strip the sha256: prefix to get the filename under blobs/sha256/.
Note that the filesystem layer blobs will likely be compressed with gzip or zstd. You will need to use the appropriate command to uncompress them before extracting.
Take a moment to explore what each layer contains:
ls /opt/cont-1/layers/0/
ls /opt/cont-1/layers/1/
ls /opt/cont-1/layers/2/
Notice how the base layer contains a Linux root filesystem layout, layer 1 only adds new files, and layer 2 only modifies existing files.
Step 3: Mount the layers with OverlayFS
Now assemble all layers into a single unified filesystem using OverlayFS.
OverlayFS needs four directories:
- lowerdir - one or more read-only layers (your extracted image layers, stacked in order)
- upperdir - a writable layer for copy-on-write modifications
- workdir - a scratch directory used internally by OverlayFS
- merged - the mount point where the unified view appears
Create the OverlayFS directory structure under /opt/cont-1/overlayfs/:
Now mount the OverlayFS at /opt/cont-1/rootfs:
Hint: OverlayFS mount command
The mount command for OverlayFS looks a little monstrous, but only at first glance.
Take some time to wrap your head around it:
mount -t overlay overlay \
  -o lowerdir=<top-layer>:<middle-layer>:<base-layer>,upperdir=<upper-dir>,workdir=<work-dir> \
  <mount-point>
Pay attention to the lowerdir ordering - OverlayFS lists layers from topmost (highest priority) to bottommost (base).
Step 4: Explore the OverlayFS directories
Before making any changes, take a moment to explore what the OverlayFS directories look like.
Run ls /opt/cont-1/rootfs/ to see the merged (unified) view of all layers.
What are the top-level entries? List them separated by spaces:
The file app/version.txt exists in both layer 1 and layer 2 but with different values.
Run cat /opt/cont-1/rootfs/app/version.txt - what value do you see?
Now check the upper directory: ls /opt/cont-1/overlayfs/upper/.
Is it empty? Answer yes or no.
Step 5: Understand the Copy-on-Write (CoW) layer
To simulate a container modifying its filesystem, let's create a new file in /opt/cont-1/rootfs/:
echo "iximiuz Labs Rules!" > /opt/cont-1/rootfs/hello.txt
Did the new file appear in any of the lower layer directories
(/opt/cont-1/layers/0, /opt/cont-1/layers/1, /opt/cont-1/layers/2)?
Answer yes or no.
Did the file appear in the upper directory (/opt/cont-1/overlayfs/upper/)?
Answer yes or no.