Run Your First Firecracker microVM
Ways to Launch a Firecracker microVM
There are four (three common and one handy but unmaintained) ways to get a Firecracker microVM running:
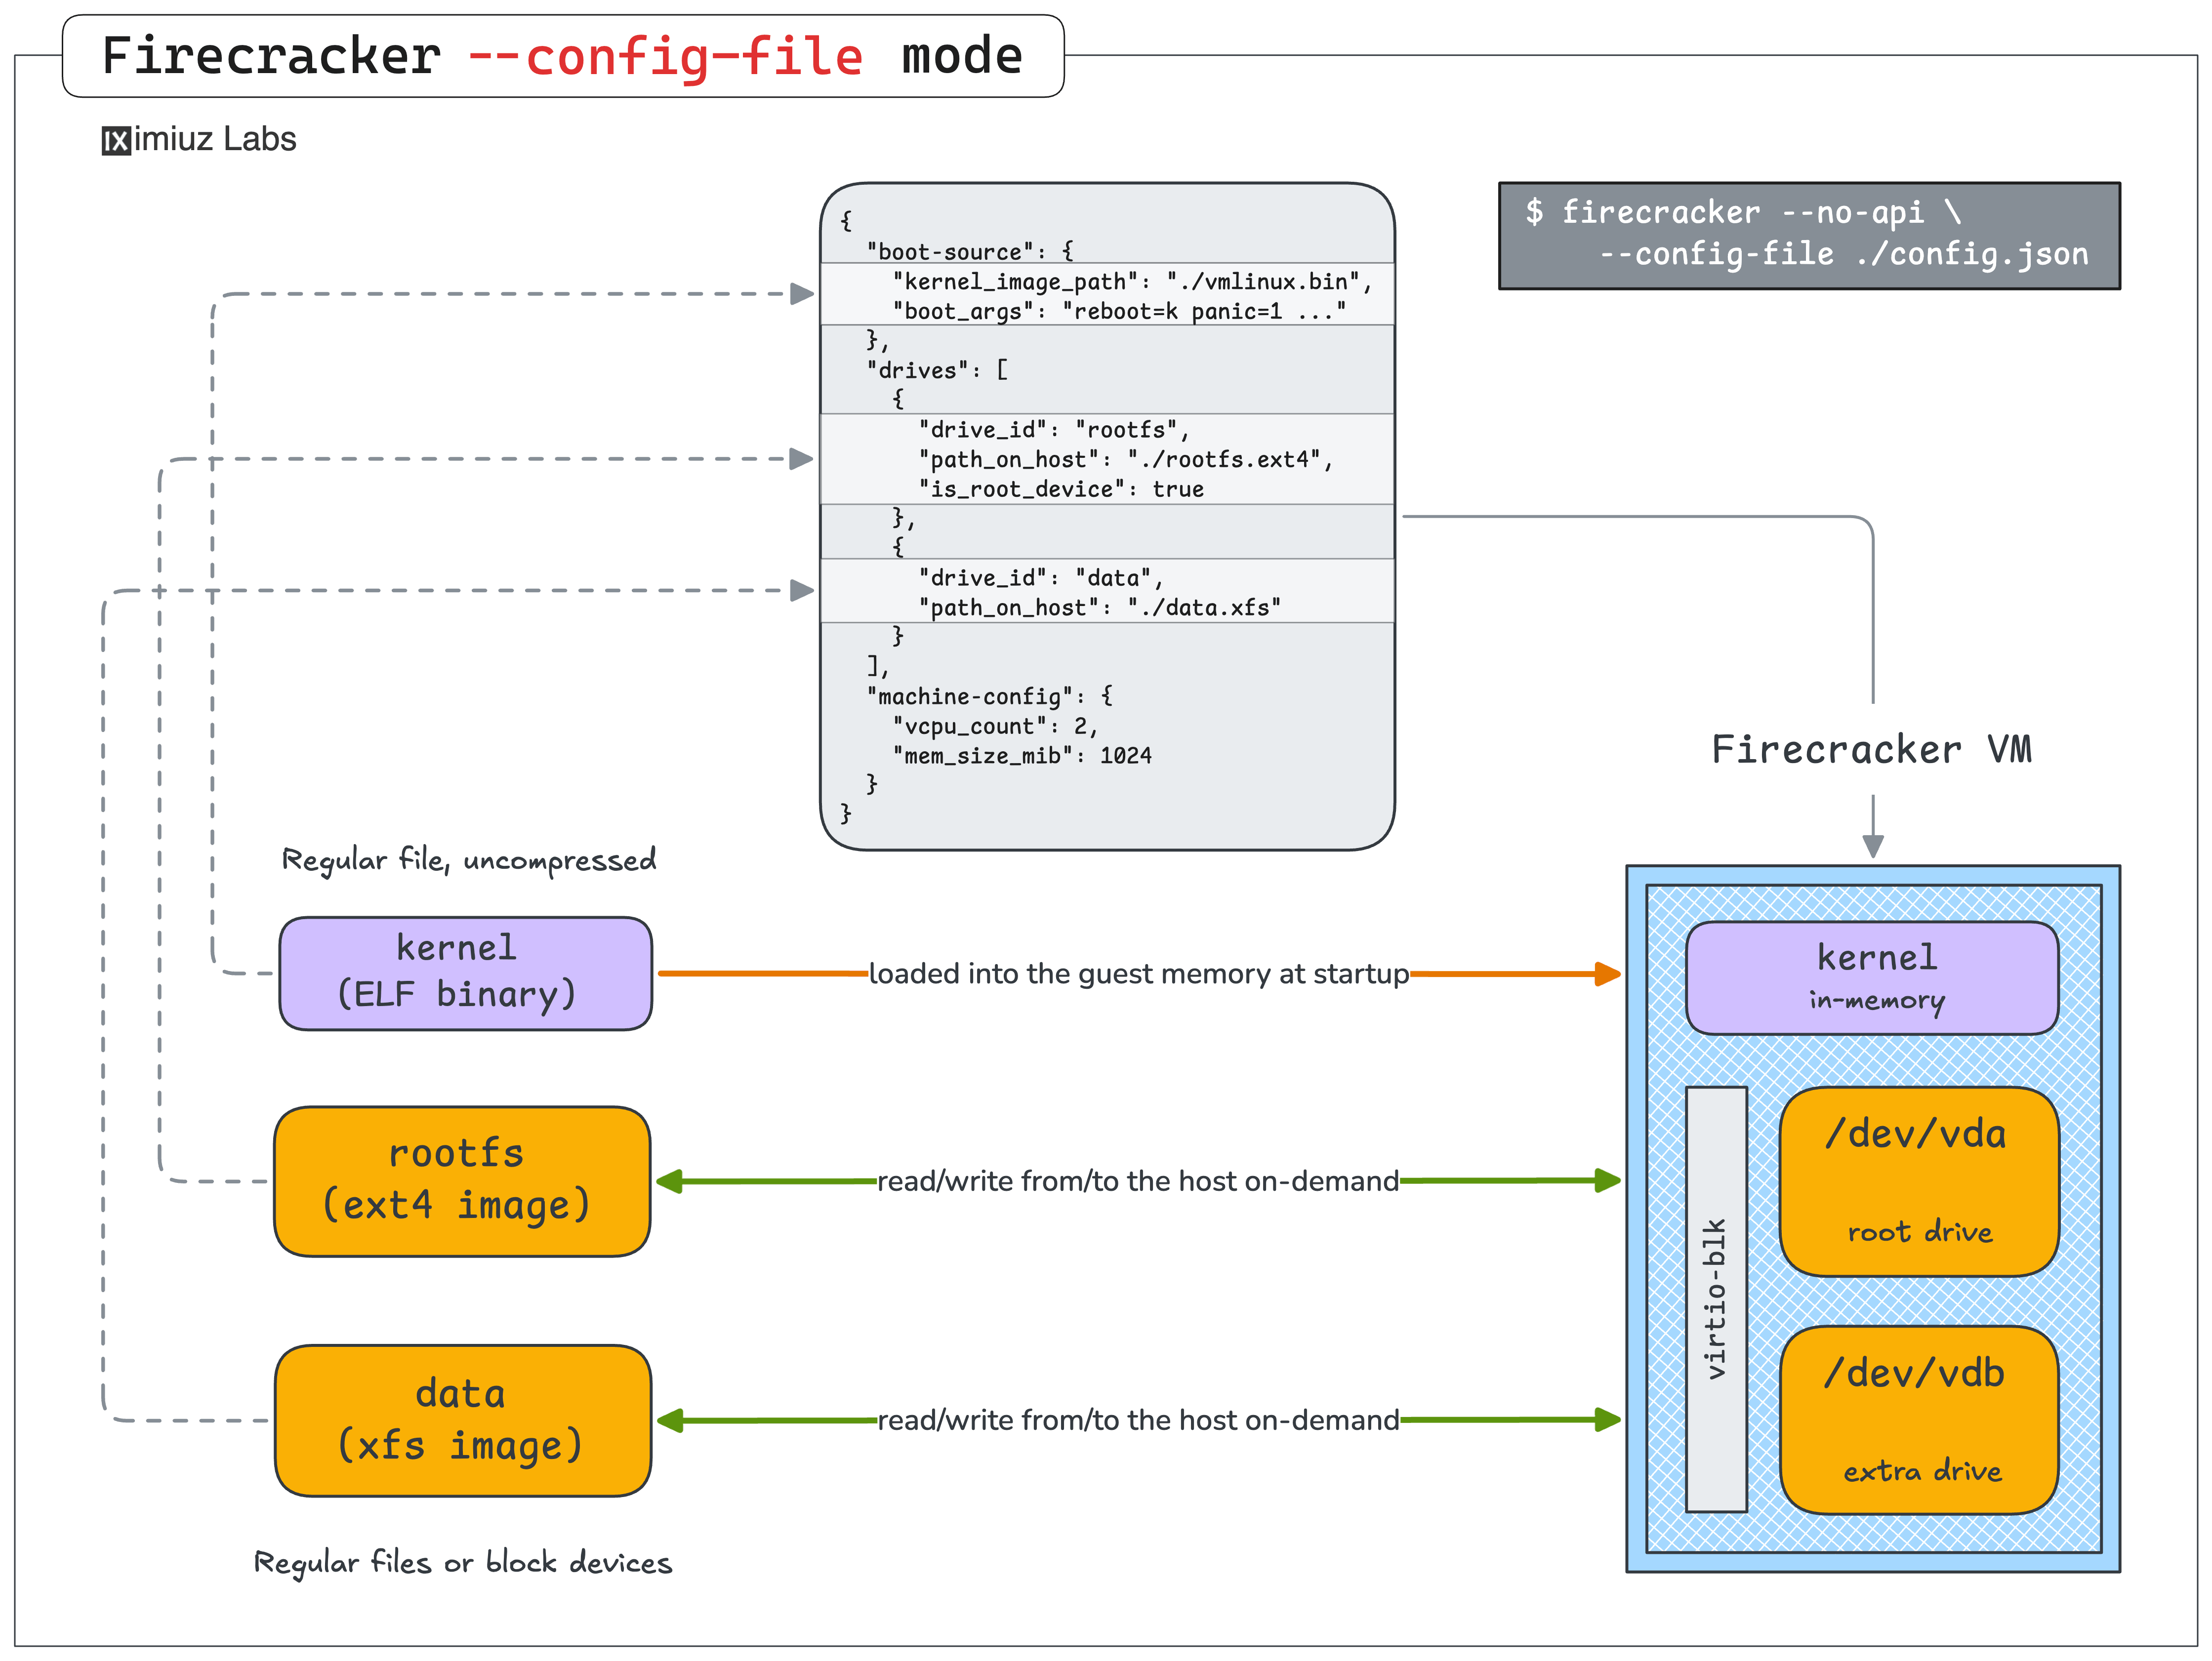
You give firecracker a JSON file that points to the kernel binary, the rootfs block device, and describes the machine's CPU and memory resources, and Firecracker boots the VM in one go but with no further control over the VM after startup (except for sending the termination signal to its process).
This lesson is about the first option. The goal is to show how simple it actually is to launch a Firecracker microVM from scratch - you will only need a kernel binary, a root filesystem, and a tiny JSON config file to pass to the firecracker command.
We're intentionally keeping things minimal here: no networking, no SSH, no copy-on-write filesystem. The microVM you boot in this lesson will only be reachable through the serial console. That's enough to see Firecracker work end-to-end and gives us a solid baseline to build on.
Install the Firecracker Binary
Firecracker is distributed as a single, statically linked binary. There's no daemon to register, no systemd unit to wire up - you just drop the executable on $PATH and the installation is complete.
The project publishes prebuilt releases on GitHub. Let's grab the latest stable release for the host architecture:
- Pick the latest stable release version:
FIRECRACKER_VERSION=v1.15.1
ARCH=$(uname -m)
- Download the release tarball:
curl -fL "https://github.com/firecracker-microvm/firecracker/releases/download/${FIRECRACKER_VERSION}/firecracker-${FIRECRACKER_VERSION}-${ARCH}.tgz" \
    -o /tmp/firecracker.tgz
- Extract the tarball:
tar -xzf /tmp/firecracker.tgz -C /tmp
- Install the
firecrackerbinary into/usr/local/bin:
sudo install -m 0755 \
    "/tmp/release-${FIRECRACKER_VERSION}-${ARCH}/firecracker-${FIRECRACKER_VERSION}-${ARCH}" \
    /usr/local/bin/firecracker
- Verify the installation:
file $(which firecracker)
firecracker --version
The release tarball also contains a jailer binary alongside firecracker.
We'll skip it for now, but we'll come back to it in the later lessons of the course,
where we lock a running microVM down inside a chroot + cgroup + seccomp sandbox for extra security.
Prepare a Kernel Binary
To start a simple microVM, Firecracker needs an uncompressed ELF vmlinux image with only a small set of drivers enabled (virtio-blk, virtio-net, serial console, etc.). However, if you want to run general-purpose workloads in your microVMs (e.g., a Docker daemon or a Kubernetes cluster with an eBPF CNI like Cilium), you will need a more complete kernel - with more options enabled and more modules included.
There are several ways to get a Firecracker-compatible kernel. For instance:
- Use the binaries from the official Firecracker GitHub project. The upstream project only publishes 5.10 and 6.1 builds - both rather dated LTS branches - and each one is stripped to the bone. These kernels are tuned for serverless workloads like Lambda, so they're missing a lot of modules that a general-purpose workload would want.
- Compile your own kernel.
Less scary than it sounds - the Firecracker repo ships a working
.configand a build helper script. We'll go through this end-to-end in a later lesson of the course. - Grab a ready-to-use kernel from iximiuz Labs.
A set of kernel images is published to ghcr.io/iximiuz/labs/kernelfs. These builds are optimized for general-purpose guest workloads, and cover a much broader version range:
5.10- derived from the official Firecracker kernel6.1- derived from the official Firecracker kernel6.12- custom microVM-optimized build of the 25th LTS release6.18- custom microVM-optimized build of the 26th LTS release
For the rest of this lesson we'll use the iximiuz Labs build. Since it's packaged as an OCI image,
we can download it with plain docker pull and copy the vmlinux binary out of the temporary container.
Let's set up a working directory and grab the kernel:
WORKDIR=~/vm
mkdir -p ${WORKDIR}
KERNEL_IMAGE=ghcr.io/iximiuz/labs/kernelfs:6.18-fc-amd64

CID=$(docker create ${KERNEL_IMAGE} noop)

docker export ${CID} | sudo tar -x \
    --xattrs --xattrs-include='*' \
    --numeric-owner \
    --same-permissions \
    -C ${WORKDIR} \
    boot lib/modules

docker rm ${CID}
If the above snippet looks a bit too magical, check out the How To Extract Container Image Filesystem tutorial before proceeding with the rest of the lesson.
The vmlinux-* file under ${WORKDIR}/boot is the uncompressed ELF kernel image Firecracker needs.
Copy it to a stable path and take a look at what we got:
cp ${WORKDIR}/boot/vmlinux-* ${WORKDIR}/vmlinux.bin
You can verify that you copied the right artifact by checking its file type:
file ${WORKDIR}/vmlinux.bin
vmlinux.bin: ELF 64-bit LSB executable, x86-64, version 1 (SYSV), statically linked...
Keep the ${WORKDIR}/boot and ${WORKDIR}/lib/modules directories around for now:
we'll re-use them in the next step to give the guest access to the custom kernel's config and the loadable modules.
Prepare a Root Filesystem
A microVM needs a root filesystem to mount as / once it is up.
What goes inside that filesystem is entirely up to you -
any Linux userspace that can run on the chosen kernel will do.
For a real workload you'd probably want a reasonably full-fledged rootfs - a proper init system (e.g., systemd), your application, logging, networking tools, etc. But for this first microVM we're going to keep things intentionally bare-bones.
The rootfs we'll use in this lesson is just the stock Alpine Linux image with one extra tweak:
OpenRC pre-installed as the init system.
And here comes the best part about it - to prepare the rootfs image for our microVM, we'll use the standard docker build command.
Here's a simple Dockerfile you can use to build the microVM's rootfs image:
FROM alpine:3

RUN <<EOR
set -euo pipefail

apk update
apk upgrade
apk add openrc

sed -i '/^#ttyS0::respawn:/s/^#//' /etc/inittab

echo "root:root" | chpasswd

echo 'hostname -F /etc/hostname' >> /etc/local.d/hostname.start
chmod +x /etc/local.d/hostname.start
rc-update add local default
EOR
A few things worth pointing out:
- The base is
alpine:3- the exact same image you'd pull from Docker Hub to run a container. We're literally reusing a container image as a VM rootfs, which is a nice reminder that the two concepts are closer than people often assume. - We install OpenRC. Containers don't need an init manager (since they are just processes in the host's process tree), but a VM needs some userspace process to become the PID 1 once the kernel finishes booting. The
alpine:3container image doesn't ship a good candidate by default, that's why we installopenrcexplicitly to fill that role. - We start a
gettyon the serial console (ttyS0) so we can actually log in once the microVM is booted. Thealpine:3container image disables it by default in/etc/inittabbecause containers don't need a serial console. - We set a root password explicitly (
root:root) so we actually know what to type in once prompted on boot. - The hostname dance is optional cosmetics. It just makes the login prompt inside the microVM show a nice hostname instead of the first octet of the VM's IP address. You can drop that line and nothing will break.
rc-update add local defaultensures our/etc/local.d/*.startscripts run at boot.
Now, store the Dockerfile in the working directory and build the rootfs image using it:
docker build -t rootfs:alpine -f ${WORKDIR}/Dockerfile.rootfs .
Bake the Root Filesystem Image
Firecracker expects microVM drives to be represented by file-backed block devices on the host. The rootfs container image we just built won't work as is - it needs to be converted into a block device that Firecracker can reference.
The simplest way to prepare a root drive for our first microVM is to:
- Create a large enough file for the future disk image
- Format it as ext4 or any other "mainstream" filesystem
- Mount it as a loop device at a temporary location
- Extract the contents of the
rootfs:alpinecontainer image straight into it - Fine-tune the filesystem (e.g., set the hostname in the
/etc/hostnamefile) - Unmount the loop device and pass the baked file to Firecracker as a root drive.
First, create an empty ext4 file of the required size (1 GiB is more than enough for Alpine):
truncate -s 1024M ${WORKDIR}/rootfs.ext4
mkfs.ext4 -F ${WORKDIR}/rootfs.ext4
Then mount it at a temporay location:
mkdir ${WORKDIR}/mnt
sudo mount -o loop ${WORKDIR}/rootfs.ext4 ${WORKDIR}/mnt
Extract the contents of the rootfs:alpine container image into it:
CID=$(docker create rootfs:alpine)

docker export ${CID} | sudo tar -x \
    --xattrs --xattrs-include='*' \
    --numeric-owner \
    --same-permissions \
    --anchored \
    --exclude='dev/*' \
    --exclude='proc/*' \
    --exclude='sys/*' \
    --exclude='.dockerenv' \
    -C ${WORKDIR}/mnt

docker rm ${CID}
All the "scary" tar options are needed to preserve the original ownership and permissions of the files and directories in the container image. Without them, you can end up with a guest that lacks essential capabilities on some files and messed up ownership on others.
At this point, the ${WORKDIR}/mnt directory (hence, the ${WORKDIR}/rootfs.ext4 file) contains a copy of the rootfs:alpine filesystem.
You can already unmount it and pass the rootfs.ext4 file to Firecracker, but usually you'll want to fine-tune the rootfs before starting the microVM.
For instance, you may want to set the hostname of the microVM to make it more pleasant to log in to:
echo 'firstvm' | sudo tee ${WORKDIR}/mnt/etc/hostname
Also optional, but useful, is to copy the kernel's /boot and /lib/modules into the rootfs so the guest can modprobe things and read its own kernel config if needed:
sudo rm -rf ${WORKDIR}/mnt/boot ${WORKDIR}/mnt/lib/modules

sudo cp -a ${WORKDIR}/boot ${WORKDIR}/mnt/boot
sudo cp -a ${WORKDIR}/lib/modules ${WORKDIR}/mnt/lib/modules
Note the -a flag - it serves the same purpose as the "scary" tar options - to preserve the original attributes (ownership, permissions, etc.) of the files and directories.
Now it's time to unmount the loop device and remove the temporary location:
sudo umount ${WORKDIR}/mnt
sudo rm -rf ${WORKDIR}/mnt
Sanity-check the result:
file ${WORKDIR}/rootfs.ext4
You should see a ~1 GiB file described as Linux rev 1.0 ext4 filesystem data.
Write the Firecracker Config JSON
Last but not least, Firecracker's "config file" mode requires a single JSON document describing the future VM. The minimal configuration needs just three sections:
boot-source- which kernel to boot and what to put on the kernel command line.drives- the drive block devices to attach (at least one, carrying the rootfs, is required).machine-config- the machine shape (at least the number of vCPUs and the memory size should be specified).
Anything else (network interfaces, extra drives, seccomp filters, etc.) is optional, and for the sake of simplicity we won't cover it in this lesson.
Let's write the config:
cat > ${WORKDIR}/config.json <<EOF
{
  "boot-source": {
    "kernel_image_path": "${WORKDIR}/vmlinux.bin",
    "boot_args": "reboot=k panic=1 console=ttyS0"
  },
  "drives": [
    {
      "drive_id": "rootfs",
      "path_on_host": "${WORKDIR}/rootfs.ext4",
      "is_root_device": true
    }
  ],
  "machine-config": {
    "vcpu_count": 2,
    "mem_size_mib": 1024
  }
}
EOF
The kernel's command-line parameters (boot_args) are particularly important to get right.
If you don't pass them, Firecracker will use the default command-line parameters, which in particular include nomodule (to disable loadable kernel module support) and 8250.nr_uarts=0 (to disable the 8250 serial interface).
If you want to run general-purpose workloads in your microVMs, the nomodule parameter can get in the way,
and the 8250.nr_uarts=0 parameter is important for our lesson since we want to log in to the microVM over the serial console.
Here is what our simplified boot_args string means:
reboot=kshut down the guest on reboot (because Firecracker doesn't support rebooting)panic=1on panic, reboot (hence, shut down) the guest after 1 secondconsole=ttyS0send the kernel's console I/O to the first serial port (ttyS0)
Boot the microVM
At this point, everything is in place - a kernel binary, a fully baked rootfs, and a config that ties the two together. It is time to launch our very first Firecracker microVM:
sudo firecracker --no-api --config-file ${WORKDIR}/config.json
That's it. No daemon, no socket, no API calls - just a single foreground command that launches the microVM and attaches the terminal to its serial console.
The booting time will greatly depend on the host's performance, the enabled kernel features, and the rootfs complexity, but in most cases it will be well under a second.
Once the microVM is started, you should see a short burst of kernel messages, the OpenRC init banner, and finally:
Welcome to Alpine Linux 3.23
Kernel 6.18.21 on x86_64 (/dev/ttyS0)

firstvm login:
Log in as root with password root (the Dockerfile set that up for us).
Once you're in, take a look around:
uname -a
cat /etc/alpine-release
free -m
ls /
ps aux
ip addr
Since we didn't configure a network interface, the guest has no way out - ip addr will only show a loopback and some dummy devices,
and any attempt to reach the internet will fail. That's expected, and we'll "fix" it in the networking lesson.
At the same time, if you try listing processes on the host using a separate terminal,
you will only see a single firecracker process -
unlike with Linux containers, the VM's process tree is completely hidden from the host:
ps axf -o pid,ppid,command
    PID    PPID COMMAND
      1       0 /sbin/init
    ...
    935       1 sshd: /usr/sbin/sshd -D [listener] 0 of 10-100 startups
    968     935  \_ sshd: laborant [priv]
    978     968  |   \_ sshd: laborant@pts/0
    979     978  |       \_ -bash
   4064     979  |           \_ sudo firecracker --no-api --config-file /home/laborant/vm/config.json
   4065    4064  |               \_ sudo firecracker --no-api --config-file /home/laborant/vm/config.json
   4066    4065  |                   \_ firecracker --no-api --config-file /home/laborant/vm/config.json
When you're done poking around, shut the guest down cleanly from inside by running reboot.
Attempting to reboot the microVM will cause the firecracker process on the host to exit:
reboot
Summary
To recap, here's what we did:
- Installed Firecracker - a single static binary from a GitHub release tarball, dropped into
/usr/local/bin. - Got a kernel - an uncompressed
vmlinuxELF binary and the/bootand/lib/modulesdirectories pulled out of a GHCR container (ghcr.io/iximiuz/labs/kernelfs). - Got a rootfs - stock Alpine from an OCI image, plus OpenRC as PID 1 and a tiny tweak to enable a
gettyon the serial console. - Baked an ext4 image -
mkfs.ext4on an empty file to create a file-backed block device, then mount it at a temporary location anddocker exportthe rootfs image into it. - Wrote a JSON config - three simple sections:
boot-source,drives,machine-config. No networking support for now. - Booted with one command -
firecracker --config-file config.json, which attaches our terminal to the guest's serial console and drops us at an Alpinelogin:prompt.
A few things worth internalizing before moving on:
- Firecracker is just a process. When it exits, the VM is gone.
- The kernel and the rootfs are completely decoupled. You can swap kernels, keep the rootfs; swap the rootfs, keep the kernel. OCI images are a surprisingly convenient distribution format for both.
- The JSON config mode is a simple way to get started. The exact same fields show up as REST resources in the next lesson, and as typed Go structs in the one after that. Once you understand the minimum three sections, everything else is additive.
In the next lesson, we'll boot the exact same VM - same kernel, same rootfs - but this time by driving Firecracker through its REST API instead of a config file. That's the interface you'd actually use from a control plane, and it's what the Go SDK wraps on top of.
- Previous lesson
- What Is Firecracker and Why Does It Exist?