How to Install and Configure containerd on a Linux Server
Why this lesson?
Earlier in the course, we learned how to pull images
and run containers using ctr,
the default containerd command-line client.
In our experiments, we relied on an already running containerd daemon that comes with every Docker Engine installation.
However, while convenient, this approach doesn't fully reveal the underlying components.
Yes, there is a daemon (containerd) exposing an API and a client (ctr),
but what else makes up a functional containerd setup?
In this lesson,
we will install containerd manually by downloading all the necessary components and placing them in the correct locations on the system.
This hands-on approach will give us a clearer picture of the moving parts (fortunately, there are only a few)
and help us understand the nerdctl architecture when we use it to interact with containerd in the next lesson.
Main containerd components
One of the main installation options mentioned in the official Getting started with containerd guide is to download it from the project's GitHub Releases page.
To get a containerd release archive for a specific version and architecture, use the following command:
VERSION=2.2.1
ARCH=amd64
URL=https://github.com/containerd/containerd/releases/download/v${VERSION}/containerd-${VERSION}-linux-${ARCH}.tar.gz

curl -L ${URL} -o containerd-${VERSION}-linux-${ARCH}.tar.gz
What's inside the containerd 2.x archive? Extract the archive to inspect its contents:
TMP_DIR=$(mktemp -d)
tar Cxvf ${TMP_DIR} containerd-${VERSION}-linux-${ARCH}.tar.gz
bin/
bin/ctr
bin/containerd
bin/containerd-stress
bin/containerd-shim-runc-v2
Interestingly, aside from the stress test tool, the archive contains only three core components:
ctr- the command-line clientcontainerd- the daemon itselfcontainerd-shim-runc-v2- an OCI container runtime shim
And that's it!
To "install" containerd, move the binaries from the release archive to /usr/local/bin
(or any other directory in your $PATH):
sudo tar Cxvf /usr/local \
    containerd-${VERSION}-linux-${ARCH}.tar.gz
💡 containerd 1.x vs. 2.x:
The major version bump was primarily due to the
removal of deprecated components,
including (but not limited to) containerd-shim and containerd-shim-runc-v1 binaries.
Thus, the containerd 1.x release archive may have a few extra files in it.
Aside from these removals, containerd 2.x is more of an evolutionary update rather than a revolutionary change.
⚠️ Note that the containerd binaries in the archive above are dynamically linked against glibc.
If you need to run containerd on a musl-based Linux distribution,
you must download the -static variant of the release archive.
containerd as a systemd service
With the binaries installed, you can run containerd with a simple:
sudo containerd
However, usually you will want to run containerd as a systemd service. Luckily, the containerd project provides a systemd unit file, and it's a relatively straightforward one.
containerd.service systemd unit file
The file below provided as an example. Make sure to download the up-to-date version of the unit file!
# Copyright The containerd Authors.
#
# Licensed under the Apache License, Version 2.0 (the "License");
# you may not use this file except in compliance with the License.
# You may obtain a copy of the License at
#
#     http://www.apache.org/licenses/LICENSE-2.0
#
# Unless required by applicable law or agreed to in writing, software
# distributed under the License is distributed on an "AS IS" BASIS,
# WITHOUT WARRANTIES OR CONDITIONS OF ANY KIND, either express or implied.
# See the License for the specific language governing permissions and
# limitations under the License.

[Unit]
Description=containerd container runtime
Documentation=https://containerd.io
After=network.target local-fs.target dbus.service

[Service]
ExecStartPre=-/sbin/modprobe overlay
ExecStart=/usr/local/bin/containerd

Type=notify
Delegate=yes
KillMode=process
Restart=always
RestartSec=5

# Having non-zero Limit*s causes performance problems due to accounting overhead
# in the kernel. We recommend using cgroups to do container-local accounting.
LimitNPROC=infinity
LimitCORE=infinity

# Comment TasksMax if your systemd version does not supports it.
# Only systemd 226 and above support this version.
TasksMax=infinity
OOMScoreAdjust=-999

[Install]
WantedBy=multi-user.target
Run the following command to install the systemd unit file:
sudo curl -L \
    https://raw.githubusercontent.com/containerd/containerd/main/containerd.service \
    -o /etc/systemd/system/containerd.service
Reload the systemd daemon and enable the containerd service:
sudo systemctl daemon-reload
sudo systemctl enable --now containerd
You can check the status of the containerd service with:
sudo systemctl status containerd
💡 By default, the containerd service works without any configuration files. However, if you need to customize it, you can generate a default configuration file:
containerd config default > /etc/containerd/config.toml
... and then edit it as required. Don't forget to restart the containerd service after that.
Preliminary containerd testing
Let's test the containerd installation by running a container. Unlike Docker, containerd expects you to explicitly pull the image first:
sudo ctr image pull ghcr.io/iximiuz/labs/nginx:alpine
So far so good! When the image is pulled, you can run a container:
sudo ctr run ghcr.io/iximiuz/labs/nginx:alpine nginx1
Oops! Trying to run a container will likely fail with the following error:
ctr: failed to create shim task: OCI runtime create failed:
unable to retrieve OCI runtime error:
exec: "runc": executable file not found in $PATH
However, in hindsight, this should be rather expected.
We haven't installed runc or any other container runtime yet,
and containerd cannot run containers on its own (surprise, surprise).
At the same time, containerd itself seems to be installed successfully -
we could pull the image, and other commands that don't require running containers
will likely also work fine.
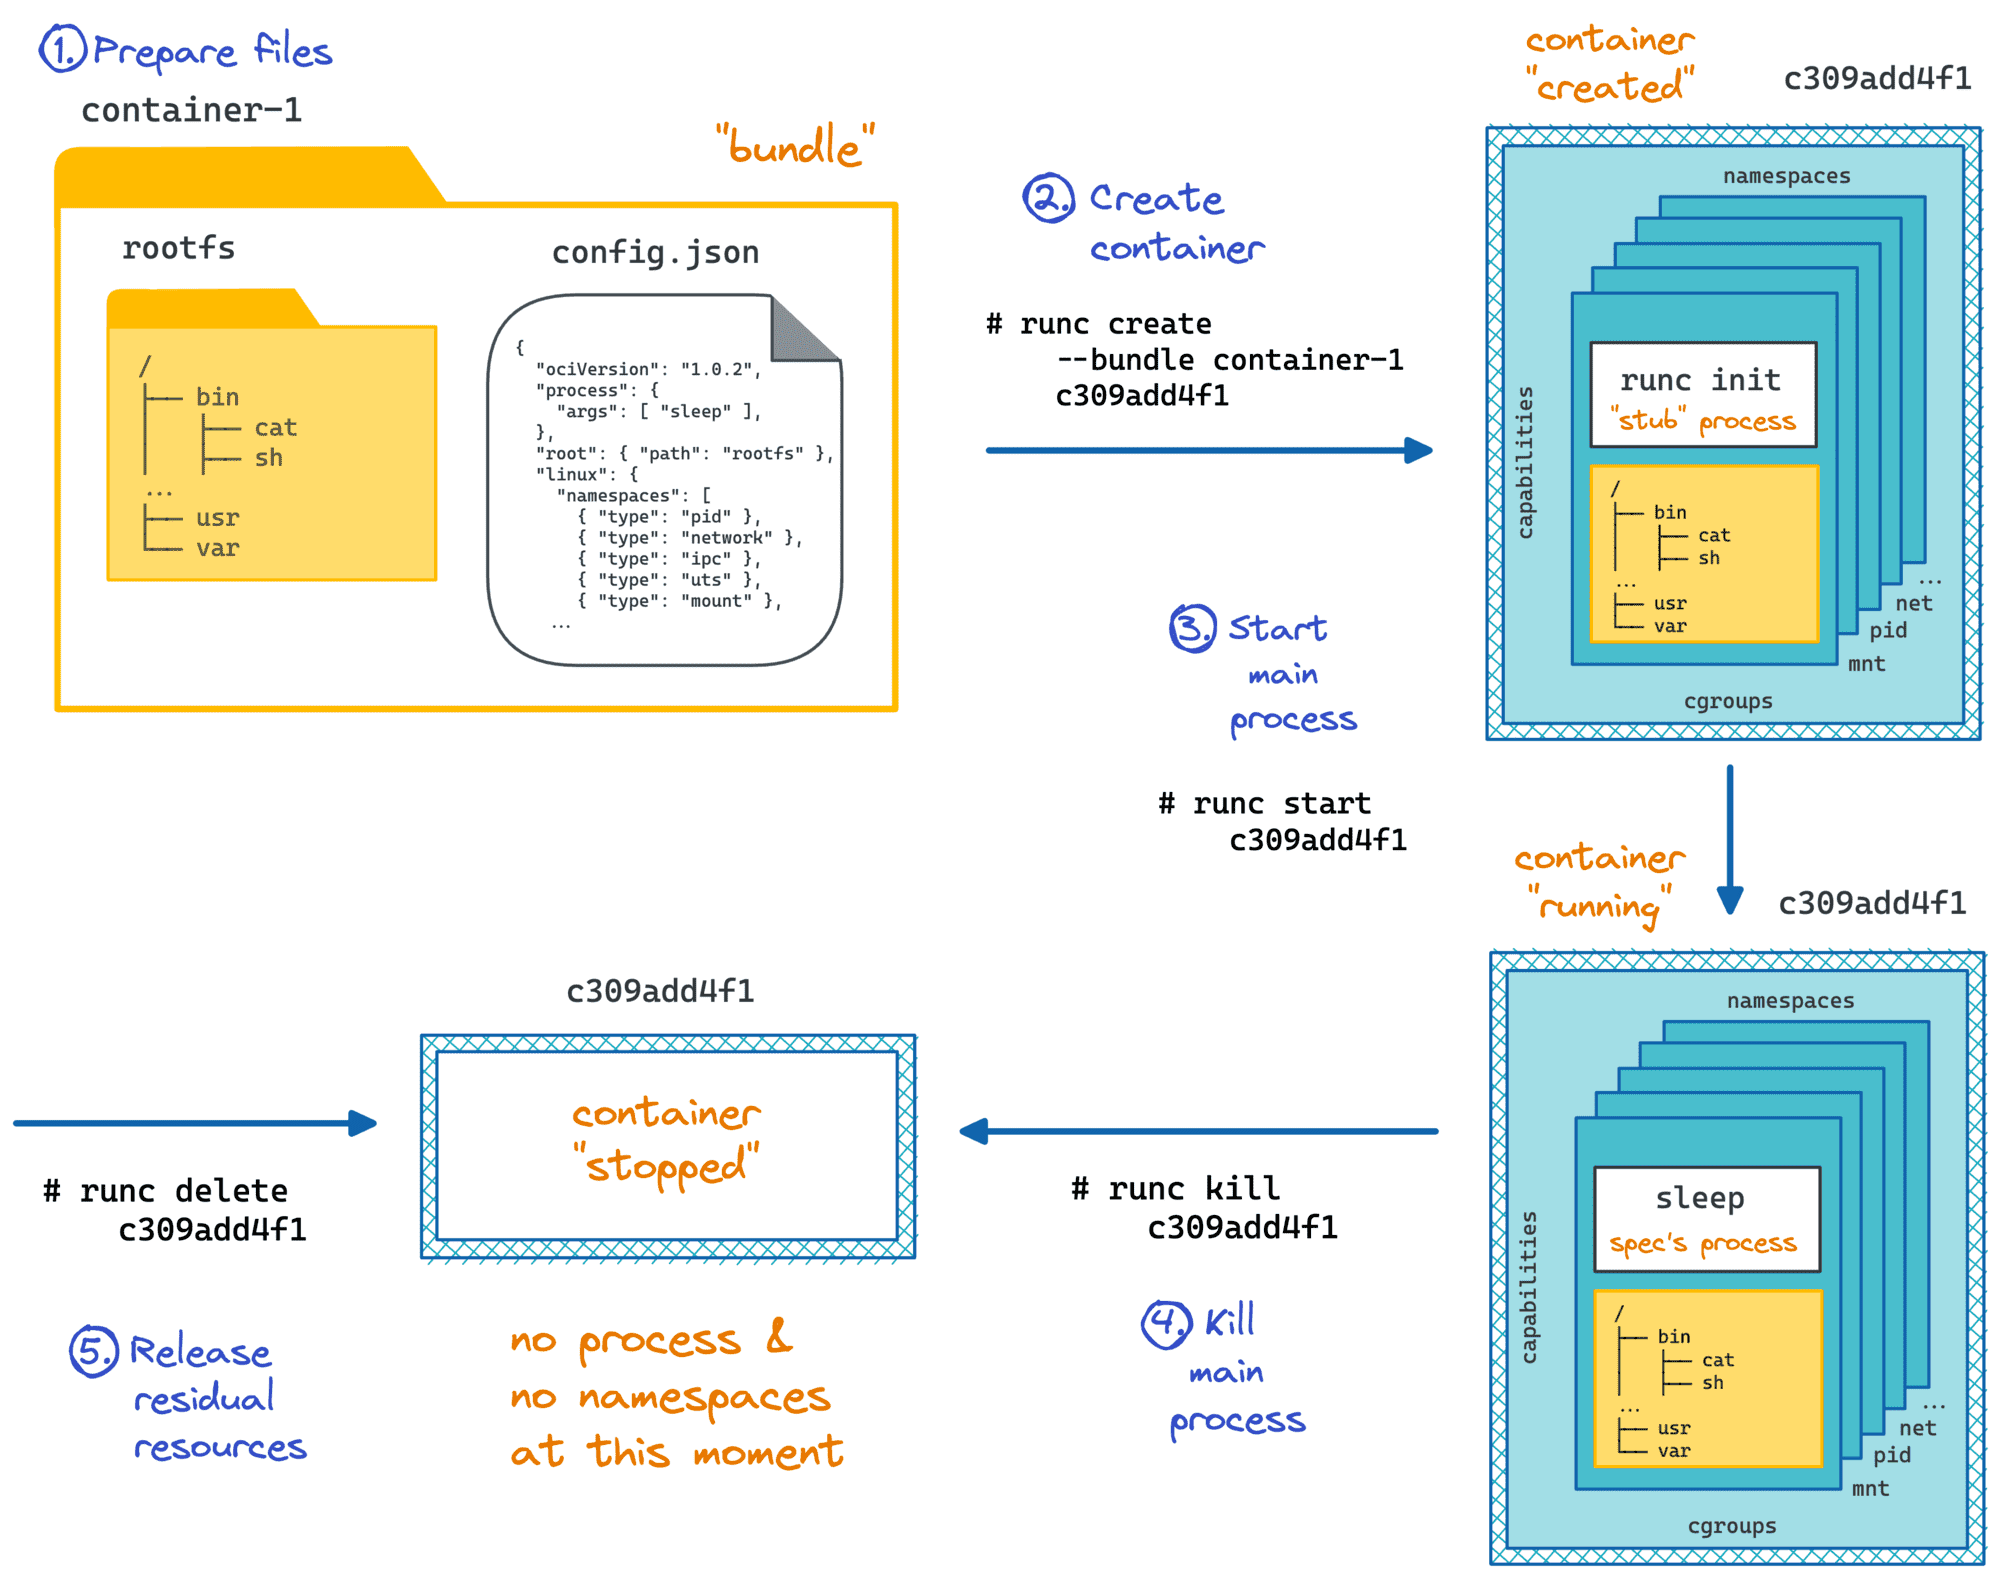
What is a container runtime (runc)?
runc is a container runtime and a reference implementation of the
OCI (Open Container Initiative) Runtime Specification.
To put it simply, runc is a command-line tool that knows how to
create, start, stop, and delete containers given a container configuration
and a root filesystem.
Docker (through containerd), Podman, Kubernetes, and other "higher-level" container runtimes and orchestrators
under the hood rely on runc (or an alternative OCI Runtime implementation) to run containers.
You can practice using runc in the Create and Start a Container Manually With runc challenge.
Adding OCI container runtime(s)
The containerd release archive doesn't include runc or any other OCI container runtimes.
You will need to install them separately.
Luckily, runc installation is rather trivial -
it's just a single statically linked binary,
which you can download from the project's GitHub Releases page:
VERSION=1.3.4
ARCH=amd64

sudo curl -L \
    https://github.com/opencontainers/runc/releases/download/v${VERSION}/runc.${ARCH} \
    -o /usr/local/bin/runc
Make the binary executable:
sudo chmod +x /usr/local/bin/runc
Now, try running a container once again:
sudo ctr run ghcr.io/iximiuz/labs/nginx:alpine nginx2
Huge success! Keep this container running for a while - we'll need it in the next unit.
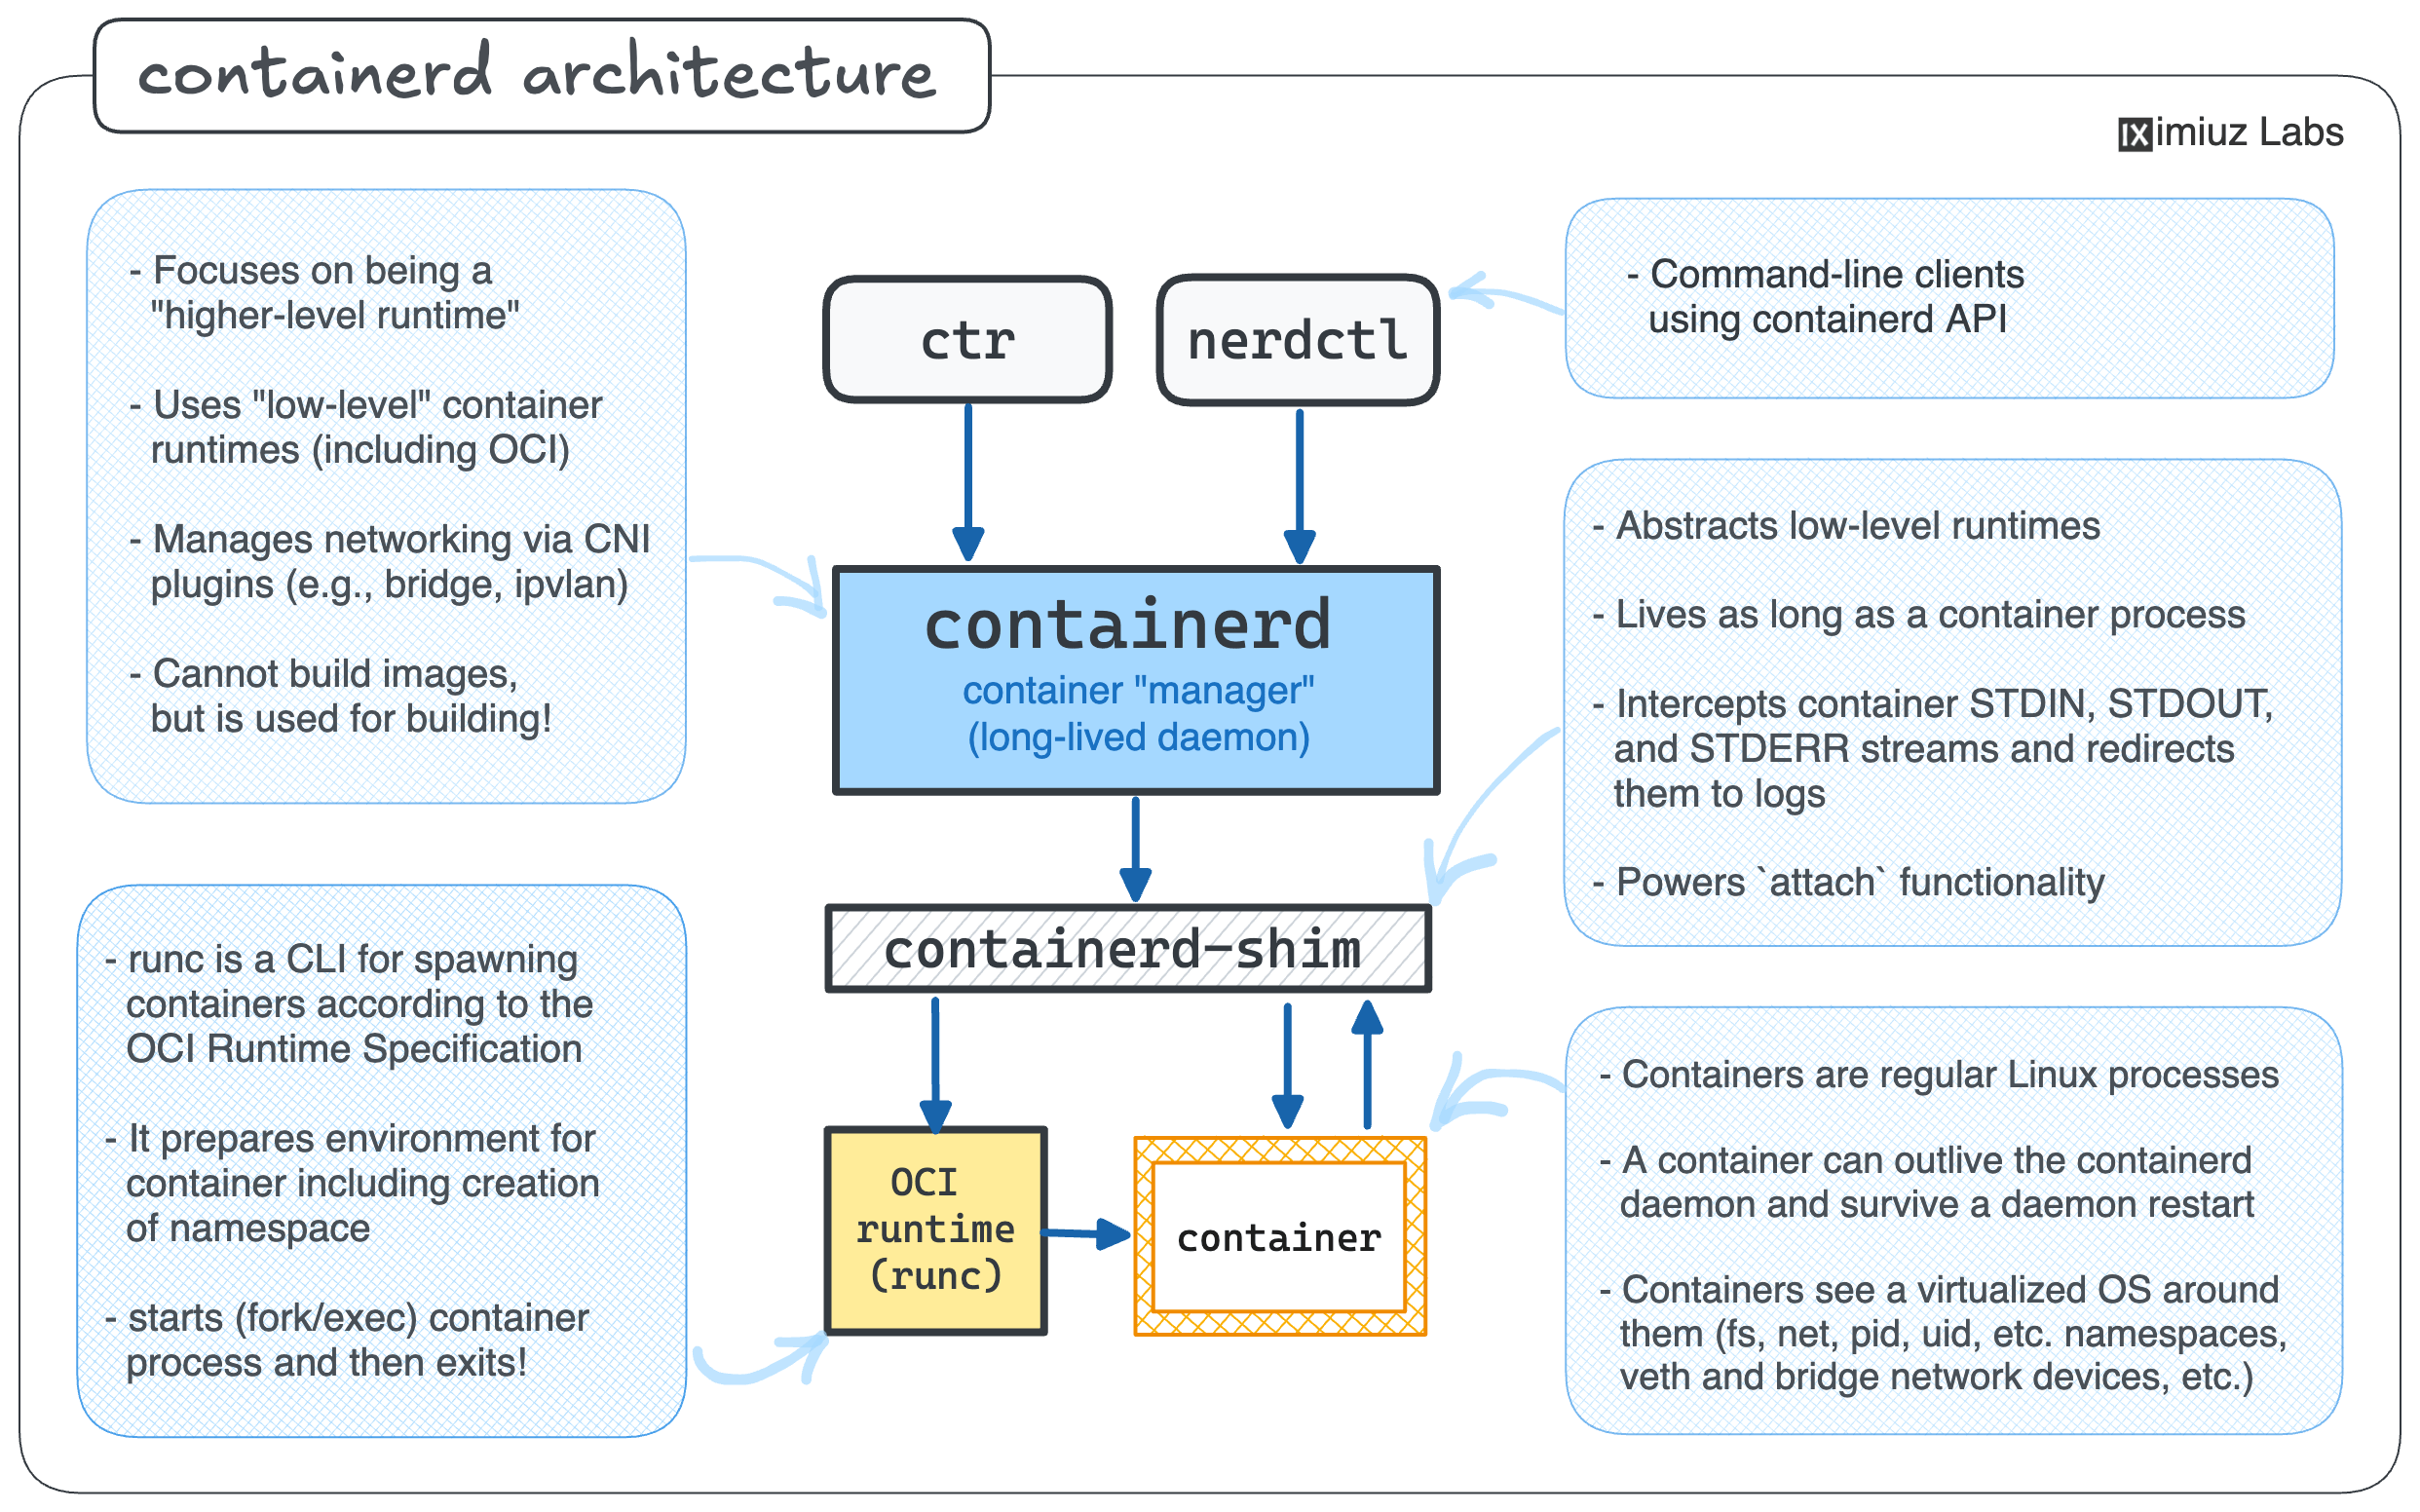
Notice how the OCI runtime was not included in the containerd release archive, whereas the runtime shim was. Runtimes are designed to be replaceable and interchangeable, and the shim acts as a "glue" between the container runtime and the containerd daemon, shielding the latter from any peculiarities of a specific runtime implementation.
💡 Unlike the GitHub release archive,
the containerd.io package for Debian, Ubuntu, Fedora, and likely other Linux distributions seems to include runc by default.
So, if you install containerd via the package manager, you may not need to install runc separately.
Testing container networking
We just successfully started an Nginx container. But can we send a request to it?
Docker containers are usually accessible from the host machine via their IP addresses.
However, if you try to list the network addresses of the nginx2 container
(from a separate terminal tab),
you'll only see the loopback interface:
sudo ctr t exec --exec-id ip nginx2 \
    ip addr show
1: lo: <LOOPBACK,UP,LOWER_UP> mtu 65536 qdisc noqueue state UNKNOWN qlen 1000
    link/loopback 00:00:00:00:00:00 brd 00:00:00:00:00:00
    inet 127.0.0.1/8 scope host lo
       valid_lft forever preferred_lft forever
    inet6 ::1/128 scope host
       valid_lft forever preferred_lft forever
You can still send a request to the Nginx server from inside the container:
sudo ctr t exec --exec-id curl nginx2 \
    curl -s -X GET http://localhost:80
...but there is no way to access the Nginx server from the host machine via an IP address.
This is because by default, the ctr run command doesn't configure any external network interfaces for the container.
To enable the de facto standard bridge container networking,
you need to use the --cni flag:
sudo ctr run --cni \
    ghcr.io/iximiuz/labs/nginx:alpine nginx3
However, the above command will likely fail with the following error:
ctr: no network config found in /etc/cni/net.d: cni plugin not initialized
This happens because the containerd release archive from GitHub doesn't include the CNI plugins.
Installing and configuring CNI plugins
Container Network Interface (CNI) plugins are statically linked executables that are used to configure the network devices and other network-related resources for containers.
To install the CNI plugins, download the archive from the project's GitHub Releases page:
VERSION=1.9.0
ARCH=amd64

curl -L \
    https://github.com/containernetworking/plugins/releases/download/v${VERSION}/cni-plugins-linux-${ARCH}-v${VERSION}.tgz \
    -o cni-plugins-linux-${ARCH}-v${VERSION}.tgz
...and extract it to the /opt/cni/bin directory (the expected location for CNI plugins on Linux):
sudo mkdir -p /opt/cni/bin

sudo tar Cxzvf /opt/cni/bin cni-plugins-linux-${ARCH}-v${VERSION}.tgz
./
./loopback
./bridge
./host-local
...and a dozen of other binaries
A typical CNI bundle includes a dozen of plugins, with loopback, bridge, and host-local IPAM being the most relevant ones for our use case:
loopback- Set the state of container's loopback interface to up.bridge- Creates a bridge, adds the host and the container to it.host-localIPAM - Maintains a local database of allocated IPs.
As the ctr run --cni error message from the previous section indicated,
the CNI plugin configuration files are expected to be present in the /etc/cni/net.d directory.
The loopback plugin configuration is self-explanatory:
cat <<EOF | sudo tee /etc/cni/net.d/99-loopback.conf
{
  "type": "loopback",
  "name": "lo",
  "cniVersion": "1.1.0"
}
EOF
The bridge and (indirectly) host-local IPAM plugins' configuration is more complex -
we need to specify the bridge device name, the IP address range for the bridge network,
and the default gateway route for containers:
cat <<EOF | sudo tee /etc/cni/net.d/10-bridge.conf
{
  "type": "bridge",
  "bridge": "bridge0",
  "name": "bridge",
  "isGateway": true,
  "ipMasq": true,
  "ipam": {
    "type": "host-local",
    "ranges": [
      [{"subnet": "172.18.0.0/24"}]
    ],
    "routes": [{"dst": "0.0.0.0/0"}]
  },
  "cniVersion": "1.0.0"
}
EOF
There is no need to restart the containerd service after the CNI plugins are installed
because it will just try executing the CNI binaries at a well-known location on every ctr run --cni command.
Now, you can run another Nginx container, this time with an external network interface:
sudo ctr run --cni \
    ghcr.io/iximiuz/labs/nginx:alpine nginx4
Testing time (from a separate terminal tab):
# Guessing the IP address here as the first available one in the
# 172.18.0.0/24 subnet, reserving 172.18.0.1 for the bridge itself.
curl -s http://172.18.0.2:80
💡 CNI plugins are optional (we were able to run the Nginx container without them),
and Docker's version of containerd (the containerd.io package) doesn't include them.
However, if you want to use containerd as a self-sufficient container runtime,
potentially via nerdctl or as a CRI runtime in your Kubernetes cluster,
you'll have to install and configure the CNI plugins.
Summary
If you followed this hands-on lesson, you should have a solid understanding of the main moving parts of a containerd installation.
The containerd release archive includes only the essential components:
ctr- the command-line clientcontainerd- the daemon itselfcontainerd-shim-runc-v2- an OCI container runtime shim
These components are enough to start the containerd daemon and even pull some images, but to run containers, you'll also need to install (and configure):
- A container runtime (e.g.
runc) - A set of CNI plugins (e.g.
bridge,host-local,loopback)
Visually, a containerd installation can be represented as follows:
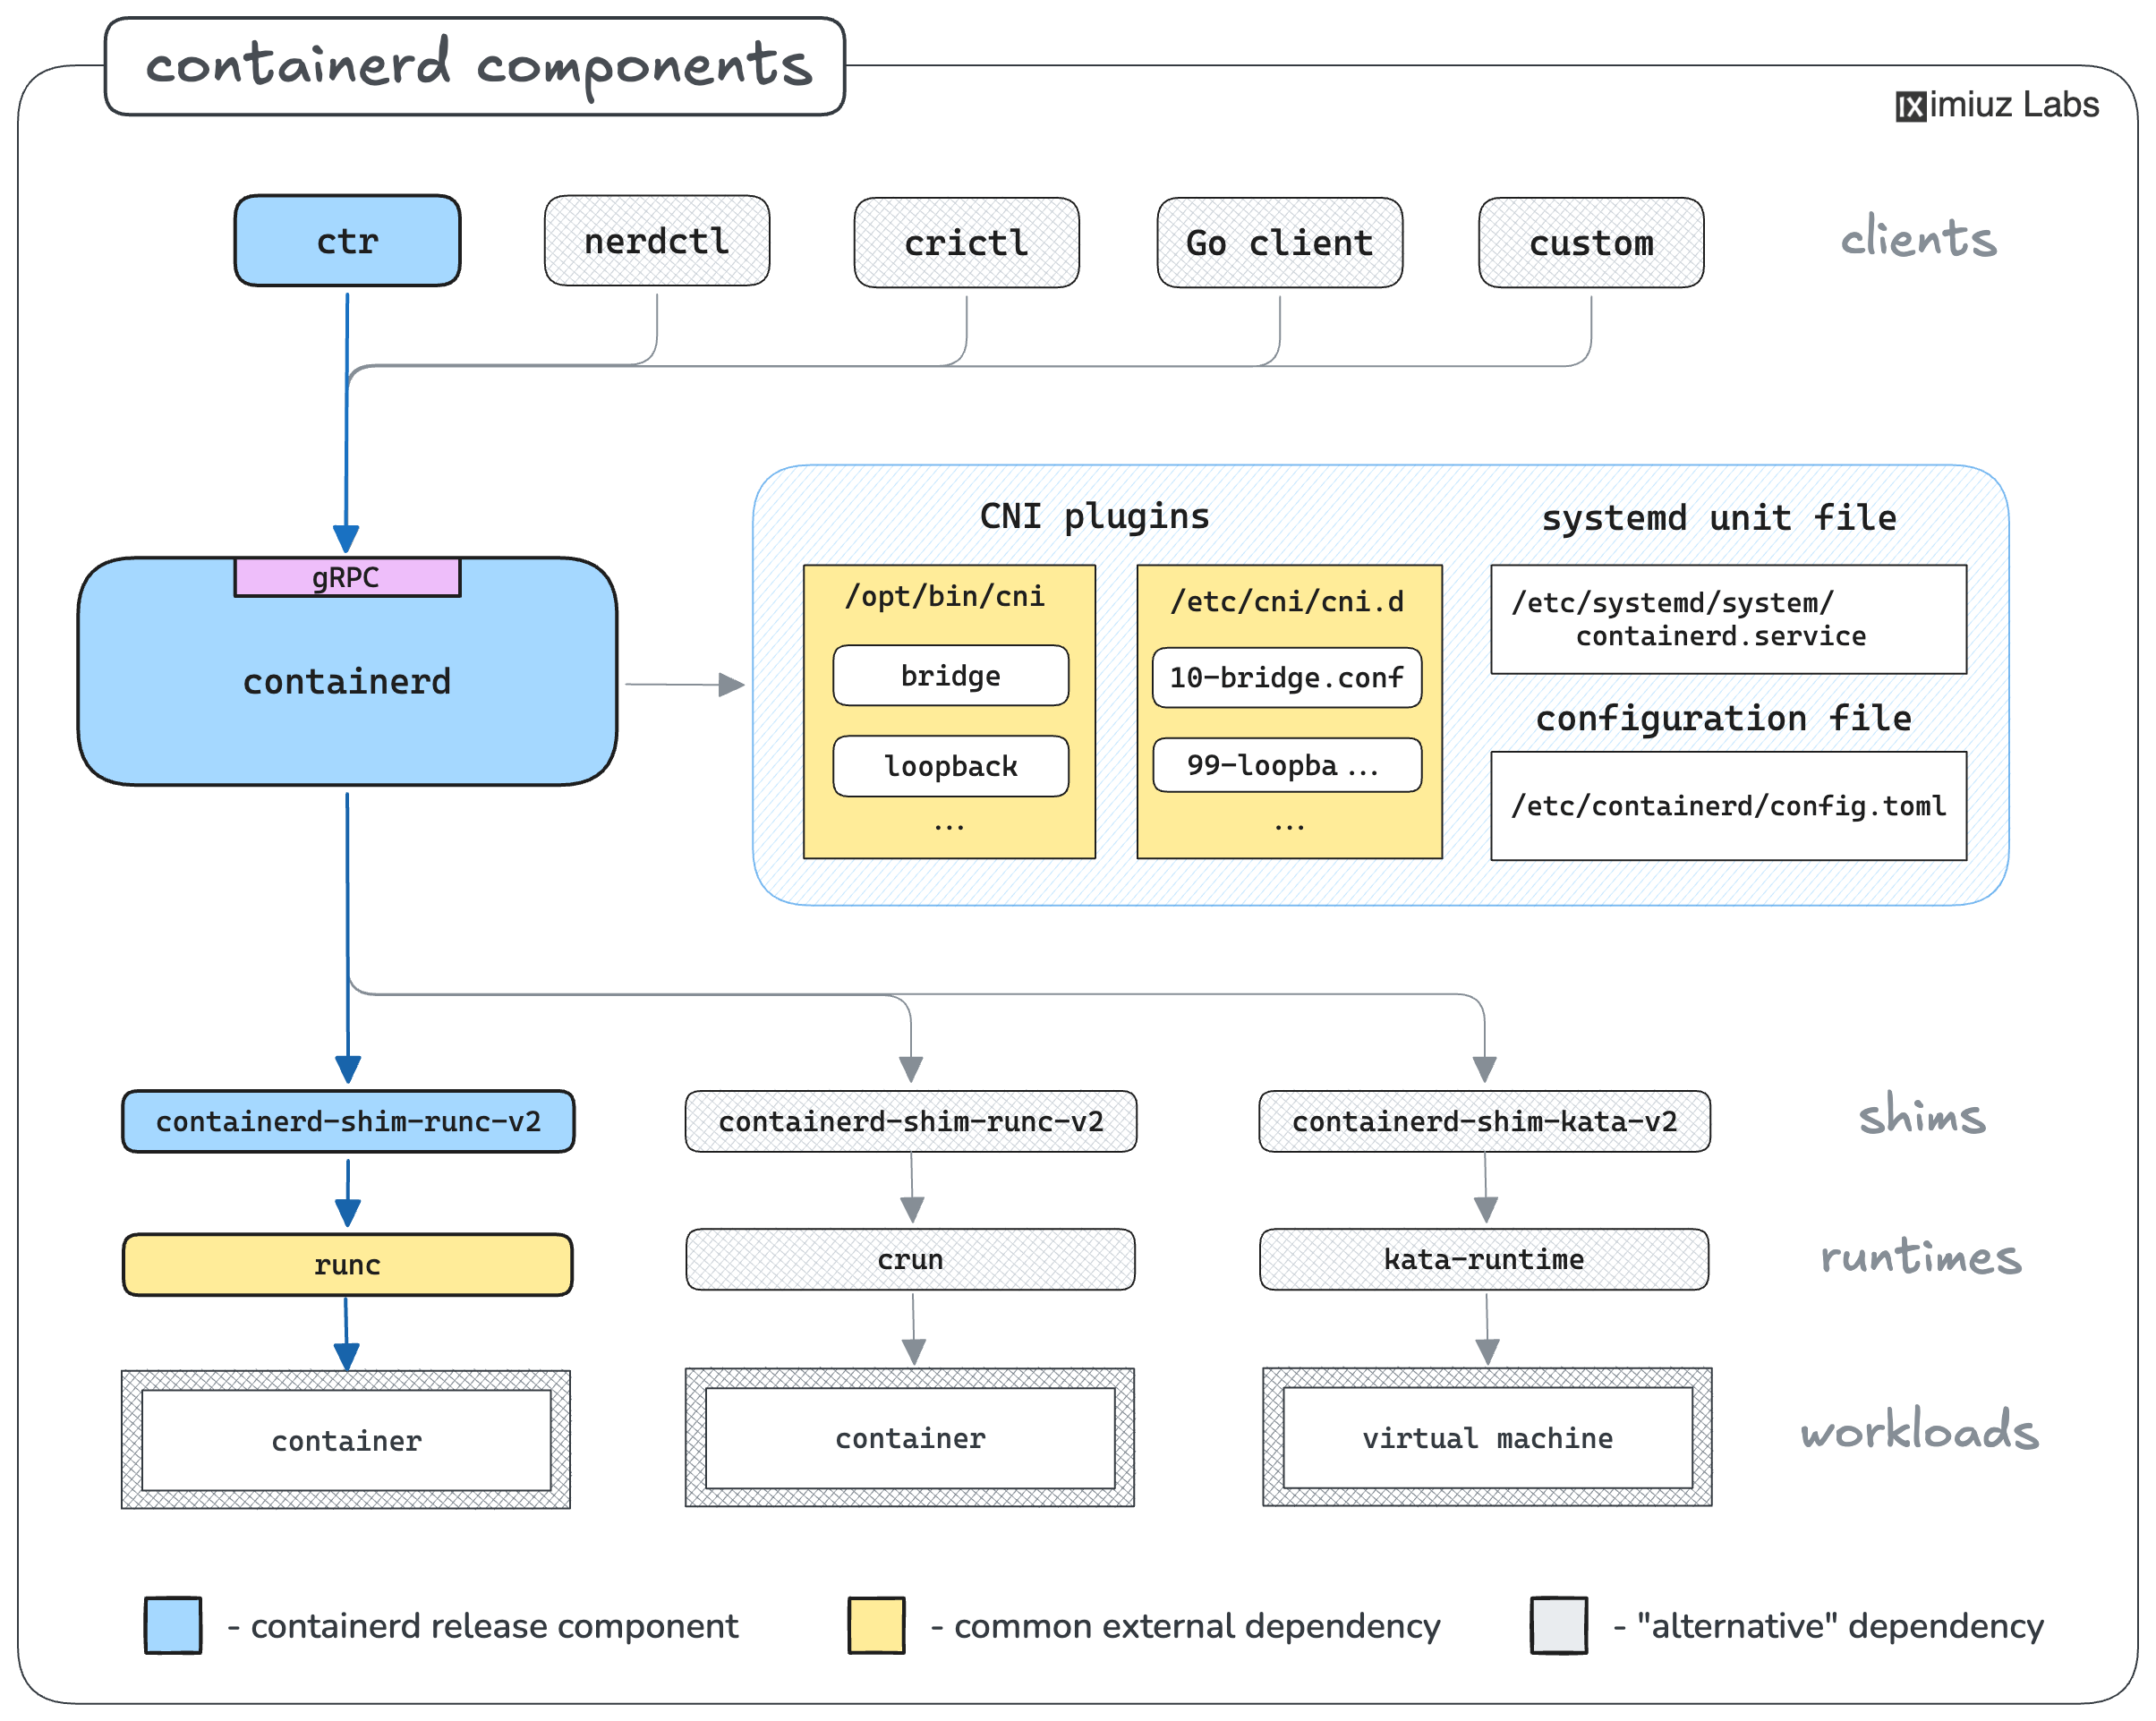
Notice how containerd supports different container runtimes and CNI plugins and can be used via various command-line and programming clients. It's like LEGO bricks all the way down (and up)!
In the next lesson, we'll explore how to extend a containerd installation with nerdctl, a Docker-compatible CLI client.
But first - practice time!
Practice
Can you install and configure containerd by yourself?
- Previous lesson
- How to Run and Manage Containers Using ctr