Hands-On Introduction to Unikernels
The source of this tutorial is available on GitHub. Feel free to use that source repository to contact the author with questions, discuss possible improvements or report mistakes.
Virtual machines provide a level of isolation unattainable by any flavor of Linux container. Virtualization technologies are widely adopted in the industry as a response to stringent security requirements, particularly in environments that share hardware between multiple tenants and must guarantee opaque boundaries between those tenants. It shouldn't come as a surprise that cloud hyperscalers provide access to compute in various forms of virtual machines1 rather than some abstraction on top of a shared OS kernel.
But reaping the security benefits of virtual machines typically requires compromising on performance aspects. Cold booting an entire operating system takes significantly more time than spawning an OS process, which hinders dynamic application scaling. Also with each VM's kernel making independent scheduling decisions on top of the same hardware resources (CPU, memory, network, GPUs, ...), running multiple general-purpose operating systems such as Linux side by side requires smart hypervisors in order to distribute those resources optimally2.
You will often encounter the term "Micro VM" to describe a type of virtual machine that attempts to address the aforementioned limitations by reducing their memory footprint through restricted device support and guest3 functionalities. While this approach demonstrates measurable improvements to boot times, the guest itself still carries the overhead of a full, general-purpose operating system.
Unikernels propose a solution to that exact problem.
Throughout this tutorial, you will learn what a unikernel is made of and even build one yourself. You will be guided throughout the steps required for running this unikernel on any Linux host, then package it as an OCI image that can be run by Docker.
Requirements
- Notions about virtualization: what is a virtual machine, a hypervisor.
- A high level understanding of how an OS process interacts with its kernel: libc, syscalls.
- A good understanding about the subsystems involved in the composition of a Linux container: namespaces, cgroups, CNI.
What Is a Unikernel?
Core Principles
In essence, a unikernel is a highly specialized type of kernel that is tailored for running one application, and that application specifically. By this property, a unikernel is capable of running in a single address space, where the usual distinction between kernel and user spaces does not exist. The application is the kernel, as much as the kernel is the application.
This design avoids paying the performance penalty of switching contexts on system calls between the user space and the kernel space, a behavior that is unavoidable in traditional operating systems. It allows a direct and quicker access to the hardware.
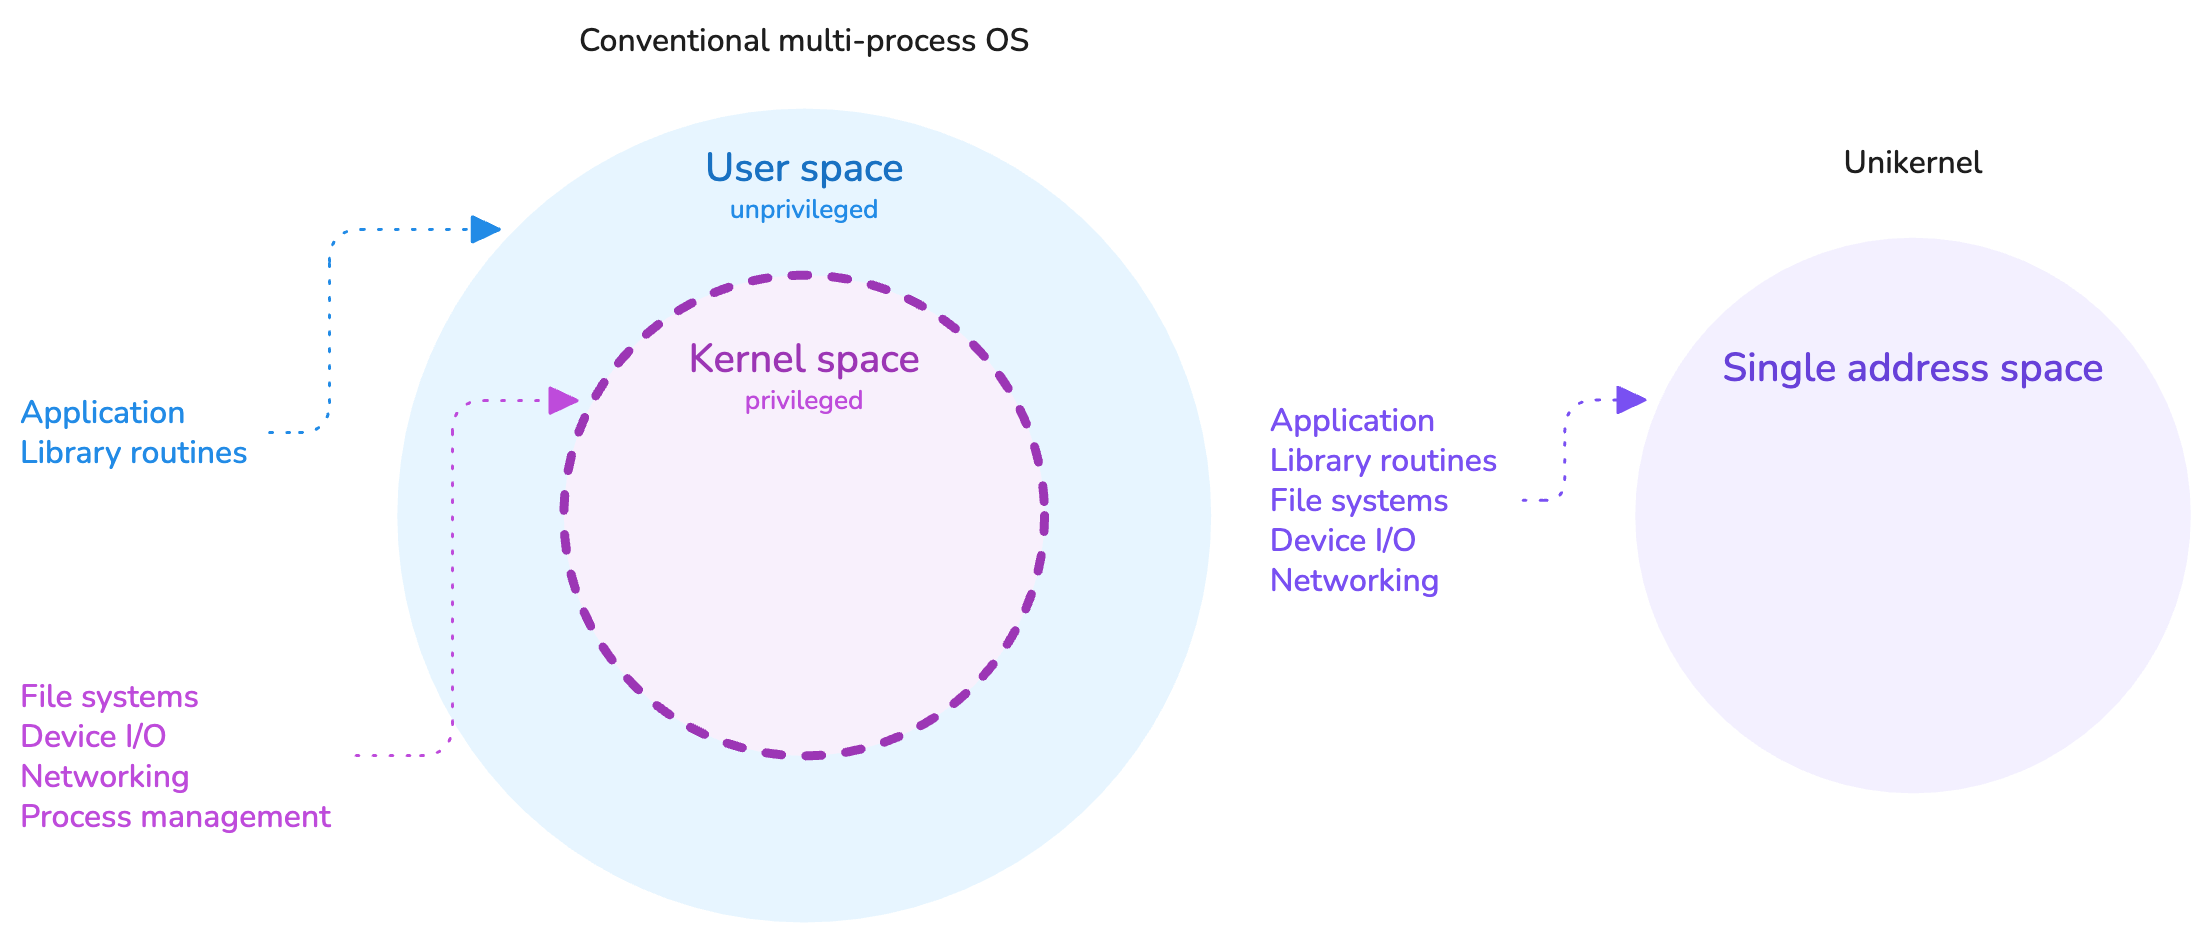
Unikernels operate in a single address space.
There exists different types of unikernel projects. Some are tailored to run applications written in specific programming languages, others are more versatile. Some are monolithic, others are modular. Some require compiling and linking the application in a special way, others are able to run unmodified ELF executables.
Despite those differences, all strive to achieve specialization in a similar way: by selecting only the components of the software stack which are relevant to the application. For instance, there is no use for disk filesystem drivers in a piece of software which interacts solely with the network and does not write any data to disk. Likewise, because the unikernel is a single application, it does not require any user management or scheduling facilities. These become opportunities for reducing the software footprint by cutting on bloat, also reducing its attack surface by extension.
We often refer to the unikernel paradigm as "library operating systems".
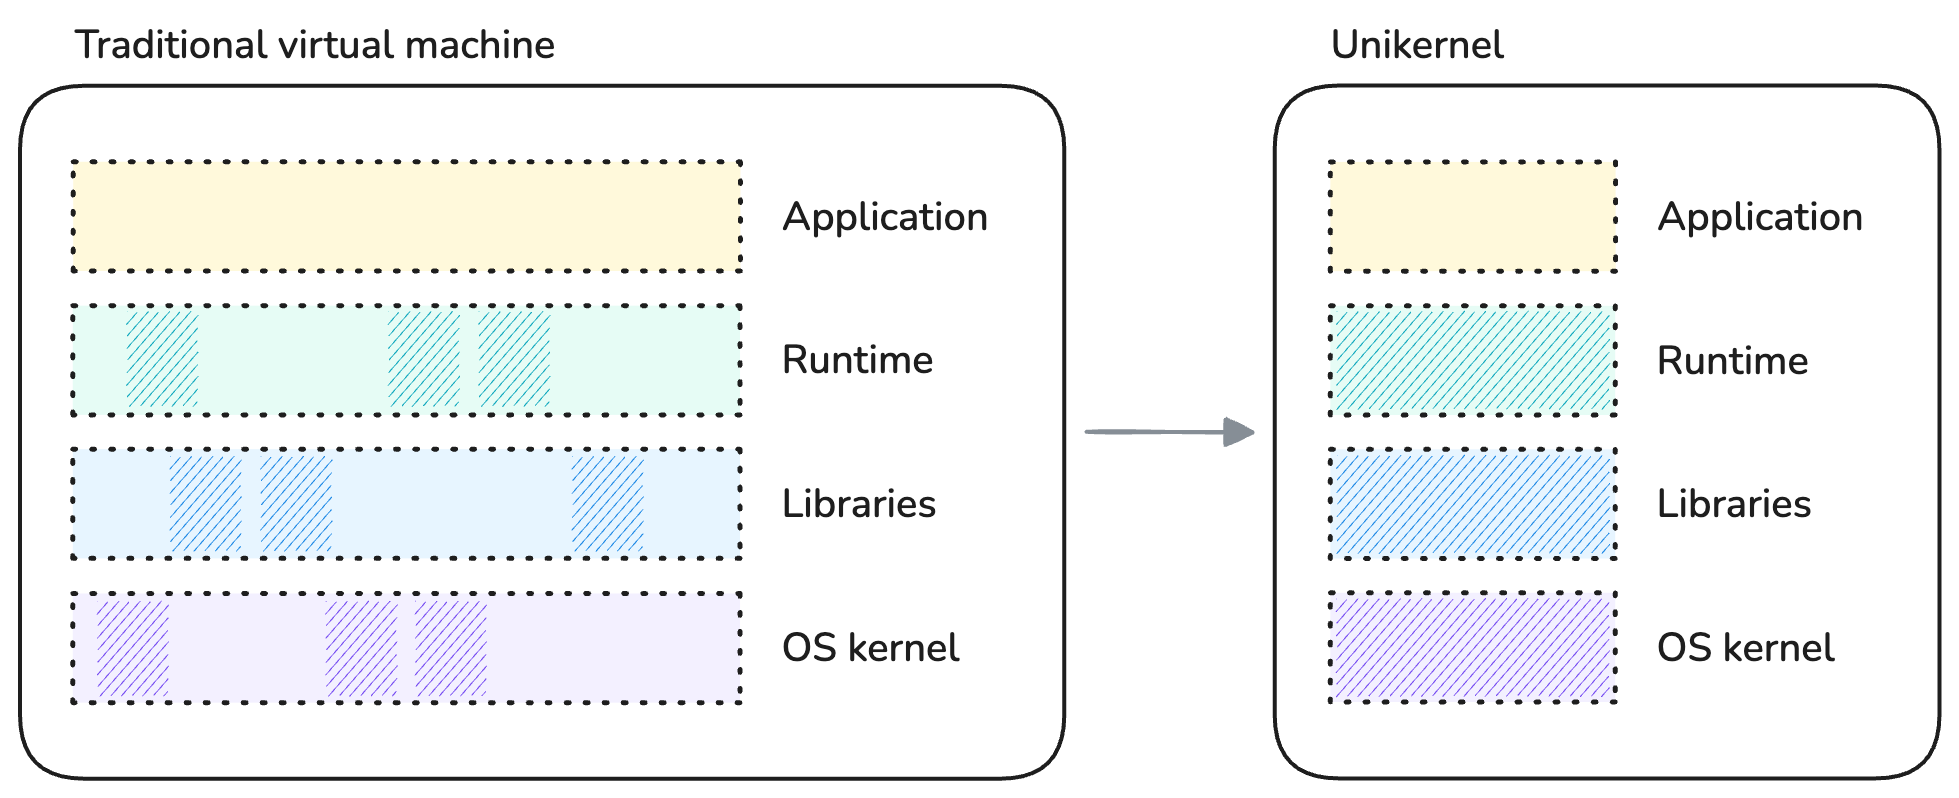
Specializing a unikernel by components selection.
The artifact produced by building a unikernel is a kernel executable that comprises the application, along with only the parts of the OS kernel, libraries and possible runtime that were selected for that application. Because a unikernel is meant to be materialized as a virtual machine, the produced artifact is specific to the target hypervisor (KVM4, Xen5, VMware, ...) and CPU architecture.
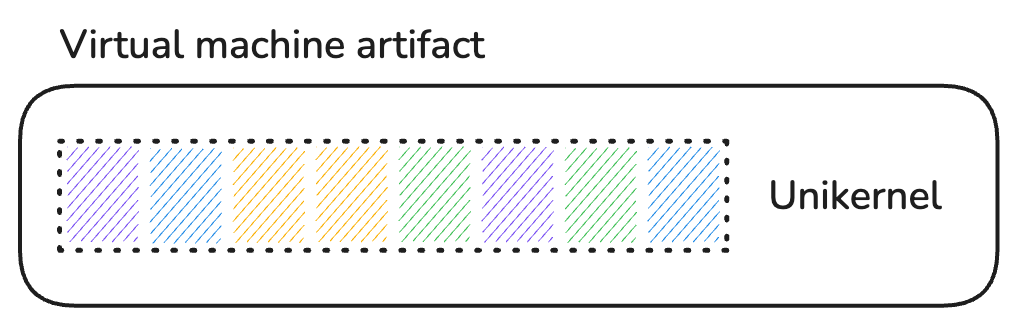
Final unikernel artifact.
In summary, unikernels:
- Operate in a drastically minimized software stack without separation between kernel and user spaces.
- Have a smaller memory footprint and attack surface than a Linux process.
- Do not share any kernel components with the host.
- Benefit from the strong isolation of a virtual machine.
As a result, unikernels offer increased security and performance compared to a containerized Linux process.
Trade-Offs
It would feel dishonest to praise unikernels for their many benefits without acknowledging some of their limitations.
Nowadays, the comparison of unikernels with Linux containers seems unavoidable, therefore the aspects enumerated below focus deliberately on use-cases that a container typically enables and which presents challenges when running the same application as a unikernel.
No Shell, No Users
We are starting with some fully embraced bait; the absence of shells and users is absolutely desired for reducing the attack surface of applications.
Yet, when comes the need to troubleshoot a misbehaving live application it is hard to beat the convenience of containers. Need to use a specific tool but the container's root filesystem is only one statically linked executable? No problem, attach your favorite debugging shell to the namespaces of the container, become root if you please, and off you go.
With a unikernel? You better be sure that the application has comprehensive observability facilities built-in.
Single Process
Unikernels are inherently single-process OSes due to their single address space design.
A range of applications use the POSIX fork system call to create children processes such as additional workers, data snapshotters, etc.
Running such applications as unikernels presents challenges and requires trade-offs.
Some notable examples:
- The PostgreSQL database server has a process-based architecture rather than using threads.
- The most widely used worker (MPM) of Apache HTTPd implements a hybrid multi-process / multi-threaded server.
- The Redis in-memory cache persists data on disk using a child process.
Containers being regular OS processes, they do not suffer from such limitation.
Note that a recent research paper shows promising advancements in supporting fork in single-address-space operating systems: μFork: Supporting POSIX fork Within a Single-Address-Space OS (September 2025).
No Standardization
Unikernels are still considered a niche technology despite building on concepts developed in the late 1990s. As such, they lack the standardization that emerges once a technology achieves a certain degree of maturity. This means that existing unikernel projects and their associated tooling are currently largely incompatible with each other.
Interestingly, compatibility with container-centric and cloud-native tooling is limited but not nonexistent, as you will discover later in this tutorial.
This lack of standardization is no different from the early days of containers, which weren't standardized either until several years into the existence of Docker containers.
Knowledge Requirements
Because unikernels are purpose-built and combine both the user and kernel code, they generally require a deeper knowledge about the software stack than is required for building conventional application artifacts. Porting an application as a unikernel may require specialist knowledge from the runtime through the kernel interfaces all the way down to the hardware.
As previously mentioned, there exist unikernel projects that can run unmodified ELF executables in a binary-compatible mode (POSIX compliant). Even though these do not enable the full, uncompromised performance and security benefits of purpose-built unikernels, they preserve a number of those benefits over a general-purpose, multi-user operating system kernel like Linux. They also bring the process of building a unikernel closer to the one of assembling a container image. Win-win.
Limited Inter-Process Communications
Finally, one limitation that stems from the virtual machine model and not the unikernel architecture in itself is the lack of supporting facilities for inter-process communications. Without a shared kernel to provide such facilities, applications running as unikernels must communicate over the network or via channels provided by their underlying hypervisor.
Containers allow multiple processes to be confined together and communicate over UNIX domain sockets, POSIX message queues, a loopback network interface, OS signals, etc.
Building the Unikernel
Now that you are equipped with general knowledge about unikernels, let's begin with the hands-on part of the tutorial, shall we?
In this tutorial, you are going to build the Nginx web server as a Unikraft unikernel, from sources.
Nginx is a classic example of server application that is both incredibly widespread6 and easy to interact with.
The Unikraft kernel was chosen for this tutorial because it ticks the following boxes:
- Comprehensive implementation of the library OS concept with a modular design that supports both porting from sources and binary compatibility.
- Supported by some of the OCI7 tooling used later in this tutorial.
The playground box is pre-initialized with the following two directories inside your HOME:
ls -p
nginx/ sources/
nginx/is your workspace for building the Nginx application as a Unikraft unikernel.sources/contains the source code of the Unikraft core, of Nginx itself (as a thin Unikraft library) and of additional libraries required by the Nginx application.
Start by changing your working directory to nginx/. You will remain in there throughout most of this tutorial:
cd nginx
This directory contains a few files which are solely responsible for configuring and building the unikernel:
ls -p1 --group-directories-first
oci/
rootfs/
workdir/
Config.uk
Makefile
Makefile.uk
qemu-x86_64.defconfig
Use the tabs below for a description of the purpose of each of these files:
A file in which kernel options with non-default values are specified.
Options which are specific to our flavor of the unikernel are enabled in this file and will be merged with the defaults of the Unikraft kernel:
- The target platform/hypervisor: KVM.
- Our preference for printing kernel messages at the info level (only errors are printed by default).
- Activation of the
/devfilesystem to enable writing to the console via the stdout I/O stream. - Mounting of some additional filesystem at boot: an embedded initrd.
CONFIG_PLAT_KVM=y
CONFIG_LIBUKPRINT_KLVL_INFO=y
CONFIG_LIBUKFS_DEVFS=y
CONFIG_LIBPOSIX_VFS_FSTAB=y
CONFIG_LIBPOSIX_VFS_FSTAB_BUILTIN=y
CONFIG_LIBPOSIX_VFS_FSTAB_BUILTIN_EINITRD=y
Kernel Configuration
First, a kernel needs a configuration, and a unikernel in no exception.
You have already encountered the qemu-x86_64.defconfig file, you are now going to generate the full kernel configuration based on those few customized values:
UK_DEFCONFIG=$PWD/qemu-x86_64.defconfig make defconfig
  MAKE    kconfig
  ...
#
# configuration written to /home/laborant/nginx/.config
#
This command should have generated a file named .config inside the workspace:
git status --short
?? .config
It contains an aggregation of all the kernel options explicitly or implicitly selected inside the workspace, merged with the defaults from the Unikraft core.
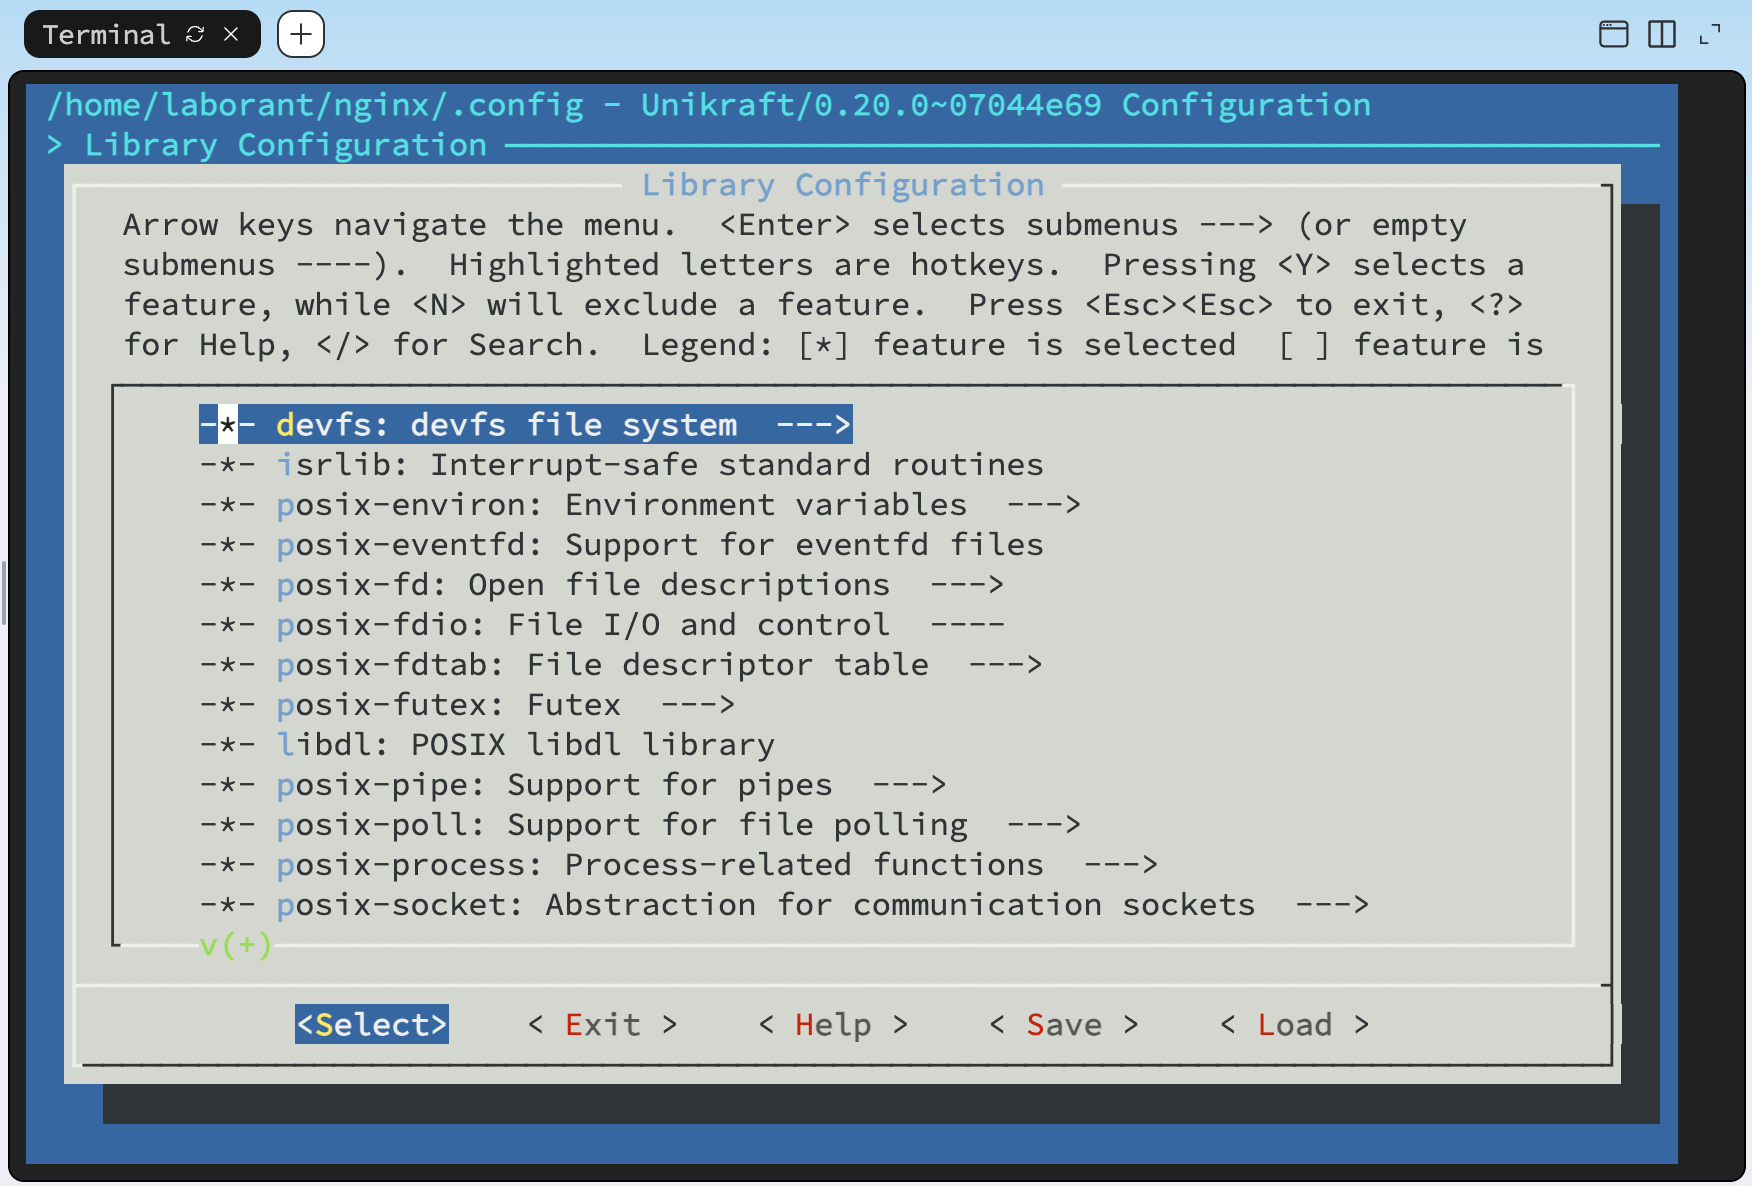
Configuration TUI
Instead of invoking the defconfig goal, you could have selected kernel options via a terminal-based kernel configuration interface.
Since your .config file is already generated, opening this interface will display the options that were selected by the defconfig goal.
Give it a try!
If you have ever built the Linux kernel from sources this should look familiar, even spark a bit of nostalgia :)
(You might have to expand the side panel for your web-based terminal to have large enough dimensions.)
make menuconfig
With the kernel configuration generated, you are now ready to proceed with the build. Let's go:
make -j $(nproc)
The build process goes through a few steps, including fetching the source code of the libraries and application (Nginx) which are not yet cached locally:
  ...
  WGET    libmusl: https://www.musl-libc.org/releases/musl-1.2.3.tar.gz
  ...
  WGET    libnginx: http://nginx.org/download/nginx-1.15.6.tar.gz
Unfortunately, about 10 seconds into the build, an error already ruins the party:
make[3]: *** No rule to make target '/home/laborant/nginx/initrd.cpio', needed by '/home/laborant/nginx/workdir/build/libposix_vfs_fstab/einitrd.o'. Stop.
This is part of the tutorial and a good segue into some peculiarity about the unikernel you are building.
Files Access
If you take a step back and think about what a typical application package contains—be it an OS package or a container image—you might be able to guess where we are heading.
Let's take a look at the files included with the nginx-common package of the playground box's distribution:
dpkg -L nginx-common
/etc/default/nginx
/etc/init.d/nginx
/etc/logrotate.d/nginx
/etc/nginx/fastcgi.conf
/etc/nginx/fastcgi_params
/etc/nginx/koi-utf
/etc/nginx/koi-win
/etc/nginx/mime.types
/etc/nginx/nginx.conf
/etc/nginx/sites-available/default
/usr/lib/systemd/system/nginx.service
/usr/share/apport/package-hooks/source_nginx.py
/usr/share/doc/nginx-common/changelog.Debian.gz
/usr/share/nginx/html/index.html
That's right, a bunch of static resources. While some are support files for the playground's Linux distribution (service definition, logrotate config, docs) others, such as the highlighted ones, are required by the Nginx application to function.
On any Linux system, exposing such files to an application is commonly accepted as storing the files on a mounted filesystem and giving read/write permissions on these files to the UNIX user that the application is going to run as. In a container image, those same files are either part of the root filesystem already, or bind mounted at run time to the root filesystem that the container pivots to.
But our unikernel does not have access to a filesystem exposed through a shared host kernel, so those files must be provided to the application by different means. One option could have been to enable selected filesystem drivers via kernel options and share files from the host at run time through the target hypervisor, similarly to a bind mount on Linux.

Sharing files from the host over the 9p protocol.
However, the option we selected in this tutorial is to embed the files in an initial ramdisk (initrd) using the kernel option LIBPOSIX_VFS_FSTAB_BUILTIN_EINITRD.
With this approach, the initial ramdisk is expanded into a root filesystem mounted as a read-write RAM-based filesystem (ramfs) upon booting the unikernel.
A perfect solution for static and non-persistent files.
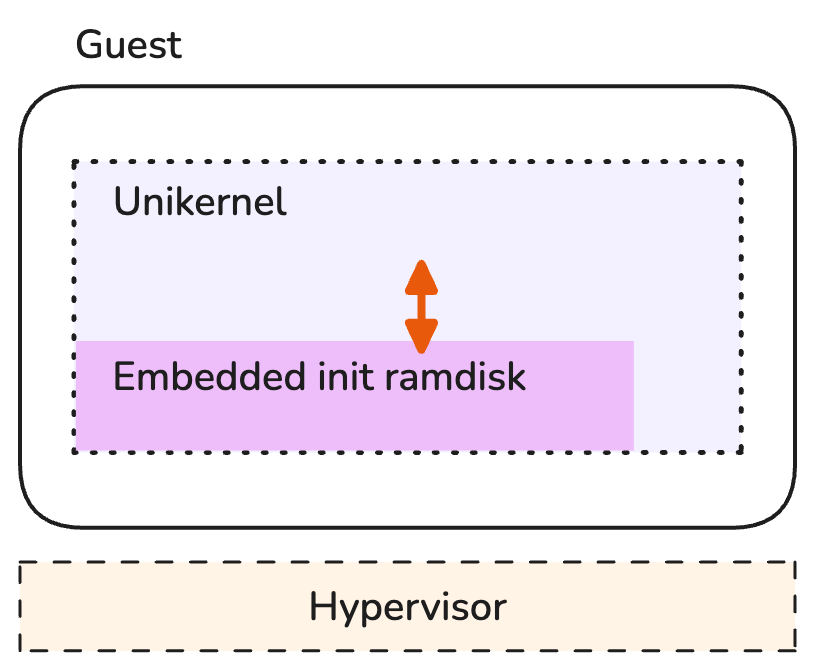
Embedding files into the unikernel as an initial ramdisk.
We pinpointed earlier the lack of standardization across unikernel projects. The approaches proposed in this section are a demonstration of mechanisms and configurations which are highly Unikraft-specific and may or may not have an equivalent in other unikernels.
The files that need to be embedded are already part of your workspace and stored in the rootfs/ directory:
tree rootfs
rootfs/
└── nginx
    ├── conf
    │   ├── mime.types
    │   └── nginx.conf
    ├── html
    │   └── index.html
    └── logs
        └── error.log
You need to convert the contents of this directory into a cpio8 archive. (Remember the error message?) The Unikraft core includes a support script which achieves just that:
workdir/unikraft/support/scripts/mkcpio initrd.cpio rootfs
The result is an archive named initrd.cpio containing all the files staged for embedding into the unikernel artifact at build time.
git status --short
?? .config
?? initrd.cpio
The cpio archive format
The format of a cpio archive isn't that different from that of a tarball. Files are merely concatenated with their contents separated by some headers and metadata.
You can print the contents of the generated initrd.cpio using the following command and verify that it matches that of the rootfs/ directory:
bsdcat initrd.cpio
Kernel Build
You should now have all required resources sorted out:
.config– a kernel configuration.initrd.cpio– an initial ramdisk for loading a root file system with a few static files into memory.
Let's try building the unikernel one more time:
make -j $(nproc)
After about 2 minutes, you should see the build succeed with a final linking and stripping of the build artifacts:
  ...
  OBJCOPY libmusl.o
  LD      nginx_qemu-x86_64.dbg
  SCSTRIP nginx_qemu-x86_64
  UKBI    nginx_qemu-x86_64.bootinfo
  MULTIBT nginx_qemu-x86_64.multiboot
make[1]: Leaving directory '/home/laborant/sources/unikraft'
All files resulting from the build are written to the build/ directory.
The one without an extension in the list below is the kernel:
git status --short
?? .config
?? initrd.cpio
?? workdir/build/nginx_qemu-x86_64
?? workdir/build/nginx_qemu-x86_64.bootinfo
?? workdir/build/nginx_qemu-x86_64.bootinfo.cmd
?? workdir/build/nginx_qemu-x86_64.cmd
?? workdir/build/nginx_qemu-x86_64.dbg
?? workdir/build/nginx_qemu-x86_64.dbg.cmd
?? workdir/build/nginx_qemu-x86_64.dbg.gdb.py
?? workdir/build/nginx_qemu-x86_64.multiboot.cmd
Unikraft kernel's naming convention
The base name of the generated kernel artifacts follows the naming convention:
$(CONFIG_UK_NAME)_$(KVM_VMM)-$(CONFIG_UK_ARCH)
You can verify that the file name nginx_qemu-x86_64 indeed matches the kernel configuration used during the build:
grep -E 'CONFIG_(UK_NAME|UK_ARCH|KVM_VMM)' --color .config
CONFIG_UK_ARCH="x86_64"
CONFIG_KVM_VMM_QEMU=y
# CONFIG_KVM_VMM_FIRECRACKER is not set
CONFIG_UK_NAME="nginx"
The format of this kernel is an ELF executable, just like the Linux kernel that your playground box is currently running on:
file workdir/build/nginx_qemu-x86_64
workdir/build/nginx_qemu-x86_64: ELF 32-bit LSB executable, Intel 80386, version 1 (SYSV), statically linked, stripped
One thing should be particularly striking about this artifact: its small size. The Nginx application and all the OS components required for running it fit into... less than 2 MB!
du -h workdir/build/nginx_qemu-x86_64
2.0M workdir/build/nginx_qemu-x86_64
For comparison, on the playground box's distribution the nginx binary, the GNU libc and the Linux kernel taken together weigh over 80 MB:
du -hL /boot/vmlinux /usr/sbin/nginx /lib/x86_64-linux-gnu/libc.so.6
78M     /boot/vmlinux
1.3M    /usr/sbin/nginx
2.1M    /lib/x86_64-linux-gnu/libc.so.6
Running the Unikernel
The kernel you just built can be run as a machine. A unikernel could technically boot on a physical machine (e.g. your laptop) providing that it was built with drivers compatible with its hardware. However, unikernels are largely meant to run as virtual machines rather than physical ones, as mentioned in the introduction to this tutorial. This is mostly for two reasons:
- One reason is that unikernels have such a minimal footprint that, in a majority of cases, it wouldn't make a lot of sense to dedicate the entire hardware of one machine to just one of them.
- The second reason has to do with hardware compatibility. By targeting paravirtualized VirtIO9 devices for instance, a unikernel can indirectly support a lot of physical hardware while retaining its high performance guarantees.
A Note on Hypervisor Support
Your nginx_qemu-x86_64 kernel is suitable for the KVM hypervisor and its userspace component in the QEMU10 virtual machine manager (VMM).
You will leverage both when running the unikernel on the playground box.
Producing a unikernel for a different hypervisor (such as Xen) or a different VMM (such as Firecracker11) would have required different build time parameters (kernel options).
The KVM kernel module effectively turns the Linux host operating system into a type-1 hypervisor. To leverage this virtualization solution, the host's CPU needs to support certain CPU instructions through virtualization extensions.
Existing CPU extensions for virtualization
Virtualization extensions for x86-based CPUs are denoted as:
- "SVM" on AMD CPUs, which stands for Secure Virtual Machine. Marketed as "AMD-V".
- "VT-x" on Intel CPUs, which stands for Virtual Machine Extensions.
You can check whether those extensions are enabled on the playground box by looking for the corresponding CPU flags:
grep -E 'svm|vmx' --color /proc/cpuinfo
The other requirement is that the host's Linux kernel includes the kvm module, expectedly.
Both of those requirements can conveniently be checked using a single command:
kvm-ok
INFO: /dev/kvm exists
KVM acceleration can be used
Your current playground box does not run on bare metal. It is itself a virtual machine, which provides hardware-assisted virtualization through nested virtualization. Consequently, guest virtual machines started inside the playground box incur a performance penalty.
This is totally acceptable in the context of this tutorial, but important to keep in mind.
Create and Run the Virtual Machine
Let's now run the kernel as a freshly created virtual machine using QEMU. Notice the unikernel executable you built in the previous section passed as argument, as well as kernel command-line parameters pointing at one of the files from your previously generated cpio archive:
sudo qemu-system-x86_64 \
  -serial stdio -display none -vga none \
  -enable-kvm -cpu host \
  -m 64M \
  -kernel workdir/build/nginx_qemu-x86_64 \
  -append '-c /nginx/conf/nginx.conf'
Interestingly, those kernel parameters do not look like typical OS kernel command-line parameters, and indeed they are not. Those parameters are Nginx command-line parameters! A unikernel has OS and application components built into a single kernel artifact, so this should hopefully make a lot of sense.
Should you need to pass parameters to the core kernel components, you would have to keep them separated from the application's parameters with --, as follows:
netdev.ip= vfs.fstab= random.seed= -- -c /nginx/conf/nginx.conf
We will use this mechanism in the next section of this tutorial.
As soon as the virtual machine is created, its console output will be printed to your terminal, just like when booting a Linux box. It includes the BIOS messages and the unikernel's boot messages:
[    0.000000] Info: [libukrandom] <swrand.c @  111> Initializing the random number generator...
[    0.000000] Info: [libukrandom] <random.c @   108> CSPRNG seed source: CPU
[    0.000000] Info: [libkvmplat] <memory.c @  497> Memory 00fd00000000-010000000000 outside mapped area
[    0.000000] Info: [libkvmplat] <setup.c @   179> Switch from bootstrap stack to stack @0x11000
[    0.000000] Info: [libukboot] <boot.c @  279> Unikraft constructor table at 0x2d1000 - 0x2d1058
[    0.000000] Info: [libukboot] <boot.c @  288> Initialize memory allocator...
[    0.000000] Info: [libukallocbbuddy] <bbuddy.c @  659> Initialize binary buddy allocator 11000
[    0.000000] Info: [libukboot] <boot.c @  347> Initialize the IRQ subsystem...
[    0.000000] Info: [libukboot] <boot.c @  354> Initialize platform time...
[    0.000000] Info: [libkvmplat] <tscclock.c @  255> Calibrating TSC clock against i8254 timer
[    0.100033] Info: [libkvmplat] <tscclock.c @  276> Clock source: TSC, frequency estimate is 4192526940 Hz
[    0.100962] Info: [libukboot] <boot.c @  358> Initialize scheduling...
[    0.101289] Info: [libukschedcoop] <schedcoop.c @  289> Initializing cooperative scheduler
[    0.102603] Info: [libukboot] <boot.c @  391> Init Table @ 0x2d6050 - 0x2d6150
[    0.103145] Info: [libukbus] <bus.c @  133> Initialize bus handlers...
[    0.103609] Info: [libukbus] <bus.c @  135> Probe buses...
[    0.104003] Info: [libukbus_pci] <pci_bus.c @  159> PCI 00:00.00 (0600 8086:1237): <no driver>
[    0.104582] Info: [libukbus_pci] <pci_bus.c @  159> PCI 00:01.00 (0600 8086:7000): <no driver>
[    0.105559] Info: [libukbus_pci] <pci_bus.c @  159> PCI 00:02.00 (0200 8086:100e): <no driver>
[    0.106190] Info: [liblwip] <init.c @  174> Initializing lwip
[    0.107715] Warn: [liblwip] <init.c @  460> No network interface attached!
[    0.109350] Info: [libposix_vfs_fstab] <fstab.c @   76> Extracting initrd embedded @ 0x26d000 (7168 bytes) to /...
[    0.110007] Info: [libukallocregion] <region.c @  186> Initialize allocregion allocator @ 0x54020, len 5136
[    0.110719] Info: [libukcpio] <cpio.c @  248> Creating directory /.
[    0.111433] Info: [libukcpio] <cpio.c @  253> Path exists, checking type
[    0.111895] Info: [libukcpio] <cpio.c @  278> Path exists and is dir, doing chmod
[    0.112514] Info: [libukcpio] <cpio.c @  357> ./nginx inode 144531 has more than 1 link (5)
[    0.113055] Info: [libukcpio] <cpio.c @  248> Creating directory /./nginx
[    0.113795] Info: [libukcpio] <cpio.c @  357> ./nginx/conf inode 144532 has more than 1 link (2)
[    0.114352] Info: [libukcpio] <cpio.c @  248> Creating directory /./nginx/conf
[    0.115256] Info: [libukcpio] <cpio.c @  194> Extracting /./nginx/conf/nginx.conf (361 bytes)
[    0.116722] Info: [libukcpio] <cpio.c @  194> Extracting /./nginx/conf/mime.types (5058 bytes)
[    0.117400] Info: [libukcpio] <cpio.c @  357> ./nginx/logs inode 144537 has more than 1 link (2)
[    0.117924] Info: [libukcpio] <cpio.c @  248> Creating directory /./nginx/logs
[    0.118398] Info: [libukcpio] <cpio.c @  194> Extracting /./nginx/logs/error.log (0 bytes)
[    0.118891] Info: [libukcpio] <cpio.c @  357> ./nginx/html inode 144535 has more than 1 link (2)
[    0.119397] Info: [libukcpio] <cpio.c @  248> Creating directory /./nginx/html
[    0.119875] Info: [libukcpio] <cpio.c @  194> Extracting /./nginx/html/index.html (139 bytes)
[    0.120739] Warn: [libposix_process] <clone.c @  193> uk_posix_clone_sighand() stubbed
[    0.120988] Warn: [libuklock] <semaphore.c @   23> uk_posix_clone_sysvsem() stubbed
Powered by
o.   .o       _ _               __ _
Oo   Oo  ___ (_) | __ __  __ _ ' _) :_
oO   oO ' _ `| | |/ /  _)' _` | |_|  _)
oOo oOO| | | | |   (| | | (_) |  _) :_
 OoOoO ._, ._:_:_,\_._,  .__,_:_, \___)
                 Ijiraq 0.21.0~f6f00b2d
[    0.139012] Info: [libukboot] <boot.c @  470> Pre-init table at 0x2d6240 - 0x2d6240
[    0.139491] Info: [libukboot] <boot.c @  481> Constructor table at 0x2d6240 - 0x2d6240
[    0.140007] Info: [libukboot] <boot.c @  496> Environment variables:
[    0.140307] Info: [libukboot] <boot.c @  498>        PATH=/bin
[    0.140582] Info: [libukboot] <boot.c @  504> Calling main(3, ['workdir/build/nginx_qemu-x86_64', '-c', '/nginx/conf/nginx.conf'])
[    0.155220] Warn: [libposix_process] <rt_sigprocmask.c @   72> __uk_syscall_r_rt_sigprocmask() stubbed
[    0.155796] Warn: [libposix_process] <rt_sigaction.c @   69> __uk_syscall_r_rt_sigaction() stubbed
There are three notable things to be observed in this output:
- The
libposix_vfs_fstabcomponent initiated the extraction of the (embedded) initial ramdisk onto the ramfs filesystem at/(timestamp0.109350). - The
libukcpiocomponent proceeded with the actual extraction of each file and directory from the (embedded) initial ramdisk (from timestamp0.110719). - The
libukbootcomponent finally called the kernel'smain()function, namely the Nginx application, with the parameters passed on the command line (timestamp0.140582).
All of this in under 150 milliseconds.
Are you seeing a higher boot time than above?
This is expected if you are following this tutorial through the lab's playground box. Here is why.
As mentioned in a previous remark, your current playground box is itself a VM that provides hardware-assisted virtualization through nested virtualization, which incurs a performance penalty to guest virtual machines started inside of it. Due to the usage of KVM, I/O and setup instructions trigger hardware VM-exits ("hypervisor trap"), which are expensive in a doubly-nested guest like the unikernel VM ("double trap").
In order to keep the comparison of the unikernel's boot time to Linux's on an even playing field in this section of the tutorial, the numbers shown above were obtained by running the unikernel VM on a non-virtualized Ubuntu host.
For comparison, your current playground micro VM requires over 1 second just to reach the point where it can run its init process, and about 1 second more for reaching the main user target, without the performance penalty induced by the nested virtualization.
Having to wait that long for starting a Nginx server would feel like an eternity.
sudo journalctl -b -o short-monotonic
[    0.000000] docker-01 kernel: Linux version 6.1.167 (root@buildkitsandbox) ...
[    0.000000] docker-01 kernel: Command line: console=ttyS0 reboot=k panic=1 8250.nr_uarts=1 ...
     ...
[    1.196575] docker-01 kernel: Run /sbin/init as init process
     ...
[    2.227968] docker-01 systemd[1029]: Reached target default.target - Main User Target.
Console logs of the playground box
Take a look at the console logs of your playground Linux box and compare them with what you are currently seeing in your terminal :)
So, what else can we do with this unikernel at that point? Not much, at least not just yet. Since you did not create the virtual machine with any network device, you cannot perform any meaningful interaction with the Nginx server, such as sending a HTTP request to it. This aspect was deliberately left out from this section. The good news is that we are going to remediate to it in the next one.
For now, terminate the QEMU process by sending the key combination Ctrl+C on your keyboard.
qemu-system-x86_64: terminating on signal 2
In case this key sequence does not work for you, open a second terminal and interrupt the QEMU process from there:
sudo killall qemu-system-x86_64
Docker Integration
By Docker, what we really mean here is software conforming to the OCI image and runtime specifications. But that didn't make for a catchy heading.
Arguably, we could have covered a bit of the network configuration required for obtaining a HTTP response from Nginx in the previous section, and this tutorial could have ended here. Except that would have meant passing on some very interesting ways of running unikernels alongside Linux containers.
Containers are currently the dominant deployment unit in the cloud-native landscape. A rich ecosystem of technologies, rallied behind the Kubernetes12 project, allows virtually anyone to run services at "Google-scale" nowadays. Much of this convenience stems from the assumption that everything is packaged and run like a container.
Could unikernels, instead of competing against this ecosystem, tap into its richness to ease their adoption?
It turns out that this idea isn't new. Several projects have shown that it is possible to run applications as if they were a container, but with the enhanced isolation of a virtual machine. Those are presented in the section Secure Container Runtimes of the post Journey From Containerization To Orchestration And Beyond.
In this section, you will use two open source projects listed on the page of the Unikernel Alliance:
- Bunny — to create an OCI image from your already built Nginx unikernel.
- urunc — to run the Nginx unikernel off its OCI image, this time with network support.
... all of this using nothing but the docker CLI.
Let's get started.
OCI Image
Bunny makes packaging unikernels as easy as it is to package containers. The resulting images are standard OCI images that can be pushed to and pulled from any container registry.
First off, change your working directory to oci/, assuming that you are currently still in the nginx/ workspace:
cd oci
This directory contains a single file named bunnyfile with a YAML syntax.
cat bunnyfile
#syntax=harbor.nbfc.io/nubificus/bunny:latest
version: v0.1

platforms:
  framework: unikraft
  version: 0.20.0
  monitor: qemu
  architecture: x86

kernel:
  from: local
  path: nginx_qemu-x86_64

cmd: ['-c', '/nginx/conf/nginx.conf']
You would be right to assume that a unikernel shall be packaged using instructions from a Dockerfile, like any other container image.
However, because Bunny was designed to be used as a frontend for BuildKit13, it is able to parse its own build definition which is tailored for packaging the special software artifact which are unikernels.
In a bunnyfile, the generic and imperative instructions of a Dockerfile (ENV, COPY, RUN, etc.) are traded for declarative and structured attributes which describe the nature of the unikernel and how it should be run:
- The
frameworkit was built with (what type of unikernel). - The virtual machine
monitorthat can run it (what hypervisor). - The
cmd(command-line parameters) that should be supplied to the kernel at boot time. - The
pathat which the kernel image resides on the local filesystem.
The Dockerfile syntax is also supported by Bunny as an alternative to the bunnyfile syntax.
According to that last path instruction, Bunny expects the unikernel executable inside the current directory with the name nginx_qemu-x86_64, so you will need to copy it there:
cp ../workdir/build/nginx_qemu-x86_64 .
Run a Docker image build inside the current directory, using bunnyfile in place of the default Dockerfile, and see what happens:
docker image build \
  -f bunnyfile \
  -t lab/nginx-unikernel:latest \
  .
[+] Building 6.0s (8/8) FINISHED                                     docker:default
 => [internal] load build definition from bunnyfile                            0.0s
 => => transferring dockerfile: 274B                                           0.0s
 => resolve image config for docker-image://harbor.nbfc.io/nubificus/bunny:la  1.4s
 => docker-image://harbor.nbfc.io/nubificus/bunny:latest@sha256:5c4ea3e06932d  3.9s
 => => resolve harbor.nbfc.io/nubificus/bunny:latest@sha256:5c4ea3e06932d2668  0.0s
 => => sha256:0e389784892b49cd4cd99ca91a80297d06961a154497f72 6.32MB / 6.32MB  3.7s
 => => extracting sha256:0e389784892b49cd4cd99ca91a80297d06961a15449f3efe7c0c  0.1s
 => Internal:Read-bunnyfile                                                    0.0s
 => => transferring context: 274B                                              0.0s
 => local://context                                                            0.0s
 => => transferring context: 2.01MB                                            0.0s
 => copy /nginx_qemu-x86_64 /.boot/kernel                                      0.0s
 => mkfile /urunc.json                                                         0.0s
 => exporting to image                                                         0.3s
 => => exporting layers                                                        0.2s
 => => exporting manifest sha256:f32ca3bca1dd80259da2fdd4fbc1e4e31127f50d6e02  0.0s
 => => exporting config sha256:d6fee3cd090c49bcaea28735d783b410fe16519199a158  0.0s
 => => exporting attestation manifest sha256:6b208d4aab720d228a27adf0576d7050  0.0s
 => => exporting manifest list sha256:42e109d9ea5fba9c86de0296559468f13d3f2f7  0.0s
 => => naming to docker.io/lab/nginx-unikernel:latest                          0.0s
 => => unpacking to docker.io/lab/nginx-unikernel:latest                       0.0s
Even though bunny does not come pre-installed inside the playground box, the build completed without hurdle.
Is this surprising? Upon closer inspection, it shouldn't be.
Because the first line in the bunnyfile is a syntax directive with a special meaning, BuildKit was able to understand that it had to load the bunny frontend dynamically from a container image and invoke it to generate its build graph:
#syntax=harbor.nbfc.io/nubificus/bunny:latest
Neat!
The OCI images produced by Bunny have the peculiarity of being automatically labeled with some exotic key-values.
You can enumerate these by inspecting the lab/nginx-unikernel:latest image you created:
docker image inspect \
  --format='{{range $k,$v := .Config.Labels}}{{printf "%s=%s\n" $k $v}}{{end}}' \
  lab/nginx-unikernel:latest
com.urunc.unikernel.binary=/.boot/kernel
com.urunc.unikernel.cmdline=-c /nginx/conf/nginx.conf
com.urunc.unikernel.hypervisor=qemu
com.urunc.unikernel.initrd=
com.urunc.unikernel.mountRootfs=false
com.urunc.unikernel.unikernelType=unikraft
com.urunc.unikernel.unikernelVersion=0.20.0
Without further ado, let's figure out what makes those labels useful.
OCI Runtime
In order to create and run a container, the containerd container manager invokes a container runtime that prepares the containerized process to run within the desired namespaces and cgroups hierarchy.
In the realm of Linux containers, the container runtime of reference is runc.
Because the detail of this flow is beyond the scope of this tutorial, feel free to take the challenge Create and Start a Container Manually With runc if you are interested in ramping up your knowledge about container runtimes. Consider reading the post Journey From Containerization To Orchestration And Beyond as well.
runc makes numerous assumptions about the way a container has to run:
- a Linux process
- on top of a shared kernel
- with standard I/O streams (stdin/stdout/stderr)
- isolated from other processes by namespaces
- with its resources constrained by the facilities of that shared kernel (cgroups)
A unikernel is different. As a virtual machine running under the management of a virtual machine manager:
- Its resource constraints are enforced by virtualized hardware, not just cgroups.
- The host's namespaces do not propagate inside the guest, making namespaces such as
PID,Mount,UserandCgrouplargely irrelevant. - Bind mounts must be passed from the host through the hypervisor, in a form that is supported by the guest kernel.
- I/O streams of the guest application are not forwarded outside of the virtual machine.
For those reasons, spinning up a unikernel–or in fact any kind of virtual machine–from a container image requires a container runtime that is aware of those distinctions and is capable of operating around them.
That runtime is urunc.
In containerd, there is a naming convention that allows selecting a specific runtime for running a container without having to configure containerd to know about that runtime.
By requesting a runtime named io.containerd.$(RUNTIME).v2 on the command line, containerd attempts to create the container through the shim executable containerd-shim-$(RUNTIME)-v2, if available in the PATH.
It turns out that the urunc shim executable installed on the playground box follows that naming convention:
ls -F1 /usr/local/bin/*urunc*
/usr/local/bin/containerd-shim-urunc-v2*
/usr/local/bin/urunc*
So all you need to do in order to pick urunc for running your Nginx unikernel image is specify that runtime name as an argument to docker container run.
We also set its name explicitly to unikernel to facilitate future docker commands:
docker container run \
  -d --rm \
  --name unikernel \
  --runtime io.containerd.urunc.v2 \
  lab/nginx-unikernel:latest
e2348010d439f4f8197d1d706b2f99fbeebab76595e8320478057f7c48fc2da0
Default runtime
When the --runtime flag is not specified in docker container run commands, containerd chooses the runtime based on its own default.
In a vanilla containerd distribution, this default is runc:
containerd config default
  [plugins.'io.containerd.cri.v1.runtime']
    #...

    [plugins.'io.containerd.cri.v1.runtime'.containerd]
      default_runtime_name = 'runc'
      #...

      [plugins.'io.containerd.cri.v1.runtime'.containerd.runtimes]
        [plugins.'io.containerd.cri.v1.runtime'.containerd.runtimes.runc]
          runtime_type = 'io.containerd.runc.v2'
Verify that the unikernel is running (as a container):
docker container ls
CONTAINER ID   IMAGE                        COMMAND                  CREATED          STATUS          PORTS     NAMES
e2348010d439   lab/nginx-unikernel:latest   "-c /nginx/conf/ngin…"   10 seconds ago   Up 10 seconds             unikernel
Then print its logs (console output):
docker container logs unikernel
...
Powered by
o.   .o       _ _               __ _
Oo   Oo  ___ (_) | __ __  __ _ ' _) :_
oO   oO ' _ `| | |/ /  _)' _` | |_|  _)
oOo oOO| | | | |   (| | | (_) |  _) :_
 OoOoO ._, ._:_:_,\_._,  .__,_:_, \___)
                 Ijiraq 0.21.0~f6f00b2d
[    0.131892] Info: [libukboot] <boot.c @  470> Pre-init table at 0x2d6240 - 0x2d6240
[    0.132060] Info: [libukboot] <boot.c @  481> Constructor table at 0x2d6240 - 0x2d6240
[    0.132218] Info: [libukboot] <boot.c @  496> Environment variables:
[    0.132344] Info: [libukboot] <boot.c @  498>        PATH=/bin
[    0.132467] Info: [libukboot] <boot.c @  504> Calling main(3, ['/.boot/kernel', '-c', '/nginx/conf/nginx.conf'])
[    0.153510] Warn: [libposix_process] <rt_sigprocmask.c @   72> __uk_syscall_r_rt_sigprocmask() stubbed
[    0.153760] Warn: [libposix_process] <rt_sigaction.c @   69> __uk_syscall_r_rt_sigaction() stubbed
The output is more or less identical to the one shown when you ran the unikernel via QEMU earlier.
It doesn't end here. Check the IP address assigned to the container:
docker container inspect \
  --format='{{.NetworkSettings.Networks.bridge.IPAddress}}' \
  unikernel
172.17.0.2
Then send a HTTP request to that IP address using curl:
curl -D- http://172.17.0.2
HTTP/1.1 200 OK
Server: nginx/1.15.6
Date: Fri, 01 Jan 2026 00:00:00 GMT
Content-Type: text/html
Content-Length: 139
Last-Modified: Fri, 01 Jan 2026 00:00:00 GMT
Connection: keep-alive
ETag: "69611cbd-83"
Accept-Ranges: bytes

<!DOCTYPE html>
<html>
<head>
  <title>Hello from iximiuz Labs!</title>
</head>
<body>
  <h1>Hello from iximiuz Labs!</h1>
</body>
</html>
This time around, networking is fully functional, and it appears to be working just like with a container!
That is great progress compared to what you ended up with at the end of the previous section.
Not only interacting with the application running inside the guest is now a reality, but reaching that state was remarkably easy;
you did not need to use anything but docker commands, or even make adjustments to your unikernel.
Understanding the Unikernel Container
We are now going to dissect what just happened in order to understand how making the unikernel feel like we are interacting with a Linux container is even possible.
Process Tree
If you look at the processes currently running in your playground box, you should see a process with a familiar command line at the bottom of the list:
ps axjfww
  PPID     PID    PGID ... COMMAND
     1   23927   23927 ... /usr/local/bin/containerd-shim-urunc-v2 -namespace moby -id e2348010d439f4f8197d1d706b2f99fbeebab76595e8320478057f7c48fc2da0 -address /run/containerd/containerd.sock
 23927   23951   23951 ...  \_ /usr/bin/qemu-system-x86_64 -m 268M -L /usr/share/qemu -cpu host -enable-kvm -display none -vga none -serial stdio -smp 1 --sandbox on,obsolete=deny,elevateprivileges=deny,spawn=deny,resourcecontrol=deny -kernel /.boot/kernel -net nic,model=virtio,macaddr=6e:e5:40:9d:22:87 -net tap,script=no,downscript=no,ifname=tap0_urunc -append Unikraft  env.vars=[ PATH=/usr/local/sbin:/usr/local/bin:/usr/sbin:/usr/bin:/sbin:/bin HOSTNAME=e2348010d439 ] netdev.ip=172.17.0.2/24:172.17.0.1:8.8.8.8    -- -c /nginx/conf/nginx.conf
That's right, a QEMU process, parented to the urunc container shim, with arguments that look very similar to the ones you passed on the command line to create the virtual machine manually in the previous section of this tutorial.
Remember those somewhat exotic labels set on the container image? You just found the usage of two of them:
com.urunc.unikernel.hypervisor=qemu
com.urunc.unikernel.cmdline=-c /nginx/conf/nginx.conf
This parenting of qemu-system-x86_64 to the container shim is the reason why docker container logs printed the standard output (stdout) of the QEMU process, namely the virtual machine's console output.
Intermediate process tree
If you manage to list the processes fast enough while the container is still being created, you will notice that the process with the container's PID was originally a urunc process (not to be mistaken for a urunc shim process):
ps axjfww
  PPID     PID    PGID ... COMMAND
     1   23927   23927 ... /usr/local/bin/containerd-shim-urunc-v2 -namespace moby -id e2348010d439f4f8197d1d706b2f99fbeebab76595e8320478057f7c48fc2da0 -address /run/containerd/containerd.sock
 23927   23951   23951 ...  \_ urunc --root /run/containerd/runc/moby --log /run/containerd/io.containerd.runtime.v2.task/moby/e2348010d439f4f8197d1d706b2f99fbeebab76595e8320478057f7c48fc2da0/log.json --log-format json create --bundle /run/containerd/io.containerd.runtime.v2.task/moby/e2348010d439f4f8197d1d706b2f99fbeebab76595e8320478057f7c48fc2da0 --pid-file /run/containerd/io.containerd.runtime.v2.task/moby/e2348010d439f4f8197d1d706b2f99fbeebab76595e8320478057f7c48fc2da0/init.pid e2348010d439f4f8197d1d706b2f99fbeebab76595e8320478057f7c48fc2da0 --reexec
 23927   23973   23927 ...  \_ urunc --root /run/containerd/runc/moby --log /run/containerd/io.containerd.runtime.v2.task/moby/e2348010d439f4f8197d1d706b2f99fbeebab76595e8320478057f7c48fc2da0/log.json --log-format json start e2348010d439f4f8197d1d706b2f99fbeebab76595e8320478057f7c48fc2da0
Upon starting the container, urunc eventually "became" the container process (qemu-system-x86_64) by means of a POSIX exec system call.
The author of this tutorial wrote extensively about what happens between the creation of the container shim and that of the container process in a post titled OCI runtime: container creation flow.
This parent-child relationship between the two processes also means that the "unikernel container" is a virtual machine monitored by QEMU.
In other words, where a regular Nginx container would have nginx running as the container process, urunc created a qemu-system-x86_64 process to run the unikernel.
To verify this, compare the process ID (PID) of the container seen by Docker to the process ID seen by Linux for the process name qemu-system-x86_64.
Both commands will print the same value:
docker container inspect unikernel --format='{{.State.Pid}}'
pidof qemu-system-x86_64
23951
23951
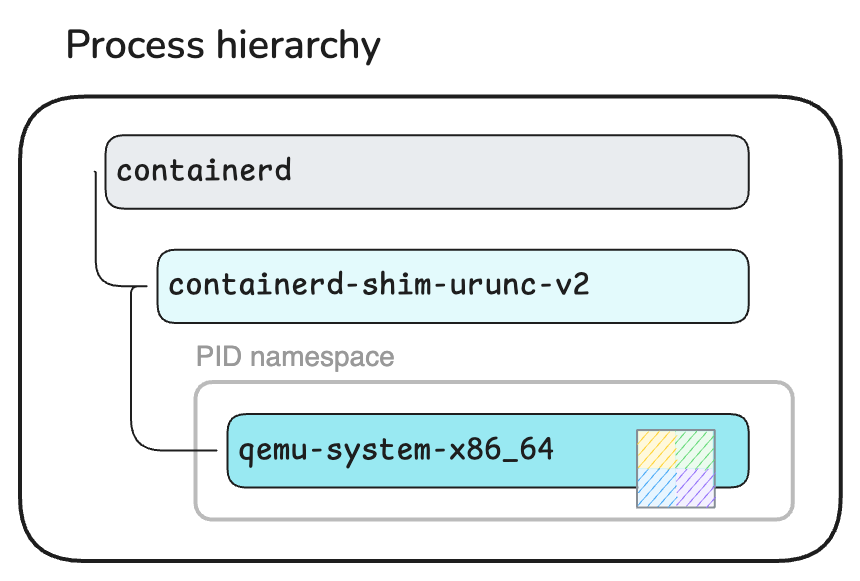
Unikernel VM parented to a container shim.
To verify that urunc created the qemu-system-x86_64 process inside a distinct PID namespace like in a regular container, enter the pid namespace of the unikernel container and list its processes.
QEMU will be displayed with the PID 1 this time, not 23951:
docker run \
  --pid=container:unikernel \
  busybox \
  ps
PID   USER     TIME  COMMAND
    1 root      0:00 /usr/bin/qemu-system-x86_64 -m 268M -L /usr/share/qemu -cpu host -enable-kvm -display none -vga none -smp 1 --sandbox on,obsolete=deny,elevateprivileges=deny,spawn=deny,resourcecontrol=deny -kernel /.boot/kernel -net nic,model=virtio,macaddr=ce:e9:db:b0:cd:d7 -net tap,script=no,downscript=no,ifname=tap0_urunc -append Unikraft  env.vars=[ PATH=/usr/local/sbin:/usr/local/bin:/usr/sbin:/usr/bin:/sbin:/bin HOSTNAME=a9c71edb95e1 ] netdev.ip=172.17.0.2/24:172.17.0.1:8.8.8.8    -- -c /nginx/conf/nginx.conf
    9 root      0:00 ps
Network Plumbing
The PID namespace may be largely irrelevant for the unikernel, but another namespace is crucial: the Network namespace.
Before diving into namespaces, let's take another look at the command-line parameters of the QEMU process.
Compared to our first, manual invocation of QEMU, the one spawned by urunc has a few additional flags related to network devices:
-net nic,model=virtio,macaddr=ce:e9:db:b0:cd:d7
-net tap,script=no,downscript=no,ifname=tap0_urunc
urunc also prepended the kernel command-line declared in the container image with few extra parameters, especially:
netdev.ip=172.17.0.2/24:172.17.0.1:8.8.8.8
The fact that 172.17.0.2 is the same IP address as the one you sent a HTTP request to earlier is noteworthy.
You might remember the following statement from right after you printed the logs of the container:
The output is more or less identical to the one shown when you ran the unikernel via QEMU earlier.
Well, a few network-related console messages actually are a novelty compared to the first, manual run of the Nginx unikernel:
docker container logs unikernel | grep -E 'lwip|net|en1' --color
[    0.104734] Info: [libuknetdev] <netdev.c @  198> Registered netdev0: 0x373030 (virtio-net)
[    0.105111] Info: [liblwip] <init.c @  174> Initializing lwip
[    0.106984] Info: [liblwip] <init.c @  225> Attach network device 0 to lwIP...
[    0.109975] Info: [libuknetdev] <netdev.c @  407> netdev0: Configured interface
[    0.111557] Info: [libuknetdev] <netdev.c @  554> netdev0: Configured receive queue 0
[    0.111943] Info: [libuknetdev] <netdev.c @  587> netdev0: Configured transmit queue 0
[    0.112321] Info: [libvirtio_net] <virtio_net.c @ 1394> virtio-net: 0 started
[    0.112966] Info: [libuknetdev] <netdev.c @  606> netdev0: Started interface
[    0.113401] Info: [liblwip] <init.c @  345> en1: Hardware address: ce:e9:db:b0:cd:d7
[    0.113561] Info: [liblwip] <init.c @  352> en1: Check checksums:
[    0.113716] Info: [liblwip] <init.c @  371> en1: Generate checksums: IP UDP TCP ICMP ICMP6
[    0.113992] Info: [liblwip] <init.c @  408> en1: Primary DNS server: 8.8.8.8
[    0.114168] Info: [liblwip] <init.c @  442> en1: Set as default interface
en1: Added
en1: Interface is up
Those messages indicate that the unikernel recognized the network device provided by QEMU (a VirtIO device) and was able to configure a corresponding network interface.
For reference, the first, manual run only showed:
[ 0.107715] Warn: [liblwip] <init.c @ 460> No network interface attached!
How did urunc know what command-line parameters to pass to the unikernel to configure its network stack?
Remember those somewhat exotic labels set on the container image (again)? One of them was:
com.urunc.unikernel.unikernelType=unikraft
By knowing the type of unikernel it is running, urunc is capable of selecting the appropriate command-line parameters.
Mystery solved!
Now, the network device and kernel command-line parameters alone do not suffice to making the guest's Nginx web server reachable from the host.
Why? Because at that point the IP address 172.17.0.2 is not yet assigned to any network interface on the host.
Before a container is started, containerd calls a CNI14 plugin to set up the container's network.
It is during that process that the network interface(s) of the container are created and configured.
Typically, the outcome is a pair of veth devices: one inside the root Network namespace and one inside the container's.
The root end gets attached to a bridge device so that network packets can be routed to the container over that bridge (docker0 on the playground box).
CNI-less setup
In certain environments, such as your playground box, containerd isn't configured to set up the network by calling a CNI plugin.
In that case, the Docker daemon handles the setup of the container's network itself.
Take a look at the network links inside both of these namespaces:
The veth0744538 interface with the ID 8 is the root end of the veth pair.
Its peer is the interface with the ID 2 (denoted by the suffix @if2) inside the container's Network namespace.
ip addr
1: lo: <LOOPBACK,UP,LOWER_UP> mtu 65536 qdisc noqueue state UNKNOWN group default qlen 1000
    link/loopback 00:00:00:00:00:00 brd 00:00:00:00:00:00
    inet 127.0.0.1/8 scope host lo
       valid_lft forever preferred_lft forever
    inet6 ::1/128 scope host
       valid_lft forever preferred_lft forever
...
4: eth0: <BROADCAST,MULTICAST,UP,LOWER_UP> mtu 1500 qdisc pfifo_fast state UP group default qlen 1000
    link/ether 5e:71:8d:13:42:0a brd ff:ff:ff:ff:ff:ff
    inet 172.16.0.2/24 brd 172.16.0.255 scope global eth0
       valid_lft forever preferred_lft forever
    inet6 fe80::8c03:f0ff:fee0:ce5f/64 scope link
       valid_lft forever preferred_lft forever
5: docker0: <BROADCAST,MULTICAST,UP,LOWER_UP> mtu 1500 qdisc noqueue state UP group default
    link/ether ee:9c:f4:49:d0:83 brd ff:ff:ff:ff:ff:ff
    inet 172.17.0.1/16 brd 172.17.255.255 scope global docker0
       valid_lft forever preferred_lft forever
    inet6 fe80::ec9c:f4ff:fe49:d083/64 scope link
       valid_lft forever preferred_lft forever
8: veth0744538@if2: <BROADCAST,MULTICAST,UP,LOWER_UP> mtu 1500 qdisc noqueue master docker0 state UP group default
    link/ether 06:33:5d:f8:cd:da brd ff:ff:ff:ff:ff:ff link-netnsid 0
    inet6 fe80::433:5dff:fef8:cdda/64 scope link
       valid_lft forever preferred_lft forever
In a standard setup, the container's Network namespace would only have the lo (loopback) and eth0 (veth) interfaces.
On the Container tab above though, you can see an additional tap0_urunc interface. What is that?
tap0_urunc is a tap network device created by urunc and provided to QEMU with the command-line flag -net tap,ifname=tap0_urunc.
The usage of such devices is the standard way in QEMU to connect the network interface of the guest (unikernel) to a real network, such as the one of the Linux host.
This is an implementation decision of urunc, and a clever design when you think about it.
CNI can configure network interfaces in a lot of different manners inside a container's network. A containerized Linux process can always assume that the network is usable as-is, thanks to the plumbing operated by CNI.
For an application running as a guest inside a virtual machine, this assumption falls apart and deploying a working network stack may require non-trivial configuration of both the host and guest.
A container runtime such as urunc cannot possibly have differentiated logic for each CNI plugin under the sun.
What it can do, however, is rely on the tap0_urunc interface to look the same in every unikernel container, then configure the network to redirect all network packets between tap0_urunc and the default interface inside the container's Network namespace (eth0).
urunc implements this through traffic control, using egress redirects.
You can peek inside the container's Network namespace and inspect those filters:
Ingress filter that redirects tap0_urunc->eth0:
sudo nsenter -t "$(pidof qemu-system-x86_64)" --net \
  tc filter show dev tap0_urunc ingress
filter parent ffff: protocol all pref 49152 u32 chain 0
filter parent ffff: protocol all pref 49152 u32 chain 0 fh 800: ht divisor 1
filter parent ffff: protocol all pref 49152 u32 chain 0 fh 800::800 order 2048 key ht 800 bkt 0 terminal flowid not_in_hw
  match 00000000/00000000 at 0
        action order 1: mirred (Egress Redirect to device eth0) stolen
        index 1 ref 1 bind 1
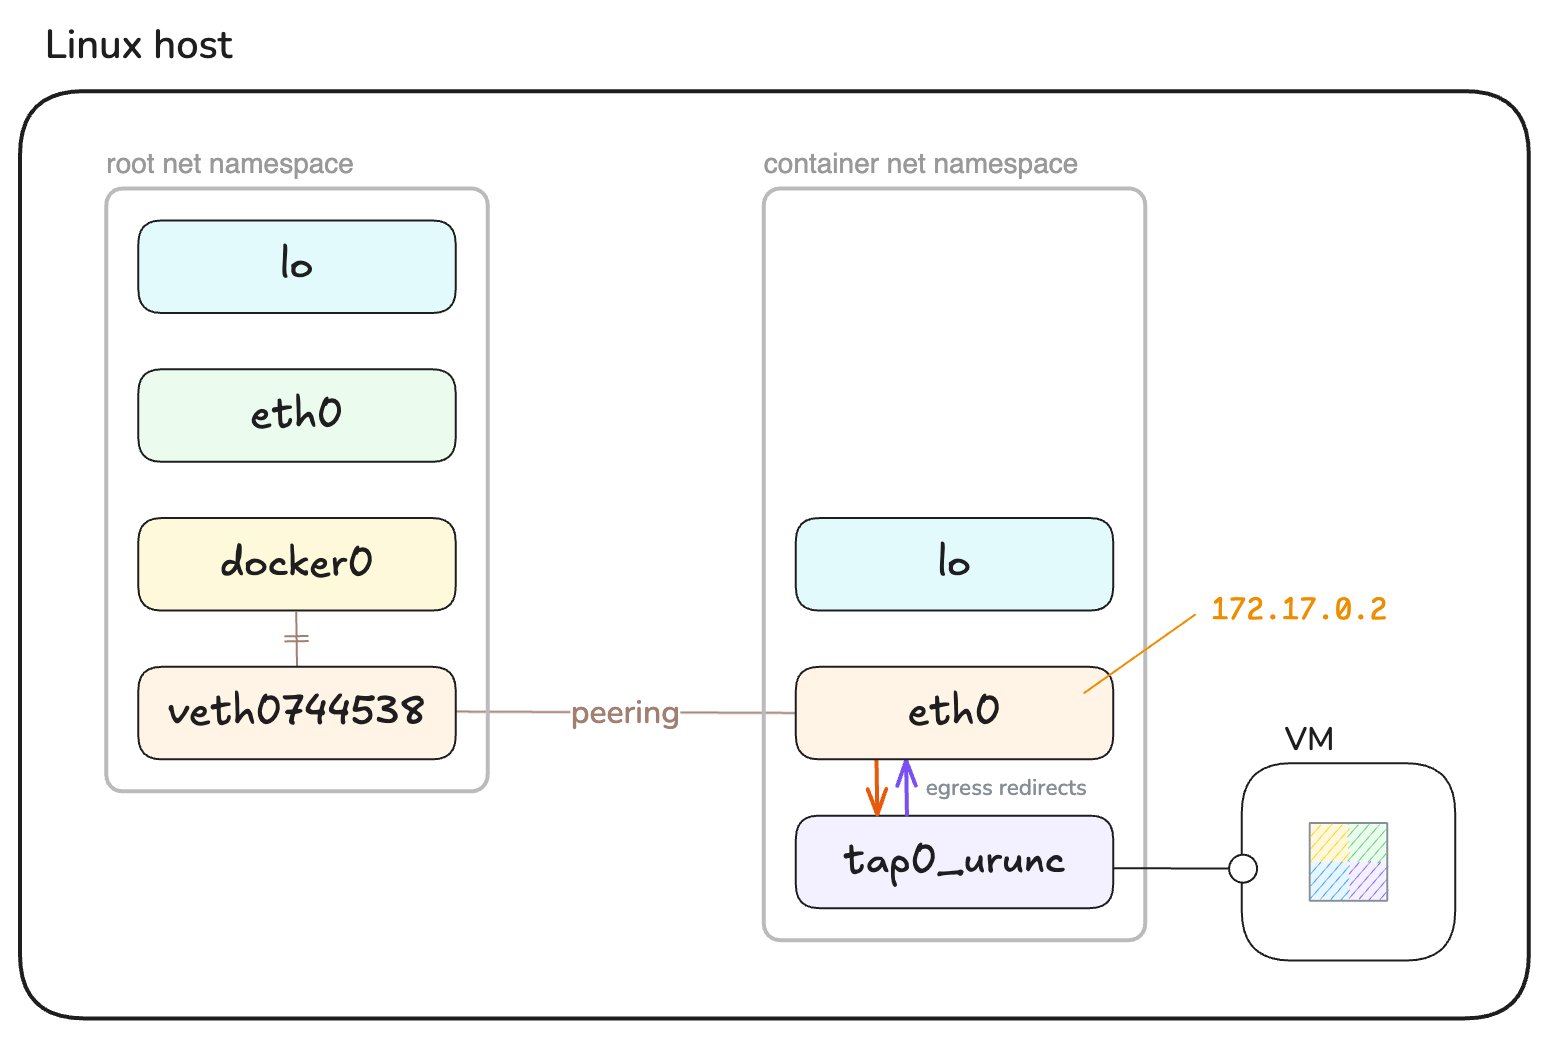
Unikernel guest connected to the host network via a TAP device.
In summary, the urunc container runtime managed to network the unikernel behind a regular container IP address by combining the following components and mechanisms:
- A container network interface set up by CNI outside of the unikernel.
- A tap network interface connecting the guest's network interface to the host's network.
- Some traffic control filters that redirect network packets between that tap interface and the container's default network interface.
That approach allows to connect practically any virtual machine to the host inside a Network namespace, making it possible to manage container and unikernel workloads using the same container infrastructure.
Resource Constraints
This tutorial is now being concluded by touching on the container configurations that can affect the settings of the unikernel virtual machine.
Let's look one more time at the command-line parameters of the QEMU process:
cat /proc/"$(pidof qemu-system-x86_64)"/cmdline | xargs --null
/usr/bin/qemu-system-x86_64 -m 268M -L /usr/share/qemu -cpu host ...
The flag -m 268M allocates a RAM size of 268 MiB to the virtual machine's guest, even though you did not specify any resource constraint with the docker container run command.
Why is that?
Containerized processes run inside a cgroups hierarchy that constrains their resource usage for CPU, memory, disk I/O, etc. Applying this model to a virtual machine makes little sense because virtual machines have a distinct isolation model underpinned by virtualized hardware.
urunc did in fact not place the QEMU process into a particular cgroups hierarchy, so it inherited the hierarchy of the containerd service:
systemctl status "$(pidof qemu-system-x86_64)"
● containerd.service - containerd container runtime
     Loaded: loaded (/usr/lib/systemd/system/containerd.service; enabled; preset: enabled)
     Active: active (running) since Thu 2026-01-01 00:00:00 UTC; 6min ago
       Docs: https://containerd.io
   Main PID: 1230 (containerd)
      Tasks: 24
     Memory: 190.2M ()
        CPU: 23.909s
     CGroup: /system.slice/containerd.service
             ├─ 1230 /usr/bin/containerd
             ├─23927 /usr/local/bin/containerd-shim-urunc-v2 -namespace moby -id e23480...
             └─23951 /usr/bin/qemu-system-x86_64 -m 268M -L /usr/share/qemu -cpu host ...
Instead, urunc attempted to translate the container configuration into suitable virtual machine parameters.
Because no memory configuration was requested, a reasonably large RAM size of 268 MiB was decided upon (QEMU's default is 128 MiB).
docker container inspect \
  --format='{{.HostConfig.Memory}}' \
  unikernel
0
When an application is deployed as a regular Linux container, the container runtime can generally make assumptions about cgroups being the preferred method for constraining the resource usage of that application, in accordance with the container's configuration. In a context where the application is instead deployed as a virtual machine, the container runtime must make its own decisions in order to match the requested constraints as closely as possible.
Let's see what urunc does when we explicitly set resource constraints while creating the unikernel container.
Terminate the previous container to avoid future confusions:
docker container stop unikernel
Create another unikernel container, this time with an explicit memory constraint of 64 MiB:
docker container run \
  -d --rm \
  --name unikernel \
  --runtime io.containerd.urunc.v2 \
  --memory 64_000_000 \
  lab/nginx-unikernel:latest
Verify that the new container has the expected configuration:
docker container inspect \
  --format='{{.HostConfig.Memory}}' \
  unikernel
64000000
Last but not least, ensure that the new QEMU virtual machine has 64 MiB of RAM instead of 268 MiB:
cat /proc/"$(pidof qemu-system-x86_64)"/cmdline | xargs --null
/usr/bin/qemu-system-x86_64 -m 64M -L /usr/share/qemu -cpu host ...
This short experiment should hopefully be a good demonstration of how parity can be achieved between various methods of constraining the resource usage of containers that differ in nature, such as unikernel VMs.
Summary
In this tutorial, you've learnt about what a unikernel is: its architecture, what it enables, but also its limitations.
Through some guided hands-on activity, you've built a web server application as a unikernel, an exercise which hopefully ignited your curiosity to explore other unikernel frameworks and experiment with them.
You've seen how some existing open source projects make it possible to integrate unikernels with a container-centric infrastructure, without having to discard the tools you are already familiar with.
Footnotes
- Amazon EC2 (cloud instances) and Amazon Lambda (cloud functions) are two notorious examples of commodity services that are powered by virtual machines under the hood (managed by Xen and Firecracker respectively). ↩
- This problem is called Double Scheduling. Its effects include performance degradation and resource contention. It is not a solved problem yet. ↩
- In virtualization terminology, the "guest" is the kernel that boots and runs inside a virtual machine, while the "host" controls the hardware and manages the virtual machines (hypervisor). ↩
- KVM is a full virtualization solution for Intel and AMD processors that is part of the Linux kernel. ↩
- Xen is a free and open source type-1 hypervisor. ↩
- Nginx powers a third of the web servers worldwide as of January 2026. ↩
- Open Container Initiative, which designs open standards for containers. ↩
- cpio is a file archive file format commonly used in the initramfs of the Linux kernel. ↩
- VirtIO is a standard for paravirtualized devices implemented by a hypervisor. ↩
- QEMU is an open source machine emulator and virtualizer. ↩
- Firecracker is an open source virtual machine manager that uses KVM. ↩
- Kubernetes is an open source system for managing the deployment of containerized applications. ↩
- BuildKit is the underlying build backend used by Docker. ↩
- The Container Network Interface consists of a specification and libraries for writing plugins to configure network interfaces in containers. ↩
About the Author
Antoine Cotten
Software developer with a strong background in infrastructure and operations. I am particularly fond of unikernels and Linux containers, especially in combination with my platform of expertise: Kubernetes. I work first and foremost in the Go programming language, and have a genuine interest in Rust which I am working towards becoming proficient in.
Writes about
Frequently covers