Uncloud: How to Set Up a New Cluster


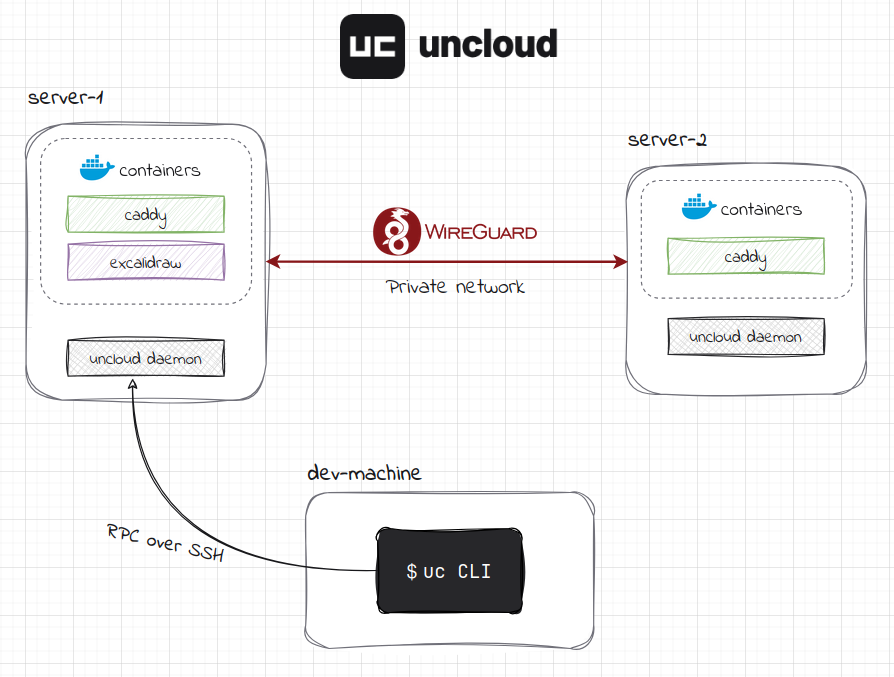
In this tutorial, you'll learn how to create and manage an Uncloud cluster from scratch. By the end, you'll have a working multi-machine cluster ready to run containerized applications that looks like this:
Click on the image to zoom in.
💡 What is Uncloud? Uncloud is a lightweight clustering and container orchestration tool that lets you deploy and manage web applications across cloud VMs and bare metal servers. Among other things, it creates a secure WireGuard mesh network between Docker hosts and provides automatic service discovery, load balancing, and HTTPS ingress — all without the complexity of Kubernetes.
Tutorial Environment
It is highly encouraged to take advantage of the interactive features of the iximiuz Labs platform and follow the tutorial by executing the commands in the interactive environment.
To get started, click the "Start Tutorial" button located under the table of contents on the left side of the screen (like, do it right now!). After a few seconds, you'll see a terminal on the right side of your screen.
In this tutorial, you have access to 3 machines:
- dev-machine - the control-only environment that is not meant to run any actual containerized workloads. Think of it as your developer machine that you'll use to control the prospective cluster remotely.
- server-1, server-2 - two "clean" Ubuntu machines that will become part of your new Uncloud cluster.
After you start the linked playground, you'll first see the shell on dev-machine with Uncloud CLI (uc for short) already installed there. To install uc manually on your local (personal, non-tutorial) machine, check out the installation guide for instructions.
To test that the uc command works, run the following on dev-machine to get the version of the Uncloud client:
uc version
⚠️ The terms "nodes", "machines", and "servers" in this tutorial are used interchangeably.
Initializing a New Cluster
Let's initialize our first cluster by setting up server-1 as the first machine.
Run the following commands on dev-machine:
uc machine init laborant@server-1 --public-ip none --no-dns
This command will install Docker, the Uncloud daemon (uncloudd), and all necessary dependencies on the remote machine. One critical component which is also installed automatically is the Corrosion service, which will helpfully handle state synchronization and service discovery as soon as there's more than one machine in the cluster. Documentation on the machine init command can be found here.
Why use --public-ip none? The --public-ip none flag tells Uncloud not to configure this machine for ingress (incoming internet traffic) because in the multi-tenant iximiuz Labs environment we don't fully control the public IP addresses of the machine. In production, you'd typically use --public-ip auto (used by default) to automatically detect and configure ingress. Read more about publishing services in the official documentation.
Why use --no-dns? The --no-dns flag skips reserving a free *.uncld.dev subdomain via Uncloud's managed DNS service. In the iximiuz Labs environment, this feature won't work due to the environment limitations, but you can use it for real scenarios. Check uc dns documentation for more information.
You can get the list of machines in the cluster along with their configuration and status via uc machine ls (or uc m ls, if you want to save a few keystrokes) command:
laborant@dev-machine:~$ uc machine ls
NAME       STATE   ADDRESS         PUBLIC IP   WIREGUARD ENDPOINTS   OS                   KERNEL    ARCH    DOCKER   VERSION
server-1   Up      10.210.0.1/24   -           172.16.0.3:51820      Ubuntu 24.04.4 LTS   6.1.167   amd64   29.6.1   0.20.0
As we can see, server-1 became the first (and the only so far) machine in our new cluster. Let's break down what each column means:
NAME: server-1- The name of the machine in the cluster. Can be changed viauc machine updatecommand.STATE: Up- The current state of the machine. "Up" means the machine is running and the Uncloud daemon is active.ADDRESS: 10.210.0.1/24- The private IP address and subnet assigned to this machine in the WireGuard mesh network. Each machine gets its own/24subnet (by default, 10.210.0.0/24, 10.210.1.0/24, etc.) from which container IP addresses are allocated.PUBLIC IP: -- The public IP address of the machine for ingress (if configured). Since we used--public-ip none, this field is empty and shows-.WIREGUARD ENDPOINTS- The network endpoints where this machine's WireGuard interface can be reached by other machines in the cluster. This includes both private and public IP addresses with the WireGuard port.OS,KERNEL,ARCH,DOCKER,VERSION- Information about the machine's operating system, kernel version, architecture, Docker version, and Uncloud version.
Adding Another Machine to the Cluster
One initialized server isn't really a cluster, right? A proper cluster typically consists of multiple machines working together.
Let's add a second machine (server-2) to the cluster. The command is quite similar — the main difference is that we use add instead of init:
uc machine add laborant@server-2 --public-ip none --yes
Similar to server-1, server-2 now has all the important components (Docker, Uncloud daemon, etc.) up and running. The two machines are automatically connected via a secure WireGuard mesh network, allowing containers to communicate across machines.
Let's check the current state of the cluster:
laborant@dev-machine:~$ uc machine ls
NAME       STATE   ADDRESS         PUBLIC IP   WIREGUARD ENDPOINTS   OS                   KERNEL    ARCH    DOCKER   VERSION
server-1   Up      10.210.0.1/24   -           172.16.0.3:51820      Ubuntu 24.04.4 LTS   6.1.167   amd64   29.6.1   0.20.0
server-2   Up      10.210.1.1/24   -           172.16.0.4:51820      Ubuntu 24.04.4 LTS   6.1.167   amd64   29.6.1   0.20.0
Our cluster now consists of two nodes 🎉
Context Management and Connections
It's possible to manage more than one cluster from a single control node. Uncloud CLI has context support, letting you switch between multiple clusters when necessary.
uc ctx is the subcommand used for context management. Here's how you can list all available contexts on your control node:
laborant@dev-machine:~$ uc ctx ls
NAME      CURRENT   CONNECTIONS
default   ✓         2
As we see, only one context (default) is available, and it's set as the current context (it will be used by default when the commands you run don't include the --context option).
The output also shows that the context has two connections. This means the current configuration is aware of two nodes in the corresponding cluster and knows how to connect to either of them.
To view the full context configuration including connection information, you can check the generated configuration file, which is by default placed in ~/.config/uncloud/config.yaml on your control node:
current_context: default
contexts:
  default:
    connections:
      - ssh: laborant@server-1
        ssh_key_file: ~/.ssh/id_ed25519
      - ssh: laborant@server-2
        ssh_key_file: ~/.ssh/id_ed25519
Note: A cluster context can have one or more connections, and each connection represents a way to reach a machine in the cluster via SSH. When you run commands, Uncloud automatically uses one of the available connections to communicate with the cluster. If one machine is unreachable, Uncloud CLI will try another connection until it finds the working one.
To switch contexts, use uc ctx use command.
Running a Simple Service
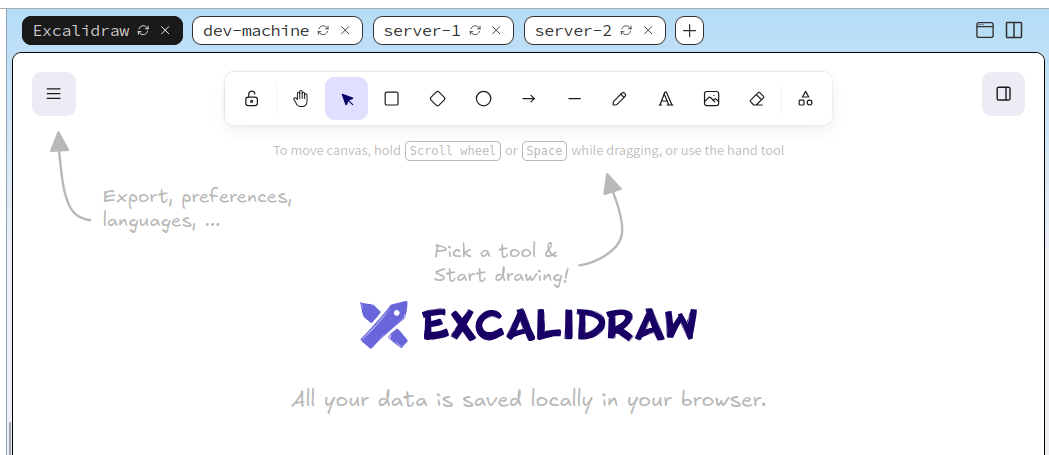
Now that we have a working cluster, let's deploy a simple web application to see the cluster in action. We'll use Excalidraw, a popular sketching and diagramming tool.
First, let's check the currently running services:
uc ls
The output should look like this:
NAME    MODE     REPLICAS   IMAGE          ENDPOINTS
caddy   global   2          caddy:2.10.2
💡 uc ls is a shortcut for the uc service ls command. Check all uc service commands for available service operations.
We can see that the Caddy web server was automatically deployed in the "global" mode, which means that an instance (replica) of this service runs on each node of the cluster, in our case - on both server-1 and server-2. Caddy will help us later by automatically routing requests to the right machines and containers. Read more about managing Caddy deployment and configuration in the documentation.
We are ready to run the following command to deploy the Excalidraw service:
uc run --name excalidraw --publish excalidraw.internal:80/http excalidraw/excalidraw
After a few moments, you'll see output showing the service is running:
[+] Running service excalidraw (replicated mode) 2/2
 ✔ Container excalidraw-azpc on server-1  Started
   ✔ Image excalidraw/excalidraw on server-1  Pulled

excalidraw endpoints:
 • http://excalidraw.internal → :80
What uc run command did:
- Picked one of the two available cluster machines at random (
server-1in our case). - Pulled the
excalidraw/excalidrawDocker image on that machine. - Created a service named
excalidrawwith one container. - Exposed the service on port 80 and
excalidraw.internalhostname on ALL cluster machines, thanks to Caddy running in the "global" mode.
Let's check the status of the new service:
laborant@dev-machine:~$ uc ls
NAME         MODE         REPLICAS   IMAGE                   ENDPOINTS
caddy        global       1          caddy:2.10.2
excalidraw   replicated   1          excalidraw/excalidraw   http://excalidraw.internal → :80

laborant@dev-machine:~$ uc inspect excalidraw
Service ID: d731dfebef3f394ecaf70edfcaae250f
Name:       excalidraw
Mode:       replicated

CONTAINER ID   IMAGE                          CREATED          STATUS                    IP ADDRESS   MACHINE
75e8e581824b   excalidraw/excalidraw:latest   45 seconds ago   Up 45 seconds (healthy)   10.210.1.3   server-2
Accessing the service
You can now access the running app via the Excalidraw tab. If the app doesn't load, wait a few seconds and click the "Refresh" button.
Click on the image to zoom in.
You can also reach the service from the dev-machine terminal. In that case, make sure to specify the correct "Host" header:
# You can target ANY server of the cluster (server-1 or server-2)
curl --header 'Host: excalidraw.internal' server-1
Congratulations! You've successfully created a multi-machine Uncloud cluster and deployed your first service. You can now explore more advanced features like scaling services across machines, using Docker Compose files, and setting up HTTPS ingress with custom domains.
Next steps
- Check the tutorial on deploying dockerized web applications with Uncloud to see how to deploy a more complex application and use some of the advanced features of Uncloud.
- Scale your service to 2 replicas with
uc scalecommand:uc scale excalidraw 2 - Deploy services using Compose-like configuration with
uc deploy(check examples in the documentation) - Learn about publishing services to the internet
- Experiment with an already initialized cluster in the dedicated playground.
Questions or Feedback?
Run into any issues or have ideas to improve this tutorial? Open an issue or contribute a fix on GitHub: https://github.com/unlabs-dev/uncloud-labs/
About the Authors
Writes about
Frequently covers
Writes about
Frequently covers