Controlling Process Resources with Linux Control Groups
Not a comprehensive guide but a practical example of how to limit process' CPU and RAM consumption using Linux cgroups. The technique may be used to:
- Protect the system from a particularly resource-hungry process
- Ensure fair resource distribution among multiple applications
- Test application performance under constrained resources
- Guarantee resource availability in multi-tenant environments
We will start with creating, configuring, and adding a process to a cgroup using the most basic (and labour-intensive) method -
manipulating the virtual filesystem cgroupfs.
After that, we will see how exactly the same can be done using higher-level tools like libcgroup's
cgcreate and cgexec,
or systemd's systemd-run and slice units.
While the focus will be on Linux-native ways of controlling process resources, the covered techniques are also directly applicable to managing resources of containers and Pods, so the tutorial is also highly relevant for people practicing Docker and Kubernetes.
Examples in this post leverage cgroup v2, but the general idea should also work with cgroup v1.
Real quick, what is cgroup?
From man7.org page on cgroups:
> Control groups, usually referred to as cgroups, are a Linux
  kernel feature which allow processes to be organized into
  hierarchical groups whose usage of various types of resources can
  then be limited and monitored.
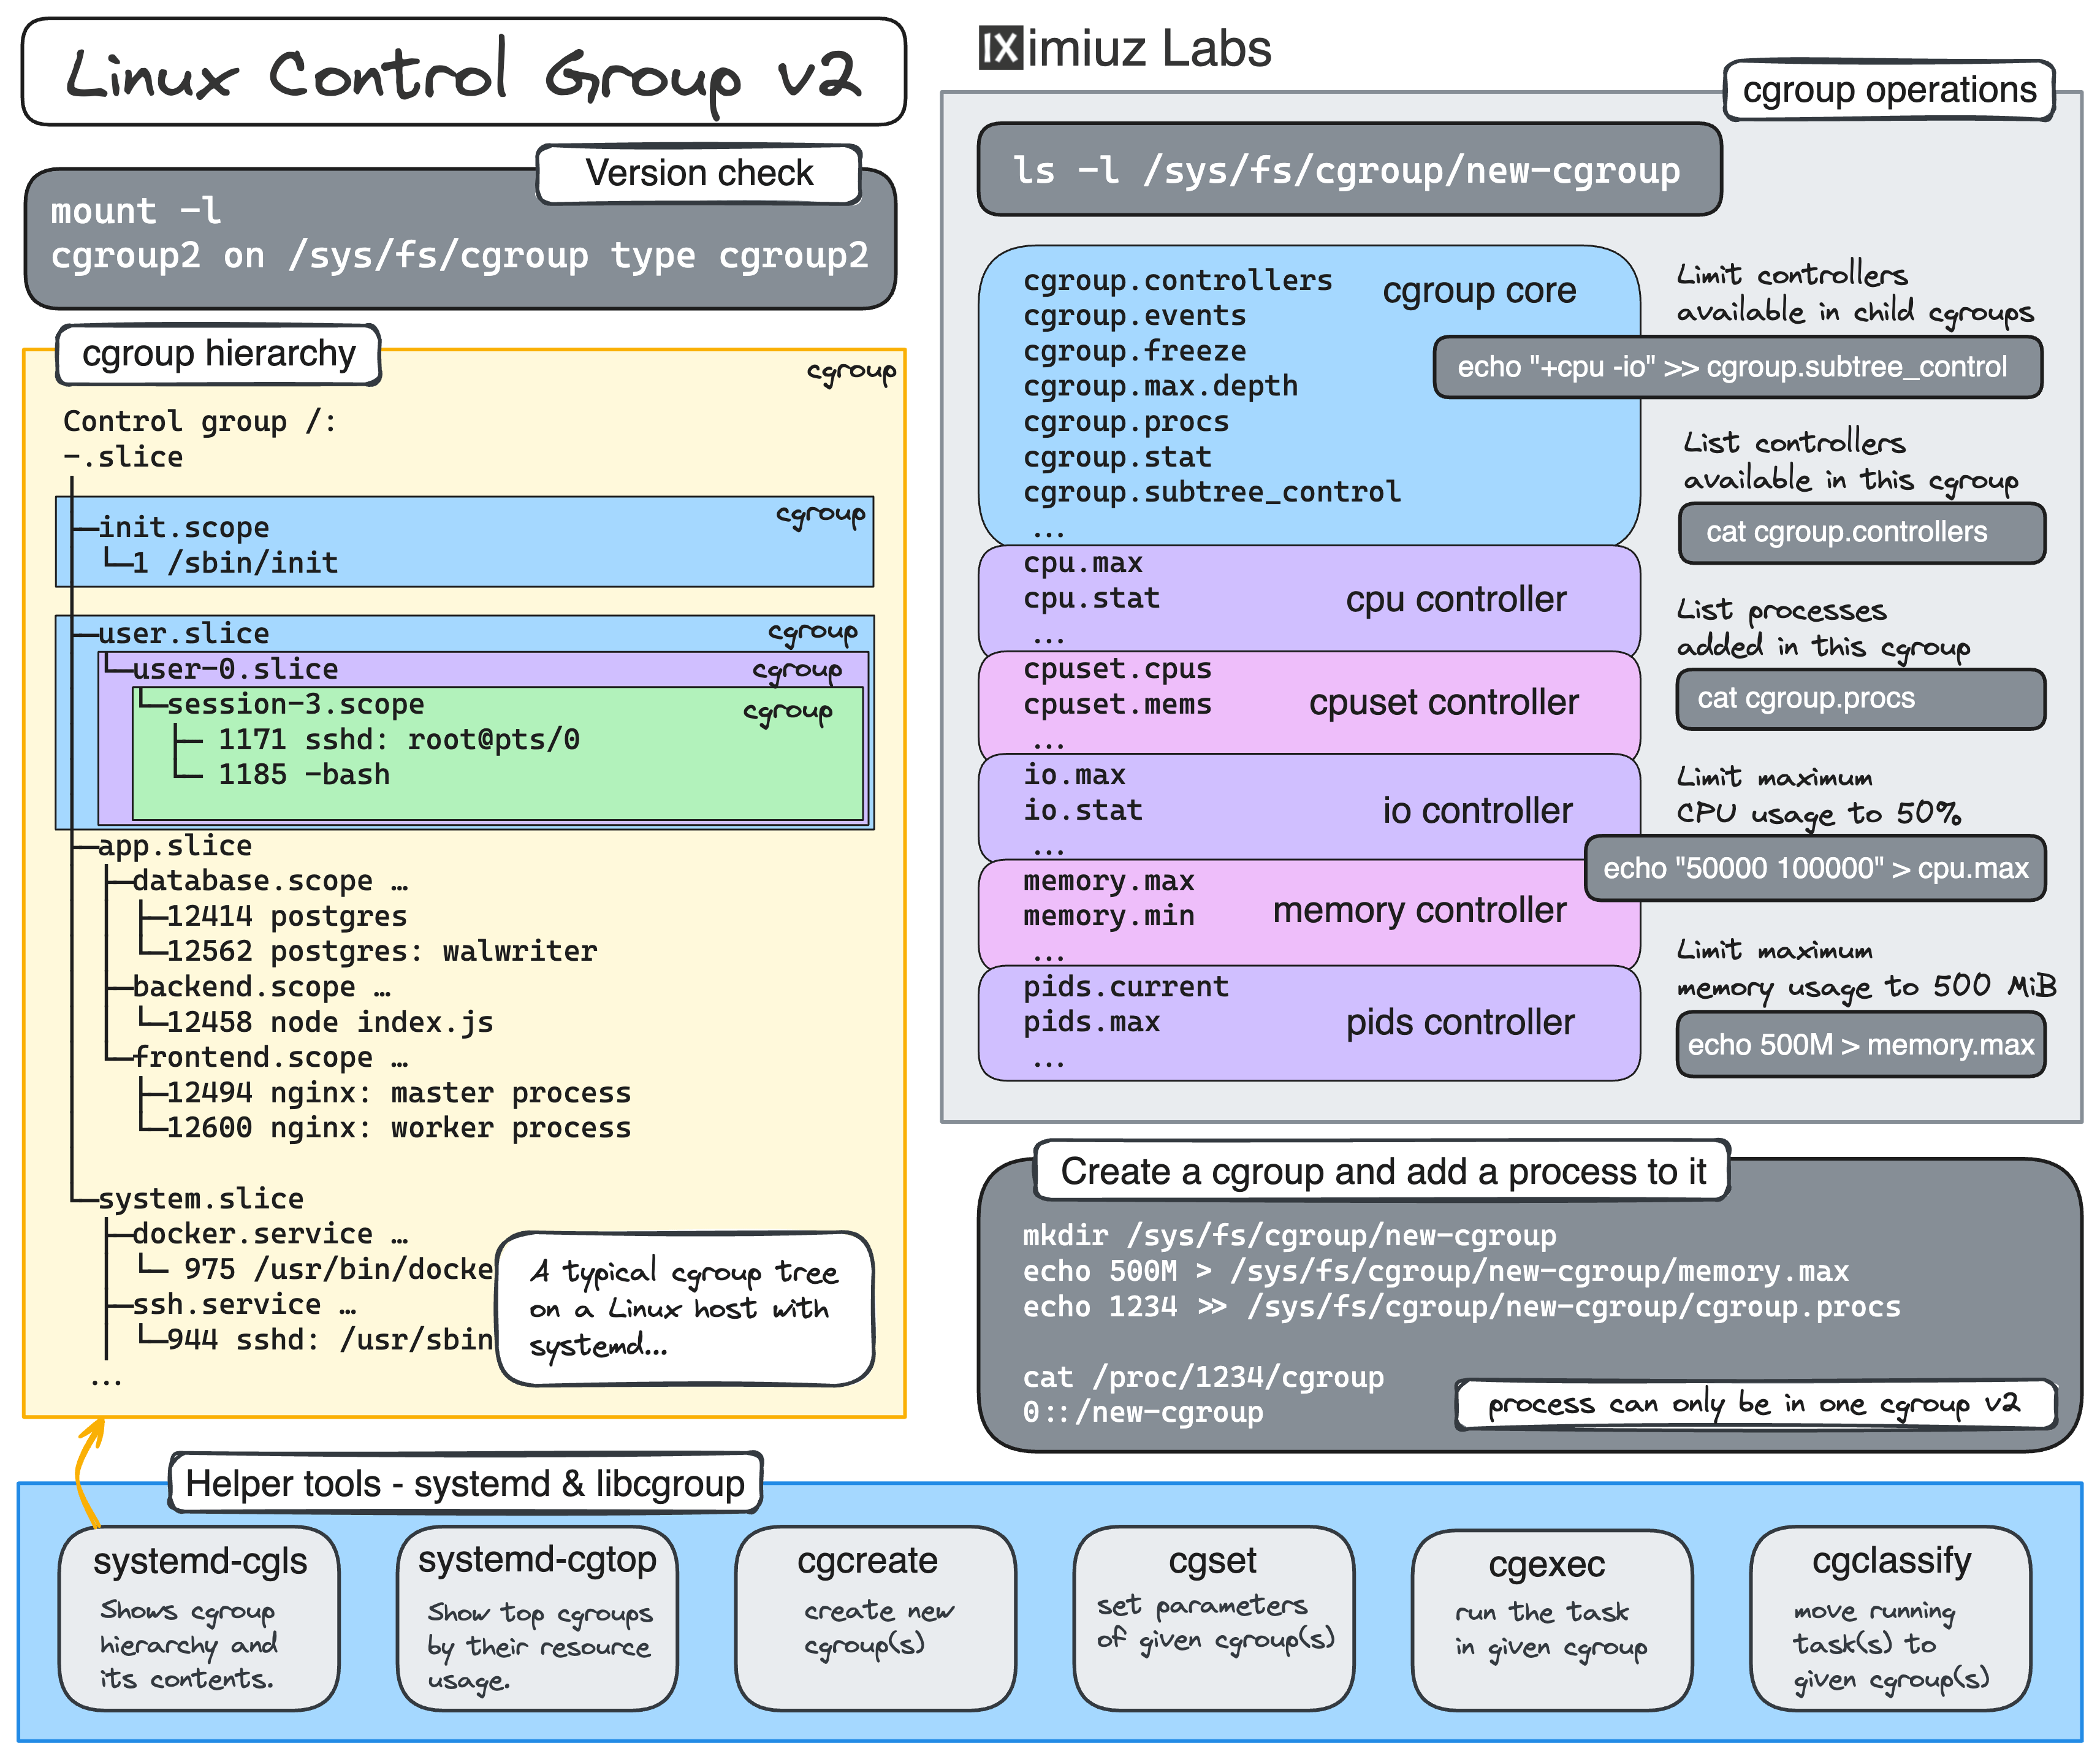
The only kernel's cgroup interface is a pseudo-filesystem called cgroupfs. There is no dedicated system calls to create, modify, or delete cgroups - all cgroup manipulation is done through creating folders and writing to specially named files in the cgroup pseudo-filesystem.
On modern Linux distributions, this pseudo-filesystem is usually mounted at /sys/fs/cgroup.
mount -l | grep cgroup
cgroup2 on /sys/fs/cgroup type cgroup2 ...
Creating a subfolder in cgroupfs leads to a new cgroup creation:
mkdir /sys/fs/cgroup/my_cgroup
The folder gets automatically populated with a set of files that can be used to configure the new cgroup:
ls /sys/fs/cgroup/my_cgroup
cgroup.controllers      io.max
cgroup.events           io.stat
cgroup.freeze           memory.current
cgroup.max.depth        memory.events
cgroup.max.descendants  memory.events.local
cgroup.procs            memory.high
cgroup.stat             memory.low
cgroup.subtree_control  memory.max
cgroup.threads          memory.min
cgroup.type             memory.numa_stat
cpu.max                 memory.oom.group
cpu.stat                memory.stat
cpu.weight              memory.swap.current
cpu.weight.nice         memory.swap.events
cpuset.cpus             memory.swap.high
cpuset.cpus.effective   memory.swap.max
cpuset.cpus.partition   pids.current
cpuset.mems             pids.events
cpuset.mems.effective   pids.max
💡 The exact set of files depends on the enabled controllers which you can see in the cgroup.controllers file.
The most commonly used controllers are cpuset, cpu, io, memory, hugetlb, and pids.
💡 Since cgroups are managed via pseudo-filesystem folders and files,
granting write access to a certain folder (or its files) can be used to allow non-root users to configure cgroups, including child cgroup creation.
If the set of available controllers for a child cgroup needs to be further restricted,
it can be done by writing to the parent's cgroup.subtree_control file:
echo "+cpu +memory -io" > /sys/fs/cgroup/<parent>/cgroup.subtree_control
This technique is known as cgroup delegation.
Higher-level tools like cgcreate, cgexec, and even systemd-run are merely wrappers performing mkdir, write, and the like calls on the cgroupfs subtree.
Now, let's get our hands dirty and run some experiments using an improvised resource hog program 🧑🔬
Resource hog program source code
The program below tries to utilize all available CPUs by starting a busy loop for each core. It also keeps allocating memory in chunks of 10MB every second until the process is terminated.
package main

import (
  "context"
  "fmt"
  "os/signal"
  "runtime"
  "sync"
  "syscall"
  "time"
)

func main() {
  ctx, cancel := signal.NotifyContext(context.Background(), syscall.SIGINT, syscall.SIGTERM)
  defer cancel()

  var wg sync.WaitGroup

  // Allocate all available CPUs
  numCPU := runtime.NumCPU()
  runtime.GOMAXPROCS(numCPU)

  // Start a busy goroutine for each CPU
  for i := 0; i < numCPU; i++ {
    go func() {
      wg.Add(1)
      defer wg.Done()

      fmt.Println("Started a CPU hog")
      for ctx.Err() == nil { /* Busy loop to keep CPU busy */ }
    }()
  }

  // Start allocating memory every second
  const memChunkMiB = 10
  var chunks [][]byte
  go func() {
    wg.Add(1)
    defer wg.Done()

    for ctx.Err() == nil {
      chunk := make([]byte, memChunkMiB*1024*1024)

      // Prevent the memory from being optimized away
      for i := 0; i < len(chunk); i++ {
        chunk[i] = byte(i % 256)
      }
      chunks = append(chunks, chunk)

      fmt.Printf("Allocated %d MB of memory\n", memChunkMiB)
      time.Sleep(1 * time.Second)
    }
  }()

  <-ctx.Done()
  fmt.Println("Received termination signal. Initiating shutdown...")

  wg.Wait()
  fmt.Println("Shutdown complete.")
}
Configuring a cgroup using cgroupfs
First, let's create a new cgroup by making a directory in the cgroup filesystem. This will be the group where we can set limits on CPU and memory usage for our resource-hungry process.
mkdir /sys/fs/cgroup/hog_pen
Next, we'll set limits on CPU and memory usage. Let's say we want to limit the CPU usage to 50% and the memory usage to 100MB.
To limit CPU usage, we'll write the <cpu_quota> and <cpu_period> values to the cpu.max file:
echo "50000 100000" > /sys/fs/cgroup/hog_pen/cpu.max
Here, 50000 is the maximum allowed CPU time per period (in microseconds), and 100000 is the period duration.
This effectively limits the CPU usage to 50%.
💡 On multi-core systems, the maximum CPU usage can be above 100%.
For instance, on a machine with 2 cores, specifying 200000 100000 is perfectly valid.
To limit memory usage, we'll write to the memory.max file:
echo "100M" > /sys/fs/cgroup/hog_pen/memory.max
Now, let's start the resource-hungry process:
~/hog
The above process is not yet constrained by the cgroup limits we set.
To move it to the hog_pen cgroup, you need to write its PID to the cgroup.procs file.
Here is how you can do it (from a separate terminal tab):
HOG_PID=$(pgrep -xo hog)

echo ${HOG_PID} >> /sys/fs/cgroup/hog_pen/cgroup.procs
When a process running in a cgroup with a memory limit approaches that limit, an out-of-memory (OOM) event is triggered, usually causing the process termination.
💡 A process can belong to only one cgroup at a time but it can be moved between cgroups.
Adding an already running process to a cgroup by writing its PID to cgroup.procs is handy,
but it doesn't work if you want to ensure that the process' resource consumption is limited at all times,
without leaving even a short gap between the process starting and being added to the cgroup.
Luckily, when a process is started, it inherits the cgroup of its parent process, so you can move the parent process to the required cgroup and then make it start the already-limited child process.
To demonstrate this, let's move the current shell process to the hog_pen cgroup:
echo $$ >> /sys/fs/cgroup/hog_pen/cgroup.procs
...and start the hog process from it:
~/hog
Finally, when the cgroup is no longer needed, it can be removed using rmdir.
Notice that you won't be able to remove the cgroup if there are still processes inside it,
so you'll have to wait for the hog process to get OOM-killed and also exit the shell session that you moved to the hog_pen cgroup.
From a new terminal tab, run:
rmdir /sys/fs/cgroup/hog_pen
If the rmdir command fails with Device or resource busy error,
double-check the cgroup's process list with cat /sys/fs/cgroup/hog_pen/cgroup.procs - it should be empty.
💡 Interesting fact: rm -rf /sys/fs/cgroup/<name> is not a viable command for cgroup deletion.
Individual files in the cgroupfs filesystem cannot be deleted, hence the rmdir command.
That's it! You've successfully created a cgroup and limited the CPU and memory usage for a process using cgroupfs. Now, let's see how to do the same using higher-level tools.
Configuring a cgroup using libcgroup
Using libcgroup tools simplifies the process of managing cgroups.
Here is how you can reproduce the same cgroup setup we did above using the cgcreate, cgset, and cgexec commands.
Some Linux distros (see RHEL and SLES) have deprecated the libcgroup package and recommend using systemd to work with cgroups to ensure only a single "manager" of the cgroupfs filesystem exists.
First, ensure you have the necessary tools installed. On a Debian-based system, you can install them with:
apt-get install cgroup-tools

# yum install libcgroup
# yum install libcgroup-tools
To create a new cgroup with libcgroup, use the cgcreate -g <controllers>:<path> command:
cgcreate -g cpu,memory:/hog_pen2
To limit the CPU and memory, use the cgset command:
cgset -r cpu.max="50000 100000" hog_pen2
cgset -r memory.max="100M" hog_pen2
To check that the new cgroup functions as expected, start the hog process:
~/hog
...and then move it to the hog_pen2 cgroup using the cgclassify command:
HOG_PID=$(pgrep -xo hog)

cgclassify -g cpu,memory:hog_pen2 ${HOG_PID}
Alternatively, you can use the cgexec command to start the hog process in the hog_pen2 cgroup right away:
cgexec -g cpu,memory:hog_pen2 ~/hog
Similarly to the rmdir trick, you can use the cgdelete command to remove the hog_pen2 cgroup when it's no longer needed:
cgdelete -g cpu,memory:/hog_pen2
Handy, right? No need to write to some obscure files or move the shell process to the cgroup manually before starting the target process. Now, let's see what systemd has to offer.
Using systemd-run to run a restricted process
As it usually happens with systemd, it wants to control every aspect of your life system,
and resource management is no exception.
The systemd-run command provides a convenient way to launch processes as background services,
possibly with the specified resource constraints.
For example, to limit CPU and memory usage of a process, you can run:
systemd-run -u hog -p CPUQuota=50% -p MemoryMax=100M ~/hog
This command will create a transient service unit hog.service with the specified resource limits.
When the background hog process reaches the specified memory limit, it will be terminated by the OOM killer.
😎 Pro tip: systemd-run automatically clears transient units for succeeded runs.
However, transient units created by failed one-off runs are not cleared automatically.
To "garbage-collect" these failed units, use the systemd-run command with the -G|--collect flag.
Alternatively, you can manually unload all failed units by running systemctl reset-failed.
Now you know what to do if you see an error like this:
Failed to start transient service unit:
Unit <name>.service was already loaded or has a fragment file.
You can see the just created cgroup (and all the other cgroups on your system) using systemd-cgls:
systemd-cgls --all
Additionally, you can use the systemd-cgtop command to see the top cgroups by their resource usage:
systemd-cgtop
💡 Interesting fact: On systemd-based Linux distros, it's usually a good idea to rely solely on systemd for cgroup manipulations. Since systemd launches its services in dedicated cgroup "slices", it becomes the de facto manager of the cgroupfs filesystem. Transitively, this means that software like containerd, Docker, and Kubernetes will typically try to avoid using cgroupfs directly and instead will leverage systemd as a cgroup "driver." See this and this for more.
Using a systemd slice to create a "persistent" cgroup
In the above example, systemd-run created a transient cgroup that is automatically cleaned up when the target process exits.
If you want to create a cgroup that outlives the process and even survives a full system reboot, you can use a systemd slice unit.
First, create a new slice file in /etc/systemd/system/:
cat <<EOF > /etc/systemd/system/hog_pen.slice
[Slice]
CPUQuota=50%
MemoryMax=100M
EOF
💡 You can use the systemctl daemon-reload command to force systemd to reload its unit files.
And now you can place an arbitrary number of processes in this slice:
systemd-run -u hog1 --slice=hog_pen.slice ~/hog
systemd-run -u hog2 --slice=hog_pen.slice ~/hog
Every process in the hog_pen.slice slice will be placed in its own child cgroup,
which inherits the resource limits set for the slice.
Thus, the cumulative CPU and memory usage of all processes in the hog_pen.slice slice will be limited to 50% CPU and 100MB of memory.
Another great thing about systemd slices is that you can use them to control resources of Docker containers.
This is especially useful if you need to tweak a cgroup controller for which there's no docker run flag (e.g., memory.oom.group),
or when you want to place multiple Docker containers in the same cgroup, emulating a Kubernetes Pod:
docker run -d --name web --cgroup-parent=hog_pen.slice nginx
docker run -d --name rdb --cgroup-parent=hog_pen.slice redis
Control group /:
-.slice
├─hog_pen.slice
│ ├─docker-98684060c21bbc18e41f31926265cb092693a20fc169498e48cc2500c19bb646.scope …
│ │ ├─4156 nginx: master process nginx -g daemon off;
│ │ ├─4208 nginx: worker process
│ │ └─4209 nginx: worker process
│ └─docker-c9948bd490491b2719a8614146fb401535f6b1268b07cb430581973f7ea586b7.scope …
│   └─4292 redis-server *:6379
Practice
Now, let's practice what we've learned. Can you complete these challenges?
Summarizing
In this tutorial, we explored various methods to manage process resources using Linux cgroups. We started with the basics of configuring cgroups using the cgroupfs, then moved on to using the libcgroup tools for more convenience, and finally leveraged systemd for both transient and persistent resource management. These techniques can help ensure fair resource distribution, protect your system from resource-hungry processes, and even test application performance under constrained conditions.
Feel free to experiment with these methods and adapt them to your specific needs. Happy resource managing!
References
About the Author
Ivan Velichko
Ivan is the creator of iximiuz Labs and a long-time tech blogger and educator with a traditional focus on server-side tech and containers.
Writes about
Frequently covers