Copy Files To/From a Running Kubernetes Pod: a Distroless Image Case
Premium Challenge
Upgrade your membership to unlock this and all other premium materials.
There is a Pod named web running in the default namespace.
Its only container uses a minimal Nginx image cgr.io/chainguard/nginx.
Whoever started the Pod forgot to add the required nginx.conf file to the container.
Your task is to copy the config file to the Pod without restarting it.
After that, you will need to copy the nginx binary from the Pod to the host for further analysis by the security team.
Copy in:
- The correct config file is located on the host at
~/nginx.conf. - The config file in the
webcontainer is located at/etc/nginx/nginx.conf. - Make sure the Nginx reloads the config after the new file is copied to the Pod.
- You can access the Nginx server at Pod's IP address on port 8080.
Copy out:
- The Nginx binary is located in the
webcontainer at/usr/sbin/nginx. - Copy the Nginx binary to the host at
~/nginx-bin.
Good luck!
Hint 1
Getting the exec: "tar": executable file not found in $PATH: unknown error?
That's because the kubectl cp command actually relies on tar presence in the target container.
Which is not the case for most of the distroless containers, including Chainguard's Nginx image.
Hint 2
For better or worse, you won't be able to install tar in the distroless container at runtime.
There is simply no package manager inside.
You'll need to find a totally different way to copy files to/from the distroless Pod.
Hint 3
In a way, it is a debugging task. What do you usually do when you need to execute a command in a distroless Pod?
Hint 4
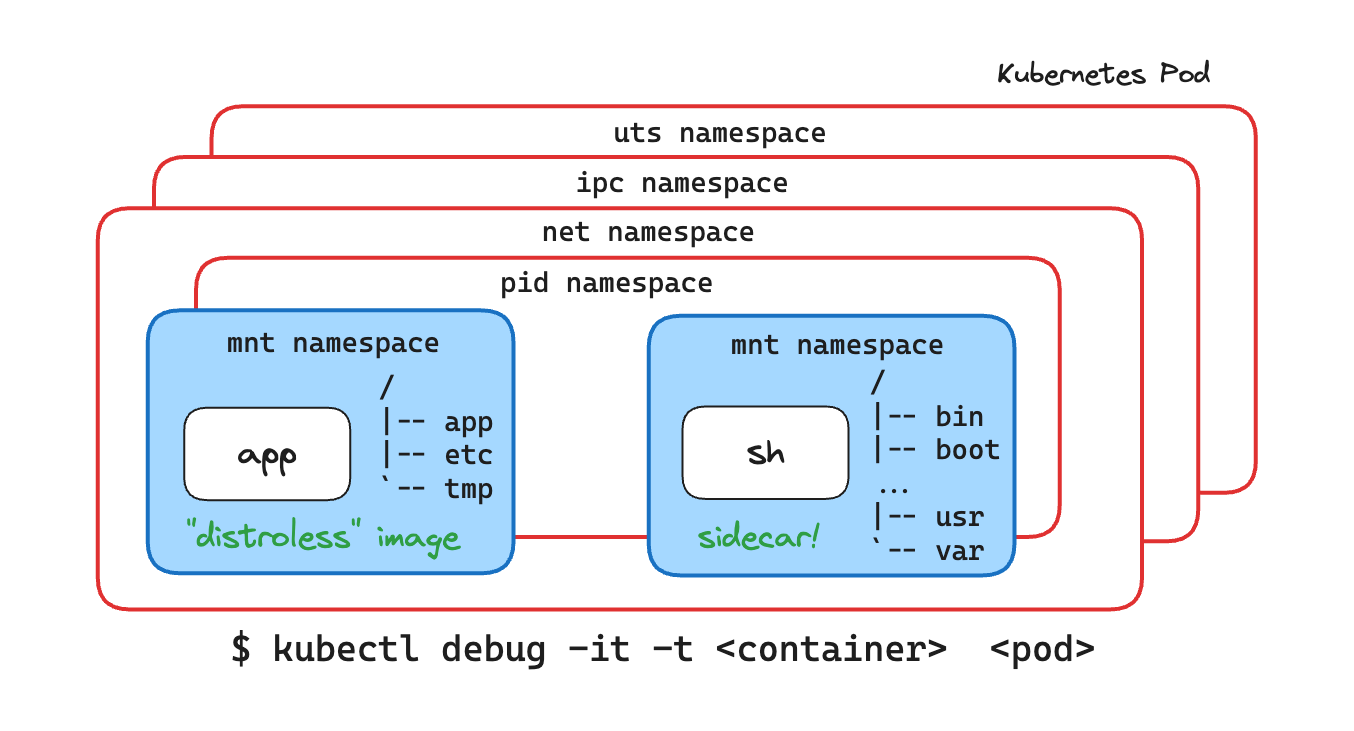
You can use the kubectl debug command to attach an ephemeral sidecar container to the distroless Pod.
It will allow you to execute commands in the distroless Pod and install any tools you need to the sidecar, including tar.
Hint 5
With the sidecar container running, you can use the kubectl cp command to copy files to/from the distroless Pod.
Hint 6
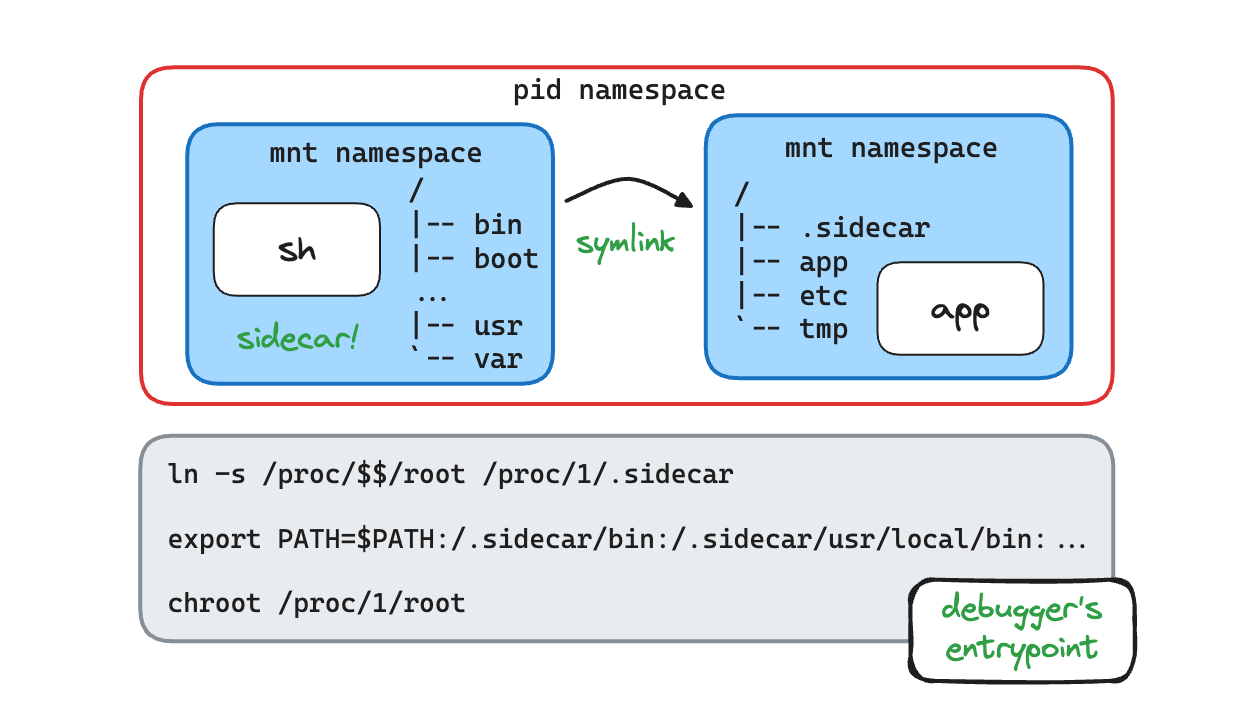
After you copied the file to the debugging sidecar, you'll need to find a way to move it to the distroless Nginx container.
Hint 7
Having trouble locating the Nginx container rootfs? Try the /proc/1/root path.
Hint 8
Chances are that you're getting the Permission denied error.
Even though ephemeral containers can be privileged enough to access the target container's rootfs,
the kubectl debug command starts a non-privileged container and doesn't allow tweaking its spec.
Luckily, you can create an ephemeral container via the API and then attach to it with kubectl attach.
kubectl proxy &

curl -Lvk localhost:8001/api/v1/namespaces/default/pods/web/ephemeralcontainers \
  -XPATCH \
  -H 'Content-Type: application/strategic-merge-patch+json' \
  -d '
{
    "spec":
    {
        "ephemeralContainers":
        [
            {
                "name": "debugger-123",
                "command": ["sh"],
                "targetContainerName": "web",
                "image": "alpine",
                "stdin": true,
                "tty": true,
                "securityContext": { "privileged": true }
            }
        ]
    }
}'
Hint 9
If you don't feel like sending curl requests by hand, you can use the cdebug command.
Much like kubectl debug, it also relies on ephemeral containers, but it tries to provide a more user-friendly debugging experience.
In particular, cdebug exec allows to specify the --privileged flag and gives you direct access to the target container's filesystem out of the box,
without the need to use the /proc/1/root workaround.
Hint 10
When the new config file is copied to the Pod, you'll need to make the Nginx server apply it.
Usually, it can be achieved with the nginx -s reload command, or, in the case of an Nginx pod:
kubectl exec POD_NAME -- nginx -s reload
However, if the above command fails with the "/var/run/nginx.pid" failed (2: No such file or directory) error,
you may want to fallback to a more low-level approach - sending a HUP signal to the Nginx process.
Not sure how to send a signal to a Kubernetes pod? Try solving these challenges first: